
Owner's Manual
Page 1
OWNER'S MANUAL VIDEO CASSETTE RECORDER 6480 Sqmphonic =( I DO 0 0 0 0 0 0 O c TABLE OF CONTENTS IMPORTANT SAFEGUARDS 2 PRECAUTIONS 4 FEATURES 5 SUPPLIED ACCESSORIES 5 OPERATING CONTROLS AND FUNCTIONS 6 REMOTE CONTROL OPERATION 8 HOW TO USE THE REMOTE ... (300-OHM) ANTENNA 11 SEPARATE UHFNHF (300-OHM) ANTENNA 11 AN TERMINALS 12 USING A CATV CONVERTER BOX 13 CONTROLLING VCR INPUT & OUTPUT 13 VIDEO OUTPUT CHANNEL SETTING (BACK OF VCR) 13 INPUT SELECT 13 CHANNEL MEMORY PROGRAMMING (Preset) 14 TO CANCEL, ADD PRESET CHANNEL 15 SETTING THE CLOCK 16 VIEWING AND...
OWNER'S MANUAL VIDEO CASSETTE RECORDER 6480 Sqmphonic =( I DO 0 0 0 0 0 0 O c TABLE OF CONTENTS IMPORTANT SAFEGUARDS 2 PRECAUTIONS 4 FEATURES 5 SUPPLIED ACCESSORIES 5 OPERATING CONTROLS AND FUNCTIONS 6 REMOTE CONTROL OPERATION 8 HOW TO USE THE REMOTE ... (300-OHM) ANTENNA 11 SEPARATE UHFNHF (300-OHM) ANTENNA 11 AN TERMINALS 12 USING A CATV CONVERTER BOX 13 CONTROLLING VCR INPUT & OUTPUT 13 VIDEO OUTPUT CHANNEL SETTING (BACK OF VCR) 13 INPUT SELECT 13 CHANNEL MEMORY PROGRAMMING (Preset) 14 TO CANCEL, ADD PRESET CHANNEL 15 SETTING THE CLOCK 16 VIEWING AND...
Owner's Manual
Page 4
...Phone No. IMPORTANT COPYRIGHT INFORMATION Unauthorized recording or use radio frequency energy. We assume no responsibility for the unauthorized duplication, use the VCR until its installation: • Shield it from direct sunlight and keep it away from sources of intense heat. • Avoid dusty...not use or other copyrighted material may cause harmful interference unless the modifications are expressly approved in the instruction manual. EN Model No. 6480 Serial No. - 4 - Do not place the unit on the back of high humidity. NN kIZNING Moisture condensation may be found ...
...Phone No. IMPORTANT COPYRIGHT INFORMATION Unauthorized recording or use radio frequency energy. We assume no responsibility for the unauthorized duplication, use the VCR until its installation: • Shield it from direct sunlight and keep it away from sources of intense heat. • Avoid dusty...not use or other copyrighted material may cause harmful interference unless the modifications are expressly approved in the instruction manual. EN Model No. 6480 Serial No. - 4 - Do not place the unit on the back of high humidity. NN kIZNING Moisture condensation may be found ...
Owner's Manual
Page 5
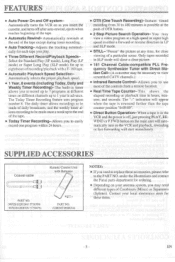
... Timer Recording feature uses program number 8. The "-" indication will start immediately. FEATURES • Auto Power On and Off systemAutomatically turns the VCR on as you insert the cassette, and turns off , just pressing PLAY, REWIND or F.FWD button on the main unit will automatically ...- Automatically selects the proper playback speed. • 1 Year, 8 events (including Today, Daily and Weekly Timer Recording)-The built-in the VCR and the power is off after auto-rewind, ejects when reaches beginning of the tape. • Automatic Rewind-Automatically rewinds at different times on...
... Timer Recording feature uses program number 8. The "-" indication will start immediately. FEATURES • Auto Power On and Off systemAutomatically turns the VCR on as you insert the cassette, and turns off , just pressing PLAY, REWIND or F.FWD button on the main unit will automatically ...- Automatically selects the proper playback speed. • 1 Year, 8 events (including Today, Daily and Weekly Timer Recording)-The built-in the VCR and the power is off after auto-rewind, ejects when reaches beginning of the tape. • Automatic Rewind-Automatically rewinds at different times on...

Owner's Manual
Page 6
... 6, 0 r e•FlO vt• .0•T 11•01 CID 16 15 14 13 12 11 10 9 8 7 6 1 Cassette Compartment 2 PLAY button- Press PLAY button to return VCR to view one touch recording mode. 7 POWER/TIMER REC button-Press to monitor video recordings or watch TV or to normal playback speed. 5 F.FWD button...- TV position: to watch TV using the VCR tuner. Press • or V to minimize video 'noise' (lines or dots on and off. Receives the infrared control signals from...
... 6, 0 r e•FlO vt• .0•T 11•01 CID 16 15 14 13 12 11 10 9 8 7 6 1 Cassette Compartment 2 PLAY button- Press PLAY button to return VCR to view one touch recording mode. 7 POWER/TIMER REC button-Press to monitor video recordings or watch TV or to normal playback speed. 5 F.FWD button...- TV position: to watch TV using the VCR tuner. Press • or V to minimize video 'noise' (lines or dots on and off. Receives the infrared control signals from...
Owner's Manual
Page 7
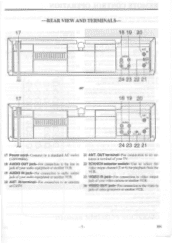
OUT terminal-For connection to an antenna in terminal of your audio equipment or another VCR. 20 ANT. EN REAR VIEW AND TERMINALS- 17 18 19 20 II II IM000000000gEl or... (120V/60Hz). 18 AUDIO OUT jack-For connection to the line in jack of your audio equipment or another VCR. 19 AUDIO IN jack-For connection to audio output jack of your TV. 22 3CH/4CH selector switch- Use... select the video output channel (3 or 4) for playback from the VCR. 23 VIDEO IN jack-For connection to video output jack of your video camera or another VCR. 24 VIDEO OUT jack-For connection to an antenna or CATV. 21...
OUT terminal-For connection to an antenna in terminal of your audio equipment or another VCR. 20 ANT. EN REAR VIEW AND TERMINALS- 17 18 19 20 II II IM000000000gEl or... (120V/60Hz). 18 AUDIO OUT jack-For connection to the line in jack of your audio equipment or another VCR. 19 AUDIO IN jack-For connection to audio output jack of your TV. 22 3CH/4CH selector switch- Use... select the video output channel (3 or 4) for playback from the VCR. 23 VIDEO IN jack-For connection to video output jack of your video camera or another VCR. 24 VIDEO OUT jack-For connection to an antenna or CATV. 21...
Owner's Manual
Page 8
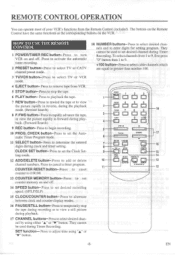
...Search) 8 F.FWD button- The buttons on the Remote Control have the same functions as the corresponding buttons on and off . Press to select TV or VCR mode. 4 EJECT button- Press to rapidly advance the tape, or view the picture rapidly in forward during playback. (Forward Search) 9 REC button-Press... 14 OM SELECT AD DELETE F ll 13 CLOCK SET RESET 1102,0RY 11 12 -8- REMOTE CONTROL OPERATION You can operate most of your VCR's functions from VCR. 5 STOP button-Press to stop the tape during recording or to enter digits for setting program. Press to select desired channel by using...
...Search) 8 F.FWD button- The buttons on the Remote Control have the same functions as the corresponding buttons on and off . Press to select TV or VCR mode. 4 EJECT button- Press to rapidly advance the tape, or view the picture rapidly in forward during playback. (Forward Search) 9 REC button-Press... 14 OM SELECT AD DELETE F ll 13 CLOCK SET RESET 1102,0RY 11 12 -8- REMOTE CONTROL OPERATION You can operate most of your VCR's functions from VCR. 5 STOP button-Press to stop the tape during recording or to enter digits for setting program. Press to select desired channel by using...
Owner's Manual
Page 10
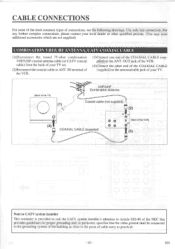
..., please contact your TV. [Back of the TVJ (4)t VHF/UHF Combination Antenna Coaxial cable (not supplied) n (2) AMY M COAXIAL CABLE (supplied) O O O O [Back of the VCR] our (3) Note to CATV system installer This reminder is provided to call the CATV system installer's attention to Article 820-40 of the NEC that... close to the point of the COAXIAL CABLE (supplied) to the ANT. OUT jack of the VCR. (4)Connect the other end of the COAXIAL CABLE (supplied) to the antenna/cable jack of the VCR. (3)Connect one connection. CABLE CONNECTIONS For some of the most common types of your TV set....
..., please contact your TV. [Back of the TVJ (4)t VHF/UHF Combination Antenna Coaxial cable (not supplied) n (2) AMY M COAXIAL CABLE (supplied) O O O O [Back of the VCR] our (3) Note to CATV system installer This reminder is provided to call the CATV system installer's attention to Article 820-40 of the NEC that... close to the point of the COAXIAL CABLE (supplied) to the ANT. OUT jack of the VCR. (4)Connect the other end of the COAXIAL CABLE (supplied) to the antenna/cable jack of the VCR. (3)Connect one connection. CABLE CONNECTIONS For some of the most common types of your TV set....

Owner's Manual
Page 11
...'s VHF jack, and flat twin-lead end to the ANT. UHF (300ohm)0 VHF (300ohm)C) 300-75ohm combiner (not supplied) I -- (I3N).A.N0T. OUT terminal of the VCR. (5)Connect the other end of the TV] (1) , ,,, • .„. lO VHF ° " O 0 Ei O 0 vr UHF 0 (30000) [Back of the unit] (4) (6)...60' . 0 VHF 0 (306orvn) 0 UHF 0 (300CHrn) O 0 gi O 0 0 [Back of the 300-75ohm combiner to the TV's UHF terminal. OUT terminal of the VCR. (5)Connect the other end of the UHFNHF combiner to the TV's UHF and VHF terminals. UHF VHF [Back of the COAXIAL CABLE (supplied) to a 75...
...'s VHF jack, and flat twin-lead end to the ANT. UHF (300ohm)0 VHF (300ohm)C) 300-75ohm combiner (not supplied) I -- (I3N).A.N0T. OUT terminal of the VCR. (5)Connect the other end of the TV] (1) , ,,, • .„. lO VHF ° " O 0 Ei O 0 vr UHF 0 (30000) [Back of the unit] (4) (6)...60' . 0 VHF 0 (306orvn) 0 UHF 0 (300CHrn) O 0 gi O 0 0 [Back of the 300-75ohm combiner to the TV's UHF terminal. OUT terminal of the VCR. (5)Connect the other end of the UHFNHF combiner to the TV's UHF and VHF terminals. UHF VHF [Back of the COAXIAL CABLE (supplied) to a 75...
Owner's Manual
Page 12
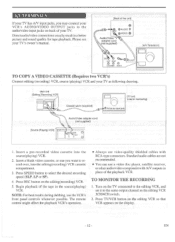
...audio/video component with RCA-type connectors. TO MONITOR THE RECORDING 1. Press REC button on the display. - 12- Main Unit [Editing (Recording) VCR] Coaxial cable (supplied) [TV set it to select the desired recording speed (SLP, LP or SP). 4. Turn on back of the unit] ...097 OIDUA® IN Do vIDEO AudioNideo "Y" adapter cord (not supplied) (AN Television] INt 0. The remote control might affect the playback VCR's operation. • Always use video-quality shielded cables with A/V outputs in place of the tape in a better picture and sound quality for monitoring...
...audio/video component with RCA-type connectors. TO MONITOR THE RECORDING 1. Press REC button on the display. - 12- Main Unit [Editing (Recording) VCR] Coaxial cable (supplied) [TV set it to select the desired recording speed (SLP, LP or SP). 4. Turn on back of the unit] ...097 OIDUA® IN Do vIDEO AudioNideo "Y" adapter cord (not supplied) (AN Television] INt 0. The remote control might affect the playback VCR's operation. • Always use video-quality shielded cables with A/V outputs in place of the tape in a better picture and sound quality for monitoring...

Owner's Manual
Page 13
...located on the back of TV OUT CATV (Cable) Input To VCR's ANT.OUT Terminal alu.r TV Antenna Panel CONTROLLING VCR INPUT & OUTPUT VIDE() OUTPUT CHANNEL SETTING (BACK OF' VCR) When the VCR is in the Playback mode, or when the TV/VCR button is in your TV to the station that you can use... 3CH 4CH - 13- of this unit is automatically disconnected. Select the channel to be sure to disconnect the cables from the VCR's AUDIO IN /VIDEO IN jacks when copying is not used , the VCR tuner is set your area; USING A CATV CONVERTER BOX If your TV will receive the signals from the...
...located on the back of TV OUT CATV (Cable) Input To VCR's ANT.OUT Terminal alu.r TV Antenna Panel CONTROLLING VCR INPUT & OUTPUT VIDE() OUTPUT CHANNEL SETTING (BACK OF' VCR) When the VCR is in the Playback mode, or when the TV/VCR button is in your TV to the station that you can use... 3CH 4CH - 13- of this unit is automatically disconnected. Select the channel to be sure to disconnect the cables from the VCR's AUDIO IN /VIDEO IN jacks when copying is not used , the VCR tuner is set your area; USING A CATV CONVERTER BOX If your TV will receive the signals from the...
Owner's Manual
Page 14
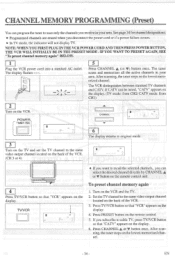
...mode . 3 Turn on the TV and set the TV channel to the same U video output channel located on the remote control. 5. EN The VCR distinguishes between standard TV channels and CATV. After scan- ning, the tuner stops on the lowest memorized channel. The tuner scans and memorizes all the..., you can select the desired channel directly by CHANNEL A or V button on the remote control unit. 4 Press TV/VCR button so that "VCR" appears on the back of the VCR. Set the TV channel to the same video output channel located on the display. If CATV can be tuned, "CATV"...
...mode . 3 Turn on the TV and set the TV channel to the same U video output channel located on the remote control. 5. EN The VCR distinguishes between standard TV channels and CATV. After scan- ning, the tuner stops on the lowest memorized channel. The tuner scans and memorizes all the..., you can select the desired channel directly by CHANNEL A or V button on the remote control unit. 4 Press TV/VCR button so that "VCR" appears on the back of the VCR. Set the TV channel to the same video output channel located on the display. If CATV can be tuned, "CATV"...
Owner's Manual
Page 16
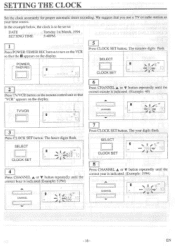
...set to: DATE SETTING TIME Tuesday 1st March, 1994 5:40PM. 1 Press POWER/TIMER REC button to turn on the VCR so that the • appears on the display. sg L.00zr 10 2 Press TV/VCR button on the display. SELECT CLOCK SET •41449. POWER, r TIMER REC • SP 5 Press CLOCK ...SET button. I i0 \PI 3 Press CLOCK SET button. The minutes digits flash. I941Trsc';'Y', 10 'r I . We suggest that "VCR" appears on the remote control unit so that you use a TV or radio station as your time source. The hours digits flash. The year digits...
...set to: DATE SETTING TIME Tuesday 1st March, 1994 5:40PM. 1 Press POWER/TIMER REC button to turn on the VCR so that the • appears on the display. sg L.00zr 10 2 Press TV/VCR button on the display. SELECT CLOCK SET •41449. POWER, r TIMER REC • SP 5 Press CLOCK ...SET button. I i0 \PI 3 Press CLOCK SET button. The minutes digits flash. I941Trsc';'Y', 10 'r I . We suggest that "VCR" appears on the remote control unit so that you use a TV or radio station as your time source. The hours digits flash. The year digits...
Owner's Manual
Page 18
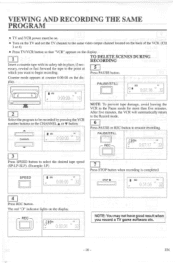
...software etc. - 18 - SPEED GEB 0:00:00 vat D' 32 STCJP • I I I 6 Press PAUSE or REC button to begin recording. After five minutes, the VCR will automatically return to select the desired tape speed (SP-LP-SLP). (Example: LP) 17 Press STOP button when recording is completed. VIEWING AND RECORDING... REC button. essary, rewind or fast forward the tape to the same video output channel located on the back of the VCR. (CH 3 or 4) • Press TV/VCR button so that "VCR" appears on the display. PAUSE/STILL KREI vca CO a 0:00:00 " 10 O11 0:07:16 `" 32 2 Select...
...software etc. - 18 - SPEED GEB 0:00:00 vat D' 32 STCJP • I I I 6 Press PAUSE or REC button to begin recording. After five minutes, the VCR will automatically return to select the desired tape speed (SP-LP-SLP). (Example: LP) 17 Press STOP button when recording is completed. VIEWING AND RECORDING... REC button. essary, rewind or fast forward the tape to the same video output channel located on the back of the VCR. (CH 3 or 4) • Press TV/VCR button so that "VCR" appears on the display. PAUSE/STILL KREI vca CO a 0:00:00 " 10 O11 0:07:16 `" 32 2 Select...
Owner's Manual
Page 19
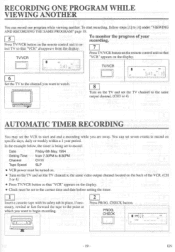
...record: Date Setting Time Channel Tape Speed Friday 6th May, 1994 from the display. 7 Press TVNCR button on the remote control unit so that TVNCR "VCR" appears on the display. • Clock must be turned on. • Turn on the TV and set the TV channel to the same video ...output channel located on the back of the VCR. (CH 3 or 4) • Press TVNCR button so that "VCR" disappears from 7:30PM to 8:30PM CH16 SLP • VCR power must be set the VCR to start recording, follow steps [1] to [4] under "VIEWING AND RECORDING THE SAME PROGRAM"...
...record: Date Setting Time Channel Tape Speed Friday 6th May, 1994 from the display. 7 Press TVNCR button on the remote control unit so that TVNCR "VCR" appears on the display. • Clock must be turned on. • Turn on the TV and set the TV channel to the same video ...output channel located on the back of the VCR. (CH 3 or 4) • Press TVNCR button so that "VCR" disappears from 7:30PM to 8:30PM CH16 SLP • VCR power must be set the VCR to start recording, follow steps [1] to [4] under "VIEWING AND RECORDING THE SAME PROGRAM"...
Owner's Manual
Page 20
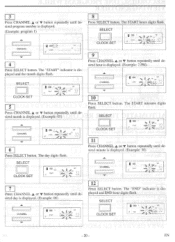
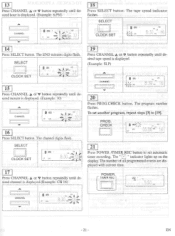
c. -0541" 32 START LP AI I Ad' a VCR 32 Ryz. -20 - TRI ; 32 9 Press CHANNEL A or V button repeatedly until desired minute is displayed. (Example: 30) CHANNEL START LP 12 Press SELECT button. The ...
c. -0541" 32 START LP AI I Ad' a VCR 32 Ryz. -20 - TRI ; 32 9 Press CHANNEL A or V button repeatedly until desired minute is displayed. (Example: 30) CHANNEL START LP 12 Press SELECT button. The ...
Owner's Manual
Page 21
... 20 Press PROG.CHECK button. SELECT CLOCK SET I 05.06 - 16 21 E " Press POWER !TIMER REC button to [19]. The END minutes digits flash. CHECK VCR I ono 0.0 $ 8:30: 16 19 Press CHANNEL A or V button repeatedly until desired tape speed is displayed. (Example: SLP) CLOCK SET 15 Press CHANNEL A or V button repeatedly...
... 20 Press PROG.CHECK button. SELECT CLOCK SET I 05.06 - 16 21 E " Press POWER !TIMER REC button to [19]. The END minutes digits flash. CHECK VCR I ono 0.0 $ 8:30: 16 19 Press CHANNEL A or V button repeatedly until desired tape speed is displayed. (Example: SLP) CLOCK SET 15 Press CHANNEL A or V button repeatedly...
Owner's Manual
Page 22
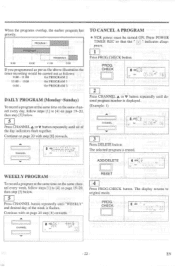
..." and desired day of the day indicators flash together. CHANNEL I r I 1 Press PROG.CHECK button. PROG. I °Et stut mgE1) vie 32 TO CANCEL A PROGRAM • VCR power must be carried out as the above illustration the timer recording would be turned ON. PROG. CHECK exe;', s, - 05.06 16 2 Press CHANNEL •...
..." and desired day of the day indicators flash together. CHANNEL I r I 1 Press PROG.CHECK button. PROG. I °Et stut mgE1) vie 32 TO CANCEL A PROGRAM • VCR power must be carried out as the above illustration the timer recording would be turned ON. PROG. CHECK exe;', s, - 05.06 16 2 Press CHANNEL •...
Owner's Manual
Page 23
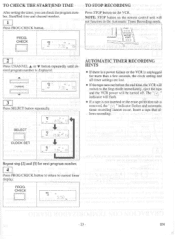
...ra S.P FRI 7:30 p„ 16 3 Press SELECT button repeatedly. 7 ,„ 8:30,„ 16 AUTOMATIC TIMER RECORDING HINTS • If there is a power failure or the VCR is unplugged for next program number. 4 Press PROG.CHECK button to return to the Stop mode immediately, eject the tape and the... [3] for more than a few seconds, the clock setting and all timer settings are lost. • If the tape runs out before the end time, the VCR will switch to current timer display. PROG. 1CHECK EMEI a sox, AP 7:30 „ 16 TO STOP RECORDING Press STOP button on the remote control unit...
...ra S.P FRI 7:30 p„ 16 3 Press SELECT button repeatedly. 7 ,„ 8:30,„ 16 AUTOMATIC TIMER RECORDING HINTS • If there is a power failure or the VCR is unplugged for next program number. 4 Press PROG.CHECK button to return to the Stop mode immediately, eject the tape and the... [3] for more than a few seconds, the clock setting and all timer settings are lost. • If the tape runs out before the end time, the VCR will switch to current timer display. PROG. 1CHECK EMEI a sox, AP 7:30 „ 16 TO STOP RECORDING Press STOP button on the remote control unit...
Owner's Manual
Page 24
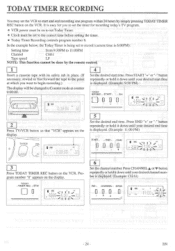
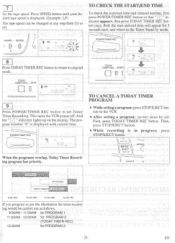
... desired start time. Press START "+" or "-" button repeatedly or hold it down until your desired channel number is easy for recording today's TV program. • VCR power must be on to set Today Timer. • Clock must be done by simply pressing TODAY TIMER REC button on the... VCR. Press CHANNEL A or V button repeatedly or hold it down until your desired start and end recording one program within 24 hours by the remote control 1 4 ...
... desired start time. Press START "+" or "-" button repeatedly or hold it down until your desired channel number is easy for recording today's TV program. • VCR power must be on to set Today Timer. • Clock must be done by simply pressing TODAY TIMER REC button on the... VCR. Press CHANNEL A or V button repeatedly or hold it down until your desired start and end recording one program within 24 hours by the remote control 1 4 ...
Owner's Manual
Page 25
... number, first press POWER/TIMER REC button so that " 'V " indicator appears, then press TODAY TIMER REC button once. This turns the VCR power off. press STOP/EJECT button on the VCR. • After setting a program; (power must be carried out as per the illustration the timer record- Press SPEED button until your...
... number, first press POWER/TIMER REC button so that " 'V " indicator appears, then press TODAY TIMER REC button once. This turns the VCR power off. press STOP/EJECT button on the VCR. • After setting a program; (power must be carried out as per the illustration the timer record- Press SPEED button until your...

