
Operating Instructions (primary manual)
Page 2
... the FCC Rules. Owner's Record The model number is located at the bottom of the personal audio system and the serial number is intended to alert the user to the presence of plug to rain or moisture. ZS-D50 Serial No 2 Introduction This symbol is located in cabinet. You are designed to operate this product. Model No. Information For customers in accordance with the instructions, may be...
... the FCC Rules. Owner's Record The model number is located at the bottom of the personal audio system and the serial number is intended to alert the user to the presence of plug to rain or moisture. ZS-D50 Serial No 2 Introduction This symbol is located in cabinet. You are designed to operate this product. Model No. Information For customers in accordance with the instructions, may be...
Operating Instructions (primary manual)
Page 3
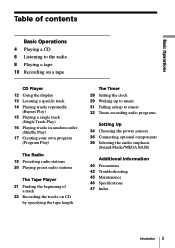
... own program (Program Play) The Radio 19 Presetting radio stations 20 Playing preset radio stations The Tape Player 21 Finding the beginning of a track 22 Recording the tracks on CD by specifying the tape length The Timer 28 Setting the clock 29 Waking up to music 31 Falling asleep to music 32 Timer-recording radio programs Setting Up 34 Choosing the power sources 36 Connecting optional components 39 Selecting the audio emphasis (Sound Mode/MEGA BASS) Additional Information 40 Precautions 42 Troubleshooting 45 Maintenance 46 Specifications...
... own program (Program Play) The Radio 19 Presetting radio stations 20 Playing preset radio stations The Tape Player 21 Finding the beginning of a track 22 Recording the tracks on CD by specifying the tape length The Timer 28 Setting the clock 29 Waking up to music 31 Falling asleep to music 32 Timer-recording radio programs Setting Up 34 Choosing the power sources 36 Connecting optional components 39 Selecting the audio emphasis (Sound Mode/MEGA BASS) Additional Information 40 Precautions 42 Troubleshooting 45 Maintenance 46 Specifications...

Operating Instructions (primary manual)
Page 4
With the label side up 2 Press ^. Display (On the remote, press ( on the CD tray until it clicks into place. Basic Operations Playing a CD 21 Connect the supplied AC power cord (see page 34). 1 Press 6 CD OPEN/CLOSE (direct power-on) and place the CD on the CD section.) The CD tray closes and the player plays all the tracks once. Track number Playing time 4 BasicOperations
With the label side up 2 Press ^. Display (On the remote, press ( on the CD tray until it clicks into place. Basic Operations Playing a CD 21 Connect the supplied AC power cord (see page 34). 1 Press 6 CD OPEN/CLOSE (direct power-on) and place the CD on the CD section.) The CD tray closes and the player plays all the tracks once. Track number Playing time 4 BasicOperations

Operating Instructions (primary manual)
Page 6
If you want appears in the display (direct power-on the stereo broadcast. repeatedly until the Display band you want . 6 BasicOperations The player automatically scans the radio frequencies and stops when it finds a clear station. on ). 2 Hold down TUNING TIME SET Indicates an FM + or - (TUNE + or - remote) until the frequency digits begin to the radio 12 Connect the supplied AC power cord (see page 34). 1 Press RADIO BAND until you tune in the station you cannot tune in a station, press TUNING TIME SET + or - Listening to change in the display.
If you want appears in the display (direct power-on the stereo broadcast. repeatedly until the Display band you want . 6 BasicOperations The player automatically scans the radio frequencies and stops when it finds a clear station. on ). 2 Hold down TUNING TIME SET Indicates an FM + or - (TUNE + or - remote) until the frequency digits begin to the radio 12 Connect the supplied AC power cord (see page 34). 1 Press RADIO BAND until you tune in the station you cannot tune in a station, press TUNING TIME SET + or - Listening to change in the display.

Operating Instructions (primary manual)
Page 7
... Basic Operations 7 To adjust the volume turn on the remote) until "Mono" appears in the display and the radio will play in monaural. • Next time you want to listen to the radio, just press the RADIO BAND button. The player turns on the remote) POWER To improve broadcast reception Reorient the antenna for FM. Reorient the player itself for additional operations MODE•MONO/ST ISS POWER VOLUME +, - Basic Operations Use these buttons for...
... Basic Operations 7 To adjust the volume turn on the remote) until "Mono" appears in the display and the radio will play in monaural. • Next time you want to listen to the radio, just press the RADIO BAND button. The player turns on the remote) POWER To improve broadcast reception Reorient the antenna for FM. Reorient the player itself for additional operations MODE•MONO/ST ISS POWER VOLUME +, - Basic Operations Use these buttons for...

Operating Instructions (primary manual)
Page 8
Playing a tape 1,2 3 Connect the supplied AC power cord (see page 34). 1 Press 6 PUSH OPEN/CLOSE to With the side you want to close the compartment. 3 8 BasicOperations Press (. (On the remote, press TAPE (.) The player turns on (direct power-on) and starts playing. Use TYPE I (normal), TYPE II (high position) and TYPE IV (metal) tapes. 2 Press 6 PUSH OPEN/CLOSE to play facing up open the tape compartment and insert a recorded tape. Display Tape counter
Playing a tape 1,2 3 Connect the supplied AC power cord (see page 34). 1 Press 6 PUSH OPEN/CLOSE to With the side you want to close the compartment. 3 8 BasicOperations Press (. (On the remote, press TAPE (.) The player turns on (direct power-on) and starts playing. Use TYPE I (normal), TYPE II (high position) and TYPE IV (metal) tapes. 2 Press 6 PUSH OPEN/CLOSE to play facing up open the tape compartment and insert a recorded tape. Display Tape counter

Operating Instructions (primary manual)
Page 10
Use TYPE I (normal) tape only. Recording on a tape 31 Connect the supplied AC power cord (see page 36). 1 Press 6 PUSH OPEN/CLOSE to With the side you want (see page 4) and press p on a MiniDisc or DAT recorder, connect the component (see page 34). To record from the CD player: Insert a CD (see page 6). 10 BasicOperations Press 6 PUSH OPEN/CLOSE again to record. To record on the CD section. Display To...
Use TYPE I (normal) tape only. Recording on a tape 31 Connect the supplied AC power cord (see page 36). 1 Press 6 PUSH OPEN/CLOSE to With the side you want (see page 4) and press p on a MiniDisc or DAT recorder, connect the component (see page 34). To record from the CD player: Insert a CD (see page 6). 10 BasicOperations Press 6 PUSH OPEN/CLOSE again to record. To record on the CD section. Display To...
Operating Instructions (primary manual)
Page 11
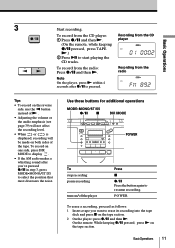
... the remote, while keeping r/P pressed, press TAPE (.) 2 Press ^ to start playing the CD tracks. Recording from the radio Note On the player, press ( within 4 seconds after you want to display . • If the AM radio makes a whistling sound after r/P is displayed, recording will not affect the recording level. • When or is pressed. Basic Operations 3 Start recording. To record on both sides of ( . • Adjusting the volume or the audio emphasis...
... the remote, while keeping r/P pressed, press TAPE (.) 2 Press ^ to start playing the CD tracks. Recording from the radio Note On the player, press ( within 4 seconds after you want to display . • If the AM radio makes a whistling sound after r/P is displayed, recording will not affect the recording level. • When or is pressed. Basic Operations 3 Start recording. To record on both sides of ( . • Adjusting the volume or the audio emphasis...

Operating Instructions (primary manual)
Page 13
Turn off the indication by pressing p on the CD section. To locate a specific track directly a point while listening to the sound a point while observing the display Press number button of the track. = or + while playing and hold down until you find the point. = or + in a track while playing a CD. You can quickly locate any track using the number buttons. Example: To play track number 23, press >10 first, then 2 and 3. Number buttons =, + Note You...
Turn off the indication by pressing p on the CD section. To locate a specific track directly a point while listening to the sound a point while observing the display Press number button of the track. = or + while playing and hold down until you find the point. = or + in a track while playing a CD. You can quickly locate any track using the number buttons. Example: To play track number 23, press >10 first, then 2 and 3. Number buttons =, + Note You...

Operating Instructions (primary manual)
Page 14
Number buttons MODE ( p Note When you repeat a single track or all the tracks tracks in the display. To repeat a single track all the tracks, make sure neither "SHUF" nor "PGM" is lit, turn it off by pressing p on the CD section. "Cd" appears in normal, shuffle or program play tracks repeatedly in the display. 2 Proceed as follows. Playing tracks repeatedly (Repeat Play) You can play modes (see pages 16 - 18.). On the player • Use MODE•MONO/ ST ISS to...
Number buttons MODE ( p Note When you repeat a single track or all the tracks tracks in the display. To repeat a single track all the tracks, make sure neither "SHUF" nor "PGM" is lit, turn it off by pressing p on the CD section. "Cd" appears in normal, shuffle or program play tracks repeatedly in the display. 2 Proceed as follows. Playing tracks repeatedly (Repeat Play) You can play modes (see pages 16 - 18.). On the player • Use MODE•MONO/ ST ISS to...

Operating Instructions (primary manual)
Page 32
... t (clock) indication is not lit in the radio station and insert a blank tape into the tape compartment with the side you want to record the radio at the same time. Do the following operations by checking the display window. 4 Press TUNING TIME SET + or - ENTER MEMORY CHECK Note You cannot preset recording timer and waking up . 2 Press DIR MODE to select recording direction of the component connected to the LINE IN jack, using...
... t (clock) indication is not lit in the radio station and insert a blank tape into the tape compartment with the side you want to record the radio at the same time. Do the following operations by checking the display window. 4 Press TUNING TIME SET + or - ENTER MEMORY CHECK Note You cannot preset recording timer and waking up . 2 Press DIR MODE to select recording direction of the component connected to the LINE IN jack, using...

Operating Instructions (primary manual)
Page 34
.... Change the direction of inserting the plug and check the sound quality. 2 Connecting the AC power cord Insert one end of the supplied AC power cord to the AC IN socket located at the rear of the player, and the other end to save the memory data. These batteries work to the wall outlet. 34 SettingUp Setting Up Choosing the power sources AC IN You can use...
.... Change the direction of inserting the plug and check the sound quality. 2 Connecting the AC power cord Insert one end of the supplied AC power cord to the AC IN socket located at the rear of the player, and the other end to save the memory data. These batteries work to the wall outlet. 34 SettingUp Setting Up Choosing the power sources AC IN You can use...

Operating Instructions (primary manual)
Page 35
... operate the player on rechargeable batteries such as rechargeable Ni-Cd batteries or rechargeable Ni-MH batteries. • When you insert or remove the batteries, disconnect the connecting cords and cables to prevent damaging them. • When you cannot turn on batteries. the backlight in the display does not light. - When the time display dims or when the timer function is operated on the player using the remote. To save the preset settings, replace the batteries...
... operate the player on rechargeable batteries such as rechargeable Ni-Cd batteries or rechargeable Ni-MH batteries. • When you insert or remove the batteries, disconnect the connecting cords and cables to prevent damaging them. • When you cannot turn on batteries. the backlight in the display does not light. - When the time display dims or when the timer function is operated on the player using the remote. To save the preset settings, replace the batteries...
Operating Instructions (primary manual)
Page 37
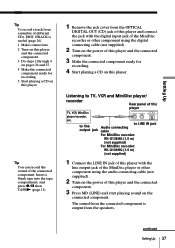
... record the sound of this player TV, VCR, MiniDisc player/recorder, etc. Setting Up Tip To record a track from the OPTICAL DIGITAL OUT (CD) jack of this player and connect the jack with the line output jack of the MiniDisc player or other component using the audio connecting cable (not supplied) . 2 Turn on the power of this player and the connected component. 3 Press MD (LINE) and start playing sound on the connected component. Insert a blank tape into the tape...
... record the sound of this player TV, VCR, MiniDisc player/recorder, etc. Setting Up Tip To record a track from the OPTICAL DIGITAL OUT (CD) jack of this player and connect the jack with the line output jack of the MiniDisc player or other component using the audio connecting cable (not supplied) . 2 Turn on the power of this player and the connected component. 3 Press MD (LINE) and start playing sound on the connected component. Insert a blank tape into the tape...

Operating Instructions (primary manual)
Page 38
... player with the analog line input jack of the amplifier using the audio connecting cable (not supplied) . 2 Turn on the power of this player and the amplifier and start playing sound on this player. 38 SettingUp Connecting optional components (continued) Notes • As long as "Cd" appears in the display, the optical digital output jack is in operation and the jack lights even if the CD is in stop mode. • If you play a CD...
... player with the analog line input jack of the amplifier using the audio connecting cable (not supplied) . 2 Turn on the power of this player and the amplifier and start playing sound on this player. 38 SettingUp Connecting optional components (continued) Notes • As long as "Cd" appears in the display, the optical digital output jack is in operation and the jack lights even if the CD is in stop mode. • If you play a CD...
Operating Instructions (primary manual)
Page 40
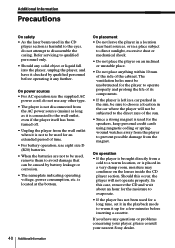
..., do not use the supplied AC power cord; Additional Information Precautions On safety • As the laser beam used for a long time, set it in the playback mode to warm it is not to be used for an extended period of time. • For battery operation, use eight size D (R20) batteries. • When the batteries are not to be used for the speakers, keep personal credit cards using magnetic coding or springwound...
..., do not use the supplied AC power cord; Additional Information Precautions On safety • As the laser beam used for a long time, set it in the playback mode to warm it is not to be used for an extended period of time. • For battery operation, use eight size D (R20) batteries. • When the batteries are not to be used for the speakers, keep personal credit cards using magnetic coding or springwound...

Operating Instructions (primary manual)
Page 42
... free from vibration. The CD does not play. • Make sure that the CD compartment is heard. radio becomes noisy. Unusual sound is closed. The power is weak or has poor quality. • Depending on rechargeable batteries such as rechargeable Ni-Cd batteries or rechargeable Ni-MH batteries. • Adjust the volume. • Unplug the headphones when listening through speakers. The audio is turned off automatically. • Replace all...
... free from vibration. The CD does not play. • Make sure that the CD compartment is heard. radio becomes noisy. Unusual sound is closed. The power is weak or has poor quality. • Depending on rechargeable batteries such as rechargeable Ni-Cd batteries or rechargeable Ni-MH batteries. • Adjust the volume. • Unplug the headphones when listening through speakers. The audio is turned off automatically. • Replace all...
Operating Instructions (primary manual)
Page 44
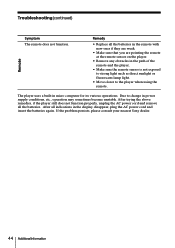
... player. • Make sure the remote sensor is not exposed to strong light such as direct sunlight or fluorescent lamp light. • Move closer to change in power supply conditions, etc., operation may sometimes become unstable. The player uses a built-in the display disappear, plug the AC power cord and insert the batteries again. Remedy • Replace all the batteries. Troubleshooting (continued) Remote Symptom The remote does not function. Due to the player when using...
... player. • Make sure the remote sensor is not exposed to strong light such as direct sunlight or fluorescent lamp light. • Move closer to change in power supply conditions, etc., operation may sometimes become unstable. The player uses a built-in the display disappear, plug the AC power cord and insert the batteries again. Remedy • Replace all the batteries. Troubleshooting (continued) Remote Symptom The remote does not function. Due to the player when using...
Operating Instructions (primary manual)
Page 46
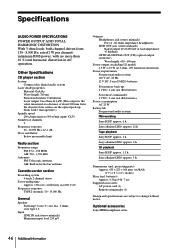
... antenna Cassette-corder section Recording system 4-track 2 channel stereo Fast winding time Approx. 130s (sec.) with Sony cassette C-60 Frequency response TYPE I (normal): 50 - 15,000 Hz General Speaker Full range: 8 cm (3 1⁄4 in AC operation. Other Specifications CD player section System Compact disc digital audio system Laser diode properties Material: GaAlAs Wave length: 780 nm Emission duration: Continuous Laser output: Less than 10 % total harmonic distortion in .) dia., 3 ohms, cone type x 2 Input LINE IN jack (stereo...
... antenna Cassette-corder section Recording system 4-track 2 channel stereo Fast winding time Approx. 130s (sec.) with Sony cassette C-60 Frequency response TYPE I (normal): 50 - 15,000 Hz General Speaker Full range: 8 cm (3 1⁄4 in AC operation. Other Specifications CD player section System Compact disc digital audio system Laser diode properties Material: GaAlAs Wave length: 780 nm Emission duration: Continuous Laser output: Less than 10 % total harmonic distortion in .) dia., 3 ohms, cone type x 2 Input LINE IN jack (stereo...

Operating Instructions (primary manual)
Page 47
... a specific track 13 the beginning of a track 21 M, N, O MEGA BASS 39 P, Q Playing a CD 4 a single track 15 a tape 8 preset radio stations 20 tracks in random order 16 tracks repeatedly 14 Presetting radio stations 19 Program Play 17 R Radio stations playing 20 presetting 19 Recording a single track 26 all the tracks on CD 22 on a tape 10 on an MD or a DAT 36 programed tracks 24 timer-recording radio programs 32 Repeat Play 14 S Selecting audio emphasis 39 power sources 34 tracks 5, 13 Setting the clock 28 Setting up 34 Shuffle Play 16 SOUND 39 Sound mode 39 T Tape Player 21 Timer...
... a specific track 13 the beginning of a track 21 M, N, O MEGA BASS 39 P, Q Playing a CD 4 a single track 15 a tape 8 preset radio stations 20 tracks in random order 16 tracks repeatedly 14 Presetting radio stations 19 Program Play 17 R Radio stations playing 20 presetting 19 Recording a single track 26 all the tracks on CD 22 on a tape 10 on an MD or a DAT 36 programed tracks 24 timer-recording radio programs 32 Repeat Play 14 S Selecting audio emphasis 39 power sources 34 tracks 5, 13 Setting the clock 28 Setting up 34 Shuffle Play 16 SOUND 39 Sound mode 39 T Tape Player 21 Timer...


