Sony ZS-D5 Support and Manuals
Get Help and Manuals for this Sony item

Sony ZS-D5 Videos

SONY ZS-D5
Duration: 3:13
Total Views: 3,288
Duration: 3:13
Total Views: 3,288
SONY ZS D5 a Notebook
Duration: 4:32
Total Views: 1,646
Duration: 4:32
Total Views: 1,646
Sony ZS-D5 Mini-Disc Stereo Player
Duration: 1:20
Total Views: 2,792
Duration: 1:20
Total Views: 2,792
Sony zs d5 _ Personal audio system ng?t ngào và ?a tài
Duration: 5:36
Total Views: 382
Duration: 5:36
Total Views: 382
Popular Sony ZS-D5 Manual Pages
Operation Guide - Page 1
3-867-185-11 (1)
Personal Audio System
Operating Instructions
ZS-D5
©1999 by Sony Corporation
Operation Guide - Page 2
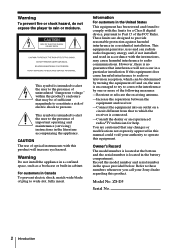
... of important operating and maintenance (servicing) instructions in accordance with the instructions, may be determined by turning the equipment off and on, the user is encouraged to try to wide slot, fully insert. Record the model number and serial number in a residential installation. ZS-D5
Serial No.
2 Introduction
Owner's Record
The model number is located at the bottom...
Operation Guide - Page 19
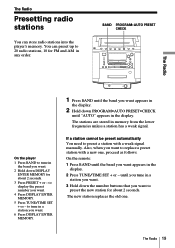
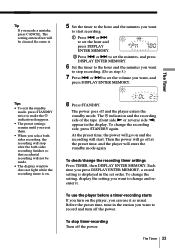
... station with a weak signal manually. The new station replaces the old one , proceed as follows:
On the remote:
1 Press BAND until you tune in a station you want.
3 Hold down DISPLAY ENTER MEMORY for about 2 seconds.
3 Press PRESET + or -
The stations are stored in the display.
2 Press TUNE/TIME SET + or - You can store...
Operation Guide - Page 24

... recording will be recorded on one side of the tape, and the second half will be recorded on the other side. If you can set the total recording time.
1 Press p on CD by specifying the tape length (continued)
r/P p
EDIT
DISPLAY ENTER MEMORY
=, +
6 PUSH OPEN/CLOSE (
Note
Do not open the ...
Operation Guide - Page 31
...allowing you cannot, store different radio stations.
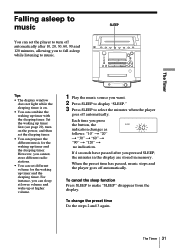
• You can set different volume for the waking up timer and the sleeping timer.
Set the waking up timer first (see page 29), turn off automatically...pressed SLEEP, the minutes in the display are stored in memory.
Falling asleep to music
You can set the player to turn on .
• You can combine the waking up at higher volume.
...
Operation Guide - Page 32

... record on page 28). Make sure you receive the AM program in the display. You can set the clock (see "Setting the clock" on facing forward.
2 Press DIR MODE to display the t indication.
If so... that you use AC power as the power source for optimum recording quality.
• When you have set timer to record the radio at the same time.
DISPLAY ENTER MEMORY
=, + DIR MODE
Note
You ...
Operation Guide - Page 33
...the standby mode, press STANDBY twice to make the t indication disappear.
• The preset settings remain until you reset them.
• When you select both sides recording, the recording will ...stop recording. (Do as usual.
The power goes off the power. To change the recording timer settings Press TIMER, then DISPLAY ENTER MEMORY. Before the preset time, tune in the display.
Then the ...
Operation Guide - Page 34
... batteries with new ones.
AC IN
Note
Be sure to the wall outlet.
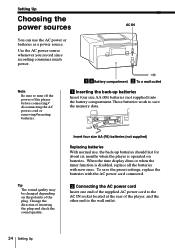
34 Setting Up Insert four size AA (R6) batteries (not supplied)
Replacing batteries With normal use the AC power or batteries as a power source. Setting Up
Choosing the power sources
You can use , the back-up batteries Insert four size...
Operation Guide - Page 35
...
To use , the batteries should last for about six months. Setting Up
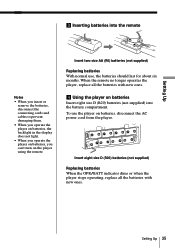
3 Inserting batteries into the remote
Notes
• When you ... into the battery compartment. Insert eight size D (R20) batteries (not supplied)
Replacing batteries When the OPR/BATT indicator dims or when the player stops operating, replace all the batteries with new ones. When the remote no longer operates the player...
Operation Guide - Page 36

... to the instruction manual of the recorder to be connected
Optical miniplug (MiniDisc recorder, etc.)
L-type 7-pin connector (DAT recorder, etc.)
Square-shaped optical connector (MiniDisc recorder, DAT recorder, etc.)
Model number of ... OUT (CD) jack of the connecting cable
POC-5AB POC-DA12P POC-10A
36 Setting Up
Recording a CD on the type of the digital input jack of the component ...
Operation Guide - Page 37
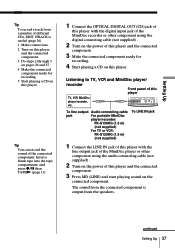
... and the connected
component.
3 Make the connected component ready for recording. 5 Start playing a CD on this player
TV, VCR, MiniDisc player/recorder, etc.
continued
Setting Up 37
Setting Up
Tip To record a track from a number of different CDs, EDIT 1TRACK is output from the connected component is useful (page 26). 1 Make connections...
Operation Guide - Page 38
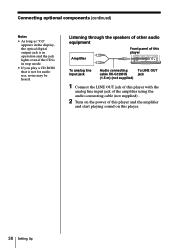
... using the audio connecting cable (not supplied) .
2 Turn on the power of this player and the amplifier
and start playing sound on this player.
38 Setting Up Connecting optional components (continued)
Notes
• As long as "Cd" appears in the display, the optical digital output jack is in operation and the...
Operation Guide - Page 39
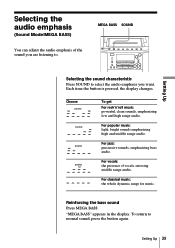
... For vocals: the presence of the sound you want. "MEGA BASS" appears in the display.
Setting Up 39
For popular music: light, bright sounds emphasizing high and middle range audio.
Each time the... For classical music: the whole dynamic range for music.
MEGA BASS SOUND
Setting Up
Selecting the sound characteristic
Press SOUND to select the audio emphasis you are listening to normal...
Operation Guide - Page 40
...cards using magnetic coding or springwound ... when it any questions or problems concerning your player, please consult your nearest Sony dealer.
40 Additional Information
On...
player section is harmful to disassemble the casing. Refer servicing to choose a location in the car where the player...CD and wait about an hour for a long time, set it checked by battery leakage or corrosion.
• ...
Operation Guide - Page 44
...computer for its various operations. If the problem persists, please consult your nearest Sony dealer.
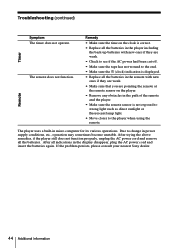
44 Additional Information Remedy
• Make sure the time on the clock is correct.
• Replace all the batteries in the player including the...the AC power cord and insert the batteries again. After all the batteries. Troubleshooting (continued)
Timer
Symptom The timer does not operate.
Sony ZS-D5 Reviews
We have not received any reviews for Sony yet.