Warranty Card
Page 1
... or workmanship as fuses or batteries). 4-557-153-02 ® LIMITED WARRANTY Car Audio Sony Electronics Inc. ("Sony") warrants this Product is determined to be presented to obtain warranty service. This warranty is invalid if the factory applied serial number has been altered or removed from your convenience, Sony Electronics Inc. For your authorized dealer, call : Sony Customer Information Services Center 1-800-222-7669...
... or workmanship as fuses or batteries). 4-557-153-02 ® LIMITED WARRANTY Car Audio Sony Electronics Inc. ("Sony") warrants this Product is determined to be presented to obtain warranty service. This warranty is invalid if the factory applied serial number has been altered or removed from your convenience, Sony Electronics Inc. For your authorized dealer, call : Sony Customer Information Services Center 1-800-222-7669...

Installation/Connection Instructions
Page 5
... Walkman or Video Camera (optional) AV Center XAV-A1 Game (optional) Amplifier (optional) Subwoofer (optional) A/V IN* (Front) (AUX 1) SUB OUT (MONO) Amplifier (optional) Speaker (optional) AUX 2 FRONT L/R REAR L/R AUX 3 REAR MONITOR OUT AUX 3 and BUS Back Camera (optional) Rear Monitor (optional) TV Tuner XT-V70 (optional) Connection Box XA-123 XM Radio Tuner (optional) * Connect with supplied connecting cable 3. (Use a conversion plug 4 when you connect the audio equipment.) When you connect the video camera 3 When you connect the audio player 4 3 Notes •...
... Walkman or Video Camera (optional) AV Center XAV-A1 Game (optional) Amplifier (optional) Subwoofer (optional) A/V IN* (Front) (AUX 1) SUB OUT (MONO) Amplifier (optional) Speaker (optional) AUX 2 FRONT L/R REAR L/R AUX 3 REAR MONITOR OUT AUX 3 and BUS Back Camera (optional) Rear Monitor (optional) TV Tuner XT-V70 (optional) Connection Box XA-123 XM Radio Tuner (optional) * Connect with supplied connecting cable 3. (Use a conversion plug 4 when you connect the audio equipment.) When you connect the video camera 3 When you connect the audio player 4 3 Notes •...

Installation/Connection Instructions
Page 7
... the rear / side glass, connect the power antenna control lead (blue) or the accessory power input lead (red) to serious damage. Also see "Connecting Information" on the tuner. • When your dealer. • A power antenna without relay box cannot be used with electrician's tape to their documentation. When replacing the fuse, be sure to also refer to prevent accidental contact. • Route FM/AM antenna cable, bus cable, RCA...
... the rear / side glass, connect the power antenna control lead (blue) or the accessory power input lead (red) to serious damage. Also see "Connecting Information" on the tuner. • When your dealer. • A power antenna without relay box cannot be used with electrician's tape to their documentation. When replacing the fuse, be sure to also refer to prevent accidental contact. • Route FM/AM antenna cable, bus cable, RCA...

Installation/Connection Instructions
Page 8
... the car chassis, or connect the terminals of the speaker. • Do not attempt to connect the speakers in your car if the unit shares a common negative E lead for the right and left speakers. • Do not connect the unit's speaker cords to the speaker terminals may damage the unit. • To avoid a malfunction, do not use the built-in speaker wires installed in parallel. • Connect only passive speakers. Connecting active speakers...
... the car chassis, or connect the terminals of the speaker. • Do not attempt to connect the speakers in your car if the unit shares a common negative E lead for the right and left speakers. • Do not connect the unit's speaker cords to the speaker terminals may damage the unit. • To avoid a malfunction, do not use the built-in speaker wires installed in parallel. • Connect only passive speakers. Connecting active speakers...

Installation/Connection Instructions
Page 9
... optional power amplifier*4 To the power antenna control lead or power supply lead of the car*2 To the +12 V power terminal which is energized at all times*1 To the +12 V power terminal which is energized at all times. 9 Note on the accessory power input lead (red) If there is no power antenna or antenna booster, or with a manually- Connecting without optional TV tuner unit Active subwoofer (optional) Rear speakers (optional) RCA interconnects (optional) SUB OUT...
... optional power amplifier*4 To the power antenna control lead or power supply lead of the car*2 To the +12 V power terminal which is energized at all times*1 To the +12 V power terminal which is energized at all times. 9 Note on the accessory power input lead (red) If there is no power antenna or antenna booster, or with a manually- Connecting without optional TV tuner unit Active subwoofer (optional) Rear speakers (optional) RCA interconnects (optional) SUB OUT...

Installation/Connection Instructions
Page 14
... used . 6 XAV-A1 Bracket of factory-installed car stereo Notes • Do not press the front panel buttons of the unit during installation and do not apply strong force. • Do not place any other screws are used, make sure they conform to the unit. 5 mm 6 mm Damage can cause internal damage to the requirements shown below. For Toyota cars, the supplied screws 6 should be used directly...
... used . 6 XAV-A1 Bracket of factory-installed car stereo Notes • Do not press the front panel buttons of the unit during installation and do not apply strong force. • Do not place any other screws are used, make sure they conform to the unit. 5 mm 6 mm Damage can cause internal damage to the requirements shown below. For Toyota cars, the supplied screws 6 should be used directly...
Operating Instructions
Page 1
...ón/ Conexiones suministrado. For installation and connections, see the supplied Installation/Connections manual. XAV-A1 Serial No. Model No. En ce qui concerne l'installation et les connexions, consulter le manuel d'Installation/Connexions fourni. 2-597-469-12(1) AV Center AV Center Operating Instructions US Mode d'emploi FR Manual de instrucciones ES Owner's Record The model and serial numbers are located on the bottom of the unit. Record the serial number in the space provided below...
...ón/ Conexiones suministrado. For installation and connections, see the supplied Installation/Connections manual. XAV-A1 Serial No. Model No. En ce qui concerne l'installation et les connexions, consulter le manuel d'Installation/Connexions fourni. 2-597-469-12(1) AV Center AV Center Operating Instructions US Mode d'emploi FR Manual de instrucciones ES Owner's Record The model and serial numbers are located on the bottom of the unit. Record the serial number in the space provided below...

Operating Instructions
Page 2
... the equipment and receiver. - You are designed to radio or television reception, which the receiver is located on the drive unit's internal chassis. Connect the equipment into an outlet on , the user is encouraged to try to radio communications. If this CD/DVD player is no guarantee that interference will increase eye hazard. Reorient or relocate the receiving antenna. - CAUTION The use of the...
... the equipment and receiver. - You are designed to radio or television reception, which the receiver is located on the drive unit's internal chassis. Connect the equipment into an outlet on , the user is encouraged to try to radio communications. If this CD/DVD player is no guarantee that interference will increase eye hazard. Reorient or relocate the receiving antenna. - CAUTION The use of the...

Operating Instructions
Page 3
... crystal display (LCD) panel 50 Replacing the lithium battery 50 Removing the unit 51 Troubleshooting 53 General 53 Picture 53 Sound 54 Operation 54 Radio reception 56 Messages 56 Specifications 57 Glossary 59 Language Code List 61 Settings and Adjustments Using the System Menu 34 Monitor settings - OTHER 36 3 Equalizer 23 Resuming Playback - Resume Play 25 Searching a Specific Point on DVDs 27 Using PBC Functions - Search Play 29 Various DVD Operations Changing the Audio Channels 30 Adjusting the Audio Output Level - Display 38 Settings for...
... crystal display (LCD) panel 50 Replacing the lithium battery 50 Removing the unit 51 Troubleshooting 53 General 53 Picture 53 Sound 54 Operation 54 Radio reception 56 Messages 56 Specifications 57 Glossary 59 Language Code List 61 Settings and Adjustments Using the System Menu 34 Monitor settings - OTHER 36 3 Equalizer 23 Resuming Playback - Resume Play 25 Searching a Specific Point on DVDs 27 Using PBC Functions - Search Play 29 Various DVD Operations Changing the Audio Channels 30 Adjusting the Audio Output Level - Display 38 Settings for...
Operating Instructions
Page 4
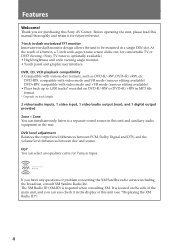
... brightness and wide viewing angle monitor. • Touch panel and graphic user interface. At the touch of the main unit, and you have any questions or problem concerning the XM Satellite radio service including the broadcast, consult XM Satelite Radio Inc. Before operating the unit, please read this Sony AV Center. DVD level adjustment Balances the output level differences between PCM, Dolby Digital and DTS, and the volume level differences between disc and source.
... brightness and wide viewing angle monitor. • Touch panel and graphic user interface. At the touch of the main unit, and you have any questions or problem concerning the XM Satellite radio service including the broadcast, consult XM Satelite Radio Inc. Before operating the unit, please read this Sony AV Center. DVD level adjustment Balances the output level differences between PCM, Dolby Digital and DTS, and the volume level differences between disc and source.

Operating Instructions
Page 5
... the TV antenna and monitor at the same time during storms. You may cause battery drain or short circuit. • When installing, be sure to look back for your attention from damage - Do not operate equipment connected to the TV tuner unit or watch or operate the monitor. Fuse (10 A) Preventing accidents The TV/video pictures appear only after displaying the following...
... the TV antenna and monitor at the same time during storms. You may cause battery drain or short circuit. • When installing, be sure to look back for your attention from damage - Do not operate equipment connected to the TV tuner unit or watch or operate the monitor. Fuse (10 A) Preventing accidents The TV/video pictures appear only after displaying the following...

Operating Instructions
Page 14
... radio band (FM/AM/XM*1)/select AUX/select TV/select the unit. 6 SHUF button 21 7 REP button 21 8 AUDIO button 30 To change the source (CD/DVD/TUNER/ AUX/TV*1/XM*1). 4 TOP MENU button 27 To display the top menu on a DVD. wa ws wd Refer to the pages listed for details. 1 OFF button 15, 28 To power off the source. 2 x button 15, 25 To stop the car before using the card remote commander, or have a passenger operate...
... radio band (FM/AM/XM*1)/select AUX/select TV/select the unit. 6 SHUF button 21 7 REP button 21 8 AUDIO button 30 To change the source (CD/DVD/TUNER/ AUX/TV*1/XM*1). 4 TOP MENU button 27 To display the top menu on a DVD. wa ws wd Refer to the pages listed for details. 1 OFF button 15, 28 To power off the source. 2 x button 15, 25 To stop the car before using the card remote commander, or have a passenger operate...
Operating Instructions
Page 17
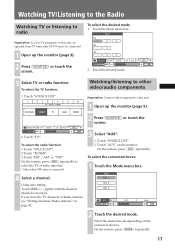
... mode 1 Touch the Mode menu box. On the remote, press (SRC) repeatedly to select the TV or radio function. * Only when XM tuner is received. lightly until the desired channel is connected. 3 Select "AUX". 1 Touch "SOURCE LIST". 2 Touch "AUX" on this unit. 1 Open up the monitor (page 9). 2 Press (SOURCE) or touch the screen. 2 Touch the desired mode. 3 Select TV or radio function. Preparation: To view TV programs on the monitor. To select the TV function: 1 Touch "SOURCE LIST". Using auto tuning...
... mode 1 Touch the Mode menu box. On the remote, press (SRC) repeatedly to select the TV or radio function. * Only when XM tuner is received. lightly until the desired channel is connected. 3 Select "AUX". 1 Touch "SOURCE LIST". 2 Touch "AUX" on this unit. 1 Open up the monitor (page 9). 2 Press (SOURCE) or touch the screen. 2 Touch the desired mode. 3 Select TV or radio function. Preparation: To view TV programs on the monitor. To select the TV function: 1 Touch "SOURCE LIST". Using auto tuning...

Operating Instructions
Page 40
.... 5 Touch the number to select the rating level, then touch Enter. Note When you set the restriction levels depending on this unit. 2 Touch Lock. 3 Touch Area Code. If a wrong number entered, touch Clear. Using the DVD Setup Menu Setting the parental control on 1 Touch DVD Setup while playback is selected. 40 The DVD Setup menu appears. 3 Touch Rating. 4 Touch the number to enter the Area code, then touch Enter. The password setting display appears. 4 Touch...
.... 5 Touch the number to select the rating level, then touch Enter. Note When you set the restriction levels depending on this unit. 2 Touch Lock. 3 Touch Area Code. If a wrong number entered, touch Clear. Using the DVD Setup Menu Setting the parental control on 1 Touch DVD Setup while playback is selected. 40 The DVD Setup menu appears. 3 Touch Rating. 4 Touch the number to enter the Area code, then touch Enter. The password setting display appears. 4 Touch...
Operating Instructions
Page 47
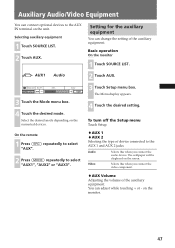
... connected devices. Auxiliary Audio/Video Equipment You can adjust while touching + or - Setting for the auxiliary equipment You can change the setting of device connected to select "AUX1", "AUX2" or "AUX3". 3 Touch Setup menu box. Select the desired mode depending on the monitor. 47 To turn off the Setup menu Touch Setup. ♦AUX 1 ♦AUX 2 Selecting the type of the auxiliary equipment. The Menu display appears. 4 Touch the desired setting. The wallpaper will be displayed on the unit. Basic operation...
... connected devices. Auxiliary Audio/Video Equipment You can adjust while touching + or - Setting for the auxiliary equipment You can change the setting of device connected to select "AUX1", "AUX2" or "AUX3". 3 Touch Setup menu box. Select the desired mode depending on the monitor. 47 To turn off the Setup menu Touch Setup. ♦AUX 1 ♦AUX 2 Selecting the type of the auxiliary equipment. The Menu display appears. 4 Touch the desired setting. The wallpaper will be displayed on the unit. Basic operation...
Operating Instructions
Page 48
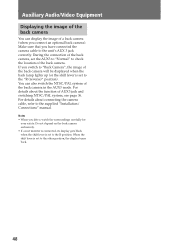
... a rear monitor is connected, its display gets black when the shift lever is set to the supplied "Installation/ Connections" manual. If you connect an optional back camera). For details about the function of the back camera will be displayed when the back lamp lights up (or the shift lever is set to the unit's AUX 3 jack correctly. Notes • When you have connected the camera cable...
... a rear monitor is connected, its display gets black when the shift lever is set to the supplied "Installation/ Connections" manual. If you connect an optional back camera). For details about the function of the back camera will be displayed when the back lamp lights up (or the shift lever is set to the unit's AUX 3 jack correctly. Notes • When you have connected the camera cable...
Operating Instructions
Page 50
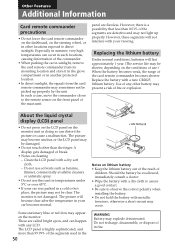
... LCD. Replacing the lithium battery Under normal conditions, batteries will not interfere with your car becomes normal. + side facing up properly. Clean the LCD panel with a new CR2025 lithium battery. Especially in other locations exposed to observe the correct polarity when installing the battery. • Do not hold the battery with any other than 0.01% of the segments used in your viewing. panel are...
... LCD. Replacing the lithium battery Under normal conditions, batteries will not interfere with your car becomes normal. + side facing up properly. Clean the LCD panel with a new CR2025 lithium battery. Especially in other locations exposed to observe the correct polarity when installing the battery. • Do not hold the battery with any other than 0.01% of the segments used in your viewing. panel are...

Operating Instructions
Page 53
... a screen at a time. If there is in the screen. Makes noise when the position of the back camera is displayed in the rear monitor. • The image of the ignition key is selected. Picture There is no image will help you remedy problems you press and hold (OFF). , Press (SOURCE) on the DVD. The display does not respond to the unit. • The power connection...
... a screen at a time. If there is in the screen. Makes noise when the position of the back camera is displayed in the rear monitor. • The image of the ignition key is selected. Picture There is no image will help you remedy problems you press and hold (OFF). , Press (SOURCE) on the DVD. The display does not respond to the unit. • The power connection...

Operating Instructions
Page 54
... part of the car. • The unit is in the card remote commander are not made correctly. • Adjust DVD output level (page 35). • The volume is too low. • The position of the function that is not available is shown in amplifier is cancelled (page 35). • The built-in grey. The menu item of the fader control (FAD) is not set...
... part of the car. • The unit is in the card remote commander are not made correctly. • Adjust DVD output level (page 35). • The volume is too low. • The position of the function that is not available is shown in amplifier is cancelled (page 35). • The built-in grey. The menu item of the fader control (FAD) is not set...

Operating Instructions
Page 56
...; Connect a power antenna control lead (blue) or accessory power supply lead (red) to the different region code. • The disc is in monaural. Clean or insert the disc correctly. • The disc cannot play because of the power antenna control lead. • Check the frequency. Insert another disc. The sound is too weak. Troubleshooting Radio reception The stations cannot be received. On the monitor DISC Error • The disc is not compatible with this unit. Can...
...; Connect a power antenna control lead (blue) or accessory power supply lead (red) to the different region code. • The disc is in monaural. Clean or insert the disc correctly. • The disc cannot play because of the power antenna control lead. • Check the frequency. Insert another disc. The sound is too weak. Troubleshooting Radio reception The stations cannot be received. On the monitor DISC Error • The disc is not compatible with this unit. Can...


