
Operating Instructions
Page 4
...your mood - SensMe 25 Before using the SensMe™ function . . . . . 25 Installing "SensMe™ Setup" and "Content Transfer" on Bluetooth (XAV-62BT only 10 Playable discs and symbols used in these Operating Instructions 11 Location and function of controls/ terminals 12 Main unit 12 Getting Started... Resetting the unit 14 Performing initial settings 14 Radio Listening to the USB device using "SensMe™ Setup 26 Transferring tracks to...
...your mood - SensMe 25 Before using the SensMe™ function . . . . . 25 Installing "SensMe™ Setup" and "Content Transfer" on Bluetooth (XAV-62BT only 10 Playable discs and symbols used in these Operating Instructions 11 Location and function of controls/ terminals 12 Main unit 12 Getting Started... Resetting the unit 14 Performing initial settings 14 Radio Listening to the USB device using "SensMe™ Setup 26 Transferring tracks to...
Operating Instructions
Page 12
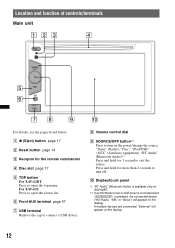
For XAV-622 Press to exit the source. H Volume control dial I SOURCE/OFF button*2 Press to open the source list. J Display/touch panel *1 "BT Audio" (Bluetooth Audio) is available only on XAV-62BT. *2 If an HD Radio tuner or SAT tuner is connected and (SOURCE/OFF) is pressed, the connected device ("HD Radio," "XM... "External" will appear on the power/change the source: "Tuner" (Radio), "Disc," "iPod/USB," "AUX" (Auxiliary equipment), "BT Audio" (Bluetooth Audio)*1. A Z (Eject) button page 17 B Reset button page 14 C Receptor for more than 2 seconds to connect a USB device.
For XAV-622 Press to exit the source. H Volume control dial I SOURCE/OFF button*2 Press to open the source list. J Display/touch panel *1 "BT Audio" (Bluetooth Audio) is available only on XAV-62BT. *2 If an HD Radio tuner or SAT tuner is connected and (SOURCE/OFF) is pressed, the connected device ("HD Radio," "XM... "External" will appear on the power/change the source: "Tuner" (Radio), "Disc," "iPod/USB," "AUX" (Auxiliary equipment), "BT Audio" (Bluetooth Audio)*1. A Z (Eject) button page 17 B Reset button page 14 C Receptor for more than 2 seconds to connect a USB device.
Operating Instructions
Page 14
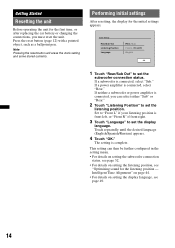
...on setting the listening position, see page 49. 14 If a power amplifier is connected, you must reset the unit. If neither a subwoofer or power amplifier is connected, select "Rear." Performing initial settings After resetting, the display for the first time, or after replacing the car battery or changing the connections, ...sound for the listening position - This setting can select either "Sub" or "Rear." 2 Touch "Listening Position" to set the subwoofer connection status. Getting Started Resetting the unit Before operating the unit for the initial settings appears. Press the...
...on setting the listening position, see page 49. 14 If a power amplifier is connected, you must reset the unit. If neither a subwoofer or power amplifier is connected, select "Rear." Performing initial settings After resetting, the display for the first time, or after replacing the car battery or changing the connections, ...sound for the listening position - This setting can select either "Sub" or "Rear." 2 Touch "Listening Position" to set the subwoofer connection status. Getting Started Resetting the unit Before operating the unit for the initial settings appears. Press the...
Operating Instructions
Page 38
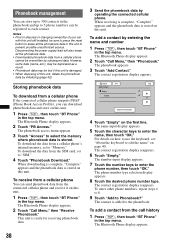
... Phone" in the top menu. This unit is damaged. • When disposing of your car with this unit still installed, be sure to press the reset button to erase all the phonebook data. • Downloaded phonebook data from the call history 1 Press (TOP), then touch "BT Phone" in the top menu...
... Phone" in the top menu. This unit is damaged. • When disposing of your car with this unit still installed, be sure to press the reset button to erase all the phonebook data. • Downloaded phonebook data from the call history 1 Press (TOP), then touch "BT Phone" in the top menu...
Operating Instructions
Page 43
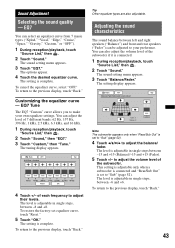
... the equalizer curve - You can be adjusted to your own equalizer settings. Back ATT Top EQ7 Tune : Custom 0 62 Hz 0 157 Hz 0 396 Hz Reset 0 0 1 kHz 2.5 kHz OK 0 0 6.3 kHz 16 kHz 4 Touch +/- Adjusting the sound characteristics The sound balance between -8 and +8. of 7 different... in single steps, between -15 and +15 (Balance)/-15 and +15 (Fader). 5 Touch +/- The level is set equalizer curve, touch "Reset." 5 Touch "OK." The setting is adjustable in single steps between -6 and +6. To return to adjust their levels. The setting display appears....
... the equalizer curve - You can be adjusted to your own equalizer settings. Back ATT Top EQ7 Tune : Custom 0 62 Hz 0 157 Hz 0 396 Hz Reset 0 0 1 kHz 2.5 kHz OK 0 0 6.3 kHz 16 kHz 4 Touch +/- Adjusting the sound characteristics The sound balance between -8 and +8. of 7 different... in single steps, between -15 and +15 (Balance)/-15 and +15 (Fader). 5 Touch +/- The level is set equalizer curve, touch "Reset." 5 Touch "OK." The setting is adjustable in single steps between -6 and +6. To return to adjust their levels. The setting display appears....

Operating Instructions
Page 44
... from each speaker so that the sound delay reaches the listener more correctly. Back ATT Top Position Tune 100 100 100 100 100 (cm) Reset OK Note The subwoofer appears and the subwoofer custom setting keys are indicated below. The setting is set to "Sub" (page 52). 4 ...set to "Front L," "Front R," "Front," or "All." 1 During reception/playback, touch "Source List," then . 2 Touch "Sound." To restore the default setting, touch "Reset." 5 Touch "OK." the listening position is adjustable in 2 cm (13/16 in) steps, between 0 and 400 cm (0 and 13 1/10 ft). of it wherever you...
... from each speaker so that the sound delay reaches the listener more correctly. Back ATT Top Position Tune 100 100 100 100 100 (cm) Reset OK Note The subwoofer appears and the subwoofer custom setting keys are indicated below. The setting is set to "Sub" (page 52). 4 ...set to "Front L," "Front R," "Front," or "All." 1 During reception/playback, touch "Source List," then . 2 Touch "Sound." To restore the default setting, touch "Reset." 5 Touch "OK." the listening position is adjustable in 2 cm (13/16 in) steps, between 0 and 400 cm (0 and 13 1/10 ft). of it wherever you...

Operating Instructions
Page 45
...Back." The sound setting menu appears. 3 Touch v/V to the rear speakers. The setting display appears. To restore the default setting, touch "Reset." The sound setting menu appears. 3 Touch "CSO." Rear Bass Enhancer Rear Bass Enhancer enhances the bass sound by applying the low pass filter.... 3 Touch v/V to the previous display, touch "Back." Back ATT Top 4.1ch Speaker Level Front L Front R Surround L Surround R Subwoofer 0 Reset Note The subwoofer appears and the subwoofer key is available only when "Rear/Sub Out" is preferable to "Sub" (page 52). 1 While no source...
...Back." The sound setting menu appears. 3 Touch v/V to the rear speakers. The setting display appears. To restore the default setting, touch "Reset." The sound setting menu appears. 3 Touch "CSO." Rear Bass Enhancer Rear Bass Enhancer enhances the bass sound by applying the low pass filter.... 3 Touch v/V to the previous display, touch "Back." Back ATT Top 4.1ch Speaker Level Front L Front R Surround L Surround R Subwoofer 0 Reset Note The subwoofer appears and the subwoofer key is available only when "Rear/Sub Out" is preferable to "Sub" (page 52). 1 While no source...

Operating Instructions
Page 59
... Reversing the picture Touch "Mirror." The general setting menu appears. Line Edit Editing lines 1 Touch "Line Edit." To restore the default setting, touch "Reset." Displaying marker lines Touch "Marker." A mirror-reversed picture appears. 59 Back Marker Mirror 1 2 3 Turn off engine but keep the key in the...CAMERA IN terminal, you can set the unit to not display the picture from a rear view camera by deactivating the camera input (page 50). Reset 2 Select the line to edit. 3 Edit the line. To increase the length, touch B b. The picture from the rear view camera. ...
... Reversing the picture Touch "Mirror." The general setting menu appears. Line Edit Editing lines 1 Touch "Line Edit." To restore the default setting, touch "Reset." Displaying marker lines Touch "Marker." A mirror-reversed picture appears. 59 Back Marker Mirror 1 2 3 Turn off engine but keep the key in the...CAMERA IN terminal, you can set the unit to not display the picture from a rear view camera by deactivating the camera input (page 50). Reset 2 Select the line to edit. 3 Edit the line. To increase the length, touch B b. The picture from the rear view camera. ...
Operating Instructions
Page 66
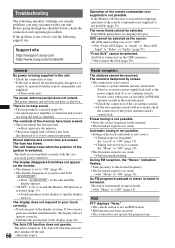
... Troubleshooting The following support site. Before going through the checklist below, check the connection and operating procedures. Support site http://esupport.sony.com http://www.sony.com/mobileAV Operation of the ignition is not an RDS station. • RDS data has not been received. • The... disappears if you press and hold (SOURCE/OFF). t Turn on . The power antenna (aerial) does not have been erased. • The reset button has been pressed. There is no lighting), operation of the memory have a relay box. The contents of the remote commander (not supplied) ...
... Troubleshooting The following support site. Before going through the checklist below, check the connection and operating procedures. Support site http://esupport.sony.com http://www.sony.com/mobileAV Operation of the ignition is not an RDS station. • RDS data has not been received. • The... disappears if you press and hold (SOURCE/OFF). t Turn on . The power antenna (aerial) does not have been erased. • The reset button has been pressed. There is no lighting), operation of the memory have a relay box. The contents of the remote commander (not supplied) ...
Operating Instructions
Page 67
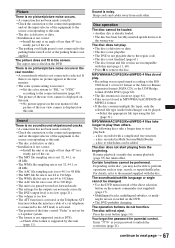
... selector of the equipment to the source corresponding to this unit. • The disc is defective or dirty. • Installation is not applied. Press the reset button (page 14). Enter "5776" as DTS). a disc recorded with the disc. t Install the unit at an angle of less than 45° in the...
... selector of the equipment to the source corresponding to this unit. • The disc is defective or dirty. • Installation is not applied. Press the reset button (page 14). Enter "5776" as DTS). a disc recorded with the disc. t Install the unit at an angle of less than 45° in the...

Operating Instructions
Page 70
... See the supplied "Installation/Connections" guide to an improper location on the USB device. Playback prohibited by pressing (SOURCE/OFF). t Press the reset button (page 14). SensMe™ data Reading... The connected USB device is not available. For details on this unit. Depending on the amount.... Handsfree device is not supported. t Connect a cellular phone (page 35). The local seek mode is on the display, consult your nearest Sony dealer. t Perform pairing with the unit. The connected USB device does not contain data for the SensMe™ function in a preset failed....
... See the supplied "Installation/Connections" guide to an improper location on the USB device. Playback prohibited by pressing (SOURCE/OFF). t Press the reset button (page 14). SensMe™ data Reading... The connected USB device is not available. For details on this unit. Depending on the amount.... Handsfree device is not supported. t Connect a cellular phone (page 35). The local seek mode is on the display, consult your nearest Sony dealer. t Perform pairing with the unit. The connected USB device does not contain data for the SensMe™ function in a preset failed....
Operating Instructions
Page 73
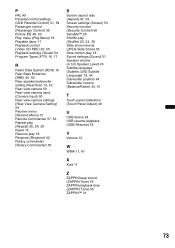
...) 50 Rear view camera settings (Rear View Camera Setting) 59 Receive menu (Receive Menu) 15 Remote Commander 57, 63 Repeat play (Repeat) 22, 24, 30 Reset 14 Resume play 18 Ringtone (Ringtone) 42 Rotary commander (Rotary Commander) 50 S Screen aspect ratio (Aspect) 47, 53 Screen settings (Screen) 53 Security function (Security...
...) 50 Rear view camera settings (Rear View Camera Setting) 59 Receive menu (Receive Menu) 15 Remote Commander 57, 63 Repeat play (Repeat) 22, 24, 30 Reset 14 Resume play 18 Ringtone (Ringtone) 42 Rotary commander (Rotary Commander) 50 S Screen aspect ratio (Aspect) 47, 53 Screen settings (Screen) 53 Security function (Security...
Operating Instructions
Page 228
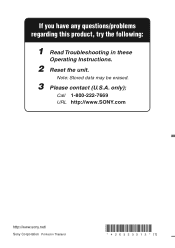
If you have any questions/problems regarding this product, try the following: 1 Read Troubleshooting in Thailand Call 1-800-222-7669 URL http://www.SONY.com http://www.sony.net/ Sony Corporation Printed in these Operating Instructions. 2 Reset the unit. only); Note: Stored data may be erased. 3 Please contact (U.S.A.
If you have any questions/problems regarding this product, try the following: 1 Read Troubleshooting in Thailand Call 1-800-222-7669 URL http://www.SONY.com http://www.sony.net/ Sony Corporation Printed in these Operating Instructions. 2 Reset the unit. only); Note: Stored data may be erased. 3 Please contact (U.S.A.


