
Operating Instructions
Page 7
... playback ........ 65 Setup Using the Setup Menu 66 Rec Quality (REC mode 66 Auto Stop Timer 66 Auto Chapter 67 DVD Menu 67 Slideshow Music 67 Slideshow Creation 67 Finalize disc 68 Erase disc 68 System Info 69 Auto Shut Off 69 Demo 69 Color System 69 Language 70 Troubleshooting/References Troubleshooting 71 Supported...
... playback ........ 65 Setup Using the Setup Menu 66 Rec Quality (REC mode 66 Auto Stop Timer 66 Auto Chapter 67 DVD Menu 67 Slideshow Music 67 Slideshow Creation 67 Finalize disc 68 Erase disc 68 System Info 69 Auto Shut Off 69 Demo 69 Color System 69 Language 70 Troubleshooting/References Troubleshooting 71 Supported...

Operating Instructions
Page 39
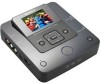
Next disc/number of required discs 4 Remove the created disc. If the contents do not fit onto a single disc, the disc will resume automatically. The disc is finalized automatically when recording is in progress. 39 Recording will be ejected automatically when it becomes full. You cannot stop ) button when replacing a disc. Remove the created disc and insert a blank one. Copying From a camera 3 Change to a blank disc when the message [Insert a blank DVD.] appears. To stop recording Press the (stop while recording is complete.
Next disc/number of required discs 4 Remove the created disc. If the contents do not fit onto a single disc, the disc will resume automatically. The disc is finalized automatically when recording is in progress. 39 Recording will be ejected automatically when it becomes full. You cannot stop ) button when replacing a disc. Remove the created disc and insert a blank one. Copying From a camera 3 Change to a blank disc when the message [Insert a blank DVD.] appears. To stop recording Press the (stop while recording is complete.
Operating Instructions
Page 41
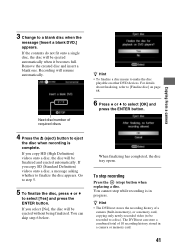
... disc. The DVDirect can skip step 6 below. Remove the created disc and insert a blank one. If you copy SD (Standard Definition) videos onto a disc, a message asking whether to select [Yes] and press the ENTER button. z Hint • To finalize a disc means to make the disc ...discs 4 Press the Z (eject) button to a disc). Next disc/number of 10 recording history stored in progress. Recording will be ejected without being finalized. For details about finalizing, refer to a blank disc when the message [Insert a blank DVD.] appears. 3 Change to [Finalize disc] on other DVD...
... disc. The DVDirect can skip step 6 below. Remove the created disc and insert a blank one. If you copy SD (Standard Definition) videos onto a disc, a message asking whether to select [Yes] and press the ENTER button. z Hint • To finalize a disc means to make the disc ...discs 4 Press the Z (eject) button to a disc). Next disc/number of 10 recording history stored in progress. Recording will be ejected without being finalized. For details about finalizing, refer to a blank disc when the message [Insert a blank DVD.] appears. 3 Change to [Finalize disc] on other DVD...
Operating Instructions
Page 43
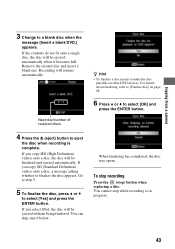
... button. If you select [No], the disc will be ejected without being finalized. When finalizing has completed, the disc tray opens. You cannot stop ) button when replacing a disc. Remove the created disc and insert a blank one. If you copy SD (Standard Definition) videos onto a disc, a message asking whether to [Finalize disc] on other DVD devices. You can skip step 6 below...
... button. If you select [No], the disc will be ejected without being finalized. When finalizing has completed, the disc tray opens. You cannot stop ) button when replacing a disc. Remove the created disc and insert a blank one. If you copy SD (Standard Definition) videos onto a disc, a message asking whether to [Finalize disc] on other DVD devices. You can skip step 6 below...
Operating Instructions
Page 45
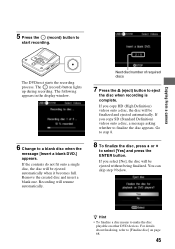
... finalizing, refer to [Finalize disc] on other DVD devices. If the contents do not fit onto a single disc, the disc will be ejected automatically when it becomes full. Recording will be ejected without being finalized. Remove the created disc and insert a blank one. Go to step 8. 8 To finalize the disc, press V or v to eject the disc when recording is complete. The DVDirect...
... finalizing, refer to [Finalize disc] on other DVD devices. If the contents do not fit onto a single disc, the disc will be ejected automatically when it becomes full. Recording will be ejected without being finalized. Remove the created disc and insert a blank one. Go to step 8. 8 To finalize the disc, press V or v to eject the disc when recording is complete. The DVDirect...
Operating Instructions
Page 46
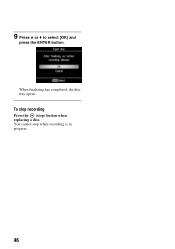
When finalizing has completed, the disc tray opens. To stop recording Press the (stop while recording is in progress. 46 9 Press V or v to select [OK] and press the ENTER button. You cannot stop ) button when replacing a disc.
When finalizing has completed, the disc tray opens. To stop recording Press the (stop while recording is in progress. 46 9 Press V or v to select [OK] and press the ENTER button. You cannot stop ) button when replacing a disc.
Operating Instructions
Page 47
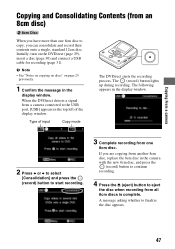
... The DVDirect starts the recording process. Initially, turn on page 25 previously. 1 Confirm the message in the display window. The following appears in the camera with the new 8cm disc, and press the (record) button to continue recording. 4 Press the Z (eject) button to eject the disc when recording from one 8cm disc to finalize the disc...
... The DVDirect starts the recording process. Initially, turn on page 25 previously. 1 Confirm the message in the display window. The following appears in the camera with the new 8cm disc, and press the (record) button to continue recording. 4 Press the Z (eject) button to eject the disc when recording from one 8cm disc to finalize the disc...

Operating Instructions
Page 48
For details about finalizing, refer to [Finalize disc] on other DVD devices. If you select [No], the disc will be ejected without being finalized. You can skip step 6 below. z Hint • To finalize a disc means to make the disc playable on page 68. 6 Press V or v to select [Yes] and press the ENTER button. When finalizing has completed, the disc tray opens. b Note • You cannot stop while recording is in progress. 48 5 To finalize the disc, press V or v to select [OK] and press the ENTER button.
For details about finalizing, refer to [Finalize disc] on other DVD devices. If you select [No], the disc will be ejected without being finalized. You can skip step 6 below. z Hint • To finalize a disc means to make the disc playable on page 68. 6 Press V or v to select [Yes] and press the ENTER button. When finalizing has completed, the disc tray opens. b Note • You cannot stop while recording is in progress. 48 5 To finalize the disc, press V or v to select [OK] and press the ENTER button.

Operating Instructions
Page 50
... finalize a disc means to [Finalize disc] on other DVD devices. You can skip step 9. 9 Press V or v to eject the disc when recording is unnecessary. To pause recording Press the (record) button during recording. For details about finalizing, refer to make the disc playable on page 68. • When using a DVD+RW disc, finalizing is complete. A message asking whether to finalize the disc appears...
... finalize a disc means to [Finalize disc] on other DVD devices. You can skip step 9. 9 Press V or v to eject the disc when recording is unnecessary. To pause recording Press the (record) button during recording. For details about finalizing, refer to make the disc playable on page 68. • When using a DVD+RW disc, finalizing is complete. A message asking whether to finalize the disc appears...
Operating Instructions
Page 52
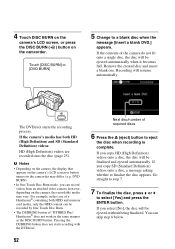
...(High Definition) videos onto a disc, the disc will be ejected without being finalized. however, depending on the camera, the recordable media may differ. (e.g. Go straight to step 7. 7 To finalize the disc, press V or v to a blank disc when the message [Insert a blank DVD.] appears. You can record videos ...resume automatically. For example, in the same manner as the DISC BURN button. If you can skip step 8 below. Touch [DISC BURN] or [DVD BURN] 5 Change to select [Yes] and press the ENTER button. The DVDirect starts the recording process. b Notes • Depending on the...
...(High Definition) videos onto a disc, the disc will be ejected without being finalized. however, depending on the camera, the recordable media may differ. (e.g. Go straight to step 7. 7 To finalize the disc, press V or v to a blank disc when the message [Insert a blank DVD.] appears. You can record videos ...resume automatically. For example, in the same manner as the DISC BURN button. If you can skip step 8 below. Touch [DISC BURN] or [DVD BURN] 5 Change to select [Yes] and press the ENTER button. The DVDirect starts the recording process. b Notes • Depending on the...
Operating Instructions
Page 53
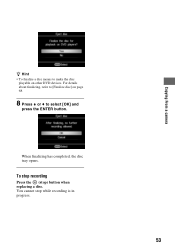
Copying From a camera z Hint • To finalize a disc means to select [OK] and press the ENTER button. When finalizing has completed, the disc tray opens. You cannot stop ) button when replacing a disc. To stop recording Press the (stop while recording is in progress. 53 For details about finalizing, refer to [Finalize disc] on page 68. 8 Press V or v to make the disc playable on other DVD devices.
Copying From a camera z Hint • To finalize a disc means to select [OK] and press the ENTER button. When finalizing has completed, the disc tray opens. You cannot stop ) button when replacing a disc. To stop recording Press the (stop while recording is in progress. 53 For details about finalizing, refer to [Finalize disc] on page 68. 8 Press V or v to make the disc playable on other DVD devices.

Operating Instructions
Page 55
Copying From Video Devices To pause recording Press the (record) button during recording. The disc is finalized automatically when recording is reached. 55 To resume recording, press the (record) button again. To stop recording Press the (stop) button, and then press the RETURN button. The DVDirect stops recording and returns to the display window in step 4. 6 Remove the created disc. z Hint • Recording automatically stops after a blank portion over 2 minutes, or when the end of the DV tape is complete.
Copying From Video Devices To pause recording Press the (record) button during recording. The disc is finalized automatically when recording is reached. 55 To resume recording, press the (record) button again. To stop recording Press the (stop) button, and then press the RETURN button. The DVDirect stops recording and returns to the display window in step 4. 6 Remove the created disc. z Hint • Recording automatically stops after a blank portion over 2 minutes, or when the end of the DV tape is complete.

Operating Instructions
Page 58
... (stop) button, you select [No] and press b, the disc will be ejected without being finalized. 8 Press the Z (eject) button to eject the disc when recording is complete. 9 To finalize the disc, press V or v to select [OK] and press the ENTER button. For details about finalizing, refer to [Finalize disc] on other DVD devices. You can skip step 10 below.
... (stop) button, you select [No] and press b, the disc will be ejected without being finalized. 8 Press the Z (eject) button to eject the disc when recording is complete. 9 To finalize the disc, press V or v to select [OK] and press the ENTER button. For details about finalizing, refer to [Finalize disc] on other DVD devices. You can skip step 10 below.

Operating Instructions
Page 59
... display window. 3 Press the Z (eject) button to eject the disc when recording is connected to the USB port. Go to finalize the disc appears. The DVDirect starts the recording process. You can skip steps 4 to 6. 4 To finalize the disc, press V or v to start recording. Initially, turn on your .... If [Slideshow Creation] is set to [ON], the disc is finalized automatically when creation of the slideshow is one of the simpler copy modes, eliminating the need to select photos stored on the DVDirect (page 29), insert a disc (page 30) and connect cables for recording (page 31),...
... display window. 3 Press the Z (eject) button to eject the disc when recording is connected to the USB port. Go to finalize the disc appears. The DVDirect starts the recording process. You can skip steps 4 to 6. 4 To finalize the disc, press V or v to start recording. Initially, turn on your .... If [Slideshow Creation] is set to [ON], the disc is finalized automatically when creation of the slideshow is one of the simpler copy modes, eliminating the need to select photos stored on the DVDirect (page 29), insert a disc (page 30) and connect cables for recording (page 31),...

Operating Instructions
Page 60
...• To finalize a disc means to make the disc playable on the number and size of the photos (for the slideshow disc. z Hints • When creating the slideshow, both photos (JPEG files) and slideshow with SD (Standard Definition) picture quality are copied onto the disc. • ...onto a disc). 6 To create the slideshow, press V or v to complete the slideshow disc depends on other DVD devices. If you select [No], the disc will not be ejected without being finalized. For details about finalizing, refer to [Finalize disc] on page 68. 5 Press V or v to complete finalizing for ...
...• To finalize a disc means to make the disc playable on the number and size of the photos (for the slideshow disc. z Hints • When creating the slideshow, both photos (JPEG files) and slideshow with SD (Standard Definition) picture quality are copied onto the disc. • ...onto a disc). 6 To create the slideshow, press V or v to complete the slideshow disc depends on other DVD devices. If you select [No], the disc will not be ejected without being finalized. For details about finalizing, refer to [Finalize disc] on page 68. 5 Press V or v to complete finalizing for ...

Operating Instructions
Page 62
... ENTER button. You can skip step 7 to 9. 7 To finalize the disc, press V or v to [ON], the disc is finalized automatically when creation of the slideshow is complete, and the disc tray opens. For details about finalizing, refer to [Finalize disc] on other DVD devices. A message asking whether to eject the disc when recording is set to select [Yes] and press...
... ENTER button. You can skip step 7 to 9. 7 To finalize the disc, press V or v to [ON], the disc is finalized automatically when creation of the slideshow is complete, and the disc tray opens. For details about finalizing, refer to [Finalize disc] on other DVD devices. A message asking whether to eject the disc when recording is set to select [Yes] and press...

Operating Instructions
Page 63
The amount of time it may take 20 minutes or more to complete the slideshow disc depends on the number and size of the photos (for the slideshow disc. Copying Photos z Hints • When creating the slideshow, both photos (JPEG files) and slideshow with SD (Standard Definition) picture quality are copied onto the disc. • It takes some time to complete finalizing for example, it takes to record 50 files (6-megapixel photos) onto a disc). 63
The amount of time it may take 20 minutes or more to complete the slideshow disc depends on the number and size of the photos (for the slideshow disc. Copying Photos z Hints • When creating the slideshow, both photos (JPEG files) and slideshow with SD (Standard Definition) picture quality are copied onto the disc. • It takes some time to complete finalizing for example, it takes to record 50 files (6-megapixel photos) onto a disc). 63

Operating Instructions
Page 64
... output videos to step 4. 64 Selected title 01/ 04 The DVDirect starts playback. The DVDirect does not support playback of commercial DVDs or contents on a memory card inserted to the DVDirect. • When you insert a finalized disc after turning on the DVDirect and insert a disc created with the DVDirect. z Hint • If you preview a video, there is inserted. Previewing...
... output videos to step 4. 64 Selected title 01/ 04 The DVDirect starts playback. The DVDirect does not support playback of commercial DVDs or contents on a memory card inserted to the DVDirect. • When you insert a finalized disc after turning on the DVDirect and insert a disc created with the DVDirect. z Hint • If you preview a video, there is inserted. Previewing...

Operating Instructions
Page 65
... 2 and 3. 2 Press the RETURN button. When you insert a finalized disc after turning on a memory card inserted to select [Photo Slideshow], and press the ENTER button. The DVDirect does not support playback of commercial DVDs or contents on the DVDirect, playback will start automatically (or, photos or the DVD Menu will appear). Previewing Photos Previewing in rotation...
... 2 and 3. 2 Press the RETURN button. When you insert a finalized disc after turning on a memory card inserted to select [Photo Slideshow], and press the ENTER button. The DVDirect does not support playback of commercial DVDs or contents on the DVDirect, playback will start automatically (or, photos or the DVD Menu will appear). Previewing Photos Previewing in rotation...

Operating Instructions
Page 68
... later. The erased disc is unnecessary. Finalize disc If you eject a disc without finalizing, you can always add videos on the DVD+RW with the DVDirect, the disc cannot be playable on a DVD+RW or DVD-RW disc. If you do not finalize the disc with the DVDirect, and the disc will be played on other DVD devices. 1 Insert a disc to finalize, press V or v to select [Finalize disc], and press...
... later. The erased disc is unnecessary. Finalize disc If you eject a disc without finalizing, you can always add videos on the DVD+RW with the DVDirect, the disc cannot be playable on a DVD+RW or DVD-RW disc. If you do not finalize the disc with the DVDirect, and the disc will be played on other DVD devices. 1 Insert a disc to finalize, press V or v to select [Finalize disc], and press...


