Operating Instructions
Page 2
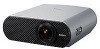
.... - This product contains mercury.Disposal of this equipment does cause harmful interference to the presence of Conformity Trade Name: SONY Model No.: VPL-HS51A/HS60 Responsible Party: Sony Electronics Inc. 2 Address: 16530 Via Esprillo, San Diego CA 92127 U.S.A. Declaration of important operating and maintenance (servicing)...for a Class B digital device, pursuant to which can radiate radio frequency energy and, if not installed and used in this manual could void your local authorities or Electronics Industries Alliance (www.eiae.org http://www.eiae.org). WARNING To reduce the risk of...
.... - This product contains mercury.Disposal of this equipment does cause harmful interference to the presence of Conformity Trade Name: SONY Model No.: VPL-HS51A/HS60 Responsible Party: Sony Electronics Inc. 2 Address: 16530 Via Esprillo, San Diego CA 92127 U.S.A. Declaration of important operating and maintenance (servicing)...for a Class B digital device, pursuant to which can radiate radio frequency energy and, if not installed and used in this manual could void your local authorities or Electronics Industries Alliance (www.eiae.org http://www.eiae.org). WARNING To reduce the risk of...
Operating Instructions
Page 6
Precautions On safety • Check that the operating voltage of your unit is identical with the voltage of the VPL-HS60 unless the model name is specifically mentioned. Do not block or place anything near these holes, or internal heat build-up may occur, causing ... unit. For maximum protection, repack your unit as it was originally packed at the factory. 6 Precautions This manual covers models VPLHS51A and VPL-HS60. The air coming out is still running. The illustrations of the projector used for several days. • To disconnect the cord, pull it is not to the wall outlet, ...
Precautions On safety • Check that the operating voltage of your unit is identical with the voltage of the VPL-HS60 unless the model name is specifically mentioned. Do not block or place anything near these holes, or internal heat build-up may occur, causing ... unit. For maximum protection, repack your unit as it was originally packed at the factory. 6 Precautions This manual covers models VPLHS51A and VPL-HS60. The air coming out is still running. The illustrations of the projector used for several days. • To disconnect the cord, pull it is not to the wall outlet, ...

Operating Instructions
Page 7
... install the projector and screen, how to connect the equipment from which you want to make sure it contains the following items: • Remote control (1) • Size AA (R6) batteries (2) • Air filter (for replacement) (1) • AC power cord (1) • CD-ROM (Application software) (VPL-HS51A only) (1) • Operating Instructions (this manual) (1) Inserting...
... install the projector and screen, how to connect the equipment from which you want to make sure it contains the following items: • Remote control (1) • Size AA (R6) batteries (2) • Air filter (for replacement) (1) • AC power cord (1) • CD-ROM (Application software) (VPL-HS51A only) (1) • Operating Instructions (this manual) (1) Inserting...

Operating Instructions
Page 15
... a DVD player/recorder which connector you should connect the cable, S VIDEO (S video connector) or VIDEO (video connector), connect it to S VIDEO to the video output. See also the instruction manual of the projector Speakers AV amplifier PR/CR VIDEO INPUT S VIDEO INPUT A Video equipment to S video or video output : Video signal flow S video or video cable (not supplied) Tip If you do not know to which...
... a DVD player/recorder which connector you should connect the cable, S VIDEO (S video connector) or VIDEO (video connector), connect it to S VIDEO to the video output. See also the instruction manual of the projector Speakers AV amplifier PR/CR VIDEO INPUT S VIDEO INPUT A Video equipment to S video or video output : Video signal flow S video or video cable (not supplied) Tip If you do not know to which...
Operating Instructions
Page 40
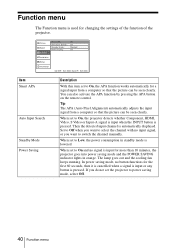
When set to switch the channel manually. Set to Off when you want to On, the projector detects whether Component, HDMI, Video, S Video or Input-A signal is input when the INPUT button is lowered. The lamp goes out and the cooling fan keeps running. In power saving mode, ...no button functions for more than 10 minutes, the projector goes into power saving mode and...
When set to switch the channel manually. Set to Off when you want to On, the projector detects whether Component, HDMI, Video, S Video or Input-A signal is input when the INPUT button is lowered. The lamp goes out and the cooling fan keeps running. In power saving mode, ...no button functions for more than 10 minutes, the projector goes into power saving mode and...

Operating Instructions
Page 42
...Input-A Signal Sel. : Color System : On English Auto Auto Installation Setup Information Sel: Set: Back: Exit: Item Status Language Input-A Signal Sel. Video GBR: Inputs the signal from among NTSC3.58, PAL, SECAM, NTSC4.43, PAL-M, PAL-N or PAL-60. Select the color system of signal ...the color system of the input signal automatically from a TV game or HDTV broadcast. Color System Description Set to Off to the selected system manually. 42 Setup Menu Auto: Selects the input signal type automatically. Computer: Inputs the signal from a DVD player/ recorder, digital tuner, etc....
...Input-A Signal Sel. : Color System : On English Auto Auto Installation Setup Information Sel: Set: Back: Exit: Item Status Language Input-A Signal Sel. Video GBR: Inputs the signal from among NTSC3.58, PAL, SECAM, NTSC4.43, PAL-M, PAL-N or PAL-60. Select the color system of signal ...the color system of the input signal automatically from a TV game or HDTV broadcast. Color System Description Set to Off to the selected system manually. 42 Setup Menu Auto: Selects the input signal type automatically. Computer: Inputs the signal from a DVD player/ recorder, digital tuner, etc....

Operating Instructions
Page 44
... from the computer. 2 Press the APA (Auto Pixel Alignment) button. This APA processing time may extend beyond the screen. • If you adjust the picture manually. (1 page 39) 44 Adjusting Picture Quality of the synchronized signal is adjusted properly, "complete!" If the image does not still appear properly, input the signal...
... from the computer. 2 Press the APA (Auto Pixel Alignment) button. This APA processing time may extend beyond the screen. • If you adjust the picture manually. (1 page 39) 44 Adjusting Picture Quality of the synchronized signal is adjusted properly, "complete!" If the image does not still appear properly, input the signal...
Operating Instructions
Page 51
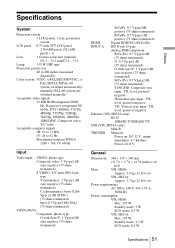
... diagonally) Color system NTSC3.58/PAL/SECAM/NTSC4.43/ PAL-M/PAL-N/PAL-60 system, switched automatically/ manually (PAL-60 system not switched manually) Acceptable video signals 15 kHz RGB/component 50/60 Hz, Progressive component 50/ 60 Hz, DTV (480/60i,...mm (13 5/8 u 5 7/8 u 14 5/8 inches) (w/ h/d) Mass VPL-HS60: Approx. 5.6 kg (12 lb 6 oz) VPL-HS51A: Approx. 5.7 kg (12 lb 6 oz) Power requirements AC 100 to 240 V, 0.8-1.95 A, 50/60 Hz Power consumption VPL-HS60: Max. 195 W Standby mode: 3 W ECO mode: 0.5 W VPL-HS51A: Max. 195 W Standby mode: 4.5 W ECO mode: 0.5 W ...
... diagonally) Color system NTSC3.58/PAL/SECAM/NTSC4.43/ PAL-M/PAL-N/PAL-60 system, switched automatically/ manually (PAL-60 system not switched manually) Acceptable video signals 15 kHz RGB/component 50/60 Hz, Progressive component 50/ 60 Hz, DTV (480/60i,...mm (13 5/8 u 5 7/8 u 14 5/8 inches) (w/ h/d) Mass VPL-HS60: Approx. 5.6 kg (12 lb 6 oz) VPL-HS51A: Approx. 5.7 kg (12 lb 6 oz) Power requirements AC 100 to 240 V, 0.8-1.95 A, 50/60 Hz Power consumption VPL-HS60: Max. 195 W Standby mode: 3 W ECO mode: 0.5 W VPL-HS51A: Max. 195 W Standby mode: 4.5 W ECO mode: 0.5 W ...

Operating Instructions
Page 58
The installation measurements are shown below when installing the projector on a ceiling, refer to the Installation manual for installation. Make sure to the center of the screen. 14.4 152.5 216.5 (19/32) (6 1/8) (8 5/8) Front of the cabinet Center of the lens Distance between...Center of the supporting pole (The center of the supporting pole is parallel to consult with a qualified Sony personnel for Dealers of the unit.) Unit: mm (inches) 58 Ceiling Installation Top view Install the projector so that the center of the lens is different from that of the PSS-610. When using...
The installation measurements are shown below when installing the projector on a ceiling, refer to the Installation manual for installation. Make sure to the center of the screen. 14.4 152.5 216.5 (19/32) (6 1/8) (8 5/8) Front of the cabinet Center of the lens Distance between...Center of the supporting pole (The center of the supporting pole is parallel to consult with a qualified Sony personnel for Dealers of the unit.) Unit: mm (inches) 58 Ceiling Installation Top view Install the projector so that the center of the lens is different from that of the PSS-610. When using...

