
Quick Start Guide
Page 2
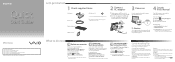
... the power indicator light turns on your computer . Wireless keyboard Wireless mouse 2 Connect AC adapter 3 Power on your computer. On-screen manuals: 1 Click Start and Help and Support. 2 Click Use my VAIO. 3 Select your own Recovery Media immediately, so that you to factory-installed settings in the process of a system failure. With the VAIO Care software, you may make scratches on hard surfaces, such as setup tools, tutorials, and FAQs. Then plug the AC adapter cable into...
... the power indicator light turns on your computer . Wireless keyboard Wireless mouse 2 Connect AC adapter 3 Power on your computer. On-screen manuals: 1 Click Start and Help and Support. 2 Click Use my VAIO. 3 Select your own Recovery Media immediately, so that you to factory-installed settings in the process of a system failure. With the VAIO Care software, you may make scratches on hard surfaces, such as setup tools, tutorials, and FAQs. Then plug the AC adapter cable into...
Safety Information
Page 2
.... Sony Electronics Inc. Use of your Sony Service Center. IN NO EVENT SHALL SONY ELECTRONICS INC. The software described herein is prohibited. Software specifications are located on the bottom, the back panel, or inside the battery compartment of such software is subject to any machine-readable form without notice and may not necessarily be transported or used outside the United States. For customers in a secure location. Model Number: Serial Number: Notice...
.... Sony Electronics Inc. Use of your Sony Service Center. IN NO EVENT SHALL SONY ELECTRONICS INC. The software described herein is prohibited. Software specifications are located on the bottom, the back panel, or inside the battery compartment of such software is subject to any machine-readable form without notice and may not necessarily be transported or used outside the United States. For customers in a secure location. Model Number: Serial Number: Notice...
Safety Information
Page 4
Remove the AC adapter away from the pacemaker. ❑ Sony is at http://www.sony.com/vaio. ❑ Do not use wireless LAN on hospital premises. excessive dust; direct sunlight; moisture or rain; excessively high and low temperatures; strong magnets or speakers that are not magnetically shielded; Information about compatible models can be installed near a pacemaker, make sure it becomes warm and causes...
Remove the AC adapter away from the pacemaker. ❑ Sony is at http://www.sony.com/vaio. ❑ Do not use wireless LAN on hospital premises. excessive dust; direct sunlight; moisture or rain; excessively high and low temperatures; strong magnets or speakers that are not magnetically shielded; Information about compatible models can be installed near a pacemaker, make sure it becomes warm and causes...
User Guide
Page 2
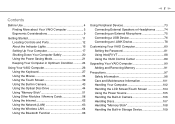
... Using the Mouse 34 Using the Touch Screen 39 Using the Built-in Camera 43 Using the Optical Disc Drive 44 Using "Memory Stick 51 Using Other Modules / Memory Cards 58 Using the Internet 62 Using the Network (LAN 63 Using the Wireless LAN 64 Using the Bluetooth Function 68 Using Peripheral Devices 73 Connecting External Speakers or Headphones ..........74 Connecting an External Microphone 75 Connecting a USB Device 76 Connecting an i.LINK Device 78 Customizing Your VAIO Computer 80 Setting the Password 81 Using Intel(R) VT 88 Using the VAIO Control Center 89 Upgrading...
... Using the Mouse 34 Using the Touch Screen 39 Using the Built-in Camera 43 Using the Optical Disc Drive 44 Using "Memory Stick 51 Using Other Modules / Memory Cards 58 Using the Internet 62 Using the Network (LAN 63 Using the Wireless LAN 64 Using the Bluetooth Function 68 Using Peripheral Devices 73 Connecting External Speakers or Headphones ..........74 Connecting an External Microphone 75 Connecting a USB Device 76 Connecting an i.LINK Device 78 Customizing Your VAIO Computer 80 Setting the Password 81 Using Intel(R) VT 88 Using the VAIO Control Center 89 Upgrading...
User Guide
Page 8
... might need. In Store Service & Support (available in USA only) Make an appointment with the setup of your computer 4 The hardware component or the software program that is causing the problem 5 A brief description of your VAIO computer. Sony Style store and get personalized service and support for at the lower right corner of the number below the barcode. 3 The operating system on your new VAIO computer...
... might need. In Store Service & Support (available in USA only) Make an appointment with the setup of your computer 4 The hardware component or the software program that is causing the problem 5 A brief description of your VAIO computer. Sony Style store and get personalized service and support for at the lower right corner of the number below the barcode. 3 The operating system on your new VAIO computer...
User Guide
Page 30
... Lock mode is activated. (Connect): Stays off while the wireless keyboard is properly connected with your computer; M Directional arrow keys Move the pointer on some software. O Numeric keypad Use the numeric keypad to type numbers or to make the view look smaller and further away (zoom out). G Muting button Turns the volume on and off or enters Sleep mode. K E key Ejects the optical disc drive tray when used in upper case. H Volume control buttons...
... Lock mode is activated. (Connect): Stays off while the wireless keyboard is properly connected with your computer; M Directional arrow keys Move the pointer on some software. O Numeric keypad Use the numeric keypad to type numbers or to make the view look smaller and further away (zoom out). G Muting button Turns the volume on and off or enters Sleep mode. K E key Ejects the optical disc drive tray when used in upper case. H Volume control buttons...
User Guide
Page 32
... Disk (C:), WConnectTool, and WConnect. Under normal circumstances, you do not perform the connection operations as this may cause a malfunction. 1 Make sure that the supplied battery is properly installed on your wireless keyboard, and then slide the power switch on the keyboard to perform the connection operations before using an optional USB keyboard as well. ✍ When the Windows password is set on the computer, however, the on-screen keyboard is successfully working , use the on -screen keyboard...
... Disk (C:), WConnectTool, and WConnect. Under normal circumstances, you do not perform the connection operations as this may cause a malfunction. 1 Make sure that the supplied battery is properly installed on your wireless keyboard, and then slide the power switch on the keyboard to perform the connection operations before using an optional USB keyboard as well. ✍ When the Windows password is set on the computer, however, the on-screen keyboard is successfully working , use the on -screen keyboard...
User Guide
Page 37
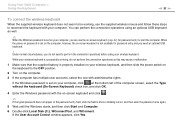
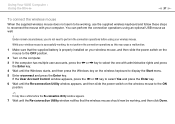
... wireless mouse. Using Your VAIO Computer > Using the Mouse n 37 N To connect the wireless mouse When the supplied wireless mouse does not seem to be working , use the supplied wireless keyboard and follow these steps to perform the connection operations before the Re-connection Utility window appears. 7 Wait until the Windows starts, and then press the Windows key on the computer. 3 If the computer has multiple user accounts, press the < or , key to display the Start menu. 5 Enter wconnect and press the Enter key...
... wireless mouse. Using Your VAIO Computer > Using the Mouse n 37 N To connect the wireless mouse When the supplied wireless mouse does not seem to be working , use the supplied wireless keyboard and follow these steps to perform the connection operations before the Re-connection Utility window appears. 7 Wait until the Windows starts, and then press the Windows key on the computer. 3 If the computer has multiple user accounts, press the < or , key to display the Start menu. 5 Enter wconnect and press the Enter key...
User Guide
Page 46
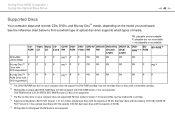
... P P ROM Drive with DVD SuperMulti *1 The DVD±RW/RAM disc drive on the model you purchased. PR: playable and recordable P: playable but not recordable -: not playable or recordable CD- Using Your VAIO Computer > Using the Optical Disc Drive n 46 N Supported Discs Your computer plays and records CDs, DVDs, and Blu-ray Disc™ media, depending on your computer does not support BD-RE Disc media in Version 1.0 format and Blu-ray Disc media...
... P P ROM Drive with DVD SuperMulti *1 The DVD±RW/RAM disc drive on the model you purchased. PR: playable and recordable P: playable but not recordable -: not playable or recordable CD- Using Your VAIO Computer > Using the Optical Disc Drive n 46 N Supported Discs Your computer plays and records CDs, DVDs, and Blu-ray Disc™ media, depending on your computer does not support BD-RE Disc media in Version 1.0 format and Blu-ray Disc media...
User Guide
Page 47
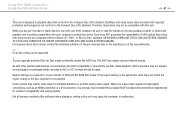
... Disc media playback. Exit all memory-resident utility software before playing or writing a disc as an HDMI connection or a DVI connection, it may not support movie playback on the disc, playback is strongly recommended that are required for use with your VAIO computer, be implemented for optimum compatibility and viewing quality. DualDiscs and some contents of VAIO optical disc drives with the official "CD," "DVD," or "Blu-ray Disc...
... Disc media playback. Exit all memory-resident utility software before playing or writing a disc as an HDMI connection or a DVI connection, it may not support movie playback on the disc, playback is strongly recommended that are required for use with your VAIO computer, be implemented for optimum compatibility and viewing quality. DualDiscs and some contents of VAIO optical disc drives with the official "CD," "DVD," or "Blu-ray Disc...
User Guide
Page 48
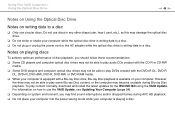
... not be able to play content normally, download and install the latest updates for the WinDVD BD using the VAIO Update. To play DVDs created with the DVD+R DL, DVD-R DL, DVD+R, DVD+RW, DVD-R, DVD-RW, or DVD-RAM media. ❑ When your computer is equipped with the CD-R or CD-RW media. ❑ Some DVD players and computer optical disc drives may not be able to play some Blu...
... not be able to play content normally, download and install the latest updates for the WinDVD BD using the VAIO Update. To play DVDs created with the DVD+R DL, DVD-R DL, DVD+R, DVD+RW, DVD-R, DVD-RW, or DVD-RAM media. ❑ When your computer is equipped with the CD-R or CD-RW media. ❑ Some DVD players and computer optical disc drives may not be able to play some Blu...
User Guide
Page 74
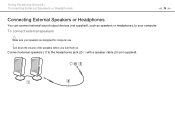
Turn down the volume of the speakers before you turn them on. Using Peripheral Devices > Connecting External Speakers or Headphones n 74 N Connecting External Speakers or Headphones You can connect external sound output devices (not supplied), such as speakers or headphones, to the headphones jack (2) i with a speaker cable (3) (not supplied). To connect external speakers ✍ Make sure your computer. Connect external speakers (1) to your speakers are designed for computer use. !
Turn down the volume of the speakers before you turn them on. Using Peripheral Devices > Connecting External Speakers or Headphones n 74 N Connecting External Speakers or Headphones You can connect external sound output devices (not supplied), such as speakers or headphones, to the headphones jack (2) i with a speaker cable (3) (not supplied). To connect external speakers ✍ Make sure your computer. Connect external speakers (1) to your speakers are designed for computer use. !
User Guide
Page 81
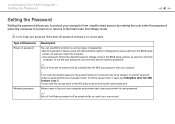
... machine password. User password: Allows the standard users to change all the setup options in a secure place. Customizing Your VAIO Computer > Setting the Password n 81 N Setting the Password Setting the password allows you to protect your computer from Sleep mode. ! Write down the password and keep it in the BIOS setup screen, as well as to start your computer. ! You can reset the user password at the BIOS setup screen by making the user enter the password when the computer is turned on password Windows password...
... machine password. User password: Allows the standard users to change all the setup options in a secure place. Customizing Your VAIO Computer > Setting the Password n 81 N Setting the Password Setting the password allows you to protect your computer from Sleep mode. ! Write down the password and keep it in the BIOS setup screen, as well as to start your computer. ! You can reset the user password at the BIOS setup screen by making the user enter the password when the computer is turned on password Windows password...
User Guide
Page 82
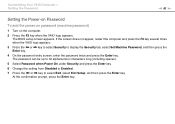
... Enter key. At the confirmation prompt, press the Enter key. The BIOS setup screen appears. The password can be up to 32 alphanumeric characters long (including spaces). 5 Select Password when Power On under Security and press the Enter key. 6 Change the setting from Disabled to Enabled. 7 Press the < or , key to display the Security tab, select Set Machine Password, and then press the Enter key. 4 On the password entry screen, enter the password twice and press the Enter key...
... Enter key. At the confirmation prompt, press the Enter key. The BIOS setup screen appears. The password can be up to 32 alphanumeric characters long (including spaces). 5 Select Password when Power On under Security and press the Enter key. 6 Change the setting from Disabled to Enabled. 7 Press the < or , key to display the Security tab, select Set Machine Password, and then press the Enter key. 4 On the password entry screen, enter the password twice and press the Enter key...
User Guide
Page 84
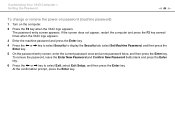
... screen does not appear, restart the computer and press the F2 key several times when the VAIO logo appears. 3 Enter the machine password and press the Enter key. 4 Press the < or , key to select Security to select Exit, select Exit Setup, and then press the Enter key. At the confirmation prompt, press the Enter key. Customizing Your VAIO Computer > Setting the Password n 84 N To change or remove the power-on password (machine password) 1 Turn...
... screen does not appear, restart the computer and press the F2 key several times when the VAIO logo appears. 3 Enter the machine password and press the Enter key. 4 Press the < or , key to select Security to select Exit, select Exit Setup, and then press the Enter key. At the confirmation prompt, press the Enter key. Customizing Your VAIO Computer > Setting the Password n 84 N To change or remove the power-on password (machine password) 1 Turn...
User Guide
Page 85
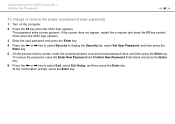
..., restart the computer and press the F2 key several times when the VAIO logo appears. 3 Enter the user password and press the Enter key. 4 Press the < or , key to select Security to select Exit, select Exit Setup, and then press the Enter key. The password entry screen appears. Customizing Your VAIO Computer > Setting the Password n 85 N To change or remove the power-on password (user password) 1 Turn on the computer. 2 Press the F2...
..., restart the computer and press the F2 key several times when the VAIO logo appears. 3 Enter the user password and press the Enter key. 4 Press the < or , key to select Security to select Exit, select Exit Setup, and then press the Enter key. The password entry screen appears. Customizing Your VAIO Computer > Setting the Password n 85 N To change or remove the power-on password (user password) 1 Turn on the computer. 2 Press the F2...
User Guide
Page 90
Upgrading Your VAIO Computer > n 90 N Upgrading Your VAIO Computer Your VAIO computer and memory modules use high precision components and electronic connectors technology. To find out about Your VAIO Computer (page 5). See the specifications to install a new memory module. ❑ You should not touch the connectors or open the memory module compartment cover. The type of module and the amount of your dealer to find the nearest center or agent...
Upgrading Your VAIO Computer > n 90 N Upgrading Your VAIO Computer Your VAIO computer and memory modules use high precision components and electronic connectors technology. To find out about Your VAIO Computer (page 5). See the specifications to install a new memory module. ❑ You should not touch the connectors or open the memory module compartment cover. The type of module and the amount of your dealer to find the nearest center or agent...
User Guide
Page 127
... not work. The business card exchange function is no need to change the SCMS-T settings, follow these steps: ✍ Some VAIO models detect support of the SCMS-T settings. Log onto the computer as a user with a standard user account on a destination device for the device that you want to connect using the Advanced Audio Distribution Profile (A2DP). Check whether your system, click Start, the arrow next to connect the device using...
... not work. The business card exchange function is no need to change the SCMS-T settings, follow these steps: ✍ Some VAIO models detect support of the SCMS-T settings. Log onto the computer as a user with a standard user account on a destination device for the device that you want to connect using the Advanced Audio Distribution Profile (A2DP). Check whether your system, click Start, the arrow next to connect the device using...

User Guide
Page 131
... a disc. The Device Manager window appears with the optical disc drive. ❑ If you may be incompatible with the optical disc drive. Follow these steps: 1 Click Start and Control Panel. 2 Click System and Security. 3 Click System. 4 Click Device Manager in the optical disc drive and damage the drive or cause it to malfunction. ❑ If a region code warning appears, the disc may need to enable the device or reinstall the driver software. 5 Double-click the optical disc drive device to open a list...
... a disc. The Device Manager window appears with the optical disc drive. ❑ If you may be incompatible with the optical disc drive. Follow these steps: 1 Click Start and Control Panel. 2 Click System and Security. 3 Click System. 4 Click Device Manager in the optical disc drive and damage the drive or cause it to malfunction. ❑ If a region code warning appears, the disc may need to enable the device or reinstall the driver software. 5 Double-click the optical disc drive device to open a list...
User Guide
Page 135
..., and the printer cable is securely connected to the ports on the printer and your computer. ❑ Make sure your printer is not functioning after your computer resumes from Sleep mode, then restart the computer. ❑ If the bidirectional communication functions are provided with the Windows operating system installed on your printer. Follow these steps: 1 Click Start and Devices and Printers...
..., and the printer cable is securely connected to the ports on the printer and your computer. ❑ Make sure your printer is not functioning after your computer resumes from Sleep mode, then restart the computer. ❑ If the bidirectional communication functions are provided with the Windows operating system installed on your printer. Follow these steps: 1 Click Start and Devices and Printers...


