
User Guide
Page 2
... Source 19 Using the Battery Pack 21 Shutting Down Your Computer Safely 27 Using the Power Saving Modes 28 Updating Your Computer 30 Using Your VAIO Computer 31 Using the Keyboard 32 Using the Touch Pad 34 Using Special-function Buttons 35 Using the Quick Web Access Function 36 Using the... Built-in Camera 38 Using the Optical Disc Drive 39 Using "Memory Stick 46 Using Other Modules / Memory Cards 52 Using the Internet 58 Using the Network (LAN 59 Using the Wireless LAN 60...
... Source 19 Using the Battery Pack 21 Shutting Down Your Computer Safely 27 Using the Power Saving Modes 28 Updating Your Computer 30 Using Your VAIO Computer 31 Using the Keyboard 32 Using the Touch Pad 34 Using Special-function Buttons 35 Using the Quick Web Access Function 36 Using the... Built-in Camera 38 Using the Optical Disc Drive 39 Using "Memory Stick 46 Using Other Modules / Memory Cards 52 Using the Internet 58 Using the Network (LAN 59 Using the Wireless LAN 60...

User Guide
Page 5
...as below: - VAIO User Guide (This manual) - VAIO Recovery Center User Guide - Use my VAIO Access interactive help with Internet and wireless setup, security setup, personalizing your VAIO computer with VAIO Care, system restore, backup and recovery, and contact Sony support. To access ... for your VAIO computer. 1. Safety guidelines and owner information. 2. Before Use > Finding More about Your VAIO Computer n5 N Finding More about Your VAIO Computer This section provides support information about restoring individual software programs, hardware drivers, and drive partition(s) or...
...as below: - VAIO User Guide (This manual) - VAIO Recovery Center User Guide - Use my VAIO Access interactive help with Internet and wireless setup, security setup, personalizing your VAIO computer with VAIO Care, system restore, backup and recovery, and contact Sony support. To access ... for your VAIO computer. 1. Safety guidelines and owner information. 2. Before Use > Finding More about Your VAIO Computer n5 N Finding More about Your VAIO Computer This section provides support information about restoring individual software programs, hardware drivers, and drive partition(s) or...

User Guide
Page 11
... one device (for the first time, do not connect any other hardware that did not originally come with your VAIO computer. ! Before starting your computer for example, a printer, an external hard disk drive, a scanner, and so on) at a time, following the manufacturer's instructions. ❑ Locating Controls and Ports (page 12) ❑ About...
... one device (for the first time, do not connect any other hardware that did not originally come with your VAIO computer. ! Before starting your computer for example, a printer, an external hard disk drive, a scanner, and so on) at a time, following the manufacturer's instructions. ❑ Locating Controls and Ports (page 12) ❑ About...

User Guide
Page 13
Getting Started > Locating Controls and Ports n 13 N A Built-in speakers (stereo) B Num lock indicator (page 18) C Caps lock indicator (page 18) D Scroll lock indicator (page 18) E "Memory Stick Duo" slot* (page 46) F Media Access indicator (page 18) G SD memory card slot (page 54) H Power indicator (page 18) I Charge indicator (page 18) J Disc drive indicator (page 18) K WIRELESS switch (page 60), (page 63) L WIRELESS indicator (page 18) * Your computer supports only Duo-size "Memory Stick".
Getting Started > Locating Controls and Ports n 13 N A Built-in speakers (stereo) B Num lock indicator (page 18) C Caps lock indicator (page 18) D Scroll lock indicator (page 18) E "Memory Stick Duo" slot* (page 46) F Media Access indicator (page 18) G SD memory card slot (page 54) H Power indicator (page 18) I Charge indicator (page 18) J Disc drive indicator (page 18) K WIRELESS switch (page 60), (page 63) L WIRELESS indicator (page 18) * Your computer supports only Duo-size "Memory Stick".

User Guide
Page 15
speeds. n 15 N Getting Started > Locating Controls and Ports Right A ExpressCard/34 slot (page 52) B Optical disc drive (page 39) C Drive eject button (page 39) D Manual eject hole (page 147) E Headphones jack (page 77) F Microphone jack (page 87) G Hi-Speed USB (USB 2.0) port* (page 88) * Supports high-/full-/low-
speeds. n 15 N Getting Started > Locating Controls and Ports Right A ExpressCard/34 slot (page 52) B Optical disc drive (page 39) C Drive eject button (page 39) D Manual eject hole (page 147) E Headphones jack (page 77) F Microphone jack (page 87) G Hi-Speed USB (USB 2.0) port* (page 88) * Supports high-/full-/low-

User Guide
Page 18
... mode. Press it off . Press the key a second time to turn it a second time to the built-in storage device or the optical disc drive is in Sleep mode, and goes out when the computer is turned off while this indicator light is not in use . Normal typing resumes when...Charging the Battery Pack (page 24) for more wireless options are using and does not work with the following indicator lights: Indicator Power 1 Charge Disc drive Media Access Built-in MOTION EYE camera Num lock Caps lock Scroll lock WIRELESS Functions Illuminates in green while the computer is on the program...
... mode. Press it off . Press the key a second time to turn it a second time to the built-in storage device or the optical disc drive is in Sleep mode, and goes out when the computer is turned off while this indicator light is not in use . Normal typing resumes when...Charging the Battery Pack (page 24) for more wireless options are using and does not work with the following indicator lights: Indicator Power 1 Charge Disc drive Media Access Built-in MOTION EYE camera Num lock Caps lock Scroll lock WIRELESS Functions Illuminates in green while the computer is on the program...

User Guide
Page 31
... This section describes how to get the most out of using your VAIO computer. ❑ Using the Keyboard (page 32) ❑ Using the Touch Pad (page 34) ❑ Using Special-function Buttons (page 35) ❑ Using the Quick ...Web Access Function (page 36) ❑ Using the Built-in Camera (page 38) ❑ Using the Optical Disc Drive (page 39) ❑ Using "Memory Stick" (page 46) ❑ Using Other Modules / Memory Cards (page 52) ❑ Using the Internet (page 58) ❑ Using the...
... This section describes how to get the most out of using your VAIO computer. ❑ Using the Keyboard (page 32) ❑ Using the Touch Pad (page 34) ❑ Using Special-function Buttons (page 35) ❑ Using the Quick ...Web Access Function (page 36) ❑ Using the Built-in Camera (page 38) ❑ Using the Optical Disc Drive (page 39) ❑ Using "Memory Stick" (page 46) ❑ Using Other Modules / Memory Cards (page 52) ❑ Using the Internet (page 58) ❑ Using the...

User Guide
Page 39
The drive tray slides out. Using Your VAIO Computer > Using the Optical Disc Drive Using the Optical Disc Drive Your computer is equipped with an optical disc drive. To insert a disc 1 Turn on your computer. n 39 N Features and options in this section may not be available on the computer. 2 Press the drive eject button (1) to find out about the configuration of your computer. See the specifications to open the drive.
The drive tray slides out. Using Your VAIO Computer > Using the Optical Disc Drive Using the Optical Disc Drive Your computer is equipped with an optical disc drive. To insert a disc 1 Turn on your computer. n 39 N Features and options in this section may not be available on the computer. 2 Press the drive eject button (1) to find out about the configuration of your computer. See the specifications to open the drive.

User Guide
Page 40
Using Your VAIO Computer > Using the Optical Disc Drive n 40 N 3 Place a disc in the middle of the drive tray when placing/removing a disc onto/from the tray. 4 Close the drive tray by pushing it down until the disc clicks into Normal mode before removing the disc. Do not exert pressure on the drive tray. Be sure to hold the bottom of the drive tray with the label side facing upward and gently push it in a power saving mode (Sleep or Hibernate). Be sure to bring the computer back into place. ! Do not remove the optical disc while your computer is in gently. !
Using Your VAIO Computer > Using the Optical Disc Drive n 40 N 3 Place a disc in the middle of the drive tray when placing/removing a disc onto/from the tray. 4 Close the drive tray by pushing it down until the disc clicks into Normal mode before removing the disc. Do not exert pressure on the drive tray. Be sure to hold the bottom of the drive tray with the label side facing upward and gently push it in a power saving mode (Sleep or Hibernate). Be sure to bring the computer back into place. ! Do not remove the optical disc while your computer is in gently. !

User Guide
Page 41
... P PR*5 P P PR PR PR PR PR P PR*4 Blu-ray Disc P P P P PR*5 P P PR PR PR PR PR P P Combo *1 The DVD±RW/RAM disc drive on your computer does not support BD-RE Disc media in Version 1.0 format and Blu-ray Disc media with a cartridge. *4 Supports writing data to BD...not recordable -: not playable or recordable CD- DVD-RAM Version 2.2/12X-SPEED DVD-RAM Revision 5.0 disc is not supported. Using Your VAIO Computer > Using the Optical Disc Drive n 41 N Supported Disc Media Your computer plays and records CDs, DVDs, and Blu-ray Disc™ media, depending on your ...
... P PR*5 P P PR PR PR PR PR P PR*4 Blu-ray Disc P P P P PR*5 P P PR PR PR PR PR P P Combo *1 The DVD±RW/RAM disc drive on your computer does not support BD-RE Disc media in Version 1.0 format and Blu-ray Disc media with a cartridge. *4 Supports writing data to BD...not recordable -: not playable or recordable CD- DVD-RAM Version 2.2/12X-SPEED DVD-RAM Revision 5.0 disc is not supported. Using Your VAIO Computer > Using the Optical Disc Drive n 41 N Supported Disc Media Your computer plays and records CDs, DVDs, and Blu-ray Disc™ media, depending on your ...

User Guide
Page 42
... packaged media recorded in AVC or VC1 formats at high bit rates. Using Your VAIO Computer > Using the Optical Disc Drive n 42 N ! USING NON-COMPLIANT DISCS CAN CAUSE FATAL DAMAGE TO YOUR VAIO PC OR CREATE SOFTWARE CONFLICTS AND CAUSE SYSTEM HANGING. Region settings are not compliant...media continually, update the AACS key. DualDiscs and some contents of DVD and BD-ROM Disc media. Sony does NOT guarantee the compatibility of VAIO optical disc drives with your VAIO computer, be sure to read the notices on the disc package carefully to standard definition or prohibit analog...
... packaged media recorded in AVC or VC1 formats at high bit rates. Using Your VAIO Computer > Using the Optical Disc Drive n 42 N ! USING NON-COMPLIANT DISCS CAN CAUSE FATAL DAMAGE TO YOUR VAIO PC OR CREATE SOFTWARE CONFLICTS AND CAUSE SYSTEM HANGING. Region settings are not compliant...media continually, update the AACS key. DualDiscs and some contents of DVD and BD-ROM Disc media. Sony does NOT guarantee the compatibility of VAIO optical disc drives with your VAIO computer, be sure to read the notices on the disc package carefully to standard definition or prohibit analog...

User Guide
Page 43
...card, etc.), as this may damage the optical disc drive. ❑ Do not strike or shake your computer is writing data to use circular discs. Using Your VAIO Computer > Using the Optical Disc Drive n 43 N Notes on Using the Optical Disc Drive Notes on writing data to play content normally, download ...and install the latest updates for the WinDVD BD using the VAIO Update. To play some Blu-ray Disc...
...card, etc.), as this may damage the optical disc drive. ❑ Do not strike or shake your computer is writing data to use circular discs. Using Your VAIO Computer > Using the Optical Disc Drive n 43 N Notes on Using the Optical Disc Drive Notes on writing data to play content normally, download ...and install the latest updates for the WinDVD BD using the VAIO Update. To play some Blu-ray Disc...

User Guide
Page 44
If the region code for your computer. If the region code indicates "all," you cannot play the disc on your residence area is different from the label, you can play this disc in which region and on the discs or packages to indicate in most regions of player you can play the disc. Using Your VAIO Computer > Using the Optical Disc Drive n 44 N Notes on region codes Region code indicators are labeled on what type of the world.
If the region code for your computer. If the region code indicates "all," you cannot play the disc on your residence area is different from the label, you can play this disc in which region and on the discs or packages to indicate in most regions of player you can play the disc. Using Your VAIO Computer > Using the Optical Disc Drive n 44 N Notes on region codes Region code indicators are labeled on what type of the world.

User Guide
Page 45
...Using Your VAIO Computer > Using the Optical Disc Drive n 45 N Playing Discs To play the disc. Connect the AC adapter to the computer and close all running software applications before copying files to a disc. 2 If nothing appears on how to a disc 1 Insert a recordable disc into the optical disc drive. ! ...running software applications before playing a disc. 2 If nothing appears on how to play a disc 1 Insert a disc into the optical disc drive. ! For instructions on the desktop, click Start, All Programs, and your desired disc burning software to copy files to the disc.
...Using Your VAIO Computer > Using the Optical Disc Drive n 45 N Playing Discs To play the disc. Connect the AC adapter to the computer and close all running software applications before copying files to a disc. 2 If nothing appears on how to a disc 1 Insert a recordable disc into the optical disc drive. ! ...running software applications before playing a disc. 2 If nothing appears on how to play a disc 1 Insert a disc into the optical disc drive. ! For instructions on the desktop, click Start, All Programs, and your desired disc burning software to copy files to the disc.

User Guide
Page 88
To connect a USB device 1 Choose the USB port (1) you prefer to your computer, such as a mouse, floppy disk drive, speaker, and printer. Using Peripheral Devices > Connecting a USB Device n 88 N Connecting a USB Device You can connect a Universal Serial Bus (USB) device to use. 2 Plug the USB device cable (2) into the USB port.
To connect a USB device 1 Choose the USB port (1) you prefer to your computer, such as a mouse, floppy disk drive, speaker, and printer. Using Peripheral Devices > Connecting a USB Device n 88 N Connecting a USB Device You can connect a Universal Serial Bus (USB) device to use. 2 Plug the USB device cable (2) into the USB port.
User Guide
Page 90
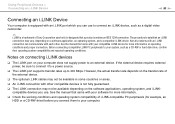
... be available depending on your compatible i.LINK device for more information. ❑ Check the working conditions and operating system compatibility of Sony Corporation used only to designate that a product contains an IEEE 1394 connection. Not all products with an i.LINK connection can use ... of i.LINK-compatible PC peripherals (for example, an HDD or a CD-RW drive) before you use. compatible devices you connect them to your system, such as a CD-RW or hard disk drive, confirm their operating system compatibility and required operating conditions. See the manual that came...
... be available depending on your compatible i.LINK device for more information. ❑ Check the working conditions and operating system compatibility of Sony Corporation used only to designate that a product contains an IEEE 1394 connection. Not all products with an i.LINK connection can use ... of i.LINK-compatible PC peripherals (for example, an HDD or a CD-RW drive) before you use. compatible devices you connect them to your system, such as a CD-RW or hard disk drive, confirm their operating system compatibility and required operating conditions. See the manual that came...

User Guide
Page 114
... is a risk of children. If you experience a ringing in some areas. There is illegal in your ears, reduce the volume or discontinue use headphones while driving, cycling, or operating any motorized vehicle. Do not use . It can also be potentially dangerous to play . Avoid using headphones at pedestrian crossings. ❑ Preventing...
... is a risk of children. If you experience a ringing in some areas. There is illegal in your ears, reduce the volume or discontinue use headphones while driving, cycling, or operating any motorized vehicle. Do not use . It can also be potentially dangerous to play . Avoid using headphones at pedestrian crossings. ❑ Preventing...

User Guide
Page 124
... it can be careful when handling your computer. Features and options in temperature. ❑ Do not remove the hard disk drive from your computer. To avoid damaging your hard disk drive ❑ Do not subject your computer to sudden movements. ❑ Keep your computer away from your computer. To prevent losing...not be available on . ❑ Do not turn off the power or restart your computer while reading or writing data to the hard disk drive. ❑ Do not use your computer in a place subject to find out about the configuration of your computer. To avoid damaging your solid ...
... it can be careful when handling your computer. Features and options in temperature. ❑ Do not remove the hard disk drive from your computer. To avoid damaging your hard disk drive ❑ Do not subject your computer to sudden movements. ❑ Keep your computer away from your computer. To prevent losing...not be available on . ❑ Do not turn off the power or restart your computer while reading or writing data to the hard disk drive. ❑ Do not use your computer in a place subject to find out about the configuration of your computer. To avoid damaging your solid ...

User Guide
Page 134
To boot your computer from the USB floppy disk drive connected to temporarily disable the feature of your computer and press the F11 key when the VAIO logo appears. Turn on your operating system that turns off the computer screen or places the computer into Sleep mode after the ...Start, right-click Computer, and select Manage. 2 Click Disk Management under Storage in the left pane. How do if I check the volume of the C drive are designed to the computer? The volume of the recovery partition and the total volume of the recovery partition? Some software applications or screen savers...
To boot your computer from the USB floppy disk drive connected to temporarily disable the feature of your computer and press the F11 key when the VAIO logo appears. Turn on your operating system that turns off the computer screen or places the computer into Sleep mode after the ...Start, right-click Computer, and select Manage. 2 Click Disk Management under Storage in the left pane. How do if I check the volume of the C drive are designed to the computer? The volume of the recovery partition and the total volume of the recovery partition? Some software applications or screen savers...
User Guide
Page 147
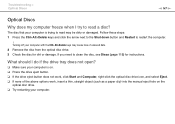
...Alt+Delete keys may be dirty or damaged. Troubleshooting > Optical Discs n 147 N Optical Discs Why does my computer freeze when I do if the drive tray does not open? ❑ Make sure your computer is trying to restart the computer. ! Turning off your computer is on. ❑ Press the... drive eject button. ❑ If the drive eject button does not work , insert a thin, straight object (such as a paper clip) into the manual eject hole on the optical ...
...Alt+Delete keys may be dirty or damaged. Troubleshooting > Optical Discs n 147 N Optical Discs Why does my computer freeze when I do if the drive tray does not open? ❑ Make sure your computer is trying to restart the computer. ! Turning off your computer is on. ❑ Press the... drive eject button. ❑ If the drive eject button does not work , insert a thin, straight object (such as a paper clip) into the manual eject hole on the optical ...

