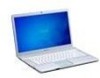

User Guide
Page 3
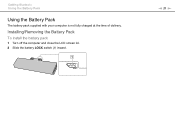
n3 N Precautions 97 Safety Information 98 Care and Maintenance Information 102 Handling Your Computer 103 Handling the LCD Screen 105 Using the Power Source 106 Handling the Built-in Camera 107 Handling Discs 108 Using the Battery Pack 109 Handling "Memory Stick 110 Handling ...
n3 N Precautions 97 Safety Information 98 Care and Maintenance Information 102 Handling Your Computer 103 Handling the LCD Screen 105 Using the Power Source 106 Handling the Built-in Camera 107 Handling Discs 108 Using the Battery Pack 109 Handling "Memory Stick 110 Handling ...
User Guide
Page 14
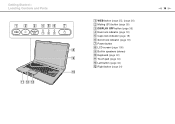
Getting Started > Locating Controls and Ports A WEB button (page 35), (page 36) B Muting (S1) button (page 35) C DISPLAY OFF button (page 35) D Num lock indicator (page 18) E Caps lock indicator (page 18) F Scroll lock indicator (page 18) G Power button H LCD screen (page 105) I Built-in speakers (stereo) J Keyboard (page 32) K Touch pad (page 34) L Left button (page 34) M Right button (page 34) n 14 N
Getting Started > Locating Controls and Ports A WEB button (page 35), (page 36) B Muting (S1) button (page 35) C DISPLAY OFF button (page 35) D Num lock indicator (page 18) E Caps lock indicator (page 18) F Scroll lock indicator (page 18) G Power button H LCD screen (page 105) I Built-in speakers (stereo) J Keyboard (page 32) K Touch pad (page 34) L Left button (page 34) M Right button (page 34) n 14 N
User Guide
Page 21
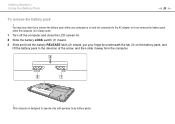
Installing/Removing the Battery Pack To install the battery pack 1 Turn off the computer and close the LCD screen lid. 2 Slide the battery LOCK switch (1) inward. n 21 N Getting Started > Using the Battery Pack Using the Battery Pack The battery pack supplied with your computer is not fully charged at the time of delivery.
Installing/Removing the Battery Pack To install the battery pack 1 Turn off the computer and close the LCD screen lid. 2 Slide the battery LOCK switch (1) inward. n 21 N Getting Started > Using the Battery Pack Using the Battery Pack The battery pack supplied with your computer is not fully charged at the time of delivery.
User Guide
Page 23
This computer is in Sleep mode. 1 Turn off the computer and close the LCD screen lid. 2 Slide the battery LOCK switch (1) inward. 3 Slide and hold the battery RELEASE latch (2) inward, put your fingertip underneath the tab (3) on the battery pack, ... on and not connected to the AC adapter or if you remove the battery pack while the computer is designed to operate only with genuine Sony battery packs. Getting Started > Using the Battery Pack n 23 N To remove the battery pack !
This computer is in Sleep mode. 1 Turn off the computer and close the LCD screen lid. 2 Slide the battery LOCK switch (1) inward. 3 Slide and hold the battery RELEASE latch (2) inward, put your fingertip underneath the tab (3) on the battery pack, ... on and not connected to the AC adapter or if you remove the battery pack while the computer is designed to operate only with genuine Sony battery packs. Getting Started > Using the Battery Pack n 23 N To remove the battery pack !
User Guide
Page 26
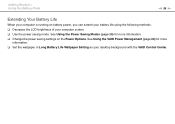
See Using the VAIO Power Management (page 88) for more information. ❑ Set the wallpaper in Long Battery Life Wallpaper Setting as your computer screen. ❑ Use the power saving mode. See Using the Power Saving Modes (page 28) for more information. ❑ Change the... power saving settings on battery power, you can extend your battery life using the following methods. ❑ Decrease the LCD brightness of your desktop background with the VAIO...
See Using the VAIO Power Management (page 88) for more information. ❑ Set the wallpaper in Long Battery Life Wallpaper Setting as your computer screen. ❑ Use the power saving mode. See Using the Power Saving Modes (page 28) for more information. ❑ Change the... power saving settings on battery power, you can extend your battery life using the following methods. ❑ Decrease the LCD brightness of your desktop background with the VAIO...
User Guide
Page 28
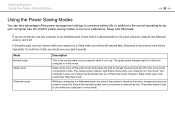
... on the built-in Sleep mode, you do not intend to conserve battery life. Your computer comes out of the system is turned off the LCD screen and places the built-in storage device(s) and the CPU into Hibernate mode or turn it is in Hibernate mode, the state of Sleep mode...
... on the built-in Sleep mode, you do not intend to conserve battery life. Your computer comes out of the system is turned off the LCD screen and places the built-in storage device(s) and the CPU into Hibernate mode or turn it is in Hibernate mode, the state of Sleep mode...
User Guide
Page 32
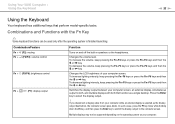
...the Fn+F6 keys and then the M or , key. Changes the LCD brightness of your computer while an external display is finished launching. Switches the display output between your computer. Using Your VAIO Computer > Using the Keyboard n 32 N Using the Keyboard Your keyboard has... additional keys that function as the display output destination, the computer screen goes blank. Combinations and Functions with both that perform model-...
...the Fn+F6 keys and then the M or , key. Changes the LCD brightness of your computer while an external display is finished launching. Switches the display output between your computer. Using Your VAIO Computer > Using the Keyboard n 32 N Using the Keyboard Your keyboard has... additional keys that function as the display output destination, the computer screen goes blank. Combinations and Functions with both that perform model-...

User Guide
Page 97
... N Precautions This section describes safety guidelines and precautions to help you protect your VAIO computer from potential damage. ❑ Safety Information (page 98) ❑ Care and Maintenance Information (page 102) ❑ Handling Your Computer (page 103) ❑ Handling the LCD Screen (page 105) ❑ Using the Power Source (page 106) ❑ Handling the...
... N Precautions This section describes safety guidelines and precautions to help you protect your VAIO computer from potential damage. ❑ Safety Information (page 98) ❑ Care and Maintenance Information (page 102) ❑ Handling Your Computer (page 103) ❑ Handling the LCD Screen (page 105) ❑ Using the Power Source (page 106) ❑ Handling the...

User Guide
Page 102
LCD Screen Use a soft, dry cloth to wipe the surface of the disc from the center out. ❑ If the disc is badly soiled, moisten a... cloth with a soft dry cloth. Do not use a soft cloth to wipe the surface from the center out. Rubbing the surface could damage the screen. Built-in camera with a dry soft cloth. Wipe off with a mild detergent solution. Discs ❑ Proper care of the built-in Camera Clean...edges and use solvents (such as benzine, thinner, alcohol, commercially available cleaners, or anti-static spray) which may damage the finish of the LCD screen.
LCD Screen Use a soft, dry cloth to wipe the surface of the disc from the center out. ❑ If the disc is badly soiled, moisten a... cloth with a soft dry cloth. Do not use a soft cloth to wipe the surface from the center out. Rubbing the surface could damage the screen. Built-in camera with a dry soft cloth. Wipe off with a mild detergent solution. Discs ❑ Proper care of the built-in Camera Clean...edges and use solvents (such as benzine, thinner, alcohol, commercially available cleaners, or anti-static spray) which may damage the finish of the LCD screen.

User Guide
Page 104
... sensitive to pressure or added stress, and exerting pressure may be sure to hold the base with one hand and gently lift the LCD screen lid with both hands. ❑ Use a carrying case specially designed to malfunction. To carry the computer with the lid open the ...computer, hold the computer with the other. The LCD screen may damage the screen or cause it to carry your computer. Precautions > Handling Your Computer n 104 N ❑ To avoid losing data when your computer...
... sensitive to pressure or added stress, and exerting pressure may be sure to hold the base with one hand and gently lift the LCD screen lid with both hands. ❑ Use a carrying case specially designed to malfunction. To carry the computer with the lid open the ...computer, hold the computer with the other. The LCD screen may damage the screen or cause it to carry your computer. Precautions > Handling Your Computer n 104 N ❑ To avoid losing data when your computer...

User Guide
Page 105
... is normal and does not indicate a malfunction. ❑ The LCD screen is not a malfunction. Sony assumes no liability for an extended period of the LCD screen or exert pressure on the LCD screen. This could damage the LCD screen. Precautions > Handling the LCD Screen n 105 N Handling the LCD Screen ❑ Do not leave the LCD screen facing the sun. When the computer returns to normal...
... is normal and does not indicate a malfunction. ❑ The LCD screen is not a malfunction. Sony assumes no liability for an extended period of the LCD screen or exert pressure on the LCD screen. This could damage the LCD screen. Precautions > Handling the LCD Screen n 105 N Handling the LCD Screen ❑ Do not leave the LCD screen facing the sun. When the computer returns to normal...

User Guide
Page 115
To turn on but my screen remains blank? ❑ Make sure the LCD backlight of unsaved data. Unplug the AC adapter and leave the computer for more than four seconds to close the application window. Turning off your ... the Shut down your computer is turned on. If the Windows Security window appears, click Restart. Then plug the AC adapter and turn on the LCD backlight, see Using Special-function Buttons (page 35). ❑ Press the Alt+F4 keys several times to shut down button, and Restart to restart your...
To turn on but my screen remains blank? ❑ Make sure the LCD backlight of unsaved data. Unplug the AC adapter and leave the computer for more than four seconds to close the application window. Turning off your ... the Shut down your computer is turned on. If the Windows Security window appears, click Restart. Then plug the AC adapter and turn on the LCD backlight, see Using Special-function Buttons (page 35). ❑ Press the Alt+F4 keys several times to shut down button, and Restart to restart your...

User Guide
Page 135
... pack is installed properly and is charged. See Using the Battery Pack (page 21) for more information. ❑ The LCD backlight of your computer is running on the LCD backlight, see Using Special-function Buttons (page 35). See Using the Power Saving Modes (page 28) for more information.... ❑ If the display output is in LCD (Video) Sleep mode, press any key to the external display, press the Fn+F7 keys. Troubleshooting > Display n 135 N Display Why did my screen go blank? ❑ Your computer screen may have been turned off.
... pack is installed properly and is charged. See Using the Battery Pack (page 21) for more information. ❑ The LCD backlight of your computer is running on the LCD backlight, see Using Special-function Buttons (page 35). See Using the Power Saving Modes (page 28) for more information.... ❑ If the display output is in LCD (Video) Sleep mode, press any key to the external display, press the Fn+F7 keys. Troubleshooting > Display n 135 N Display Why did my screen go blank? ❑ Your computer screen may have been turned off.

User Guide
Page 137
... memory available. What should I do if my screen is disconnected, you can check the total amount of your computer. The displayed value may be different from the actual amount of the LCD screen. Right-click on your computer screen. Press the Fn+F6 keys to change the ...display output. Alternatively, you cannot display a video on the desktop, select Screen resolution, and click Advanced Settings and the Adapter tab.
... memory available. What should I do if my screen is disconnected, you can check the total amount of your computer. The displayed value may be different from the actual amount of the LCD screen. Right-click on your computer screen. Press the Fn+F6 keys to change the ...display output. Alternatively, you cannot display a video on the desktop, select Screen resolution, and click Advanced Settings and the Adapter tab.


