
User Guide
Page 4
n4 N Precautions ...92 On Handling the LCD Screen ...93 On Using the Power Source ...94 On Handling Your Computer...95 On Handling Floppy Disks ...97 On Handling Discs ...98 On Using the Battery Pack...99 On Using Headphones...100 On Handling Memory Stick Media...101 On Handling the Hard Disk ...102 On Updating Your Computer ...103 Troubleshooting ...104 Computer ...105 System Security ...112 Battery...113 Internet ...115 Networking ...117 Optical Discs ...120 Display ...124 Printing ...128 Microphone ...129 Mouse ...130 Speakers ...131 Touch Pad...132
n4 N Precautions ...92 On Handling the LCD Screen ...93 On Using the Power Source ...94 On Handling Your Computer...95 On Handling Floppy Disks ...97 On Handling Discs ...98 On Using the Battery Pack...99 On Using Headphones...100 On Handling Memory Stick Media...101 On Handling the Hard Disk ...102 On Updating Your Computer ...103 Troubleshooting ...104 Computer ...105 System Security ...112 Battery...113 Internet ...115 Networking ...117 Optical Discs ...120 Display ...124 Printing ...128 Microphone ...129 Mouse ...130 Speakers ...131 Touch Pad...132

User Guide
Page 6
.... ! Printed Documentation ❑ Welcome mat - n6 N Before Use Before Use Congratulations on your purchase of this manual may look slightly different from those of your VAIO computer. Sony has combined leading-edge technology in this Sony VAIO® computer, and welcome to read on -screen User Guide.
.... ! Printed Documentation ❑ Welcome mat - n6 N Before Use Before Use Congratulations on your purchase of this manual may look slightly different from those of your VAIO computer. Sony has combined leading-edge technology in this Sony VAIO® computer, and welcome to read on -screen User Guide.

User Guide
Page 7
...Sony online support Web site at: http://esupport.sony.com/EN/VAIO/ for customers in USA, http://www.sony.ca/support for customers in Canada, http://esupport.sony.com/ES/VAIO/ for customers in Spanish speaking Latin American countries or areas, or http://esupport.sony.com/ES/VAIO.../BR/ for customers in Brazil. ❑ VAIO...partition(s) or your VAIO computer. Provides ...
...Sony online support Web site at: http://esupport.sony.com/EN/VAIO/ for customers in USA, http://www.sony.ca/support for customers in Canada, http://esupport.sony.com/ES/VAIO/ for customers in Spanish speaking Latin American countries or areas, or http://esupport.sony.com/ES/VAIO.../BR/ for customers in Brazil. ❑ VAIO...partition(s) or your VAIO computer. Provides ...

User Guide
Page 8
...find the on-screen User Guide, warranty information, other Internet sites you will find the answers you need. Choose from Microsoft and Sony. ❑ VAIO Sites Contains links to other VAIO documents, and system and software information for your computer. ❑ VAIO Support Access ...interactive help in the form of VAIO tutorials, an escalation page containing support and contact...
...find the on-screen User Guide, warranty information, other Internet sites you will find the answers you need. Choose from Microsoft and Sony. ❑ VAIO Sites Contains links to other VAIO documents, and system and software information for your computer. ❑ VAIO Support Access ...interactive help in the form of VAIO tutorials, an escalation page containing support and contact...

User Guide
Page 10
... adds to find the best position. Choose a location where windows and lights do not create glare and reflection on the display. Make sure the display screen is at a comfortable viewing distance. Adjust the brightness setting of the display to avoid bright spots on the display. When using an external display, set...
... adds to find the best position. Choose a location where windows and lights do not create glare and reflection on the display. Make sure the display screen is at a comfortable viewing distance. Adjust the brightness setting of the display to avoid bright spots on the display. When using an external display, set...

User Guide
Page 12
... ports shown on the following pages. Front A Num lock indicator (page 17) B Caps lock indicator (page 17) C Scroll lock indicator (page 17) D Power button E LCD screen (page 93) F Keyboard (page 27) G Touch pad (page 29) H Power indicator (page 17) I Battery indicator (page 17) J Hard disk drive indicator (page 17) K WLAN (Wireless...
... ports shown on the following pages. Front A Num lock indicator (page 17) B Caps lock indicator (page 17) C Scroll lock indicator (page 17) D Power button E LCD screen (page 93) F Keyboard (page 27) G Touch pad (page 29) H Power indicator (page 17) I Battery indicator (page 17) J Hard disk drive indicator (page 17) K WLAN (Wireless...

User Guide
Page 20
Installing the Battery Pack To install the battery pack 1 Turn off the computer and close the LCD screen lid. 2 Slide the battery lock switch (1) to the UNLOCK position. 3 Slide the battery pack into the battery compartment until it clicks into place. Using the Battery Pack The battery pack supplied with your computer is not fully charged at the time of purchase. n 20 N Getting Started
Installing the Battery Pack To install the battery pack 1 Turn off the computer and close the LCD screen lid. 2 Slide the battery lock switch (1) to the UNLOCK position. 3 Slide the battery pack into the battery compartment until it clicks into place. Using the Battery Pack The battery pack supplied with your computer is not fully charged at the time of purchase. n 20 N Getting Started

User Guide
Page 24
To remove the battery pack 1 Turn off the computer and close the LCD screen lid. 2 Slide the battery lock switch (1) to the AC adapter or if you remove the battery pack while the computer is in Sleep mode. You may lose data if you remove the battery pack while your computer is on and not connected to the UNLOCK position. 3 Slide and hold the battery release latch (2) and slide the battery pack away from the computer. n 24 N Getting Started Removing the Battery Pack !
To remove the battery pack 1 Turn off the computer and close the LCD screen lid. 2 Slide the battery lock switch (1) to the AC adapter or if you remove the battery pack while the computer is in Sleep mode. You may lose data if you remove the battery pack while your computer is on and not connected to the UNLOCK position. 3 Slide and hold the battery release latch (2) and slide the battery pack away from the computer. n 24 N Getting Started Removing the Battery Pack !

User Guide
Page 27
... the built-in speakers and the headphones. To increase the volume, press Fn+F4 and then M or ,, or keep pressing Fn+F4. n 27 N Using Your VAIO Computer Using the Keyboard Your keyboard is very similar to a desktop computer keyboard, but has additional keys that perform model-specific tasks. Combinations/Feature Fn...
... the built-in speakers and the headphones. To increase the volume, press Fn+F4 and then M or ,, or keep pressing Fn+F4. n 27 N Using Your VAIO Computer Using the Keyboard Your keyboard is very similar to a desktop computer keyboard, but has additional keys that perform model-specific tasks. Combinations/Feature Fn...

User Guide
Page 29
n 29 N Using Your VAIO Computer Action Point Click Double-click Right-click Drag Scroll Description Slide your finger on the touch pad while pressing the left button. Press the ... scroll feature). Press the right button (4) once. Press the left button twice. Slide your finger on the touch pad (1) to place the pointer (2) on the screen using the touch pad. In many applications, this action displays a shortcut menu. Slide your finger along the right edge of the touch pad to scroll...
n 29 N Using Your VAIO Computer Action Point Click Double-click Right-click Drag Scroll Description Slide your finger on the touch pad while pressing the left button. Press the ... scroll feature). Press the right button (4) once. Press the left button twice. Slide your finger on the touch pad (1) to place the pointer (2) on the screen using the touch pad. In many applications, this action displays a shortcut menu. Slide your finger along the right edge of the touch pad to scroll...

User Guide
Page 35
n 35 N Using Your VAIO Computer Notes on writing data to a disc ❑ Use only Sony recommended software, which is at least 50 percent charged. ❑ Make sure you use the same disc burning software to add data to a disc. To ... to burn discs, make sure you exit and close the session before you burned with your computer while writing data to a disc. ❑ Deactivate the screen saver and exit anti-virus software before writing data to a disc. ❑ Do not use circular discs. Use of different disc burning software for additional...
n 35 N Using Your VAIO Computer Notes on writing data to a disc ❑ Use only Sony recommended software, which is at least 50 percent charged. ❑ Make sure you use the same disc burning software to add data to a disc. To ... to burn discs, make sure you exit and close the session before you burned with your computer while writing data to a disc. ❑ Deactivate the screen saver and exit anti-virus software before writing data to a disc. ❑ Do not use circular discs. Use of different disc burning software for additional...
User Guide
Page 37
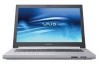
... to a disc ! Do not strike or shake your computer while writing data to a disc. 1 Insert a disc into the optical disc drive. 2 If nothing appears on -screen instructions until the empty disc folder appears. 2 Open the folder that contains the file(s) you want to copy and drag them to select an option.... Copying Files to CDs To copy files to play an audio CD 1 Insert a disc into the optical disc drive. n 37 N Using Your VAIO Computer Playing CDs To play the CD.
... to a disc ! Do not strike or shake your computer while writing data to a disc. 1 Insert a disc into the optical disc drive. 2 If nothing appears on -screen instructions until the empty disc folder appears. 2 Open the folder that contains the file(s) you want to copy and drag them to select an option.... Copying Files to CDs To copy files to play an audio CD 1 Insert a disc into the optical disc drive. n 37 N Using Your VAIO Computer Playing CDs To play the CD.

User Guide
Page 51
... a telephone cable 1 Plug one end of these connections may result in excess electrical current and could cause a malfunction in the internal modem. n 51 N Using Your VAIO Computer Using the Internet Setting Up a Dial-up Internet Connection Before you can connect to the Internet, you need to connect your telephone cable connection... through a splitter, the modem or connected device may not work with a telephone cable (not supplied). Some of the phone cable (1) into the modem port on -screen instructions.
... a telephone cable 1 Plug one end of these connections may result in excess electrical current and could cause a malfunction in the internal modem. n 51 N Using Your VAIO Computer Using the Internet Setting Up a Dial-up Internet Connection Before you can connect to the Internet, you need to connect your telephone cable connection... through a splitter, the modem or connected device may not work with a telephone cable (not supplied). Some of the phone cable (1) into the modem port on -screen instructions.

User Guide
Page 55
... your model supports the Bluetooth functionality and/or the IEEE 802.11a/b/g standard. You cannot select the 5 GHz bandwidth, which is used for the IEEE 802.11a standard, on ad-hoc networks. 1 Turn on -screen instructions. * See the online Specifications to see whether your desired wireless option(s) and click OK. 2 Click Start... switch. The Wireless LAN indicator lights up a connection or network window appears. 5 Select an option to display the Wireless Device Switch window. n 55 N Using Your VAIO Computer To communicate without an access point (ad-hoc) ! The Set up .
... your model supports the Bluetooth functionality and/or the IEEE 802.11a/b/g standard. You cannot select the 5 GHz bandwidth, which is used for the IEEE 802.11a standard, on ad-hoc networks. 1 Turn on -screen instructions. * See the online Specifications to see whether your desired wireless option(s) and click OK. 2 Click Start... switch. The Wireless LAN indicator lights up a connection or network window appears. 5 Select an option to display the Wireless Device Switch window. n 55 N Using Your VAIO Computer To communicate without an access point (ad-hoc) ! The Set up .

User Guide
Page 57
... Control Panel. 4 Click View network status and tasks under Network and Internet. 5 Click Manage wireless networks. 6 Click Add. 7 Follow the on-screen instructions. * See the online Specifications to see whether your access point for more information. 2 Turn on the taskbar to display the Wireless Device Switch ...window. n 57 N Using Your VAIO Computer To connect to a wireless network 1 Make sure an access point is set up . The Wireless LAN indicator lights up . Turning off...
... Control Panel. 4 Click View network status and tasks under Network and Internet. 5 Click Manage wireless networks. 6 Click Add. 7 Follow the on-screen instructions. * See the online Specifications to see whether your access point for more information. 2 Turn on the taskbar to display the Wireless Device Switch ...window. n 57 N Using Your VAIO Computer To connect to a wireless network 1 Make sure an access point is set up . The Wireless LAN indicator lights up . Turning off...

User Guide
Page 60
... after connecting all other end into an AC outlet. 2 Plug the display cable (2) (not supplied) into your computer. Connected external displays are used as secondary screens. n 60 N Using Peripheral Devices Connecting an External Display You can connect an external display (not supplied) to your computer. Connecting a Computer Display You can connect...
... after connecting all other end into an AC outlet. 2 Plug the display cable (2) (not supplied) into your computer. Connected external displays are used as secondary screens. n 60 N Using Peripheral Devices Connecting an External Display You can connect an external display (not supplied) to your computer. Connecting a Computer Display You can connect...

User Guide
Page 63
... 1 Right-click on the desktop and select Personalize from the shortcut menu. 2 Click Display Settings. The Display Settings window appears. 3 Follow the on-screen instructions to change the settings. ✍ You may not be used as the primary monitor when an external display (desktop monitor, etc.) is connected to...n 63 N Using Peripheral Devices Selecting Display Modes You can select which display to be able to display the same contents on your computer screen and the external display or projector at the same time, see Using the Multiple Monitors Function (page 64) for more information.
... 1 Right-click on the desktop and select Personalize from the shortcut menu. 2 Click Display Settings. The Display Settings window appears. 3 Follow the on-screen instructions to change the settings. ✍ You may not be used as the primary monitor when an external display (desktop monitor, etc.) is connected to...n 63 N Using Peripheral Devices Selecting Display Modes You can select which display to be able to display the same contents on your computer screen and the external display or projector at the same time, see Using the Multiple Monitors Function (page 64) for more information.
User Guide
Page 64
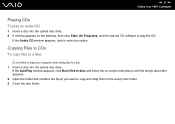
... different colors on each display. Set fewer colors or a lower resolution for each display, do not expand a single window across separate displays. otherwise your computer screen and the external display can move the cursor from one display to drag objects, such as a single desktop. For example, if you to the other...
... different colors on each display. Set fewer colors or a lower resolution for each display, do not expand a single window across separate displays. otherwise your computer screen and the external display can move the cursor from one display to drag objects, such as a single desktop. For example, if you to the other...

User Guide
Page 65
n 65 N Using Peripheral Devices To select the Multiple Monitors mode 1 Right-click on -screen instructions to change the settings. ✍ Additionally, you can set the display colors and resolution for each display and customize the Multiple Monitors mode. The Display Settings window appears. 3 Follow the on the desktop and select Personalize from the shortcut menu. 2 Click Display Settings.
n 65 N Using Peripheral Devices To select the Multiple Monitors mode 1 Right-click on -screen instructions to change the settings. ✍ Additionally, you can set the display colors and resolution for each display and customize the Multiple Monitors mode. The Display Settings window appears. 3 Follow the on the desktop and select Personalize from the shortcut menu. 2 Click Display Settings.

User Guide
Page 75
... from other standard users to start your password and keep it , a password reset fee will allow for other people. n 75 N Customizing Your VAIO Computer Setting the Password Use one of the BIOS functions to forget the password. To set the user password, you to be charged, and your... from unauthorized access. Make sure not to set the machine password. ! The power-on password, you forget the power-on the BIOS setup screen, as well as starting the computer. Write down your computer without entering the password. If you cannot start your computer. The machine password is...
... from other standard users to start your password and keep it , a password reset fee will allow for other people. n 75 N Customizing Your VAIO Computer Setting the Password Use one of the BIOS functions to forget the password. To set the user password, you to be charged, and your... from unauthorized access. Make sure not to set the machine password. ! The power-on password, you forget the power-on the BIOS setup screen, as well as starting the computer. Write down your computer without entering the password. If you cannot start your computer. The machine password is...

