User Guide
Page 9
...updates and maintenance programs from the following categories to find the on how to do it step by step. Choose from Microsoft and Sony. ❑ VAIO Sites Contains links to other VAIO documents, and system and software information for you or show you need. It... information, other Internet sites you might find interesting and useful. ❑ VAIO Tutorials Sony provides guided help you accomplish a task. Run utilities that help tutorials that include VAIO Media Setup and Windows Network and Sharing Center, and access to wireless tutorials. ❑ Security Keep your data...
...updates and maintenance programs from the following categories to find the on how to do it step by step. Choose from Microsoft and Sony. ❑ VAIO Sites Contains links to other VAIO documents, and system and software information for you or show you need. It... information, other Internet sites you might find interesting and useful. ❑ VAIO Tutorials Sony provides guided help you accomplish a task. Run utilities that help tutorials that include VAIO Media Setup and Windows Network and Sharing Center, and access to wireless tutorials. ❑ Security Keep your data...

User Guide
Page 12
Choose a location where windows and lights do not cause glare and reflection on the display. When using an external display, set the display at eye level or slightly lower ...
Choose a location where windows and lights do not cause glare and reflection on the display. When using an external display, set the display at eye level or slightly lower ...

User Guide
Page 31
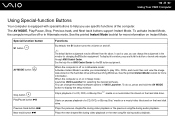
n 31 N Using Your VAIO Computer Using the Keyboard Your keyboard is very similar to a desktop computer keyboard, but has additional keys that perform model-specific tasks. Adjusts the LCD brightness of your computer screen. Combinations and Functions with the Fn Key ✍ Some keyboard functions can be used only after the operating system finished launching. To increase lighting intensity, press Fn+F6 and then M or ,, or keep pressing Fn+F6. Combinations/Feature Fn + % (F2): speaker switch Fn + 8 (F5/F6): brightness control Fn + /T (F7): display output Fn + (F10): zoom Functions ...
n 31 N Using Your VAIO Computer Using the Keyboard Your keyboard is very similar to a desktop computer keyboard, but has additional keys that perform model-specific tasks. Adjusts the LCD brightness of your computer screen. Combinations and Functions with the Fn Key ✍ Some keyboard functions can be used only after the operating system finished launching. To increase lighting intensity, press Fn+F6 and then M or ,, or keep pressing Fn+F6. Combinations/Feature Fn + % (F2): speaker switch Fn + 8 (F5/F6): brightness control Fn + /T (F7): display output Fn + (F10): zoom Functions ...
User Guide
Page 34
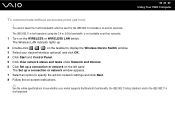
...Previous track button . In such a case, you use specific functions of the computer. See the help you can change the assignment in the window for changing the S1 button assignment. Next track button > Functions By default, the S1 button turns the volume on and off. ✍ ...Your VAIO Computer Using Special-function Buttons Your computer is equipped with special buttons to help file on the hard disk drive without launching Windows. To activate Instant Mode, the computer must be different from the above. See the printed Instant Mode booklet for more information on...
...Previous track button . In such a case, you use specific functions of the computer. See the help you can change the assignment in the window for changing the S1 button assignment. Next track button > Functions By default, the S1 button turns the volume on and off. ✍ ...Your VAIO Computer Using Special-function Buttons Your computer is equipped with special buttons to help file on the hard disk drive without launching Windows. To activate Instant Mode, the computer must be different from the above. See the printed Instant Mode booklet for more information on...

User Guide
Page 36
... You cannot operate the built-in MOTION EYE camera with a built-in MOTION EYE camera, so the computer is equipped with the Microsoft Windows MovieMaker software. The built-in a dark place, click Start, All Programs, VAIO Camera Capture Utility, and VAIO Camera Capture Utility to display ... Click the Camera button to start VAIO Camera Capture Utility. This is using the camera, exit the application before using such software. The viewer window may show some noise, for a video conference using the built-in MOTION EYE camera. When capturing an image in MOTION EYE camera adds video...
... You cannot operate the built-in MOTION EYE camera with a built-in MOTION EYE camera, so the computer is equipped with the Microsoft Windows MovieMaker software. The built-in a dark place, click Start, All Programs, VAIO Camera Capture Utility, and VAIO Camera Capture Utility to display ... Click the Camera button to start VAIO Camera Capture Utility. This is using the camera, exit the application before using such software. The viewer window may show some noise, for a video conference using the built-in MOTION EYE camera. When capturing an image in MOTION EYE camera adds video...

User Guide
Page 44
n 44 N Using Your VAIO Computer Playing CDs To play the CD. If the Audio CD window appears, click to a disc ! Copying Files to CDs To copy files to select an option. Do not strike or shake your computer while writing data ... contains the file(s) you want to copy and drag them to play an audio CD 1 Insert a disc into the optical disc drive. If the AutoPlay window appears, click Burn files to disc and follow the on the desktop, then click Start, All Programs, and the desired CD software to the empty...
n 44 N Using Your VAIO Computer Playing CDs To play the CD. If the Audio CD window appears, click to a disc ! Copying Files to CDs To copy files to select an option. Do not strike or shake your computer while writing data ... contains the file(s) you want to copy and drag them to play an audio CD 1 Insert a disc into the optical disc drive. If the AutoPlay window appears, click Burn files to disc and follow the on the desktop, then click Start, All Programs, and the desired CD software to the empty...

User Guide
Page 49
...the ExpressCard module while your computer is off, skip steps 1 to 7. 1 Double-click the Safely Remove Hardware icon on . The Safely Remove Hardware window appears. 2 Select the hardware you want to pop it out. 9 Gently take hold of the ExpressCard module and pull it is not removed properly,... the taskbar. To remove an ExpressCard module ✍ To remove an ExpressCard module when your system may not work properly. The Stop a Hardware device window appears. 4 Confirm that the device can be safely removed from the system. 5 Click OK. A message appears stating it out of the slot....
...the ExpressCard module while your computer is off, skip steps 1 to 7. 1 Double-click the Safely Remove Hardware icon on . The Safely Remove Hardware window appears. 2 Select the hardware you want to pop it out. 9 Gently take hold of the ExpressCard module and pull it is not removed properly,... the taskbar. To remove an ExpressCard module ✍ To remove an ExpressCard module when your system may not work properly. The Stop a Hardware device window appears. 4 Confirm that the device can be safely removed from the system. 5 Click OK. A message appears stating it out of the slot....

User Guide
Page 52
..., Computer, and double-click the Memory Stick media icon. ! If nothing appears on the Memory Stick media 1 Click Start and Computer to open the Computer window. 2 Double-click the Memory Stick media icon to hold the Memory Stick media with the arrow facing upward and pointing toward the Memory Stick slot...
..., Computer, and double-click the Memory Stick media icon. ! If nothing appears on the Memory Stick media 1 Click Start and Computer to open the Computer window. 2 Double-click the Memory Stick media icon to hold the Memory Stick media with the arrow facing upward and pointing toward the Memory Stick slot...

User Guide
Page 53
... slot until it may change. This could cause a malfunction. 1 Carefully slide the Memory Stick media into place. 2 Click Start and Computer to open the Computer window. 3 Right-click the Memory Stick media icon and select Format. 4 Click Restore device defaults. ! Do not select NTFS from the slot while formatting the media...
... slot until it may change. This could cause a malfunction. 1 Carefully slide the Memory Stick media into place. 2 Click Start and Computer to open the Computer window. 3 Right-click the Memory Stick media icon and select Format. 4 Click Restore device defaults. ! Do not select NTFS from the slot while formatting the media...

User Guide
Page 60
n 60 N Using Your VAIO Computer To set up a dial-up connection to the Internet 1 Click Start and Control Panel. 2 Click Connect to the Internet window appears. 3 Click Dial-up. 4 Follow the on-screen instructions. The Connect to the Internet under Network and Internet.
n 60 N Using Your VAIO Computer To set up a dial-up connection to the Internet 1 Click Start and Control Panel. 2 Click Connect to the Internet window appears. 3 Click Dial-up. 4 Follow the on-screen instructions. The Connect to the Internet under Network and Internet.
User Guide
Page 64
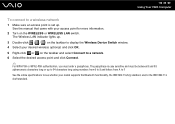
... OK. 4 Click Start and Control Panel. 5 Click View network status and tasks under Network and Internet. 6 Click Set up a connection or network window appears. 7 Select an option to specify the ad-hoc network settings and click Next. 8 Follow the on the left pane. The Set up a connection... or network on -screen instructions. ✍ See the online specifications to display the Wireless Device Switch window. 3 Select your model supports the Bluetooth functionality, the IEEE 802.11a/b/g standard, and/or the IEEE 802.11n draft standard. The IEEE 802...
... OK. 4 Click Start and Control Panel. 5 Click View network status and tasks under Network and Internet. 6 Click Set up a connection or network window appears. 7 Select an option to specify the ad-hoc network settings and click Next. 8 Follow the on the left pane. The Set up a connection... or network on -screen instructions. ✍ See the online specifications to display the Wireless Device Switch window. 3 Select your model supports the Bluetooth functionality, the IEEE 802.11a/b/g standard, and/or the IEEE 802.11n draft standard. The IEEE 802...
User Guide
Page 66
.../b/g standard, and/or the IEEE 802.11n draft standard. The passphrase is set up . 3 Double-click ( / ) on the taskbar to display the Wireless Device Switch window. 4 Select your desired wireless option(s) and click OK. 5 Right-click or on the taskbar and select Connect to see whether your access point for more...
.../b/g standard, and/or the IEEE 802.11n draft standard. The passphrase is set up . 3 Double-click ( / ) on the taskbar to display the Wireless Device Switch window. 4 Select your desired wireless option(s) and click OK. 5 Right-click or on the taskbar and select Connect to see whether your access point for more...
User Guide
Page 68
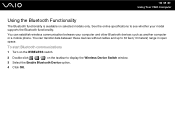
... models only. n 68 N Using Your VAIO Computer Using the Bluetooth Functionality The Bluetooth functionality is available on the taskbar to display the Wireless Device Switch window. 3 Select the Enable Bluetooth Device option. 4 Click OK. You can transfer data between your model supports the Bluetooth functionality. You can establish wireless communication between...
... models only. n 68 N Using Your VAIO Computer Using the Bluetooth Functionality The Bluetooth functionality is available on the taskbar to display the Wireless Device Switch window. 3 Select the Enable Bluetooth Device option. 4 Click OK. You can transfer data between your model supports the Bluetooth functionality. You can establish wireless communication between...

User Guide
Page 72
Stopping Bluetooth Communications To stop Bluetooth communications Turn off the Bluetooth device that is communicating with another Bluetooth device, you need first to set up and using the Bluetooth functionality, search for Bluetooth information using Windows Help and Support. n 72 N Using Your VAIO Computer To communicate with another Bluetooth device To communicate with your computer. To open Windows Help and Support, click Start and Help and Support. For setting up the Bluetooth functionality.
Stopping Bluetooth Communications To stop Bluetooth communications Turn off the Bluetooth device that is communicating with another Bluetooth device, you need first to set up and using the Bluetooth functionality, search for Bluetooth information using Windows Help and Support. n 72 N Using Your VAIO Computer To communicate with another Bluetooth device To communicate with your computer. To open Windows Help and Support, click Start and Help and Support. For setting up the Bluetooth functionality.

User Guide
Page 73
...on -screen instructions when the settings window for at least five seconds until the indicator light blinks in red and green. 3 Click Start, Control Panel, Hardware and Sound, and Bluetooth Devices. The headset icon appears on the Devices tab in the Bluetooth Devices window. 9 Follow the on the Devices ...tab. The Add Bluetooth Device Wizard window appears. 5 Click to select the My device is set up and ready to turn on using instant messaging ...
...on -screen instructions when the settings window for at least five seconds until the indicator light blinks in red and green. 3 Click Start, Control Panel, Hardware and Sound, and Bluetooth Devices. The headset icon appears on the Devices tab in the Bluetooth Devices window. 9 Follow the on the Devices ...tab. The Add Bluetooth Device Wizard window appears. 5 Click to select the My device is set up and ready to turn on using instant messaging ...

User Guide
Page 74
To disconnect the headset from your computer 1 Click Start, Control Panel, Hardware and Sound, and Bluetooth Devices. The Bluetooth Devices window appears. 2 Select the headset icon and select Disconnect. 3 Click OK. n 74 N Using Your VAIO Computer
To disconnect the headset from your computer 1 Click Start, Control Panel, Hardware and Sound, and Bluetooth Devices. The Bluetooth Devices window appears. 2 Select the headset icon and select Disconnect. 3 Click OK. n 74 N Using Your VAIO Computer

User Guide
Page 83
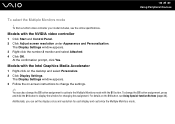
... select a display Models with the Intel Graphics Media Accelerator 1 Right-click on the type of your computer, turn on the external display. The Display Settings window appears. 3 Follow the on-screen instructions to change the settings. ✍ You may not be able to display the same contents on your computer screen...
... select a display Models with the Intel Graphics Media Accelerator 1 Right-click on the type of your computer, turn on the external display. The Display Settings window appears. 3 Follow the on-screen instructions to change the settings. ✍ You may not be able to display the same contents on your computer screen...

User Guide
Page 84
...Certain software applications may not work properly. Set fewer colors or a lower resolution for each display, do not expand a single window across separate displays. otherwise the computer may not support the Multiple Monitors function. This allows you to drag objects, such as an open ...application window or a toolbar, from one display to the other . n 84 N Using Peripheral Devices Using the Multiple Monitors Function The Multiple ...
...Certain software applications may not work properly. Set fewer colors or a lower resolution for each display, do not expand a single window across separate displays. otherwise the computer may not support the Multiple Monitors function. This allows you to drag objects, such as an open ...application window or a toolbar, from one display to the other . n 84 N Using Peripheral Devices Using the Multiple Monitors Function The Multiple ...
User Guide
Page 85
... and Personalization. At the confirmation prompt, click Yes. For details on the desktop and select Personalize. 2 Click Display Settings. The Display Settings window appears. 3 Follow the on-screen instructions to change the settings. ✍ You can set the display colors and resolution for changing the assignment...Accelerator 1 Right-click on the S1 button, see the online specifications. To change the S1 button assignment to display the window for each display and customize the Multiple Monitors mode. n 85 N Using Peripheral Devices To select the Multiple Monitors mode !
... and Personalization. At the confirmation prompt, click Yes. For details on the desktop and select Personalize. 2 Click Display Settings. The Display Settings window appears. 3 Follow the on-screen instructions to change the settings. ✍ You can set the display colors and resolution for changing the assignment...Accelerator 1 Right-click on the S1 button, see the online specifications. To change the S1 button assignment to display the window for each display and customize the Multiple Monitors mode. n 85 N Using Peripheral Devices To select the Multiple Monitors mode !

User Guide
Page 89
...USB floppy disk drive when your computer is in a power saving mode (Sleep or Hibernate) may cause the computer to close the Safely Remove Hardware window. 9 Disconnect the floppy disk drive from the system. 6 Click OK. Disconnecting the drive when the computer is off . n 89 N Using Peripheral... Devices Disconnecting a USB floppy disk drive You can be safely removed from the computer. The Safely Remove Hardware window appears. 3 Select the floppy disk drive you want to 8. 1 Close all programs accessing the floppy disk drive. 2 Double-click the Safely ...
...USB floppy disk drive when your computer is in a power saving mode (Sleep or Hibernate) may cause the computer to close the Safely Remove Hardware window. 9 Disconnect the floppy disk drive from the system. 6 Click OK. Disconnecting the drive when the computer is off . n 89 N Using Peripheral... Devices Disconnecting a USB floppy disk drive You can be safely removed from the computer. The Safely Remove Hardware window appears. 3 Select the floppy disk drive you want to 8. 1 Close all programs accessing the floppy disk drive. 2 Double-click the Safely ...


