User Guide
Page 2
... More about Your VAIO Computer 5 Ergonomic Considerations 9 Getting Started 11 Locating Controls and Ports 12 About the Indicator Lights 18 Connecting a Power Source 19 Using the Battery Pack 20 Shutting Down Your Computer Safely 27 Updating Your Computer 28 Using Your VAIO Computer 29 Using the...Connecting a USB Device 87 Connecting an i.LINK Device 89 Customizing Your VAIO Computer 91 Setting the Password 92 Using the VAIO Control Center 99 Using the Power Saving Modes 100 Using the VAIO Power Management 105 Upgrading Your VAIO Computer 107 Adding and Removing Memory 108
... More about Your VAIO Computer 5 Ergonomic Considerations 9 Getting Started 11 Locating Controls and Ports 12 About the Indicator Lights 18 Connecting a Power Source 19 Using the Battery Pack 20 Shutting Down Your Computer Safely 27 Updating Your Computer 28 Using Your VAIO Computer 29 Using the...Connecting a USB Device 87 Connecting an i.LINK Device 89 Customizing Your VAIO Computer 91 Setting the Password 92 Using the VAIO Control Center 99 Using the Power Saving Modes 100 Using the VAIO Power Management 105 Upgrading Your VAIO Computer 107 Adding and Removing Memory 108
User Guide
Page 11
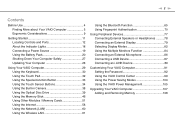
... start up your computer with your VAIO computer. ! Before starting your computer for example, a printer, an external hard disk drive, a scanner, and so on) at a time, following the manufacturers' instructions. ❑ Locating Controls and Ports (page 12) ❑ About the Indicator Lights (page 18) ❑ Connecting a Power Source (page 19) ❑ Using the...
... start up your computer with your VAIO computer. ! Before starting your computer for example, a printer, an external hard disk drive, a scanner, and so on) at a time, following the manufacturers' instructions. ❑ Locating Controls and Ports (page 12) ❑ About the Indicator Lights (page 18) ❑ Connecting a Power Source (page 19) ❑ Using the...

User Guide
Page 12
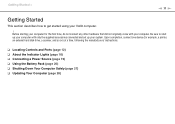
Getting Started > Locating Controls and Ports n 12 N Locating Controls and Ports Take a moment to identify the controls and ports shown on the following pages. Front A Built-in MOTION EYE camera (page 38) B Built-in MOTION EYE camera indicator (page 18) C Built-in ... pad (page 32) H Fingerprint sensor*1 (page 70) I Memory Stick slot*2 (page 46) J Media Access indicator (page 18) K SD memory card slot (page 54) L Power indicator (page 18) M Charge indicator (page 18) N Disc drive indicator (page 18) *1 On selected models only. *2 Your computer supports both the standard-size Memory Stick...
Getting Started > Locating Controls and Ports n 12 N Locating Controls and Ports Take a moment to identify the controls and ports shown on the following pages. Front A Built-in MOTION EYE camera (page 38) B Built-in MOTION EYE camera indicator (page 18) C Built-in ... pad (page 32) H Fingerprint sensor*1 (page 70) I Memory Stick slot*2 (page 46) J Media Access indicator (page 18) K SD memory card slot (page 54) L Power indicator (page 18) M Charge indicator (page 18) N Disc drive indicator (page 18) *1 On selected models only. *2 Your computer supports both the standard-size Memory Stick...
User Guide
Page 13
... control area* / : Volume : Muting For information on how to use the touch sensor buttons above , see Controlling Music and Video Playback (page 35). E Power button F Num lock indicator (page 18) G Caps lock indicator (page 18) H Scroll lock indicator (page 18) I WIRELESS switch (page 61), (page ...65) J WIRELESS indicator (page 18) * On selected models only. Getting Started > Locating Controls and Ports n 13 N A CAPTURE button* (page 33) B Playback control area* : Fast-rewind : Play/Pause : Fast-forward For information on how to use the...
... control area* / : Volume : Muting For information on how to use the touch sensor buttons above , see Controlling Music and Video Playback (page 35). E Power button F Num lock indicator (page 18) G Caps lock indicator (page 18) H Scroll lock indicator (page 18) I WIRELESS switch (page 61), (page ...65) J WIRELESS indicator (page 18) * On selected models only. Getting Started > Locating Controls and Ports n 13 N A CAPTURE button* (page 33) B Playback control area* : Fast-rewind : Play/Pause : Fast-forward For information on how to use the...

User Guide
Page 19
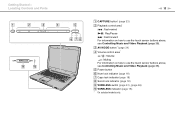
...the AC adapter. If you do not intend to use the AC adapter 1 Plug one end of the power cord (1) into the AC adapter (3). 2 Plug the other end of the power cord into an AC outlet (2). 3 Plug the cable connected to your computer for a long period of ... To use your computer. Make sure that the AC outlet is easily accessible. Getting Started > Connecting a Power Source Connecting a Power Source You can use either an AC adapter or a rechargeable battery pack for supplying power to the AC adapter (3) into the DC IN port (4) on the AC adapter. ✍ To disconnect your computer.
...the AC adapter. If you do not intend to use the AC adapter 1 Plug one end of the power cord (1) into the AC adapter (3). 2 Plug the other end of the power cord into an AC outlet (2). 3 Plug the cable connected to your computer for a long period of ... To use your computer. Make sure that the AC outlet is easily accessible. Getting Started > Connecting a Power Source Connecting a Power Source You can use either an AC adapter or a rechargeable battery pack for supplying power to the AC adapter (3) into the DC IN port (4) on the AC adapter. ✍ To disconnect your computer.

User Guide
Page 79
.... Features and options in this section may not be available on the computer. To connect a computer display 1 If necessary, plug one end of the display's power cord (1) into your display, and the other end into an AC outlet. 2 Plug the display cable (2) into the monitor...
.... Features and options in this section may not be available on the computer. To connect a computer display 1 If necessary, plug one end of the display's power cord (1) into your display, and the other end into an AC outlet. 2 Plug the display cable (2) into the monitor...

User Guide
Page 80
Using Peripheral Devices > Connecting an External Display n 80 N Connecting a Multimedia Computer Display You can connect a multimedia computer display that includes built-in speakers and a microphone to your multimedia computer display (1) into an AC outlet. 2 Plug the display cable (2) into the monitor port (3) a on the computer. 3 Plug the speaker cable (4) into the headphones jack (5) i on the computer. 4 Plug the microphone cable (6) into the microphone jack (7) m on the computer. To connect a multimedia computer display 1 Plug the power cord of your computer.
Using Peripheral Devices > Connecting an External Display n 80 N Connecting a Multimedia Computer Display You can connect a multimedia computer display that includes built-in speakers and a microphone to your multimedia computer display (1) into an AC outlet. 2 Plug the display cable (2) into the monitor port (3) a on the computer. 3 Plug the speaker cable (4) into the headphones jack (5) i on the computer. 4 Plug the microphone cable (6) into the microphone jack (7) m on the computer. To connect a multimedia computer display 1 Plug the power cord of your computer.

User Guide
Page 81
To connect a projector 1 Connect the power cord (1) of your computer. n 81 N Using Peripheral Devices > Connecting an External Display Connecting a Projector You can connect a projector (for example, the Sony LCD projector) to your projector into an AC outlet. 2 Plug a display cable (2) into the monitor port (3) a on the computer. 3 Plug an audio cable (4) into the headphones jack (5) i on the computer. 4 Plug the display cable and the audio cable into the port and jack on the projector (6).
To connect a projector 1 Connect the power cord (1) of your computer. n 81 N Using Peripheral Devices > Connecting an External Display Connecting a Projector You can connect a projector (for example, the Sony LCD projector) to your projector into an AC outlet. 2 Plug a display cable (2) into the monitor port (3) a on the computer. 3 Plug an audio cable (4) into the headphones jack (5) i on the computer. 4 Plug the display cable and the audio cable into the port and jack on the projector (6).

User Guide
Page 89
... that came with other . The procedure to establish an i.LINK connection may not be sure to connect it to a power source. ❑ The i.LINK port supports transfer rates up to designate that came with each other compatible devices is a trademark of i.LINK-compatible PC peripherals ... system compatibility of Sony Corporation used only to 400 Mbps. See the manual that a product contains an IEEE 1394 connection. Before connecting compatible i.LINK PC peripherals to an external device. compatible devices you connect them to your computer does not supply power to your system,...
... that came with other . The procedure to establish an i.LINK connection may not be sure to connect it to a power source. ❑ The i.LINK port supports transfer rates up to designate that came with each other compatible devices is a trademark of i.LINK-compatible PC peripherals ... system compatibility of Sony Corporation used only to 400 Mbps. See the manual that a product contains an IEEE 1394 connection. Before connecting compatible i.LINK PC peripherals to an external device. compatible devices you connect them to your computer does not supply power to your system,...

User Guide
Page 120
... images. ❑ Do not let the direct sunlight get into the lens of the built-in camera regardless of your computer's power state, as it is sensitive to the i.LINK port. ❑ Clean the lens protection cover of the built-in camera, as it off with a blower brush or a soft brush. Precautions...
... images. ❑ Do not let the direct sunlight get into the lens of the built-in camera regardless of your computer's power state, as it is sensitive to the i.LINK port. ❑ Clean the lens protection cover of the built-in camera, as it off with a blower brush or a soft brush. Precautions...
User Guide
Page 158
...1 Click Start and Control Panel. 2 Click Printer under Hardware and Sound. 3 Right-click the printer icon and select Properties. 4 Click the Ports tab. 5 Click to install the printer driver software before you use your computer may need to cancel the Enable bidirectional support check box. 6 ... sure your printer is on, and the printer cable is securely connected to the ports on the printer and your computer. ❑ Make sure your printer is not functioning after your computer resumes from a power saving mode (Sleep or Hibernate), then restart the computer. ❑ If the bidirectional...
...1 Click Start and Control Panel. 2 Click Printer under Hardware and Sound. 3 Right-click the printer icon and select Properties. 4 Click the Ports tab. 5 Click to install the printer driver software before you use your computer may need to cancel the Enable bidirectional support check box. 6 ... sure your printer is on, and the printer cable is securely connected to the ports on the printer and your computer. ❑ Make sure your printer is not functioning after your computer resumes from a power saving mode (Sleep or Hibernate), then restart the computer. ❑ If the bidirectional...

User Guide
Page 167
.... You may prevent a device from working at all. ❑ USB hubs may need to the AC outlet. ❑ Try using another USB port on and using a digital camera, check if the battery is charged. The driver software could be installed to the specific... port you used the first time you connect the device. ❑ Try connecting a simple, low-powered device such as a mouse to your computer without a hub. Troubleshooting > Peripherals n 167 N Peripherals What should I do ...
.... You may prevent a device from working at all. ❑ USB hubs may need to the AC outlet. ❑ Try using another USB port on and using a digital camera, check if the battery is charged. The driver software could be installed to the specific... port you used the first time you connect the device. ❑ Try connecting a simple, low-powered device such as a mouse to your computer without a hub. Troubleshooting > Peripherals n 167 N Peripherals What should I do ...


