User Guide
Page 3
... Serial Bus (USB) Device...60 Connecting a Printer ...62 Connecting an i.LINK Device ...63 Customizing Your VAIO Computer ...65 Setting the Password ...66 Setting Up Your Computer with the VAIO Control Center 71 Using the Power Saving Mode...72 Upgrading Your VAIO Computer...75 Adding and Removing Memory...76 Precautions ...82 Handling the LCD Screen ...83 Using the...
... Serial Bus (USB) Device...60 Connecting a Printer ...62 Connecting an i.LINK Device ...63 Customizing Your VAIO Computer ...65 Setting the Password ...66 Setting Up Your Computer with the VAIO Control Center 71 Using the Power Saving Mode...72 Upgrading Your VAIO Computer...75 Adding and Removing Memory...76 Precautions ...82 Handling the LCD Screen ...83 Using the...
User Guide
Page 12
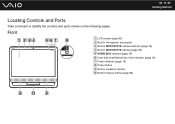
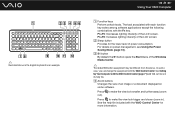
n 12 N Getting Started Locating Controls and Ports Take a moment to identify the controls and ports shown on the following pages. Front A LCD screen (page 83) B Built-in microphone (monaural) C Built-in MOTION EYE camera indicator (page 16) D Built-in MOTION EYE camera (page 25) E WIRELESS indicator (page 16) F Hard disk drive/Optical disc drive indicator (page 16) G Power indicator (page 16) H Power button I Built-in speakers (stereo) J Bottom chassis frame (page 86)
n 12 N Getting Started Locating Controls and Ports Take a moment to identify the controls and ports shown on the following pages. Front A LCD screen (page 83) B Built-in microphone (monaural) C Built-in MOTION EYE camera indicator (page 16) D Built-in MOTION EYE camera (page 25) E WIRELESS indicator (page 16) F Hard disk drive/Optical disc drive indicator (page 16) G Power indicator (page 16) H Power button I Built-in speakers (stereo) J Bottom chassis frame (page 86)

User Guide
Page 16
...unlit, the memory card is reading or writing data. n 16 N Getting Started About the Indicator Lights Your computer is equipped with the following indicator lights: Indicator Power 1 Built-in MOTION EYE camera Media Access Hard disk drive/Optical disc drive WIRELESS Functions Illuminates in green when... the computer is on . Illuminates while the built-in MOTION EYE camera is in use . Illuminates when the ...
...unlit, the memory card is reading or writing data. n 16 N Getting Started About the Indicator Lights Your computer is equipped with the following indicator lights: Indicator Power 1 Built-in MOTION EYE camera Media Access Hard disk drive/Optical disc drive WIRELESS Functions Illuminates in green when... the computer is on . Illuminates while the built-in MOTION EYE camera is in use . Illuminates when the ...

User Guide
Page 18
To connect the AC adapter 1 Plug one end of the power cord (1) into the AC adapter (3). 2 Plug the other end of the power cord into an AC outlet (2). 3 Plug the AC adapter cable (4) into the DC IN port (5). 4 Route the AC adapter cable through the cable clamp (6). n 18 N Getting Started Connecting a Power Source You need an AC adapter to connect your computer to an AC power source. ✍ Use only the supplied AC adapter for your computer.
To connect the AC adapter 1 Plug one end of the power cord (1) into the AC adapter (3). 2 Plug the other end of the power cord into an AC outlet (2). 3 Plug the AC adapter cable (4) into the DC IN port (5). 4 Route the AC adapter cable through the cable clamp (6). n 18 N Getting Started Connecting a Power Source You need an AC adapter to connect your computer to an AC power source. ✍ Use only the supplied AC adapter for your computer.

User Guide
Page 19
If you may lose all unsaved data. The shape of the DC In plug varies depending on or in Sleep mode, you unplug the AC adapter from AC power, unplug the AC adapter when the computer is on the AC adapter. ✍ To disconnect your computer completely from your computer while the computer is off. Make sure that the AC outlets are easily accessible. ! n 19 N Getting Started !
If you may lose all unsaved data. The shape of the DC In plug varies depending on or in Sleep mode, you unplug the AC adapter from AC power, unplug the AC adapter when the computer is on the AC adapter. ✍ To disconnect your computer completely from your computer while the computer is off. Make sure that the AC outlets are easily accessible. ! n 19 N Getting Started !
User Guide
Page 20
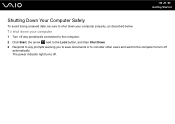
The power indicator light turns off automatically. To shut down your computer 1 Turn off any peripherals connected to the computer. 2 Click Start, the arrow next to the Lock button, and then Shut Down. 3 Respond to any prompts warning you to save documents or to consider other users and wait for the computer to shut down your computer properly, as described below. n 20 N Getting Started Shutting Down Your Computer Safely To avoid losing unsaved data, be sure to turn off .
The power indicator light turns off automatically. To shut down your computer 1 Turn off any peripherals connected to the computer. 2 Click Start, the arrow next to the Lock button, and then Shut Down. 3 Respond to any prompts warning you to save documents or to consider other users and wait for the computer to shut down your computer properly, as described below. n 20 N Getting Started Shutting Down Your Computer Safely To avoid losing unsaved data, be sure to turn off .
User Guide
Page 23
...level of power consumption. Press to make the view look bigger and closer (zoom in its help file included with the VAIO Control Center (page 71) and find out more information. Fn+F5: Decreases lighting intensity of the LCD screen. n 23 N Using Your VAIO Computer A ...Function keys Perform certain tasks. ✍ Illustrated above . The task associated with each function key varies among software applications except the following combinations with the VAIO Control Center. C S1 button By default, the S1 button...
...level of power consumption. Press to make the view look bigger and closer (zoom in its help file included with the VAIO Control Center (page 71) and find out more information. Fn+F5: Decreases lighting intensity of the LCD screen. n 23 N Using Your VAIO Computer A ...Function keys Perform certain tasks. ✍ Illustrated above . The task associated with each function key varies among software applications except the following combinations with the VAIO Control Center. C S1 button By default, the S1 button...
User Guide
Page 33
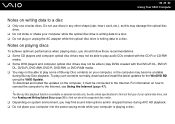
... contents normally, download and install the latest updates for the WinDVD BD using the VAIO Update. See the online specifications to find out the type of Blu-ray Disc ... as this may become unstable during AVC HD playback. ❑ Do not place your computer into the power saving mode while your computer while the optical disc drive is writing data to a disc. ❑ Do not ...DVD-RAM media. ❑ You may not be connected to the Internet. n 33 N Using Your VAIO Computer Notes on the computer, it must be able to play some of your optical disc drive, and then Reading and Writing ...
... contents normally, download and install the latest updates for the WinDVD BD using the VAIO Update. See the online specifications to find out the type of Blu-ray Disc ... as this may become unstable during AVC HD playback. ❑ Do not place your computer into the power saving mode while your computer while the optical disc drive is writing data to a disc. ❑ Do not ...DVD-RAM media. ❑ You may not be connected to the Internet. n 33 N Using Your VAIO Computer Notes on the computer, it must be able to play some of your optical disc drive, and then Reading and Writing ...
User Guide
Page 62
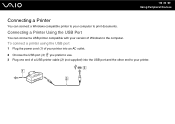
To connect a printer using the USB port 1 Plug the power cord (1) of your printer into an AC outlet. 2 Choose the USB port (3) you prefer to use. 3 Plug one end of Windows to the computer. n 62 N Using Peripheral Devices Connecting a Printer You can connect a USB printer compatible with your version of a USB printer cable (2) (not supplied) into the USB port and the other end to print documents. Connecting a Printer Using the USB Port You can connect a Windows-compatible printer to your computer to your printer.
To connect a printer using the USB port 1 Plug the power cord (1) of your printer into an AC outlet. 2 Choose the USB port (3) you prefer to use. 3 Plug one end of Windows to the computer. n 62 N Using Peripheral Devices Connecting a Printer You can connect a USB printer compatible with your version of a USB printer cable (2) (not supplied) into the USB port and the other end to print documents. Connecting a Printer Using the USB Port You can connect a Windows-compatible printer to your computer to your printer.

User Guide
Page 63
compatible devices you connect them to your computer does not supply power to 400 Mbps. If the external device requires external power, be available depending on the software applications, operating system, and i.LINK- However, the actual transfer rate depends on the transfer rate ...an i.LINK port, which you can use . n 63 N Using Peripheral Devices Connecting an i.LINK Device Notes on connecting i.LINK devices ❑ Your computer is not fully guaranteed. ❑ The i.LINK connection may not be available in some countries or areas. ❑ An i.LINK connection with other ...
compatible devices you connect them to your computer does not supply power to 400 Mbps. If the external device requires external power, be available depending on the software applications, operating system, and i.LINK- However, the actual transfer rate depends on the transfer rate ...an i.LINK port, which you can use . n 63 N Using Peripheral Devices Connecting an i.LINK Device Notes on connecting i.LINK devices ❑ Your computer is not fully guaranteed. ❑ The i.LINK connection may not be available in some countries or areas. ❑ An i.LINK connection with other ...
User Guide
Page 65
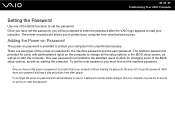
Among other things, you will learn how to change the main settings of your VAIO computer. n 65 N Customizing Your VAIO Computer Customizing Your VAIO Computer This section briefly describes how to use and customize the look of your Sony software and utilities. ❑ Setting the Password (page 66) ❑ Setting Up Your Computer with the VAIO Control Center (page 71) ❑ Using the Power Saving Mode (page 72)
Among other things, you will learn how to change the main settings of your VAIO computer. n 65 N Customizing Your VAIO Computer Customizing Your VAIO Computer This section briefly describes how to use and customize the look of your Sony software and utilities. ❑ Setting the Password (page 66) ❑ Setting Up Your Computer with the VAIO Control Center (page 71) ❑ Using the Power Saving Mode (page 72)
User Guide
Page 66
...and keep it , a password reset fee will be sent in the BIOS setup screen, as well as starting the computer. n 66 N Customizing Your VAIO Computer Setting the Password Use one of the BIOS functions to forget the password. There are two types of the BIOS setup options, as well as to... for service to change all the setup options in for changing some of the power-on password allows you will be charged, and your computer may need assistance to protect your computer. To set the power-on the computer to reset the password. The user password is provided to start your...
...and keep it , a password reset fee will be sent in the BIOS setup screen, as well as starting the computer. n 66 N Customizing Your VAIO Computer Setting the Password Use one of the BIOS functions to forget the password. There are two types of the BIOS setup options, as well as to... for service to change all the setup options in for changing some of the power-on password allows you will be charged, and your computer may need assistance to protect your computer. To set the power-on the computer to reset the password. The user password is provided to start your...
User Guide
Page 67
... key several times when the VAIO logo appears. 3 Press the < or , key to select Security to select Exit, select Exit Setup, and then press the Enter key. At the confirmation prompt, press the Enter key. The BIOS setup screen appears. n 67 N Customizing Your VAIO Computer To add the power-on password (machine password) 1 Turn... on the computer. 2 Press the F2 key when the...
... key several times when the VAIO logo appears. 3 Press the < or , key to select Security to select Exit, select Exit Setup, and then press the Enter key. At the confirmation prompt, press the Enter key. The BIOS setup screen appears. n 67 N Customizing Your VAIO Computer To add the power-on password (machine password) 1 Turn... on the computer. 2 Press the F2 key when the...

User Guide
Page 68
... Enter key. 5 On the password entry screen, enter the password twice and press the Enter key. n 68 N Customizing Your VAIO Computer To add the power-on the computer. 2 Press the F2 key when the VAIO logo appears. At the confirmation prompt, press the Enter key. The BIOS setup screen appears. Make sure you set the...
... Enter key. 5 On the password entry screen, enter the password twice and press the Enter key. n 68 N Customizing Your VAIO Computer To add the power-on the computer. 2 Press the F2 key when the VAIO logo appears. At the confirmation prompt, press the Enter key. The BIOS setup screen appears. Make sure you set the...

User Guide
Page 69
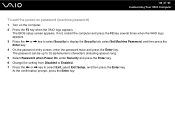
n 69 N Customizing Your VAIO Computer Changing/Removing the Power-on Password To change or remove the power-on password (machine password) 1 Turn on the computer. 2 Press the F2 key when the VAIO logo appears. To remove the password, leave the Enter New Password and Confirm New Password fields blank and press the Enter key. 6..., enter the current password once and a new password twice, and then press the Enter key. If not, restart the computer and press the F2 key several times when the VAIO logo appears. 3 Enter the machine password and press the Enter key. 4 Press the < or , key to select ...
n 69 N Customizing Your VAIO Computer Changing/Removing the Power-on Password To change or remove the power-on password (machine password) 1 Turn on the computer. 2 Press the F2 key when the VAIO logo appears. To remove the password, leave the Enter New Password and Confirm New Password fields blank and press the Enter key. 6..., enter the current password once and a new password twice, and then press the Enter key. If not, restart the computer and press the F2 key several times when the VAIO logo appears. 3 Enter the machine password and press the Enter key. 4 Press the < or , key to select ...

User Guide
Page 70
...key several times when the VAIO logo appears. 3 Enter the user password and press the Enter key. 4 Press the < or , key to select Security to select Exit, select Exit Setup, and then press the Enter key. n 70 N Customizing Your VAIO Computer To change or remove the power-on password (user password...) 1 Turn on the computer. 2 Press the F2 key when the VAIO logo appears. To remove the password, leave the Enter New Password and Confirm New Password...
...key several times when the VAIO logo appears. 3 Enter the user password and press the Enter key. 4 Press the < or , key to select Security to select Exit, select Exit Setup, and then press the Enter key. n 70 N Customizing Your VAIO Computer To change or remove the power-on password (user password...) 1 Turn on the computer. 2 Press the F2 key when the VAIO logo appears. To remove the password, leave the Enter New Password and Confirm New Password...

User Guide
Page 72
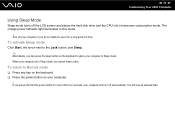
Using Normal Mode This is the normal state of the computer when it is lit in use. The green power indicator light is in this mode. n 72 N Customizing Your VAIO Computer Using the Power Saving Mode In addition to the normal operating mode, your computer has a distinct power saving mode called Sleep mode.
Using Normal Mode This is the normal state of the computer when it is lit in use. The green power indicator light is in this mode. n 72 N Customizing Your VAIO Computer Using the Power Saving Mode In addition to the normal operating mode, your computer has a distinct power saving mode called Sleep mode.
User Guide
Page 73
...power button on the keyboard to place your computer in Sleep mode. You will turn off the LCD screen and places the hard disk drive and the CPU into a low power consumption mode. If you press and hold the power... button for more than four seconds, your computer if you do not intend to the Lock ...; Alternatively, you cannot insert a disc. The orange power indicator light illuminates in Sleep mode, you can press the sleep button on your computer is in this mode. ! To activate Sleep mode ...
...power button on the keyboard to place your computer in Sleep mode. You will turn off the LCD screen and places the hard disk drive and the CPU into a low power consumption mode. If you press and hold the power... button for more than four seconds, your computer if you do not intend to the Lock ...; Alternatively, you cannot insert a disc. The orange power indicator light illuminates in Sleep mode, you can press the sleep button on your computer is in this mode. ! To activate Sleep mode ...
User Guide
Page 74
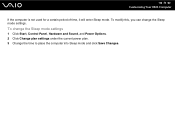
To modify this, you can change the Sleep mode settings 1 Click Start, Control Panel, Hardware and Sound, and Power Options. 2 Click Change plan settings under the current power plan. 3 Change the time to place the computer into Sleep mode and click Save Changes. n 74 N Customizing Your VAIO Computer If the computer is not used for a certain period of time, it will enter Sleep mode. To change the Sleep mode settings.
To modify this, you can change the Sleep mode settings 1 Click Start, Control Panel, Hardware and Sound, and Power Options. 2 Click Change plan settings under the current power plan. 3 Change the time to place the computer into Sleep mode and click Save Changes. n 74 N Customizing Your VAIO Computer If the computer is not used for a certain period of time, it will enter Sleep mode. To change the Sleep mode settings.
User Guide
Page 78
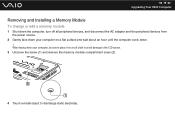
n 78 N Upgrading Your VAIO Computer Removing and Installing a Memory Module To change or add a memory module 1 Shut down the computer, turn off all peripheral devices, and disconnect the AC adapter and the peripheral devices from the power source. 2 Gently face down your computer on a flat surface and wait about an hour until the computer cools down your computer, be sure to place it on a soft cloth to avoid damage to the LCD screen. 3 Unscrew the screw (1) and remove the memory module compartment cover (2). 4 Touch a metal object to discharge static electricity. When facing down . !
n 78 N Upgrading Your VAIO Computer Removing and Installing a Memory Module To change or add a memory module 1 Shut down the computer, turn off all peripheral devices, and disconnect the AC adapter and the peripheral devices from the power source. 2 Gently face down your computer on a flat surface and wait about an hour until the computer cools down your computer, be sure to place it on a soft cloth to avoid damage to the LCD screen. 3 Unscrew the screw (1) and remove the memory module compartment cover (2). 4 Touch a metal object to discharge static electricity. When facing down . !

