User Guide
Page 2
n2 N Contents Before Use ...5 Documentation ...6 Ergonomic Considerations ...9 Getting Started ...11 Locating Controls and Ports...12 About the Indicator Lights ...16 Setting Up Your Computer ...17 Shutting Down Your Computer Safely ...20 Using Your VAIO Computer ...21 Using the Keyboard ...22 Using the Built-in MOTION EYE Camera...25 Using the Optical Disc Drive ...28 Using the Memory Stick ...38 Using the SD Memory Card ...44 Using the Internet...47 Using the Network (LAN) ...48 Using the Wireless LAN (WLAN) ...49 Using the Bluetooth Function ...52
n2 N Contents Before Use ...5 Documentation ...6 Ergonomic Considerations ...9 Getting Started ...11 Locating Controls and Ports...12 About the Indicator Lights ...16 Setting Up Your Computer ...17 Shutting Down Your Computer Safely ...20 Using Your VAIO Computer ...21 Using the Keyboard ...22 Using the Built-in MOTION EYE Camera...25 Using the Optical Disc Drive ...28 Using the Memory Stick ...38 Using the SD Memory Card ...44 Using the Internet...47 Using the Network (LAN) ...48 Using the Wireless LAN (WLAN) ...49 Using the Bluetooth Function ...52
User Guide
Page 3
... a Printer ...62 Connecting an i.LINK Device ...63 Customizing Your VAIO Computer ...65 Setting the Password ...66 Setting Up Your Computer with the VAIO Control Center 71 Using the Power Saving Mode...72 Upgrading Your VAIO Computer...75 Adding and Removing Memory...76 Precautions ...82 Handling the LCD ...Screen ...83 Using the Power Source ...84 Handling Your Computer ...85 Handling the Built-in MOTION EYE Camera...87 Handling Floppy Disks ...88 Handling Discs ...89 Using Headphones ...
... a Printer ...62 Connecting an i.LINK Device ...63 Customizing Your VAIO Computer ...65 Setting the Password ...66 Setting Up Your Computer with the VAIO Control Center 71 Using the Power Saving Mode...72 Upgrading Your VAIO Computer...75 Adding and Removing Memory...76 Precautions ...82 Handling the LCD ...Screen ...83 Using the Power Source ...84 Handling Your Computer ...85 Handling the Built-in MOTION EYE Camera...87 Handling Floppy Disks ...88 Handling Discs ...89 Using Headphones ...

User Guide
Page 4
n4 N Troubleshooting ...94 Computer ...96 System Security ...101 Built-in MOTION EYE Camera...102 Networking ...104 Bluetooth Technology ...107 Optical Discs ...111 Display ...116 Printing ...117 Microphone ...118 Mouse ...119 Speakers ...120 Keyboard...122 Floppy Disks ...123 Audio/Video...124 Memory Stick ...128 Peripherals ...129 Support Options ...130 Sony Support Information ...130 Trademarks ...134
n4 N Troubleshooting ...94 Computer ...96 System Security ...101 Built-in MOTION EYE Camera...102 Networking ...104 Bluetooth Technology ...107 Optical Discs ...111 Display ...116 Printing ...117 Microphone ...118 Mouse ...119 Speakers ...120 Keyboard...122 Floppy Disks ...123 Audio/Video...124 Memory Stick ...128 Peripherals ...129 Support Options ...130 Sony Support Information ...130 Trademarks ...134
User Guide
Page 12
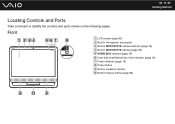
n 12 N Getting Started Locating Controls and Ports Take a moment to identify the controls and ports shown on the following pages. Front A LCD screen (page 83) B Built-in microphone (monaural) C Built-in MOTION EYE camera indicator (page 16) D Built-in MOTION EYE camera (page 25) E WIRELESS indicator (page 16) F Hard disk drive/Optical disc drive indicator (page 16) G Power indicator (page 16) H Power button I Built-in speakers (stereo) J Bottom chassis frame (page 86)
n 12 N Getting Started Locating Controls and Ports Take a moment to identify the controls and ports shown on the following pages. Front A LCD screen (page 83) B Built-in microphone (monaural) C Built-in MOTION EYE camera indicator (page 16) D Built-in MOTION EYE camera (page 25) E WIRELESS indicator (page 16) F Hard disk drive/Optical disc drive indicator (page 16) G Power indicator (page 16) H Power button I Built-in speakers (stereo) J Bottom chassis frame (page 86)

User Guide
Page 16
...16 N Getting Started About the Indicator Lights Your computer is equipped with the following indicator lights: Indicator Power 1 Built-in MOTION EYE camera Media Access Hard disk drive/Optical disc drive WIRELESS Functions Illuminates in green when the computer is on . Illuminates when the WIRELESS switch ...is turned on , illuminates in orange while the computer is reading or writing data. Illuminates when the drive is...
...16 N Getting Started About the Indicator Lights Your computer is equipped with the following indicator lights: Indicator Power 1 Built-in MOTION EYE camera Media Access Hard disk drive/Optical disc drive WIRELESS Functions Illuminates in green when the computer is on . Illuminates when the WIRELESS switch ...is turned on , illuminates in orange while the computer is reading or writing data. Illuminates when the drive is...
User Guide
Page 21
Using Your VAIO Computer This section describes how to get the most out of using your VAIO computer. ❑ Using the Keyboard (page 22) ❑ Using the Built-in MOTION EYE Camera (page 25) ❑ Using the Optical Disc Drive (page 28) ❑ Using the Memory Stick (page 38) ❑ Using the SD Memory Card (page 44) ❑ Using the Internet (page 47) ❑ Using the Network (LAN) (page 48) ❑ Using the Wireless LAN (WLAN) (page 49) ❑ Using the Bluetooth Function (page 52) n 21 N Using Your VAIO Computer
Using Your VAIO Computer This section describes how to get the most out of using your VAIO computer. ❑ Using the Keyboard (page 22) ❑ Using the Built-in MOTION EYE Camera (page 25) ❑ Using the Optical Disc Drive (page 28) ❑ Using the Memory Stick (page 38) ❑ Using the SD Memory Card (page 44) ❑ Using the Internet (page 47) ❑ Using the Network (LAN) (page 48) ❑ Using the Wireless LAN (WLAN) (page 49) ❑ Using the Bluetooth Function (page 52) n 21 N Using Your VAIO Computer

User Guide
Page 24
H E key Ejects the optical disc drive tray when used in certain software applications. n 24 N Using Your VAIO Computer E Muting button Turns the volume on the computer screen. L Numeric keypad Use the numeric keypad to type numbers or to perform basic math calculations. G Windows key Displays the Start menu. I Applications key Displays a ...
H E key Ejects the optical disc drive tray when used in certain software applications. n 24 N Using Your VAIO Computer E Muting button Turns the volume on the computer screen. L Numeric keypad Use the numeric keypad to type numbers or to perform basic math calculations. G Windows key Displays the Start menu. I Applications key Displays a ...
User Guide
Page 28
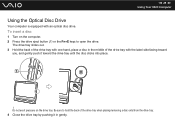
... tray with one hand, place a disc in the middle of the drive tray when placing/removing a disc onto/from the drive tray. 4 Close the drive tray by pushing it toward you, and gently push it in gently. n 28 N Using Your VAIO Computer Using the Optical Disc Drive Your computer is equipped ...with the label side facing toward the drive tray until the disc clicks into place....
... tray with one hand, place a disc in the middle of the drive tray when placing/removing a disc onto/from the drive tray. 4 Close the drive tray by pushing it toward you, and gently push it in gently. n 28 N Using Your VAIO Computer Using the Optical Disc Drive Your computer is equipped ...with the label side facing toward the drive tray until the disc clicks into place....
User Guide
Page 29
Doing so may cause the computer to malfunction. ✍ If you plan to use an external optical disc drive, connect the drive before you launch any preinstalled disc operation program. Do not remove the optical disc when your computer is in Sleep mode. n 29 N Using Your VAIO Computer !
Doing so may cause the computer to malfunction. ✍ If you plan to use an external optical disc drive, connect the drive before you launch any preinstalled disc operation program. Do not remove the optical disc when your computer is in Sleep mode. n 29 N Using Your VAIO Computer !
User Guide
Page 30
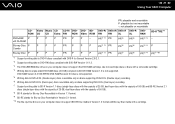
Check your specifications for the type of media your model. Use the table below to see which types of optical disc drive installed on the model you purchased. n 30 N Using Your VAIO Computer Reading and Writing Optical Discs Your computer plays and records CDs, DVDs, and Blu-ray Disc™ media, depending on your optical disc drive supports.
Check your specifications for the type of media your model. Use the table below to see which types of optical disc drive installed on the model you purchased. n 30 N Using Your VAIO Computer Reading and Writing Optical Discs Your computer plays and records CDs, DVDs, and Blu-ray Disc™ media, depending on your optical disc drive supports.
User Guide
Page 31
.... *6 Writing data to BD-R Version 1.1 discs (single-layer discs with the capacity of 25 GB, dual-layer discs with the capacity of 50 GB) and BD-RE Version 2.1 discs (single-layer discs with the capacity of 25 GB, dual-layer discs with a cartridge. Video Music CD CD-R/ DVD- n 31 N Using Your VAIO Computer PR: playable and recordable P: playable...
.... *6 Writing data to BD-R Version 1.1 discs (single-layer discs with the capacity of 25 GB, dual-layer discs with the capacity of 50 GB) and BD-RE Version 2.1 discs (single-layer discs with the capacity of 25 GB, dual-layer discs with a cartridge. Video Music CD CD-R/ DVD- n 31 N Using Your VAIO Computer PR: playable and recordable P: playable...
User Guide
Page 32
...disc product with discs that a digital HDCPcompliant environment be sure to play back discs that the AACS key update requires Internet access. For inquiries about disc formats, contact the individual publisher of the pre-recorded disc or the manufacturer of VAIO optical disc drives with a DVD recorded layer on one...-ray Disc" standard. Some contents may cause your computer's optical disc drives. Sony does NOT guarantee the compatibility of the recordable disc. ✍ 8 cm disc writing is playing a disc or writing data to malfunction. n 32 N Using Your VAIO Computer ! When...
...disc product with discs that a digital HDCPcompliant environment be sure to play back discs that the AACS key update requires Internet access. For inquiries about disc formats, contact the individual publisher of the pre-recorded disc or the manufacturer of VAIO optical disc drives with a DVD recorded layer on one...-ray Disc" standard. Some contents may cause your computer's optical disc drives. Sony does NOT guarantee the compatibility of the recordable disc. ✍ 8 cm disc writing is playing a disc or writing data to malfunction. n 32 N Using Your VAIO Computer ! When...
User Guide
Page 33
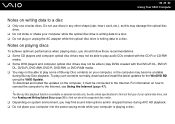
.../or dropped frames during Blu-ray Disc playback. Notes on playing discs To achieve optimum performance when playing discs, you may damage the optical disc drive. ❑ Do not strike or shake your computer is writing data to a disc. n 33 N Using Your VAIO Computer Notes on writing data to a disc ❑ Only use discs in any other shape (star, heart...
.../or dropped frames during Blu-ray Disc playback. Notes on playing discs To achieve optimum performance when playing discs, you may damage the optical disc drive. ❑ Do not strike or shake your computer is writing data to a disc. n 33 N Using Your VAIO Computer Notes on writing data to a disc ❑ Only use discs in any other shape (star, heart...

User Guide
Page 34
If the region code indicates "all," you can play this disc in which region and on what type of the world. If the region code for your residence area is different from the label, you cannot play the disc on your computer. n 34 N Using Your VAIO Computer ❑ Region code indicators are labeled on the discs or packages to indicate in most regions of player you can play the disc.
If the region code indicates "all," you can play this disc in which region and on what type of the world. If the region code for your residence area is different from the label, you cannot play the disc on your computer. n 34 N Using Your VAIO Computer ❑ Region code indicators are labeled on the discs or packages to indicate in most regions of player you can play the disc.
User Guide
Page 35
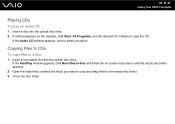
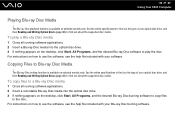
... Burn files to disc and follow the on the desktop, click Start, All Programs, and the desired CD software to play an audio CD 1 Insert a disc into the optical disc drive. If the Audio CD window appears, click to a disc 1 Insert a recordable disc into the optical disc drive. 2 If... nothing appears on -screen instructions until the empty disc folder appears. 2 Open the folder that contains the file(s) you want to copy and drag them to the empty disc folder. 3 Close the disc folder. n 35 N Using Your VAIO Computer Playing ...
... Burn files to disc and follow the on the desktop, click Start, All Programs, and the desired CD software to play an audio CD 1 Insert a disc into the optical disc drive. If the Audio CD window appears, click to a disc 1 Insert a recordable disc into the optical disc drive. 2 If... nothing appears on -screen instructions until the empty disc folder appears. 2 Open the folder that contains the file(s) you want to copy and drag them to the empty disc folder. 3 Close the disc folder. n 35 N Using Your VAIO Computer Playing ...

User Guide
Page 36
... included with your DVD burning software. Copying Files to DVDs To copy files to a disc 1 Close all running software applications. 2 Insert a recordable disc into the optical disc drive. 3 If nothing appears on the desktop, click Start, All Programs, and the desired DVD software to play a DVD 1 ... optical disc drive. 3 If nothing appears on the desktop, click Start, All Programs, and the desired DVD burning software to copy files to the disc. For instructions on how to use the software, see the help file included with your DVD software. n 36 N Using Your VAIO Computer Playing ...
... included with your DVD burning software. Copying Files to DVDs To copy files to a disc 1 Close all running software applications. 2 Insert a recordable disc into the optical disc drive. 3 If nothing appears on the desktop, click Start, All Programs, and the desired DVD software to play a DVD 1 ... optical disc drive. 3 If nothing appears on the desktop, click Start, All Programs, and the desired DVD burning software to copy files to the disc. For instructions on how to use the software, see the help file included with your DVD software. n 36 N Using Your VAIO Computer Playing ...
User Guide
Page 37
...disc. n 37 N Using Your VAIO Computer Playing Blu-ray Disc Media ! Copying Files to the disc. See the online specifications to find out the type of your optical disc drive, and then Reading and Writing Optical Discs (page 30) to use the software, see the help file included with your Blu-ray Disc...on selected models only. For instructions on the desktop, click Start, All Programs, and the desired Blu-ray Disc software to play a Blu-ray Disc media 1 Close all running software applications. 2 Insert a Blu-ray Disc media into the optical disc drive. 3 If nothing appears on how ...
...disc. n 37 N Using Your VAIO Computer Playing Blu-ray Disc Media ! Copying Files to the disc. See the online specifications to find out the type of your optical disc drive, and then Reading and Writing Optical Discs (page 30) to use the software, see the help file included with your Blu-ray Disc...on selected models only. For instructions on the desktop, click Start, All Programs, and the desired Blu-ray Disc software to play a Blu-ray Disc media 1 Close all running software applications. 2 Insert a Blu-ray Disc media into the optical disc drive. 3 If nothing appears on how ...
User Guide
Page 73
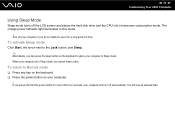
... light illuminates in Sleep mode, you cannot insert a disc. When your computer is in this mode. ! If you press and hold the power button for a long period of time. To activate Sleep mode Click Start, the arrow next to place your computer. ! To return to Normal mode ❑ Press ...the sleep button on your computer in Sleep mode. You will turn off automatically. Turn off the LCD screen and places the hard disk drive and the CPU into a low power consumption mode. n 73 N Customizing Your VAIO Computer Using Sleep Mode Sleep mode turns off your computer will lose all unsaved ...
... light illuminates in Sleep mode, you cannot insert a disc. When your computer is in this mode. ! If you press and hold the power button for a long period of time. To activate Sleep mode Click Start, the arrow next to place your computer. ! To return to Normal mode ❑ Press ...the sleep button on your computer in Sleep mode. You will turn off automatically. Turn off the LCD screen and places the hard disk drive and the CPU into a low power consumption mode. n 73 N Customizing Your VAIO Computer Using Sleep Mode Sleep mode turns off your computer will lose all unsaved ...
User Guide
Page 82
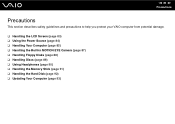
n 82 N Precautions Precautions This section describes safety guidelines and precautions to help you protect your VAIO computer from potential damage. ❑ Handling the LCD Screen (page 83) ❑ Using the Power Source (page 84) ❑ Handling Your Computer (page 85) ❑ Handling the Built-in MOTION EYE Camera (page 87) ❑ Handling Floppy Disks (page 88) ❑ Handling Discs (page 89) ❑ Using Headphones (page 90) ❑ Handling the Memory Stick (page 91) ❑ Handling the Hard Disk (page 92) ❑ Updating Your Computer (page 93)
n 82 N Precautions Precautions This section describes safety guidelines and precautions to help you protect your VAIO computer from potential damage. ❑ Handling the LCD Screen (page 83) ❑ Using the Power Source (page 84) ❑ Handling Your Computer (page 85) ❑ Handling the Built-in MOTION EYE Camera (page 87) ❑ Handling Floppy Disks (page 88) ❑ Handling Discs (page 89) ❑ Using Headphones (page 90) ❑ Handling the Memory Stick (page 91) ❑ Handling the Hard Disk (page 92) ❑ Updating Your Computer (page 93)
User Guide
Page 89
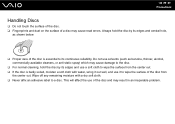
...surface from the center out. Wipe off any remaining moisture with water, wring it out well, and use of the disc and may cause read errors. Always hold the disc by its edges and central hole, as benzine, thinner, alcohol, commercially available cleaners, or anti-static spray) which may... cause damage to the disc. ❑ For normal cleaning, hold the disc by its edges and use solvents (such as shown below: ❑ Proper care of the disc is badly soiled, moisten a soft cloth with a dry soft cloth. ❑ Never ...
...surface from the center out. Wipe off any remaining moisture with water, wring it out well, and use of the disc and may cause read errors. Always hold the disc by its edges and central hole, as benzine, thinner, alcohol, commercially available cleaners, or anti-static spray) which may... cause damage to the disc. ❑ For normal cleaning, hold the disc by its edges and use solvents (such as shown below: ❑ Proper care of the disc is badly soiled, moisten a soft cloth with a dry soft cloth. ❑ Never ...

