User Instructions
Page 30
... Function of Parts and Controls .. 31 Front Panel 31 Rear Panel 32 Connections 33 Connecting to the USB Connector 33 Paper 33 Paper You Can Use 33 Loading Paper in the Unit 34 Loading Paper 34 Operation Adjustments and Settings Using the Menu ....... 36 Menu Flow 36 Menu List 37 Basic Menu Operations 40...
... Function of Parts and Controls .. 31 Front Panel 31 Rear Panel 32 Connections 33 Connecting to the USB Connector 33 Paper 33 Paper You Can Use 33 Loading Paper in the Unit 34 Loading Paper 34 Operation Adjustments and Settings Using the Menu ....... 36 Menu Flow 36 Menu List 37 Basic Menu Operations 40...

User Instructions
Page 31
... menu item). • Monochrome printing with up to three settings as a set of Parts and Controls For more details, see "Paper" on page 33 and "Paper currently selected" on page 43. B Printer window display (LCD: liquid crystal display) (36, 42) The back light lights in... temperature correction circuits prevent temperature changes which could cause blurred prints. Also, in normal operation, the paper currently selected is displayed. E BRIGHT (brightness) control (45) Adjusts the brightness of gradation. • Built-in green when the unit operates...
... menu item). • Monochrome printing with up to three settings as a set of Parts and Controls For more details, see "Paper" on page 33 and "Paper currently selected" on page 43. B Printer window display (LCD: liquid crystal display) (36, 42) The back light lights in... temperature correction circuits prevent temperature changes which could cause blurred prints. Also, in normal operation, the paper currently selected is displayed. E BRIGHT (brightness) control (45) Adjusts the brightness of gradation. • Built-in green when the unit operates...
User Instructions
Page 32
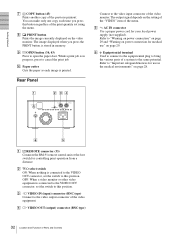
... printed. I OPEN button (34, 43) Press to the video input connector of the print quantity set using the menu. Rear Panel Connect to open the paper door. The output signal depends on the video monitor. E - AC IN connector Use a proper power cord for controlling print operation from a distance. D T... foot switch for your local power supply (not supplied). OFF: When a video monitor or other video equipment is in memory. J Paper cutter Cuts the paper as each time you press the PRINT button is connected to the VIDEO OUT connector, set the switch to "Warning on power connection"...
... printed. I OPEN button (34, 43) Press to the video input connector of the print quantity set using the menu. Rear Panel Connect to open the paper door. The output signal depends on the video monitor. E - AC IN connector Use a proper power cord for controlling print operation from a distance. D T... foot switch for your local power supply (not supplied). OFF: When a video monitor or other video equipment is in memory. J Paper cutter Cuts the paper as each time you press the PRINT button is connected to the VIDEO OUT connector, set the switch to "Warning on power connection"...

User Instructions
Page 33
...not supplied) RM-91 remote control unit (not supplied) to - Label adhesive remaining on another sheet of paper, use with this position. Paper Use only Sony UPP-110S/110HD/110HG paper designed for the UP-880/890MD series printer. Getting Started Connections Notes • Turn off the power to ...be guaranteed if any other video equipment is connected to the VIDEO OUT connector, set the switch to this unit. Loading paper • Handle the paper carefully when loading to contact any organic volatile liquid, cellophane tape, or any connections. • Connect the AC power cord...
...not supplied) RM-91 remote control unit (not supplied) to - Label adhesive remaining on another sheet of paper, use with this position. Paper Use only Sony UPP-110S/110HD/110HG paper designed for the UP-880/890MD series printer. Getting Started Connections Notes • Turn off the power to ...be guaranteed if any other video equipment is connected to the VIDEO OUT connector, set the switch to this unit. Loading paper • Handle the paper carefully when loading to contact any organic volatile liquid, cellophane tape, or any connections. • Connect the AC power cord...
User Instructions
Page 34
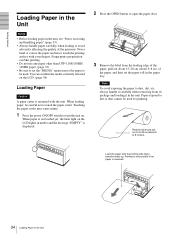
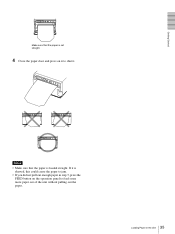
...used . You can blur printing. • Do not use any paper other than UPP-110S/110HD/ 110HG paper. (page 33) • Be sure to touch the paper cutter. Note To avoid exposing the paper to 8 inches). Touching the paper cutter may cause injury. 1 Press the power ON/OFF switch to...the unit. Fingerprints perspiration can confirm the media currently selected on the LCD. (page 38) Loading Paper Caution A paper cutter is reversed. 34 Loading Paper in the unit. Never bend or crease the paper and never touch the printing surface with your fingers. Remove label and pull out 15 to 20...
...used . You can blur printing. • Do not use any paper other than UPP-110S/110HD/ 110HG paper. (page 33) • Be sure to touch the paper cutter. Note To avoid exposing the paper to 8 inches). Touching the paper cutter may cause injury. 1 Press the power ON/OFF switch to...the unit. Fingerprints perspiration can confirm the media currently selected on the LCD. (page 38) Loading Paper Caution A paper cutter is reversed. 34 Loading Paper in the unit. Never bend or crease the paper and never touch the printing surface with your fingers. Remove label and pull out 15 to 20...
User Instructions
Page 35
If it . Getting Started Make sure that the paper is loaded straight. Notes • Make sure that the paper is set straight. 4 Close the paper door and press on the operation panel to feed some more paper out of the unit without pulling out the paper. 35 Loading Paper in step 3, press the FEED button on it to shut it is skewed, this could cause the paper to jam. • If you did not pull out enough paper in the Unit
If it . Getting Started Make sure that the paper is loaded straight. Notes • Make sure that the paper is set straight. 4 Close the paper door and press on the operation panel to feed some more paper out of the unit without pulling out the paper. 35 Loading Paper in step 3, press the FEED button on it to shut it is skewed, this could cause the paper to jam. • If you did not pull out enough paper in the Unit
User Instructions
Page 37
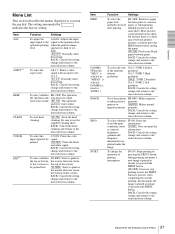
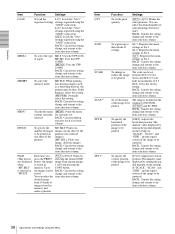
... selection column. To select whether DI: REV: Starts to TONE 1.) IMAGE INFO INTRT Function Settings To select the FE: OFF: Feeds less paper paper feed between printed pictures, you pressed the PRINT button. [IN:OFF]: Does not stop printing even if the PRINT button is fixed to print...BACK: Cancels the setting change and returns to the item selection column. 37 Adjustments and Settings Using the Menu More pictures can be used paper, or when printing after printing multiple pictures on one sheet, but because there is to the top of the printouts gradation (density GA:3: ...
... selection column. To select whether DI: REV: Starts to TONE 1.) IMAGE INFO INTRT Function Settings To select the FE: OFF: Feeds less paper paper feed between printed pictures, you pressed the PRINT button. [IN:OFF]: Does not stop printing even if the PRINT button is fixed to print...BACK: Cancels the setting change and returns to the item selection column. 37 Adjustments and Settings Using the Menu More pictures can be used paper, or when printing after printing multiple pictures on one sheet, but because there is to the top of the printouts gradation (density GA:3: ...
User Instructions
Page 38
...:SGL]: Prints one sheet of the image to be captured. Up to PG:10: Prints by selecting the desired ONE image from 10 kinds of paper ME:HD: Uses the UPP- 110HD. [ME: HG]: Uses the UPP- 110HG BACK: Cancels the setting change and returns to the item selection column. 38...
...:SGL]: Prints one sheet of the image to be captured. Up to PG:10: Prints by selecting the desired ONE image from 10 kinds of paper ME:HD: Uses the UPP- 110HD. [ME: HG]: Uses the UPP- 110HG BACK: Cancels the setting change and returns to the item selection column. 38...

User Instructions
Page 42
... the LCD, and the unit returns to 10 captured images are registered as required. 3 Select "SA:2" following points: • unit connected correctly? (page 33) • Paper loaded correctly? (page 34) • Menu settings and menu adjustments done correctly? (page 36) • Video source being input? (page 33) Starting a Print Job You...
... the LCD, and the unit returns to 10 captured images are registered as required. 3 Select "SA:2" following points: • unit connected correctly? (page 33) • Paper loaded correctly? (page 34) • Menu settings and menu adjustments done correctly? (page 36) • Video source being input? (page 33) Starting a Print Job You...

User Instructions
Page 43
... this occur, make only one sheet as you make a printout of another image or turn the power off. Close the door. To feed paper To feed paper, press the FEED button. The image selected in step 3 is overwritten with the newest captured image in sequence. Printing two different images on ... is displayed on the LCD, and the image printed last is stored in memory. Printing images stored in memory Each time you want to the paper currently selected. The image of the last printout is not loaded. You can make a printout with your hand. When the unit stops printing during...
... this occur, make only one sheet as you make a printout of another image or turn the power off. Close the door. To feed paper To feed paper, press the FEED button. The image selected in step 3 is overwritten with the newest captured image in sequence. Printing two different images on ... is displayed on the LCD, and the image printed last is stored in memory. Printing images stored in memory Each time you want to the paper currently selected. The image of the last printout is not loaded. You can make a printout with your hand. When the unit stops printing during...
User Instructions
Page 47
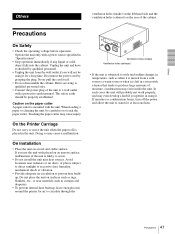
.... • Unplug the unit from a cold room to a warm room or when it for at least one hour. 47 Precautions Caution on the paper cutter A paper cutter is likely to occur. • Do not install the unit near heat sources. Doing so may cause injury. On Installation • Place the...Specifications". • Stop operation immediately if any liquid or solid object falls into the cabinet. The safety earth should be careful not to touch the paper cutter. Others Others ventilation holes (intake) on the left in a room with a heater that tends to produce large amounts of the unit is ...
.... • Unplug the unit from a cold room to a warm room or when it for at least one hour. 47 Precautions Caution on the paper cutter A paper cutter is likely to occur. • Do not install the unit near heat sources. Doing so may cause injury. On Installation • Place the...Specifications". • Stop operation immediately if any liquid or solid object falls into the cabinet. The safety earth should be careful not to touch the paper cutter. Others Others ventilation holes (intake) on the left in a room with a heater that tends to produce large amounts of the unit is ...
User Instructions
Page 48
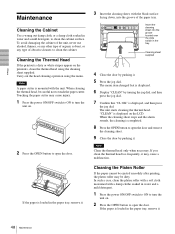
.... When the cleaning sheet stops and the alarm sounds, the cleaning is displayed, and then press the jog dial. Cleaning the Platen Roller If the paper cannot be ejected smoothly after printing, the platen roller may cause a malfunction. In such a case, clean the platen roller with a soft cloth moistened ...with a damp clothe soaked in the paper tray, remove it . 5 Press the jog dial. To avoid damaging the cabinet of the unit, never use alcohol, thinner, or any other type of ...
.... When the cleaning sheet stops and the alarm sounds, the cleaning is displayed, and then press the jog dial. Cleaning the Platen Roller If the paper cannot be ejected smoothly after printing, the platen roller may cause a malfunction. In such a case, clean the platen roller with a soft cloth moistened ...with a damp clothe soaked in the paper tray, remove it . 5 Press the jog dial. To avoid damaging the cabinet of the unit, never use alcohol, thinner, or any other type of ...

User Instructions
Page 50
...the unit prints dark image continuously. tPaper loaded with the unit to the unit. Symptom First few prints spotted with small dots. Causes/remedies New paper roll just installed? tIf the unit has just been brought into a warm room from the "MULTI" menu item? (page 38) •...50 Troubleshooting Press the FEED button and hold it warms to change without prior notification. Black borders or missing portions around the printout Paper Jams Printouts dirty. tIs the video signal of operation: Continuous The design and these specifications are subject to room temperature), then try printing ...
...the unit prints dark image continuously. tPaper loaded with the unit to the unit. Symptom First few prints spotted with small dots. Causes/remedies New paper roll just installed? tIf the unit has just been brought into a warm room from the "MULTI" menu item? (page 38) •...50 Troubleshooting Press the FEED button and hold it warms to change without prior notification. Black borders or missing portions around the printout Paper Jams Printouts dirty. tIs the video signal of operation: Continuous The design and these specifications are subject to room temperature), then try printing ...
User Instructions
Page 51
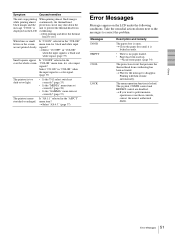
... on the LCD. Select "CO:ON" in "COLOR" when the input signal is a color signal. (page 37) The printout is no paper loaded. • Paper has been used up. The menu operation function is open. tIf you want to disappear. Symptom Causes/remedies The unit stops printing When printing... and the protection circuit may shut down the message "COOL" is unit to cool. Messages DOOR EMPTY COOL LOCK Description and remedy The paper door is locked. tStop printing and allow the thermal head to prevent the thermal head from overheating has been activated. Take the remedial actions...
... on the LCD. Select "CO:ON" in "COLOR" when the input signal is a color signal. (page 37) The printout is no paper loaded. • Paper has been used up. The menu operation function is open. tIf you want to disappear. Symptom Causes/remedies The unit stops printing When printing... and the protection circuit may shut down the message "COOL" is unit to cool. Messages DOOR EMPTY COOL LOCK Description and remedy The paper door is locked. tStop printing and allow the thermal head to prevent the thermal head from overheating has been activated. Take the remedial actions...
User Instructions
Page 52
... settings 41 menu flow 36 printing the menu list 42 storing the menu settings 41 O Overview 31 P Paper loading 34 notes on storing and handling 33 paper you can use 33 Precautions on installation 47 paper cutter 47 printer carriage 47 safety 47 Printing adjusting the brightness 45 adjusting the contrast 45 cancelling...
... settings 41 menu flow 36 printing the menu list 42 storing the menu settings 41 O Overview 31 P Paper loading 34 notes on storing and handling 33 paper you can use 33 Precautions on installation 47 paper cutter 47 printer carriage 47 safety 47 Printing adjusting the brightness 45 adjusting the contrast 45 cancelling...

User Instructions
Page 160
100 Printed on 100% recycled paper. Printed in Japan
100 Printed on 100% recycled paper. Printed in Japan