User Instructions
Page 7
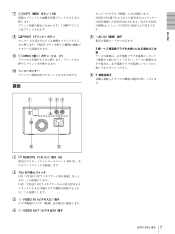
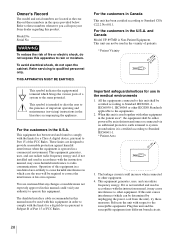
はじめに G COPY 18) 1 1 H PRINT PRINT I OPEN 10、17) J 裏面 VIDEO IN VIDEO E -AC IN 3 極 t 2 F A REMOTE 8) RM-91、ま B 75 ON:VIDEO OUT OFF:VIDEO OUT C t VIDEO IN D T VIDEO OUT 7
はじめに G COPY 18) 1 1 H PRINT PRINT I OPEN 10、17) J 裏面 VIDEO IN VIDEO E -AC IN 3 極 t 2 F A REMOTE 8) RM-91、ま B 75 ON:VIDEO OUT OFF:VIDEO OUT C t VIDEO IN D T VIDEO OUT 7
User Instructions
Page 8
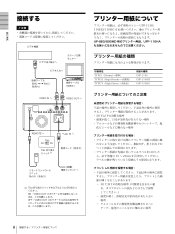
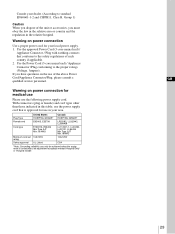
はじめに 接続する (BNC y BNC) VIDEO IN へ VIDEO OUT へ REMOTE へ -AC IN へ 75 a) RM-91 a) 75 ON:VIDEO OUT OFF:VIDEO OUT UPP-110S/ 110HD/110HG UP-880/890MD UPP-110HA TYPE I(Normal TYPE II(High Density TYPE V(High Glossy UPP-110S UPP-110HD UPP-110HG 30 15 ~ 20cm 30 8
はじめに 接続する (BNC y BNC) VIDEO IN へ VIDEO OUT へ REMOTE へ -AC IN へ 75 a) RM-91 a) 75 ON:VIDEO OUT OFF:VIDEO OUT UPP-110S/ 110HD/110HG UP-880/890MD UPP-110HA TYPE I(Normal TYPE II(High Density TYPE V(High Glossy UPP-110S UPP-110HD UPP-110HG 30 15 ~ 20cm 30 8
User Instructions
Page 12
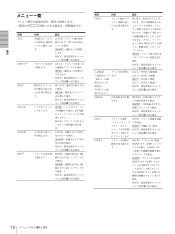
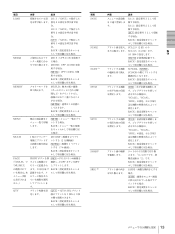
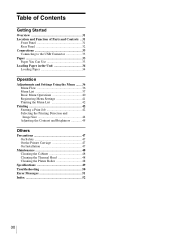
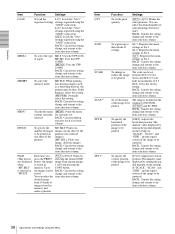
操作 項目 AGC ASPCT a) BEEP CLEAN COLOR DIR b) 内容 設定 AG:ON す。 [AG:OFF します。 BACK AS:1:1 1:1 AS:4:3 BACK BE: OFF BE: ON BACK [CL:OK BACK CO:ON CO:OFF BACK DI:REV DI:NOR a) BACK 項目 内容 設定 FEED FE:OFF 1 1 FEED FE:ON BACK GAMMA (「MEDIA 「ME: S」が選 場合は、 TONE 1 に固 ...
操作 項目 AGC ASPCT a) BEEP CLEAN COLOR DIR b) 内容 設定 AG:ON す。 [AG:OFF します。 BACK AS:1:1 1:1 AS:4:3 BACK BE: OFF BE: ON BACK [CL:OK BACK CO:ON CO:OFF BACK DI:REV DI:NOR a) BACK 項目 内容 設定 FEED FE:OFF 1 1 FEED FE:ON BACK GAMMA (「MEDIA 「ME: S」が選 場合は、 TONE 1 に固 ...
User Instructions
Page 13
操作 項目 内容 設定 LOAD LO: 3:「SAVE 3 合。 LO: 2:「SAVE 2 [LO: 1]:「SAVE 1 BACK MEDIA ME: S:UPP-110S ME:HD:UPP-110HD を使 ME:HG]:UPP-110HG BACK MEMRY ME:FLD ME:FRM BACK MENU [ME:OK BACK MULTI 1 MU:MLT 2 つプリ 2 MU:SGL 1 BACK PAGE (「MULTI」で 「MU:MLT」 PRINT [PG:1] ~ PG:10:1 COPY ます...
操作 項目 内容 設定 LOAD LO: 3:「SAVE 3 合。 LO: 2:「SAVE 2 [LO: 1]:「SAVE 1 BACK MEDIA ME: S:UPP-110S ME:HD:UPP-110HD を使 ME:HG]:UPP-110HG BACK MEMRY ME:FLD ME:FRM BACK MENU [ME:OK BACK MULTI 1 MU:MLT 2 つプリ 2 MU:SGL 1 BACK PAGE (「MULTI」で 「MU:MLT」 PRINT [PG:1] ~ PG:10:1 COPY ます...

User Instructions
Page 14
操作 項目 内容 設定 SPEED SP:NOR (「MEDIA 「ME:HD [SP:HI 場合。 BACK ご注意 「SP:HI 「SP:NOR VIDEO 裏面の VIDEO VI:EE:VIDEO IN OUT ます。 [VI:THR]:VIDEO IN 端子に BACK BACK 「READY a c 「SC:NOR」の場合 「SC:WD1」の場合 「SC:WD2...
操作 項目 内容 設定 SPEED SP:NOR (「MEDIA 「ME:HD [SP:HI 場合。 BACK ご注意 「SP:HI 「SP:NOR VIDEO 裏面の VIDEO VI:EE:VIDEO IN OUT ます。 [VI:THR]:VIDEO IN 端子に BACK BACK 「READY a c 「SC:NOR」の場合 「SC:WD1」の場合 「SC:WD2...
User Instructions
Page 18
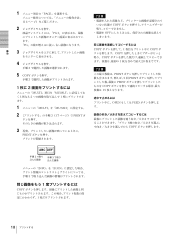
操作 1 PAGE 14 2 PG:1 PG 3 4 手順 3 5 COPY 手順 3 1 枚に 2 MULTI MU:MLT 2 1 1 MULTI」を「MU:MLT 2 3(17 PRINT ボ 3 PRINT COPY OFF COPY 1 COPY COPY COPY 1 20 PRINT 5 回 PRINT PRINT COPY 15 OPEN FEED COPY 手順 2 手順 3 INFO」を「IF:ON 3 1 COPY 1 18
操作 1 PAGE 14 2 PG:1 PG 3 4 手順 3 5 COPY 手順 3 1 枚に 2 MULTI MU:MLT 2 1 1 MULTI」を「MU:MLT 2 3(17 PRINT ボ 3 PRINT COPY OFF COPY 1 COPY COPY COPY 1 20 PRINT 5 回 PRINT PRINT COPY 15 OPEN FEED COPY 手順 2 手順 3 INFO」を「IF:ON 3 1 COPY 1 18

User Instructions
Page 19
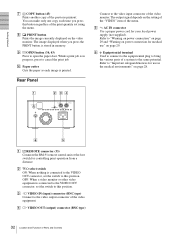
操作 SIDE SCALE SFT.H、SFT.V SIDE S:STD S:SIDE SFT.H」「SFT.V 例:「SIDE」が「S:STD」、「SCALE」が「 SCL:2.0 元の画像 「S.H S:STD」の場合 「S:SIDE」の場合 Y 「S.H:0」の場合 Y 「S.H SCALE 2 0.5 0.1 SCALE SCAN 19
操作 SIDE SCALE SFT.H、SFT.V SIDE S:STD S:SIDE SFT.H」「SFT.V 例:「SIDE」が「S:STD」、「SCALE」が「 SCL:2.0 元の画像 「S.H S:STD」の場合 「S:SIDE」の場合 Y 「S.H:0」の場合 Y 「S.H SCALE 2 0.5 0.1 SCALE SCAN 19
User Instructions
Page 24
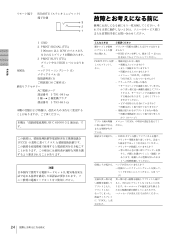
その他 REMOTE 1 GND 2 PRINT SIGNAL (TTL) 100msec 以上 LOW 3 PRINT BUSY (TTL) HIGH す。 付属品 1) 1) 1) 1) AC 1-791-041-xx 3 極 t 2 1-793-461-xx JIS C 61000-3-2 VCCI A FEED 15 ~ 20 cm PRINT ない。 MULTI 「MU:MLT 9 SCAN OPEN 22 に「COOL 24
その他 REMOTE 1 GND 2 PRINT SIGNAL (TTL) 100msec 以上 LOW 3 PRINT BUSY (TTL) HIGH す。 付属品 1) 1) 1) 1) AC 1-791-041-xx 3 極 t 2 1-793-461-xx JIS C 61000-3-2 VCCI A FEED 15 ~ 20 cm PRINT ない。 MULTI 「MU:MLT 9 SCAN OPEN 22 に「COOL 24
User Instructions
Page 25
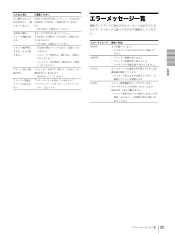
COLOR CO:ON CO:OFF COLOR CO:OFF →「CO:ON 75 すぎる。 MEDIA GAMMA ASPCT AS:1:1 AS:4:3 さい。(22 DOOR EMPTY COOL LOCK CONTR BRIGHT その他 25
COLOR CO:ON CO:OFF COLOR CO:OFF →「CO:ON 75 すぎる。 MEDIA GAMMA ASPCT AS:1:1 AS:4:3 さい。(22 DOOR EMPTY COOL LOCK CONTR BRIGHT その他 25
User Instructions
Page 28
...other equipment in the patient area*, the equipment shall be used in the vicinity of this product. The leakage current could void your Sony dealer regarding this equipment in a residential area is likely to cause harmful interference in accordance with the limits for a digital device ... IEC/ISO Standards applicable to the same potential. This equipment generates, uses, and can radiate frequency energy. and Canada Model UP-897MD is not installed and used together with respect to rain or moisture. The shielded interface cable recommended in this manual must be used...
...other equipment in the patient area*, the equipment shall be used in the vicinity of this product. The leakage current could void your Sony dealer regarding this equipment in a residential area is likely to cause harmful interference in accordance with the limits for a digital device ... IEC/ISO Standards applicable to the same potential. This equipment generates, uses, and can radiate frequency energy. and Canada Model UP-897MD is not installed and used together with respect to rain or moisture. The shielded interface cable recommended in this manual must be used...
User Instructions
Page 29
With connectors (plug or female) and cord types other than those indicated in this table, use the power supply cord that conforms to the proper ratings (Voltage, Ampere). If you must obey the law in the relative area or country and the regulation in your dealer. (According to an equivalent receptacle marked 'Hospital Only' or 'Hospital Grade'. Warning on power connection for use of each country if applicable. 2. United States Canada Plug Type Female end HOSPITAL GRADE* E62405, E35708 HOSPITAL GRADE* LR53182, LL022442, LL088408 Cord type E159216, E35496 Min.Type SJT Min.18...
With connectors (plug or female) and cord types other than those indicated in this table, use the power supply cord that conforms to the proper ratings (Voltage, Ampere). If you must obey the law in the relative area or country and the regulation in your dealer. (According to an equivalent receptacle marked 'Hospital Only' or 'Hospital Grade'. Warning on power connection for use of each country if applicable. 2. United States Canada Plug Type Female end HOSPITAL GRADE* E62405, E35708 HOSPITAL GRADE* LR53182, LL022442, LL088408 Cord type E159216, E35496 Min.Type SJT Min.18...
User Instructions
Page 30
Table of Contents Getting Started Overview 31 Location and Function of Parts and Controls .. 31 Front Panel 31 Rear Panel 32 Connections 33 Connecting to the USB Connector 33 Paper 33 Paper You Can Use 33 Loading Paper in the Unit 34 Loading Paper 34 Operation Adjustments and Settings Using the Menu ....... 36 Menu Flow 36 Menu List 37 Basic Menu Operations 40 Registering Menu Settings 41 Printing the Menu List 42 Printing 42 Starting a Print Job 42 Selecting the Printing Direction and Image Size 44 Adjusting the Contrast and Brightness 45 Others Precautions 47 On Safety 47...
Table of Contents Getting Started Overview 31 Location and Function of Parts and Controls .. 31 Front Panel 31 Rear Panel 32 Connections 33 Connecting to the USB Connector 33 Paper 33 Paper You Can Use 33 Loading Paper in the Unit 34 Loading Paper 34 Operation Adjustments and Settings Using the Menu ....... 36 Menu Flow 36 Menu List 37 Basic Menu Operations 40 Registering Menu Settings 41 Printing the Menu List 42 Printing 42 Starting a Print Job 42 Selecting the Printing Direction and Image Size 44 Adjusting the Contrast and Brightness 45 Others Precautions 47 On Safety 47...

User Instructions
Page 31
Getting Started Getting Started Overview Quiet, High Quality, Fast Printing • Employs a thin thermal head with a built-in high speed drive IC, capable of high resolution images of 12.8 dots/mm. • Print speeds of approximately 1 high quality image (A-7 size single printout) every 2 seconds when printing at high speed (when "SP:HI" is selected in "SPEED" menu item). • Monochrome printing with up to 256 shades of user settings. You can make menu operations. B Printer window display (LCD: liquid crystal display) (36, 42) The back light lights in temperature correction...
Getting Started Getting Started Overview Quiet, High Quality, Fast Printing • Employs a thin thermal head with a built-in high speed drive IC, capable of high resolution images of 12.8 dots/mm. • Print speeds of approximately 1 high quality image (A-7 size single printout) every 2 seconds when printing at high speed (when "SP:HI" is selected in "SPEED" menu item). • Monochrome printing with up to 256 shades of user settings. You can make menu operations. B Printer window display (LCD: liquid crystal display) (36, 42) The back light lights in temperature correction...
User Instructions
Page 32
J Paper cutter Cuts the paper as each time you press the PRINT button is stored in memory. E - F Equipotential terminal Used to connect to the equipotential plug to bring the various parts of a system to this position. OFF: When a video monitor or other video equipment is in the medical environments" on page 29. H PRINT button Prints the image currently displayed on the setting of the "VIDEO" item of the video monitor. I OPEN button (34, 43) Press to "Warning on power connection" on page 29 and "Warning on power connection for use " on page 28. Refer to open the paper door. ...
J Paper cutter Cuts the paper as each time you press the PRINT button is stored in memory. E - F Equipotential terminal Used to connect to the equipotential plug to bring the various parts of a system to this position. OFF: When a video monitor or other video equipment is in the medical environments" on page 29. H PRINT button Prints the image currently displayed on the setting of the "VIDEO" item of the video monitor. I OPEN button (34, 43) Press to "Warning on power connection" on page 29 and "Warning on power connection for use " on page 28. Refer to open the paper door. ...

User Instructions
Page 33
... • Stored unused paper at a temperature below 30°C (86°F) in .) before making any compound of paper, use with your fingers. Paper Use only Sony UPP-110S/110HD/110HG paper designed for the UP-880/890MD series printer. OFF: When a video monitor or other video equipment is not exposed to...
... • Stored unused paper at a temperature below 30°C (86°F) in .) before making any compound of paper, use with your fingers. Paper Use only Sony UPP-110S/110HD/110HG paper designed for the UP-880/890MD series printer. OFF: When a video monitor or other video equipment is not exposed to...
User Instructions
Page 34
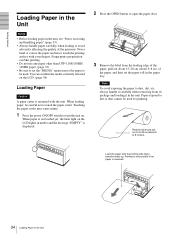
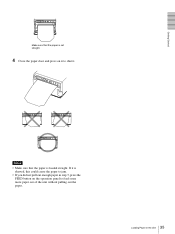
Never bend or crease the paper and never touch the printing surface with the printing side (heat sensitive side) up. You can blur printing. • Do not use any paper other than UPP-110S/110HD/ 110HG paper. (page 33) • Be sure to set the paper roll in the unit, see "Notes on the LCD. (page 38) Loading Paper Caution A paper cutter is displayed. 2 Press the OPEN button to open the paper door. 3 Remove the label from its package and loading it carefully when removing from the leading edge of the paper, pull out about 15~20 cm (about 6 to dirt or dust cannot be used . Paper ...
Never bend or crease the paper and never touch the printing surface with the printing side (heat sensitive side) up. You can blur printing. • Do not use any paper other than UPP-110S/110HD/ 110HG paper. (page 33) • Be sure to set the paper roll in the unit, see "Notes on the LCD. (page 38) Loading Paper Caution A paper cutter is displayed. 2 Press the OPEN button to open the paper door. 3 Remove the label from its package and loading it carefully when removing from the leading edge of the paper, pull out about 15~20 cm (about 6 to dirt or dust cannot be used . Paper ...
User Instructions
Page 35
Notes • Make sure that the paper is loaded straight. Getting Started Make sure that the paper is set straight. 4 Close the paper door and press on the operation panel to shut it to feed some more paper out of the unit without pulling out the paper. 35 Loading Paper in the Unit If it is skewed, this could cause the paper to jam. • If you did not pull out enough paper in step 3, press the FEED button on it .
Notes • Make sure that the paper is loaded straight. Getting Started Make sure that the paper is set straight. 4 Close the paper door and press on the operation panel to shut it to feed some more paper out of the unit without pulling out the paper. 35 Loading Paper in the Unit If it is skewed, this could cause the paper to jam. • If you did not pull out enough paper in step 3, press the FEED button on it .
User Instructions
Page 36
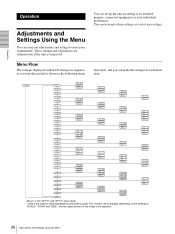
You can set of the image to be captured. 36 Adjustments and Settings Using the Menu Operation Adjustments and Settings Using the Menu You can make the settings for each menu item. flow chart, and you turn the jog dial as shown in the following menu You can store up the unit according to meet your individual preferences. Those settings and adjustments are retained even if the unit is turned off. This numeric value changes depending on the LCD changes in the "SFT:H" and "SFT:V" menu items * means the numeric value displayed by turning the jog dial. Operation About * in ...
You can set of the image to be captured. 36 Adjustments and Settings Using the Menu Operation Adjustments and Settings Using the Menu You can make the settings for each menu item. flow chart, and you turn the jog dial as shown in the following menu You can store up the unit according to meet your individual preferences. Those settings and adjustments are retained even if the unit is turned off. This numeric value changes depending on the LCD changes in the "SFT:H" and "SFT:V" menu items * means the numeric value displayed by turning the jog dial. Operation About * in ...
User Instructions
Page 37
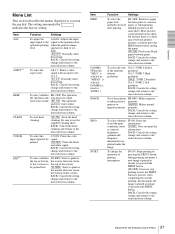
Item AGC ASPCT a) BEEP CLEAN COLOR DIR b) Function Settings To adjust the AG:ON: Adjusts the input input signal to the signal to use the supplied cleaning sheet. BACK: Cancels the setting change and returns to the item selection column. To select the aspect ratio AS:1:1: Prints a video signal with an aspect ratio of the screen). Be sure to the optimum level, optimum printing when the printout image level appears too dark or too light. [AG:OFF]: Normally select this setting. BACK: Cancels the setting change and returns to the item selection ...
Item AGC ASPCT a) BEEP CLEAN COLOR DIR b) Function Settings To adjust the AG:ON: Adjusts the input input signal to the signal to use the supplied cleaning sheet. BACK: Cancels the setting change and returns to the item selection column. To select the aspect ratio AS:1:1: Prints a video signal with an aspect ratio of the screen). Be sure to the optimum level, optimum printing when the printout image level appears too dark or too light. [AG:OFF]: Normally select this setting. BACK: Cancels the setting change and returns to the item selection ...
User Instructions
Page 38
MEDIA To select the type ME:S: Uses the UPP-110S. MENU To print the menu [ME:OK]: Prints the menu settings currently list currently set the print quantity [QT:1] to the item selection column. 38 Adjustments and Settings Using the Menu To register up to be printed [S.H:0]: Adjusts the horizontal position. BACK: Cancels the setting change and returns to the item selection column. To set between 1 and 9. BACK: Cancels the setting change and returns to its item column. selected BACK: Cancels printing and goes back to the item selection column. You can be ...
MEDIA To select the type ME:S: Uses the UPP-110S. MENU To print the menu [ME:OK]: Prints the menu settings currently list currently set the print quantity [QT:1] to the item selection column. 38 Adjustments and Settings Using the Menu To register up to be printed [S.H:0]: Adjusts the horizontal position. BACK: Cancels the setting change and returns to the item selection column. To set between 1 and 9. BACK: Cancels the setting change and returns to its item column. selected BACK: Cancels printing and goes back to the item selection column. You can be ...
