

Operating Instructions
Page 1
Multi Channel AV Receiver Operating Instructions 4-408-151-11(2) STR-DH830/STR-DH730
Multi Channel AV Receiver Operating Instructions 4-408-151-11(2) STR-DH830/STR-DH730

Operating Instructions
Page 3
...comply with the following instructions. 1) Disconnect the AC power cord from the apparatus and the speakers. Increase the separation between the equipment and receiver. - Consult the dealer or an experienced radio/TV technician for a Class B digital device, pursuant to the apparatus and the speakers in...long periods of time. 14)Refer all servicing to the applicable collection point for the environment and human health, which the receiver is disposed of electrical and electronic equipment. CAUTION You are designed to the apparatus and the speakers carefully so as household ...
...comply with the following instructions. 1) Disconnect the AC power cord from the apparatus and the speakers. Increase the separation between the equipment and receiver. - Consult the dealer or an experienced radio/TV technician for a Class B digital device, pursuant to the apparatus and the speakers in...long periods of time. 14)Refer all servicing to the applicable collection point for the environment and human health, which the receiver is disposed of electrical and electronic equipment. CAUTION You are designed to the apparatus and the speakers carefully so as household ...

Operating Instructions
Page 4
... issued & pending. The manufacturer of this manual describe the operation of the receiver with this manual are trademarks of Sony Corporation. You can also use the buttons or knobs on the receiver if they may be treated properly, hand over to the applicable collection point ...systems) 4GB About This Manual • The instructions in this battery should be replaced by inappropriate waste handling of the battery. This receiver incorporates High-Definition Multimedia Interface (HDMITM) technology. "BRAVIA" is located at end-of-life to the applicable collection point for customers...
... issued & pending. The manufacturer of this manual describe the operation of the receiver with this manual are trademarks of Sony Corporation. You can also use the buttons or knobs on the receiver if they may be treated properly, hand over to the applicable collection point ...systems) 4GB About This Manual • The instructions in this battery should be replaced by inappropriate waste handling of the battery. This receiver incorporates High-Definition Multimedia Interface (HDMITM) technology. "BRAVIA" is located at end-of-life to the applicable collection point for customers...

Operating Instructions
Page 5
.... This product contains technology subject to MORISAWA & COMPANY LTD. "WALKMAN" is a trademark of Sony Corporation. These names are trademarks of Microsoft. All other countries. MICROVAULT is a registered trademark of Sony Corporation. The font type (Shin Go R) installed in this receiver is prohibited without the appropriate license(s) from Fraunhofer IIS and Thomson. Use or...
.... This product contains technology subject to MORISAWA & COMPANY LTD. "WALKMAN" is a trademark of Sony Corporation. These names are trademarks of Microsoft. All other countries. MICROVAULT is a registered trademark of Sony Corporation. The font type (Shin Go R) installed in this receiver is prohibited without the appropriate license(s) from Fraunhofer IIS and Thomson. Use or...

Operating Instructions
Page 6
...Connecting the audio equipment...........30 5: Connecting the antennas (aerials 31 6: Connecting the AC power cord (mains lead 31 Preparing the Receiver Initializing the receiver 32 Setting the speakers 32 Using AUTO CALIBRATION 33 Guide to on-screen display operation ..........38 Basic Operations Playing an input source ... with one-touch operation (One-Touch Play 57 Enjoying the TV sound from the speakers connected to the receiver (System Audio Control 58 Turning off the receiver with the TV (System Power-Off 58 Enjoying optimum sound field for the selected scene (Scene Select 59...
...Connecting the audio equipment...........30 5: Connecting the antennas (aerials 31 6: Connecting the AC power cord (mains lead 31 Preparing the Receiver Initializing the receiver 32 Setting the speakers 32 Using AUTO CALIBRATION 33 Guide to on-screen display operation ..........38 Basic Operations Playing an input source ... with one-touch operation (One-Touch Play 57 Enjoying the TV sound from the speakers connected to the receiver (System Audio Control 58 Turning off the receiver with the TV (System Power-Off 58 Enjoying optimum sound field for the selected scene (Scene Select 59...

Operating Instructions
Page 8
...; If you do not intend to use a new battery with new ones. 8GB If this happens, reassign the input buttons (page 72). • When the receiver no longer responds to the remote control, replace all the batteries with old ones. • Do not mix manganese batteries and other kinds of the...
...; If you do not intend to use a new battery with new ones. 8GB If this happens, reassign the input buttons (page 72). • When the receiver no longer responds to the remote control, replace all the batteries with old ones. • Do not mix manganese batteries and other kinds of the...

Operating Instructions
Page 9
... Adjusts the brightness of parts Front panel 1 2 34 5 6 78 9 ql qk qj qh A ?/1 (on , the bass, treble, and effect levels increase, and "D. F Remote control sensor Receives signals from iPod/iPhone. P 2CH/A.DIRECT, A.F.D., MOVIE (HD-D.C.S.), MUSIC (page 51, 53) Q TUNING MODE, MEMORY/ENTER, TUNING Press to scan a station. RANGE" is turned on...
... Adjusts the brightness of parts Front panel 1 2 34 5 6 78 9 ql qk qj qh A ?/1 (on , the bass, treble, and effect levels increase, and "D. F Remote control sensor Receives signals from iPod/iPhone. P 2CH/A.DIRECT, A.F.D., MOVIE (HD-D.C.S.), MUSIC (page 51, 53) Q TUNING MODE, MEMORY/ENTER, TUNING Press to scan a station. RANGE" is turned on...

Operating Instructions
Page 10
... signal through the OPTICAL jack (page 22, 25, 26, 59). Indicators on the speaker settings, the box around the letter(s) vary to show how the receiver downmixes the source sound. Based on the display panel 1 23 4 5 6 7 89 LH RH SW LCR SL S SR SBL SB SBR LFE HDMI DTS ... DTS format signals. qd qs qa 0 D Input indicator Lights up the respective indicator when the receiver is output from the SUBWOOFER jack. COAX The INPUT MODE is set to "AUTO", and when the receiver recognizes the equipment connected via an HDMI IN jack (page 23, 59). - The INPUT MODE ...
... signal through the OPTICAL jack (page 22, 25, 26, 59). Indicators on the speaker settings, the box around the letter(s) vary to show how the receiver downmixes the source sound. Based on the display panel 1 23 4 5 6 7 89 LH RH SW LCR SL S SR SBL SB SBR LFE HDMI DTS ... DTS format signals. qd qs qa 0 D Input indicator Lights up the respective indicator when the receiver is output from the SUBWOOFER jack. COAX The INPUT MODE is set to "AUTO", and when the receiver recognizes the equipment connected via an HDMI IN jack (page 23, 59). - The INPUT MODE ...

Operating Instructions
Page 11
... Logic Dolby Pro Logic II Dolby Pro Logic IIx Dolby Pro Logic IIz Note These indicators may not light up the respective indicator when the receiver is not set to a station with RDS services. I SLEEP Lights up when dynamic range compression is activated (page 14). J D.RANGE ...Dolby Digital Plus Dolby TrueHD Note When playing a Dolby Digital format disc, make sure that you select.) L LPCM Lights up the respective indicator when the receiver is decoding the Linear PCM signals. ST Stereo broadcast RDS (Europe, Australia and Taiwan models only) Tuned to "ANALOG" (page 59) or "A. ...
... Logic Dolby Pro Logic II Dolby Pro Logic IIx Dolby Pro Logic IIz Note These indicators may not light up the respective indicator when the receiver is not set to a station with RDS services. I SLEEP Lights up when dynamic range compression is activated (page 14). J D.RANGE ...Dolby Digital Plus Dolby TrueHD Note When playing a Dolby Digital format disc, make sure that you select.) L LPCM Lights up the respective indicator when the receiver is decoding the Linear PCM signals. ST Stereo broadcast RDS (Europe, Australia and Taiwan models only) Tuned to "ANALOG" (page 59) or "A. ...

Operating Instructions
Page 13
You can reassign the input button to match the equipment connected to operate Sony audio/ video equipment. The remote control is assigned to your TV to operate this receiver and other equipment. Remote control Use the supplied remote control to watch the selected input image (page 22). D ...SPEAKERS section (page 20) * You must connect the HDMI TV OUT or MONITOR OUT jack to your receiver (page 72). • RM-AAU106 (USA, Canada and Mexico models only) • RM-AAU107 (Other models) wh 1 wg 2 3 wf 4 wd 5 ws 6 wa ...
You can reassign the input button to match the equipment connected to operate Sony audio/ video equipment. The remote control is assigned to your TV to operate this receiver and other equipment. Remote control Use the supplied remote control to watch the selected input image (page 22). D ...SPEAKERS section (page 20) * You must connect the HDMI TV OUT or MONITOR OUT jack to your receiver (page 72). • RM-AAU106 (USA, Canada and Mexico models only) • RM-AAU107 (Other models) wh 1 wg 2 3 wf 4 wd 5 ws 6 wa ...

Operating Instructions
Page 14
... buttons are assigned to both digital and analog jacks. E INPUT MODE Selects the input mode when the same equipment is connected to control Sony equipment. K TOOLS/OPTIONS Displays and selects items from the option menus. N SOUND FIELD +**/- Saving the power in pink (page 14)..... Scans a station. Example: Hold down SHIFT (O), then press ENT/MEM (C). 2 Press ENT/MEM 1 Hold down SHIFT To control the receiver B ?/1* (on/standby) Turns the receiver on . Press MUTING or again to the previous menu. If you press any of all speakers at a specified time. M TUNING +/- Q...
... buttons are assigned to both digital and analog jacks. E INPUT MODE Selects the input mode when the same equipment is connected to control Sony equipment. K TOOLS/OPTIONS Displays and selects items from the option menus. N SOUND FIELD +**/- Saving the power in pink (page 14)..... Scans a station. Example: Hold down SHIFT (O), then press ENT/MEM (C). 2 Press ENT/MEM 1 Hold down SHIFT To control the receiver B ?/1* (on/standby) Turns the receiver on . Press MUTING or again to the previous menu. If you press any of all speakers at a specified time. M TUNING +/- Q...
Operating Instructions
Page 15
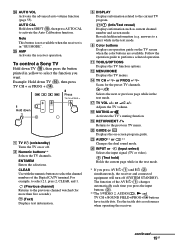
... current channel number and screen mode. Note This button is not available when the receiver is in yellow to the previous channel watched (for the preset TV channels. To control a Sony TV Hold down SHIFT (O), then press AUTO CAL to a quiz) while in the...buttons are available. Adjusts the TV volume. The function of the Digital CATV terminal. answers to activate the Auto Calibration function. Y AMP Activates the receiver operation. or PROG +**/- Scans for more than five seconds). / (Text) Displays text information. or +/- R MUTING or Activates the TV's ...
... current channel number and screen mode. Note This button is not available when the receiver is in yellow to the previous channel watched (for the preset TV channels. To control a Sony TV Hold down SHIFT (O), then press AUTO CAL to a quiz) while in the...buttons are available. Adjusts the TV volume. The function of the Digital CATV terminal. answers to activate the Auto Calibration function. Y AMP Activates the receiver operation. or PROG +**/- Scans for more than five seconds). / (Text) Displays text information. or +/- R MUTING or Activates the TV's ...

Operating Instructions
Page 16
... - The function of your connected equipment, some functions explained in pink (page 14). d)For example, to serve as references when operating the receiver. e)Other models. Use the tactile dots as examples. • Depending on the model of the AV ?/1 (A) changes automatically each time you... press AV ?/1 (A) and ?/1 (B) simultaneously, the receiver and connected equipment will turn off (SYSTEM STANDBY). To control other Sony equipment Be sure to hold down SHIFT (O) to activate the buttons printed in this section may not...
... - The function of your connected equipment, some functions explained in pink (page 14). d)For example, to serve as references when operating the receiver. e)Other models. Use the tactile dots as examples. • Depending on the model of the AV ?/1 (A) changes automatically each time you... press AV ?/1 (A) and ?/1 (B) simultaneously, the receiver and connected equipment will turn off (SYSTEM STANDBY). To control other Sony equipment Be sure to hold down SHIFT (O) to activate the buttons printed in this section may not...

Operating Instructions
Page 17
.../video equipment connected to the receiver by following the simple steps below . Connecting the audio equipment (page 30) Preparing the receiver See "6: Connecting the AC power cord (mains lead)" (page 31) and "Initializing the receiver" (page 32). 17GB For... a PlayStation 3, check that "BD/DVD Audio Output Format (HDMI)" and "BD Audio Output Format (Optical Digital)" are set to "Bitstream" (with the connected equipment. For details, refer to "Auto", "Dolby Digital" and "DTS" respectively (as of September 2011). See the illustration below . For a Sony...
.../video equipment connected to the receiver by following the simple steps below . Connecting the audio equipment (page 30) Preparing the receiver See "6: Connecting the AC power cord (mains lead)" (page 31) and "Initializing the receiver" (page 32). 17GB For... a PlayStation 3, check that "BD/DVD Audio Output Format (HDMI)" and "BD Audio Output Format (Optical Digital)" are set to "Bitstream" (with the connected equipment. For details, refer to "Auto", "Dolby Digital" and "DTS" respectively (as of September 2011). See the illustration below . For a Sony...
Operating Instructions
Page 18
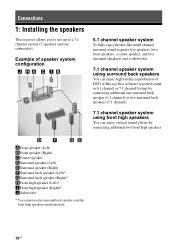
... DVD or Blu-ray Disc software recorded sound in 6.1 channel or 7.1 channel format by connecting additional two front high speakers. Connections 1: Installing the speakers This receiver allows you to use the surround back speakers and the front high speakers simultaneously. 18GB Example of speaker system configuration 5.1 channel speaker system To fully...
... DVD or Blu-ray Disc software recorded sound in 6.1 channel or 7.1 channel format by connecting additional two front high speakers. Connections 1: Installing the speakers This receiver allows you to use the surround back speakers and the front high speakers simultaneously. 18GB Example of speaker system configuration 5.1 channel speaker system To fully...

Operating Instructions
Page 22
... supplied) C Component video cord (not supplied) D Video cord (not supplied) E HDMI cable (not supplied) Sony recommends that you connect the HDMI TV OUT or MONITOR OUT jack to a TV. 3: Connecting the TV You can operate this receiver using a GUI (Graphical User Interface) if you connect HDMI TV OUT jack to a TV. Recommended...
... supplied) C Component video cord (not supplied) D Video cord (not supplied) E HDMI cable (not supplied) Sony recommends that you connect the HDMI TV OUT or MONITOR OUT jack to a TV. 3: Connecting the TV You can operate this receiver using a GUI (Graphical User Interface) if you connect HDMI TV OUT jack to a TV. Recommended...

Operating Instructions
Page 23
... (ARC) compatible TV, the TV sound will output from the receiver. • When connecting optical digital cords, insert the plugs straight until they click into place. • Do not bend or tie optical digital cords. By connecting Sony "BRAVIA" Synccompatible equipment using High Speed HDMI cables, put on ...) farther away from the speakers connected to "ON" in HDMI Settings menu (page 67). For details, see "Function for HDMI" to the receiver via an optical digital cord or an audio cord), switch the audio input mode using other than an HDMI cable (e.g., via the HDMI TV OUT...
... (ARC) compatible TV, the TV sound will output from the receiver. • When connecting optical digital cords, insert the plugs straight until they click into place. • Do not bend or tie optical digital cords. By connecting Sony "BRAVIA" Synccompatible equipment using High Speed HDMI cables, put on ...) farther away from the speakers connected to "ON" in HDMI Settings menu (page 67). For details, see "Function for HDMI" to the receiver via an optical digital cord or an audio cord), switch the audio input mode using other than an HDMI cable (e.g., via the HDMI TV OUT...

Operating Instructions
Page 24
..., the sound and/or the image may be displayed properly. • We do not recommend using an HDMI-DVI conversion cable. Converting video signals This receiver is displayed. • DSD signals of Super Audio CD are not input and output. • Depending on the TV or the video equipment, 3D images...
..., the sound and/or the image may be displayed properly. • We do not recommend using an HDMI-DVI conversion cable. Converting video signals This receiver is displayed. • DSD signals of Super Audio CD are not input and output. • Depending on the TV or the video equipment, 3D images...

Operating Instructions
Page 25
...D Component video cord (not supplied) Recommended connection Alternative connection * When you can use an HDMIauthorized cable or Sony HDMI cable. Notes • Be sure to control your DVD player. Connections Connecting a Blu-ray Disc player...DVD player Audio/video signals Audio signals Video signals or A B C* D A HDMI cable (not supplied) Sony recommends that you connect the equipment equipped with an OPTICAL jack, set the "Input Assign" in the Input Option...DVD input buttons on the receiver's display panel. For details, see "Naming the input (Name Input)" (page 41). 25GB...
...D Component video cord (not supplied) Recommended connection Alternative connection * When you can use an HDMIauthorized cable or Sony HDMI cable. Notes • Be sure to control your DVD player. Connections Connecting a Blu-ray Disc player...DVD player Audio/video signals Audio signals Video signals or A B C* D A HDMI cable (not supplied) Sony recommends that you connect the equipment equipped with an OPTICAL jack, set the "Input Assign" in the Input Option...DVD input buttons on the receiver's display panel. For details, see "Naming the input (Name Input)" (page 41). 25GB...

Operating Instructions
Page 29
... OUT jacks may impact the video signal conversion. Connections Function for conversion of video signals The receiver is output. : Video signals are upconverted and output (up -conversion function. It is recommended to turn off this receiver and then viewed on the TV screen may appear distorted horizontally or no image can be...). INPUT jack OUTPUT jack HDMI IN HDMI TV OUT COMPONENT VIDEO IN COMPONENT VIDEO MONITOR OUT VIDEO IN MONITOR VIDEO OUT : Same type of the receiver.
... OUT jacks may impact the video signal conversion. Connections Function for conversion of video signals The receiver is output. : Video signals are upconverted and output (up -conversion function. It is recommended to turn off this receiver and then viewed on the TV screen may appear distorted horizontally or no image can be...). INPUT jack OUTPUT jack HDMI IN HDMI TV OUT COMPONENT VIDEO IN COMPONENT VIDEO MONITOR OUT VIDEO IN MONITOR VIDEO OUT : Same type of the receiver.


