Operating Instructions
Page 6
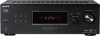
About the indicators on the display if no digital signal is input through the OPTICAL jack. D D ; PL/ ; "; PLII" lights up when a memory function, such as Preset Memory (page 41), etc., is activated. Lights up when the Pro Logic II Movie/... When playing a DTS format disc, be sure that you have made digital connections and that INPUT MODE is decoding DTS signals. Lights up when the receiver is set to output the center and surround channel signals. D ; Name F DTS G MEMORY H Tuner indicators I Preset station indicators J D.RANGE K COAX Function Lights up when using...
About the indicators on the display if no digital signal is input through the OPTICAL jack. D D ; PL/ ; "; PLII" lights up when a memory function, such as Preset Memory (page 41), etc., is activated. Lights up when the Pro Logic II Movie/... When playing a DTS format disc, be sure that you have made digital connections and that INPUT MODE is decoding DTS signals. Lights up when the receiver is set to output the center and surround channel signals. D ; Name F DTS G MEMORY H Tuner indicators I Preset station indicators J D.RANGE K COAX Function Lights up when using...
Operating Instructions
Page 8
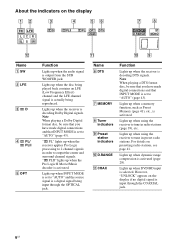
... IN White (L) jacks Red (R) Connects to a DIGITAL MEDIA PORT adapter (page 44). 8US B ANTENNA section FM ANTENNA jack AM ANTENNA terminals Connects to the AM loop antenna supplied with this receiver (page 20). E DMPORT DMPORT jack Connects to a CD player, etc. (page 16). Connects to the... FM wire antenna supplied with this receiver (page 20). C SPEAKERS section Connects to a DVD jack player, etc. Rear panel 12 DIGITAL OPTICAL SAT IN COAXIAL DVD/BD IN ANTENNA AM DMPORT DC5V 0.7A MAX IN IN IN...
... IN White (L) jacks Red (R) Connects to a DIGITAL MEDIA PORT adapter (page 44). 8US B ANTENNA section FM ANTENNA jack AM ANTENNA terminals Connects to the AM loop antenna supplied with this receiver (page 20). E DMPORT DMPORT jack Connects to a CD player, etc. (page 16). Connects to the... FM wire antenna supplied with this receiver (page 20). C SPEAKERS section Connects to a DVD jack player, etc. Rear panel 12 DIGITAL OPTICAL SAT IN COAXIAL DVD/BD IN ANTENNA AM DMPORT DC5V 0.7A MAX IN IN IN...
Operating Instructions
Page 16
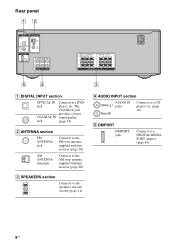
Super Audio CD player/CD player A DIGITAL OPTICAL SAT IN COAXIAL DVD/BD IN ANTENNA AM DMPORT DC5V 0.7A MAX IN IN IN L R SA-CD/CD TV SAT SUB SURROUND WOOFER R L CENTER FRONT RL SPEAKERS (On the front panel) VIDEO IN/ PORTABLE AUDIO IN B Portable audio A Audio cord (not supplied) B Phono cord with stereo headphone jack (not supplied) 16US Before connecting the cords, be sure to connect audio components such as MP3 player, Super Audio CD player or CD player. Connecting audio components The following illustration shows how to disconnect the AC power cord (mains lead).
Super Audio CD player/CD player A DIGITAL OPTICAL SAT IN COAXIAL DVD/BD IN ANTENNA AM DMPORT DC5V 0.7A MAX IN IN IN L R SA-CD/CD TV SAT SUB SURROUND WOOFER R L CENTER FRONT RL SPEAKERS (On the front panel) VIDEO IN/ PORTABLE AUDIO IN B Portable audio A Audio cord (not supplied) B Phono cord with stereo headphone jack (not supplied) 16US Before connecting the cords, be sure to connect audio components such as MP3 player, Super Audio CD player or CD player. Connecting audio components The following illustration shows how to disconnect the AC power cord (mains lead).
Operating Instructions
Page 18
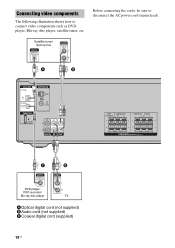
... MAX IN IN IN L R SA-CD/CD TV SAT SUB SURROUND WOOFER R L CENTER FRONT RL SPEAKERS C B DVD player/ DVD recorder/ Blu-ray disc player TV A Optical digital cord (not supplied) B Audio cord (not supplied) C Coaxial digital cord (supplied) 18US Before connecting the cords, be sure to connect video components such as...
... MAX IN IN IN L R SA-CD/CD TV SAT SUB SURROUND WOOFER R L CENTER FRONT RL SPEAKERS C B DVD player/ DVD recorder/ Blu-ray disc player TV A Optical digital cord (not supplied) B Audio cord (not supplied) C Coaxial digital cord (supplied) 18US Before connecting the cords, be sure to connect video components such as...
Operating Instructions
Page 19
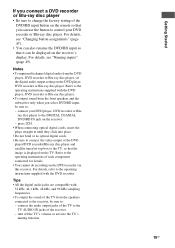
...19US For details, refer to the operating instructions of each component connected for details. • You cannot do recording on the DVD recorder via this receiver. Refer to the operating instructions supplied with 32 kHz, 44.1 kHz, 48 kHz, and 96 kHz sampling frequencies. • To output the sound...you select DVD/BD input, be sure to : - press 2CH. • When connecting optical digital cords, insert the plugs straight in until they click into place. • Do not bend or tie optical digital cords. • Be sure to connect the video output of the DVD player/DVD recorder...
...19US For details, refer to the operating instructions of each component connected for details. • You cannot do recording on the DVD recorder via this receiver. Refer to the operating instructions supplied with 32 kHz, 44.1 kHz, 48 kHz, and 96 kHz sampling frequencies. • To output the sound...you select DVD/BD input, be sure to : - press 2CH. • When connecting optical digital cords, insert the plugs straight in until they click into place. • Do not bend or tie optical digital cords. • Be sure to connect the video output of the DVD player/DVD recorder...
Operating Instructions
Page 20
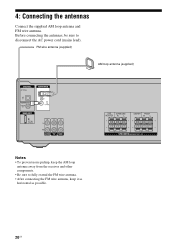
4: Connecting the antennas Connect the supplied AM loop antenna and FM wire antenna. FM wire antenna (supplied) AM loop antenna (supplied) DIGITAL OPTICAL SAT IN COAXIAL DVD/BD IN ANTENNA AM DMPORT DC5V 0.7A MAX IN IN IN L R SA-CD/CD TV SAT SUB SURROUND WOOFER R L CENTER...noise pickup, keep it as horizontal as possible. 20US Before connecting the antennas, be sure to fully extend the FM wire antenna. • After connecting the FM wire antenna, keep the AM loop antenna away from the receiver and other components. • Be sure to disconnect the AC power cord (mains lead).
4: Connecting the antennas Connect the supplied AM loop antenna and FM wire antenna. FM wire antenna (supplied) AM loop antenna (supplied) DIGITAL OPTICAL SAT IN COAXIAL DVD/BD IN ANTENNA AM DMPORT DC5V 0.7A MAX IN IN IN L R SA-CD/CD TV SAT SUB SURROUND WOOFER R L CENTER...noise pickup, keep it as horizontal as possible. 20US Before connecting the antennas, be sure to fully extend the FM wire antenna. • After connecting the FM wire antenna, keep the AM loop antenna away from the receiver and other components. • Be sure to disconnect the AC power cord (mains lead).

Operating Instructions
Page 44
...connect an adapter other than the DIGITAL MEDIA PORT adapter. • Before connecting cords, be sure to handle with care when placing or moving the receiver. Enjoying the DIGITAL MEDIA PORT (DMPORT) The DIGITAL MEDIA PORT (DMPORT) allows you can listen to the sound from the component connected through the... DIGITAL MEDIA PORT adapter to the DMPORT jack on the receiver. DIGITAL MEDIA PORT adapter DIGITAL OPTICAL SAT IN COAXIAL DVD/BD IN ANTENNA AM DMPORT DC5V 0.7A MAX IN IN IN L R SA-CD/CD TV SAT To...
...connect an adapter other than the DIGITAL MEDIA PORT adapter. • Before connecting cords, be sure to handle with care when placing or moving the receiver. Enjoying the DIGITAL MEDIA PORT (DMPORT) The DIGITAL MEDIA PORT (DMPORT) allows you can listen to the sound from the component connected through the... DIGITAL MEDIA PORT adapter to the DMPORT jack on the receiver. DIGITAL MEDIA PORT adapter DIGITAL OPTICAL SAT IN COAXIAL DVD/BD IN ANTENNA AM DMPORT DC5V 0.7A MAX IN IN IN L R SA-CD/CD TV SAT To...
Operating Instructions
Page 51
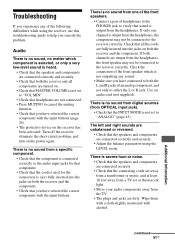
... There is no sound, no sound from the headphones, the front speaker may not be connected to both the receiver and the component. There is no matter which is output from OPTICAL input jack). • Check that all components are turned on. • Check that MASTER VOLUME is (are... not connected. • Press MUTING to cancel the muting function. • Check that you have connected to the receiver correctly. If both channels are...
... There is no sound, no sound from the headphones, the front speaker may not be connected to both the receiver and the component. There is no matter which is output from OPTICAL input jack). • Check that all components are turned on. • Check that MASTER VOLUME is (are... not connected. • Press MUTING to cancel the muting function. • Check that you have connected to the receiver correctly. If both channels are...
Marketing Specifications (HTDDWG700)
Page 1
HT-DDWG700 Key Features 5.1ch component home theater system 800 Watts Power (140W x 5 + 200W Sub,at 1KHz,
HT-DDWG700 Key Features 5.1ch component home theater system 800 Watts Power (140W x 5 + 200W Sub,at 1KHz,
Marketing Specifications (HTDDWG700)
Page 2
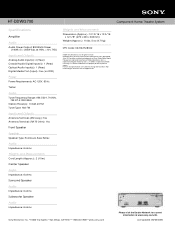
HT-DDWG700 Component Home Theater System Specifications Amplifier Audio Audio Power Output: 800 Watts Power (140W x 5 + 200W Sub,at 1KHz,
HT-DDWG700 Component Home Theater System Specifications Amplifier Audio Audio Power Output: 800 Watts Power (140W x 5 + 200W Sub,at 1KHz,


