Operating Instructions
Page 3
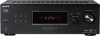
... registered in the text, for illustration purposes unless stated otherwise. Surround speakers SS-SRP700 - This receiver incorporates Dolby* Digital and Pro Logic Surround and the DTS** Digital Surround System. * Manufactured under U.S. Patent #'s: 5,451,942; 5,...Surround are registered trademarks and the DTS logos and Symbol are trademarks of the rear panel (see the illustration below). and worldwide patents issued & pending. The HT-DDWG700 consists of DTS, Inc. © 1996-2007 DTS, Inc. Dolby, Pro Logic, and the double-D symbol are trademarks of : • Receiver STR-KG700...
... registered in the text, for illustration purposes unless stated otherwise. Surround speakers SS-SRP700 - This receiver incorporates Dolby* Digital and Pro Logic Surround and the DTS** Digital Surround System. * Manufactured under U.S. Patent #'s: 5,451,942; 5,...Surround are registered trademarks and the DTS logos and Symbol are trademarks of the rear panel (see the illustration below). and worldwide patents issued & pending. The HT-DDWG700 consists of DTS, Inc. © 1996-2007 DTS, Inc. Dolby, Pro Logic, and the double-D symbol are trademarks of : • Receiver STR-KG700...
Operating Instructions
Page 4
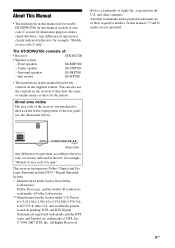
...Connecting the audio/video components 15 4: Connecting the antennas 20 5: Preparing the receiver and the remote .....21 6: Adjusting the speaker levels and balance (TEST TONE...menu 30 Adjusting the tone (TONE menu 31 Settings for the surround sound (SUR menu 31 Settings for the tuner (TUNER menu)............the system (SYSTEM menu) ...33 Tuner Operations Listening to FM/AM radio 39 Presetting radio stations 41 Other Operations Switching ...51 Specifications 54 Index Back cover Enjoying Surround Sound Enjoying Dolby Digital and DTS surround sound (AUTO FORMAT DIRECT) .......35 Selecting...
...Connecting the audio/video components 15 4: Connecting the antennas 20 5: Preparing the receiver and the remote .....21 6: Adjusting the speaker levels and balance (TEST TONE...menu 30 Adjusting the tone (TONE menu 31 Settings for the surround sound (SUR menu 31 Settings for the tuner (TUNER menu)............the system (SYSTEM menu) ...33 Tuner Operations Listening to FM/AM radio 39 Presetting radio stations 41 Other Operations Switching ...51 Specifications 54 Index Back cover Enjoying Surround Sound Enjoying Dolby Digital and DTS surround sound (AUTO FORMAT DIRECT) .......35 Selecting...
Operating Instructions
Page 6
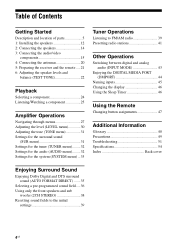
... 7 8 MEMORY ST D.RANGE MONO qs Name A SW B LFE C; Lights up when DVD/BD input is set to output the center and surround channel signals. Note When playing a Dolby Digital format disc, be sure that you have made digital connections and that INPUT MODE is selected. "; ... is activated. PLII ; Lights up when the Pro Logic II Movie/Music decoder is input through the OPTICAL jack. PL" lights up when using the receiver to "AUTO" (page 43). Name F DTS G MEMORY H Tuner indicators I Preset station indicators J D.RANGE K COAX Function Lights up when dynamic ...
... 7 8 MEMORY ST D.RANGE MONO qs Name A SW B LFE C; Lights up when DVD/BD input is set to output the center and surround channel signals. Note When playing a Dolby Digital format disc, be sure that you have made digital connections and that INPUT MODE is selected. "; ... is activated. PLII ; Lights up when the Pro Logic II Movie/Music decoder is input through the OPTICAL jack. PL" lights up when using the receiver to "AUTO" (page 43). Name F DTS G MEMORY H Tuner indicators I Preset station indicators J D.RANGE K COAX Function Lights up when dynamic ...
Operating Instructions
Page 7
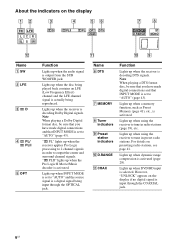
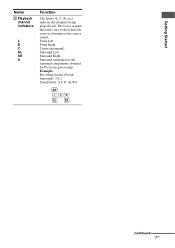
Front Left Front Right Center (monaural) Surround Left Surround Right Surround (monaural or the surround components obtained by Pro Logic processing) Example: Recording format (Front/ Surround): 3/2.1 Sound Field: A.F.D. AUTO SW LCR SL SR continued 7US The boxes around the letters vary to show how the receiver downmixes the source sound. Getting Started Name L Playback channel indicators L R C SL SR S Function The letters (L, C, R, etc.) indicate the channels being played back.
Front Left Front Right Center (monaural) Surround Left Surround Right Surround (monaural or the surround components obtained by Pro Logic processing) Example: Recording format (Front/ Surround): 3/2.1 Sound Field: A.F.D. AUTO SW LCR SL SR continued 7US The boxes around the letters vary to show how the receiver downmixes the source sound. Getting Started Name L Playback channel indicators L R C SL SR S Function The letters (L, C, R, etc.) indicate the channels being played back.
Operating Instructions
Page 8
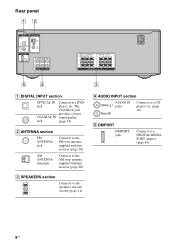
... jack AM ANTENNA terminals Connects to the AM loop antenna supplied with this receiver (page 20). Connects to the FM wire antenna supplied with this receiver (page 20). E DMPORT DMPORT jack Connects to the speakers and sub woofer (page 14). C SPEAKERS section Connects to a DIGITAL MEDIA PORT adapter (page 44). 8US ... panel 12 DIGITAL OPTICAL SAT IN COAXIAL DVD/BD IN ANTENNA AM DMPORT DC5V 0.7A MAX IN IN IN L R SA-CD/CD TV SAT SUB SURROUND WOOFER R L CENTER FRONT RL SPEAKERS 5 4 3 A DIGITAL INPUT section OPTICAL IN Connects to a CD player, etc. (page 16).
... jack AM ANTENNA terminals Connects to the AM loop antenna supplied with this receiver (page 20). Connects to the FM wire antenna supplied with this receiver (page 20). E DMPORT DMPORT jack Connects to the speakers and sub woofer (page 14). C SPEAKERS section Connects to a DIGITAL MEDIA PORT adapter (page 44). 8US ... panel 12 DIGITAL OPTICAL SAT IN COAXIAL DVD/BD IN ANTENNA AM DMPORT DC5V 0.7A MAX IN IN IN L R SA-CD/CD TV SAT SUB SURROUND WOOFER R L CENTER FRONT RL SPEAKERS 5 4 3 A DIGITAL INPUT section OPTICAL IN Connects to a CD player, etc. (page 16).
Operating Instructions
Page 12
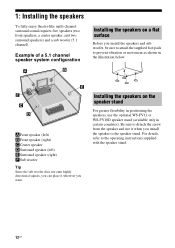
... highly directional signals, you can place it when you want. 1: Installing the speakers To fully enjoy theater-like multi channel surround sound requires five speakers (two front speakers, a center speaker, and two surround speakers) and a sub woofer (5.1 channel). For details, refer to the speaker stand. Be sure to detach the screw from...
... highly directional signals, you can place it when you want. 1: Installing the speakers To fully enjoy theater-like multi channel surround sound requires five speakers (two front speakers, a center speaker, and two surround speakers) and a sub woofer (5.1 channel). For details, refer to the speaker stand. Be sure to detach the screw from...
Operating Instructions
Page 13
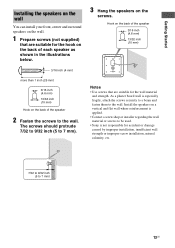
...screws that are suitable for the wall material and strength. Getting Started Installing the speakers on the wall You can install your front, center and surround speakers on the wall. 1 Prepare screws (not supplied) that are suitable for the hook on the back of each speaker as shown in ... vertical and flat wall where reinforcement is applied. • Contact a screw shop or installer regarding the wall material or screws to be used. • Sony is especially fragile, attach the screws securely to a beam and fasten them to the wall. Install the speakers on the back of the speaker 2 Fasten...
...screws that are suitable for the wall material and strength. Getting Started Installing the speakers on the wall You can install your front, center and surround speakers on the wall. 1 Prepare screws (not supplied) that are suitable for the hook on the back of each speaker as shown in ... vertical and flat wall where reinforcement is applied. • Contact a screw shop or installer regarding the wall material or screws to be used. • Sony is especially fragile, attach the screws securely to a beam and fasten them to the wall. Install the speakers on the back of the speaker 2 Fasten...
Operating Instructions
Page 14
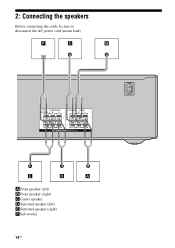
2: Connecting the speakers Before connecting the cords, be sure to disconnect the AC power cord (mains lead). F C B SUB SURROUND WOOFER R L CENTER FRONT RL SPEAKERS E D A AFront speaker (left) BFront speaker (right) CCenter speaker DSurround speaker (left) ESurround speaker (right) FSub woofer 14US
2: Connecting the speakers Before connecting the cords, be sure to disconnect the AC power cord (mains lead). F C B SUB SURROUND WOOFER R L CENTER FRONT RL SPEAKERS E D A AFront speaker (left) BFront speaker (right) CCenter speaker DSurround speaker (left) ESurround speaker (right) FSub woofer 14US
Operating Instructions
Page 15
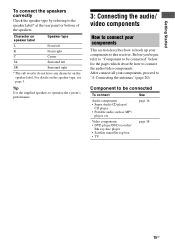
.... 3: Connecting the audio/ video components How to connect your components This section describes how to hook up your components, proceed to this receiver. Component to be connected" below for the pages which describe how to the speaker label* at the rear panel or bottom of the ...speakers. Character on speaker label L R C SL SR Speaker type Front left Front right Center Surround left Surround right * The sub woofer do not have any character on the speaker type, see page 3. Getting Started To connect the speakers correctly Check...
.... 3: Connecting the audio/ video components How to connect your components This section describes how to hook up your components, proceed to this receiver. Component to be connected" below for the pages which describe how to the speaker label* at the rear panel or bottom of the ...speakers. Character on speaker label L R C SL SR Speaker type Front left Front right Center Surround left Surround right * The sub woofer do not have any character on the speaker type, see page 3. Getting Started To connect the speakers correctly Check...
Operating Instructions
Page 16
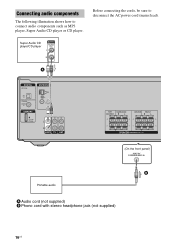
Super Audio CD player/CD player A DIGITAL OPTICAL SAT IN COAXIAL DVD/BD IN ANTENNA AM DMPORT DC5V 0.7A MAX IN IN IN L R SA-CD/CD TV SAT SUB SURROUND WOOFER R L CENTER FRONT RL SPEAKERS (On the front panel) VIDEO IN/ PORTABLE AUDIO IN B Portable audio A Audio cord (not supplied) B Phono cord with stereo headphone jack (not supplied) 16US Connecting audio components The following illustration shows how to disconnect the AC power cord (mains lead). Before connecting the cords, be sure to connect audio components such as MP3 player, Super Audio CD player or CD player.
Super Audio CD player/CD player A DIGITAL OPTICAL SAT IN COAXIAL DVD/BD IN ANTENNA AM DMPORT DC5V 0.7A MAX IN IN IN L R SA-CD/CD TV SAT SUB SURROUND WOOFER R L CENTER FRONT RL SPEAKERS (On the front panel) VIDEO IN/ PORTABLE AUDIO IN B Portable audio A Audio cord (not supplied) B Phono cord with stereo headphone jack (not supplied) 16US Connecting audio components The following illustration shows how to disconnect the AC power cord (mains lead). Before connecting the cords, be sure to connect audio components such as MP3 player, Super Audio CD player or CD player.
Operating Instructions
Page 18
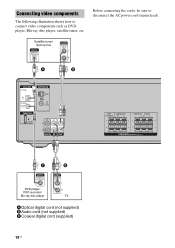
...-top box A B DIGITAL OPTICAL SAT IN COAXIAL DVD/BD IN ANTENNA AM DMPORT DC5V 0.7A MAX IN IN IN L R SA-CD/CD TV SAT SUB SURROUND WOOFER R L CENTER FRONT RL SPEAKERS C B DVD player/ DVD recorder/ Blu-ray disc player TV A Optical digital cord (not supplied) B Audio cord (not supplied) C Coaxial digital...
...-top box A B DIGITAL OPTICAL SAT IN COAXIAL DVD/BD IN ANTENNA AM DMPORT DC5V 0.7A MAX IN IN IN L R SA-CD/CD TV SAT SUB SURROUND WOOFER R L CENTER FRONT RL SPEAKERS C B DVD player/ DVD recorder/ Blu-ray disc player TV A Optical digital cord (not supplied) B Audio cord (not supplied) C Coaxial digital...
Operating Instructions
Page 20
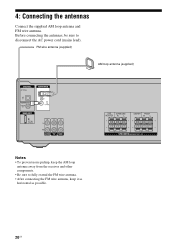
... the antennas Connect the supplied AM loop antenna and FM wire antenna. Before connecting the antennas, be sure to fully extend the FM wire antenna. • After connecting the FM wire antenna, keep it as horizontal as possible. 20US FM wire antenna (supplied) AM loop antenna (supplied) ...DIGITAL OPTICAL SAT IN COAXIAL DVD/BD IN ANTENNA AM DMPORT DC5V 0.7A MAX IN IN IN L R SA-CD/CD TV SAT SUB SURROUND WOOFER R L CENTER FRONT RL SPEAKERS Notes • To prevent noise pickup, keep the AM loop antenna away from the receiver...
... the antennas Connect the supplied AM loop antenna and FM wire antenna. Before connecting the antennas, be sure to fully extend the FM wire antenna. • After connecting the FM wire antenna, keep it as horizontal as possible. 20US FM wire antenna (supplied) AM loop antenna (supplied) ...DIGITAL OPTICAL SAT IN COAXIAL DVD/BD IN ANTENNA AM DMPORT DC5V 0.7A MAX IN IN IN L R SA-CD/CD TV SAT SUB SURROUND WOOFER R L CENTER FRONT RL SPEAKERS Notes • To prevent noise pickup, keep the AM loop antenna away from the receiver...
Operating Instructions
Page 23
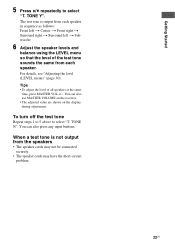
... To adjust the level of the test tone sounds the same from each speaker in sequence as follows: Front left t Center t Front right t Surround right t Surround left t Sub woofer 6 Adjust the speaker levels and balance using the LEVEL menu so that the level of all speakers at the same time, ... Y". The test tone is not output from each speaker. Getting Started 5 Press V/v repeatedly to select "T. You can also use MASTER VOLUME on the receiver. • The adjusted value are shown on the display during adjustment. When a test tone is output from the speakers • The speaker cords may...
... To adjust the level of the test tone sounds the same from each speaker in sequence as follows: Front left t Center t Front right t Surround right t Surround left t Sub woofer 6 Adjust the speaker levels and balance using the LEVEL menu so that the level of all speakers at the same time, ... Y". The test tone is not output from each speaker. Getting Started 5 Press V/v repeatedly to select "T. You can also use MASTER VOLUME on the receiver. • The adjusted value are shown on the display during adjustment. When a test tone is output from the speakers • The speaker cords may...
Operating Instructions
Page 28
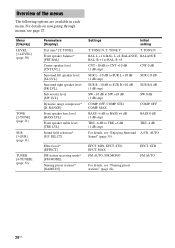
... options are available in each menu. For details on navigating through menus, see "Enjoying Surround A.F.D. TONE N, T. L +1 to BAL. R +1 to BAL. STD, COMP. Effect level* [EFFECT] FM station receiving mode* [FM MODE] Naming preset stations* [NAME IN] EFCT. RANGE] Front speaker bass level [BASS...] Center speaker level [CNT LVL] Surround left speaker level [SL LVL] Surround right speaker level [SR LVL] Sub woofer level [SW LVL] Dynamic range compressor* [D. MAX FM AUTO, FM MONO For details, see "Naming preset stations" (page 42). STD FM AUTO 28US Menu [Display] LEVEL [1-...
... options are available in each menu. For details on navigating through menus, see "Enjoying Surround A.F.D. TONE N, T. L +1 to BAL. R +1 to BAL. STD, COMP. Effect level* [EFFECT] FM station receiving mode* [FM MODE] Naming preset stations* [NAME IN] EFCT. RANGE] Front speaker bass level [BASS...] Center speaker level [CNT LVL] Surround left speaker level [SL LVL] Surround right speaker level [SR LVL] Sub woofer level [SW LVL] Dynamic range compressor* [D. MAX FM AUTO, FM MONO For details, see "Naming preset stations" (page 42). STD FM AUTO 28US Menu [Display] LEVEL [1-...

Operating Instructions
Page 29
... DIST. 10 ft. Y output* [A.V. SYNC.] Naming inputs* [NAME IN] For details, see "Naming inputs" (page 45). to DIST. 23 ft. (1 ft. step) Surround speaker position* [SUR POS.] BEHD/HI, BEHD/LO, SIDE/HI, SIDE/LO Brightness of the display* [DIMMER] 0% dim, 40% dim, 70% dim * For details, ...refer to DIST. 23 ft. [SL DIST.] (1 ft. N DIST. 10 ft. DIST. 10 ft. DIST. 10 ft. step) Surround right speaker distance* [SR DIST.] DIST. 3 ft. step) Center speaker distance* [CNT DIST.] DIST. 3 ft. Initial setting DEC. to the page in the parentheses. ...
... DIST. 10 ft. Y output* [A.V. SYNC.] Naming inputs* [NAME IN] For details, see "Naming inputs" (page 45). to DIST. 23 ft. (1 ft. step) Surround speaker position* [SUR POS.] BEHD/HI, BEHD/LO, SIDE/HI, SIDE/LO Brightness of the display* [DIMMER] 0% dim, 40% dim, 70% dim * For details, ...refer to DIST. 23 ft. [SL DIST.] (1 ft. N DIST. 10 ft. DIST. 10 ft. DIST. 10 ft. step) Surround right speaker distance* [SR DIST.] DIST. 3 ft. step) Center speaker distance* [CNT DIST.] DIST. 3 ft. Initial setting DEC. to the page in the parentheses. ...

Operating Instructions
Page 30
... menus. x FRT BAL (Front speaker balance) Lets you compress the dynamic range of each speaker. x CNT LVL (Center speaker level) x SL LVL (Surround left and right speakers. MAX" setting. RANGE (Dynamic range compressor) Lets you adjust the balance between front left speaker level) x SR LVL... (Surround right speaker level) x SW LVL (Sub woofer level) x D. This may be useful when you compress the dynamic range of the soundtrack based ...
... menus. x FRT BAL (Front speaker balance) Lets you compress the dynamic range of each speaker. x CNT LVL (Center speaker level) x SL LVL (Surround left and right speakers. MAX" setting. RANGE (Dynamic range compressor) Lets you adjust the balance between front left speaker level) x SR LVL... (Surround right speaker level) x SW LVL (Sub woofer level) x D. This may be useful when you compress the dynamic range of the soundtrack based ...

Operating Instructions
Page 31
... "HP THEA" sound field. • EFCT. For details on adjusting the parameters, see "Enjoying Surround Sound" (page 35). Note The receiver lets you want for your listening pleasure. STD The surround effect is selected (Sound Field Link). TONE menu parameters x BASS LVL (Front speaker bass level) ...x TRE LVL (Front speaker treble level) Settings for the surround sound (SUR menu) You ...
... "HP THEA" sound field. • EFCT. For details on adjusting the parameters, see "Enjoying Surround Sound" (page 35). Note The receiver lets you want for your listening pleasure. STD The surround effect is selected (Sound Field Link). TONE menu parameters x BASS LVL (Front speaker bass level) ...x TRE LVL (Front speaker treble level) Settings for the surround sound (SUR menu) You ...

Operating Instructions
Page 33
... in the amplifier menus. x NAME IN (Naming inputs) Lets you set the name of both front speakers are input. x SL DIST. (Surround left speaker and sound of the sub language will be output through menus" (page 27) and "Overview of the speakers connected to the closest ... sources. • DUAL M/S (Main/Sub) Sound of the main language will be output through the front left speaker distance) x SR DIST. (Surround right speaker distance) Lets you set the distance from your listening position to during digital broadcast. x A.V. Notes • This parameter is useful when you...
... in the amplifier menus. x NAME IN (Naming inputs) Lets you set the name of both front speakers are input. x SL DIST. (Surround left speaker and sound of the sub language will be output through menus" (page 27) and "Overview of the speakers connected to the closest ... sources. • DUAL M/S (Main/Sub) Sound of the main language will be output through the front left speaker distance) x SR DIST. (Surround right speaker distance) Lets you set the distance from your listening position to during digital broadcast. x A.V. Notes • This parameter is useful when you...

Operating Instructions
Page 34
Nevertheless, each listening environment has many variables, such as wall reflections, and you may result in forming a cohesive space between the surround sound from the immediate left and right. If you are located to obtain proper balance. Those sound fields were designed under the premise that you... and the sound of the front speakers. x DIMMER (Brightness of the display) Lets you play back multi channel surround encoded software and select the setting that provides a good sense of spaciousness and that best succeeds in a setting contrary to the above the listening position,...
Nevertheless, each listening environment has many variables, such as wall reflections, and you may result in forming a cohesive space between the surround sound from the immediate left and right. If you are located to obtain proper balance. Those sound fields were designed under the premise that you... and the sound of the front speakers. x DIMMER (Brightness of the display) Lets you play back multi channel surround encoded software and select the setting that provides a good sense of spaciousness and that best succeeds in a setting contrary to the above the listening position,...
Operating Instructions
Page 35
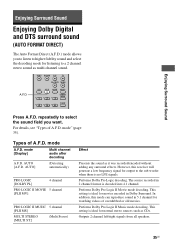
...Stereo) Effect Presents the sound as CDs. This setting is ideal for movies encoded in 2 channel format is decoded into 4.1 channel. This setting is no LFE signals. mode [Display] Multi channel audio after decoding A.F.D. In addition, this receiver will generate a low frequency signal for watching videos of overdubbed or old movies. Enjoying Surround... Sound Enjoying Surround Sound Enjoying Dolby Digital and DTS surround sound (AUTO FORMAT DIRECT)...
...Stereo) Effect Presents the sound as CDs. This setting is ideal for movies encoded in 2 channel format is decoded into 4.1 channel. This setting is no LFE signals. mode [Display] Multi channel audio after decoding A.F.D. In addition, this receiver will generate a low frequency signal for watching videos of overdubbed or old movies. Enjoying Surround... Sound Enjoying Surround Sound Enjoying Dolby Digital and DTS surround sound (AUTO FORMAT DIRECT)...


