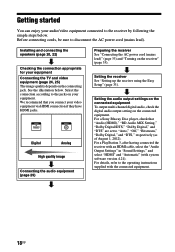
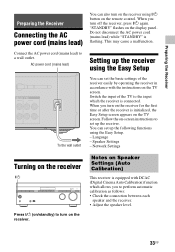
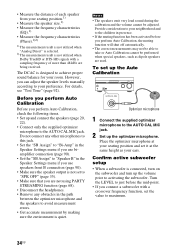
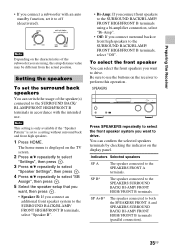
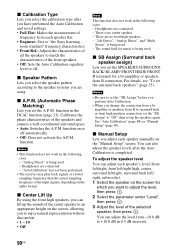
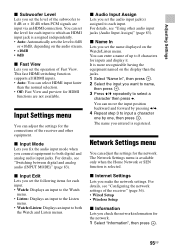
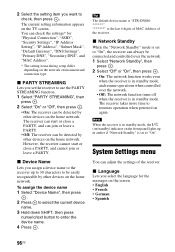
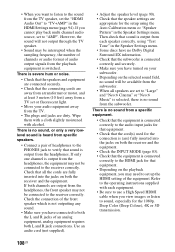
Operating Instructions (Large File - 14.22 MB)
Page 7
...30 Preparing the Receiver Connecting the AC power cord (mains lead 33 Turning on the receiver 33 Setting up the receiver using the Easy Setup 33 Configuring the network settings of the receiver 36 Guide to on-screen display (OSD) operation 40 Basic Operations Playing an input source equipment... Features About the network functions of the receiver 56 Setting up the server 57 Enjoying audio content stored on the server 62 Enjoying Sony Entertainment Network (SEN 65 Using the PARTY STREAMING function 68 Streaming music from iTunes with AirPlay 70 Updating the software 71 Searching for...
Operating Instructions (Large File - 14.22 MB)
Page 8
... (Audio Input Assign 83 Using a bi-amplifier connection 85 Reverting back to the factory default settings 85 Adjusting Settings Using the Settings menu 86 Easy Setup 88 Speaker Settings menu 88 Audio Settings menu 92 HDMI Settings menu 94 Input Settings menu 95 Network Settings menu 95 System Settings menu 96...
Operating Instructions (Large File - 14.22 MB)
Page 9
... corrosion. • When you replace the batteries, the remote control buttons may be reset to direct sunlight or lighting apparatuses. If this manual) • Quick Setup Guide (1) • Remote control (RM-AAU170) (1) • R6 (size AA) batteries (2) • FM wire antenna (aerial) (1) Inserting batteries into the remote control Insert two R6...
Operating Instructions (Large File - 14.22 MB)
Page 18
... receiver by following the simple steps below . See the illustration below . Setting the receiver See "Setting up the receiver using the Easy Setup" (page 33). Digital Analog High quality image Connecting the audio equipment (page 29) Preparing the receiver See "Connecting the AC power cord... MIX Setting," "Dolby Digital/DTS," "Dolby Digital," and "DTS" are set to disconnect the AC power cord (mains lead). For a Sony Blu-ray Disc player, check that you connect your audio/video equipment connected to the operating instructions supplied with system software version 4.21). Setting...
Operating Instructions (Large File - 14.22 MB)
Page 33
... Settings (Auto Calibration) This receiver is connected. Do not disconnect the AC power cord (mains lead) while "STANDBY" is initialized, the Easy Setup screen appears on the remote control. Connect the AC power cord (mains lead) to perform automatic calibration as follows: • Check the connection between each...on the TV screen. AC power cord (mains lead) Setting up the receiver using the Easy Setup. - Follow the on-screen instructions to set up the following functions using the Easy Setup To the wall outlet You can set the basic settings of the TV to turn off the...
Operating Instructions (Large File - 14.22 MB)
Page 34
... errors. • Get accurate measurement by making sure the environment is connected, turn on the subwoofer and turn up the optimizer microphone. Confirm active subwoofer setup • When a subwoofer is quiet. Notes • The speakers emit very loud sound during the calibration and the volume cannot be performed when special speakers...
Operating Instructions (Large File - 14.22 MB)
Page 35
...press . 3 Press V/v repeatedly to select "Speaker Settings", then press . 4 Press V/v repeatedly to select "SB Assign", then press . 5 Select the speaker setup that you want, then press . • Speaker B: If you connect an additional front speaker system to the SURROUND BACK/BI-AMP/ FRONT HIGH/FRONT B terminals... B". • Bi-Amp: If you connect front speakers to the SURROUND BACK/BI-AMP/ FRONT HIGH/FRONT B terminals using , the setup distance value may be different from the actual position. Note This setting is only available if the "Speaker Pattern" is displayed on the characteristics...
Operating Instructions (Large File - 14.22 MB)
Page 36
... turn the INPUT SELECTOR on the display panel. Connect the headphones. To set the "SB Assign" to select "Auto", then press . Press b to select "Wired Setup", then press . Press b for the next position. Press ?/1. - The home menu is not available when headphones are output from any speaker terminals. * To select "SP...
Operating Instructions (Large File - 14.22 MB)
Page 37
...the information provided by your server (page 57). The security setting display appears on the network environment, the network settings may encounter setup difficulties if the receiver and the wireless LAN router/access point are located too far from the person who set up a wireless...to select "Access Point Scan", then press . "Connecting to each other . If you can set up your Internet service provider. 1 Select "Wireless Setup" in step 5 in the space provided below. Using a wireless LAN connection There are completed. To set up the network using a WPS connecting ...
Operating Instructions (Large File - 14.22 MB)
Page 38
...the network settings may take some time.) 7 Perform the server settings. Press . Press V/v to audio content stored on the access point. "Network setup is completed" appears after the network settings are complete and " " lights up on the display panel. By default, the security key appears as... network settings, see "Information" (page 95). 4 Enter the security key (WEP key, WPA/WPA2 key), then press . Press DISPLAY repeatedly to setup a wireless network easily and securely. "IP Settings" appears on the TV screen. The IP Address Setting appears on the TV screen. 5 Press ...
Operating Instructions (Large File - 14.22 MB)
Page 39
... PIN code is displayed each time you need to select "WPS PIN", then press . If you cannot find the network name (SSID) you want (manual setup method) You can set up a WPS wireless connection by entering the receiver's PIN code into the wireless LAN router/access point. 1 Select "Manual Registration" in...
Operating Instructions (Large File - 14.22 MB)
Page 79
...TV. We recommend that supports the Control for HDMI function of the receiver and all non-Sony equipment is a mutual control function standard used by setting the Control for HDMI function on setup of the TV, refer to products featuring "BRAVIA" Sync. Preparing for the "BRAVIA" ...Sync The receiver is compatible with the "Control for HDMI-Easy Setting" function. • If your TV. The setup is not compatible with the "Control for HDMI function of the receiver and playback equipment automatically by HDMI CEC (Consumer Electronics Control) for HDMI ...
Operating Instructions (Large File - 14.22 MB)
Page 88
... automatic calibration function. 1 Follow the instructions on the position of the optimizer microphone and speakers, and the shape of the selected icon. Easy Setup Re-runs the Easy Setup to the measurement results. Note If an error code appears on the screen, see "Message list after the Auto Calibration is determined by...
Operating Instructions (Large File - 14.22 MB)
Page 90
...function. Notes • Be sure to off automatically. • Off: Does not activate the A.P.M. See "Auto Calibration" (page 88) or "Manual Setup" (page 90). You can adjust each speaker's level (front left/right, front left/right high, center, surround left/right, surround back left/ right,... SURROUND BACK/ BI-AMP/ FRONT HIGH/ FRONT B terminals for which you adjust each speaker flat. • Engineer: Sets to "the Sony listening room standard" frequency characteristics. • Front Ref.: Adjusts the characteristics of all the speakers to match the characteristics of the speakers and...
Operating Instructions (Large File - 14.22 MB)
Page 95
... is registered. For details, see "Using other equipment. Adjusting Settings x Subwoofer Level Lets you set the level of the receiver" (page 36). • Wired Setup • Wireless Setup x Information Lets you check the network information for the network. 1 Select "Information", then press . 95US This fast HDMI switching function supports all HDMI inputs...
Operating Instructions (Large File - 14.22 MB)
Page 96
...is in amber if "Network Standby" is the last 6 digits of MAC Address of the receiver. Tip The default device name is "STR-DN840 is set to "On". Note When the receiver is set the receiver to "On", the receiver can be detected by other devices ... "IP Address Setting", "IP Address", "Subnet Mask", "Default Gateway", "DNS Settings", "Primary DNS", "Secondary DNS", and "MAC Address". * The setting items during setup differ depending on the home network. x PARTY STREAMING Lets you set to use the PARTY STREAMING function. 1 Select "PARTY STREAMING", then press . 2 Select "On" ...
Operating Instructions (Large File - 14.22 MB)
Page 108
... equipment requires both the receiver and the equipment. If both channels are output from the subwoofer. • When all the cords are appropriate for the setup using "Test Tone" in the Speaker Settings menu. • Some discs have turned on the selected sound field, no Dolby Digital Surround EX information. •...
Operating Instructions (Large File - 14.22 MB)
Page 109
... you want to watch a program from the equipment connected to the TV. Depending on the connected equipment and TV, you watch a TV broadcast. - Check the setup of the connected equipment if the image is compatible with the System Audio Control function. • If the TV does not have System Audio Control...
Operating Instructions (Large File - 14.22 MB)
Page 112
... a long time in Windows Media Audio Lossless and Professional format cannot be played back. • USB device formatted with file systems other and do the setup again. 112US Erroneous display. • The data stored in the USB device may not be displayed correctly. Numbers (0 to WEP. The internal memory is extremely...
Operating Instructions (Large File - 14.22 MB)
Page 113
... turned on. • Make sure that the server has been set to the operating instructions of the wireless LAN router/access point and do the setup again. Home Network Cannot connect to the network after you turned on . • Confirm that the server is turned on the receiver. Wait for a few...