
Operating Instructions
Page 3
...will not occur in this manual could otherwise be determined by turning the equipment off and on a circuit different from the apparatus and the speakers. For customers in Europe Disposal of Old Electrical & Electronic Equipment (Applicable in accordance with the limits for the recycling of the FCC Rules... operate this apparatus during lightning storms or when unused for help. Also disconnect the AC power cord from the MAINS before disconnecting the speaker cord from that any way, such as household waste. For more of this product is damaged, liquid has been spilled or objects ...
...will not occur in this manual could otherwise be determined by turning the equipment off and on a circuit different from the apparatus and the speakers. For customers in Europe Disposal of Old Electrical & Electronic Equipment (Applicable in accordance with the limits for the recycling of the FCC Rules... operate this apparatus during lightning storms or when unused for help. Also disconnect the AC power cord from the MAINS before disconnecting the speaker cord from that any way, such as household waste. For more of this product is damaged, liquid has been spilled or objects ...
Operating Instructions
Page 6
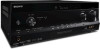
...Connecting the antennas (aerials 33 6: Connecting the AC power cord (mains lead 33 Preparing the Receiver Initializing the receiver 34 Setting the speakers 34 Using AUTO CALIBRATION 36 Guide to on-screen display operation ..........41 Enjoying Surround Sound Selecting the sound field 54 Using the SOUND ... inputs (Input Assign 63 Using a bi-amplifier connection 65 Using multi-zone features 65 Adjusting Settings Using the Settings menu 68 Speaker Settings menu 69 Surround Settings menu 71 EQ Settings menu 72 Audio Settings menu 72 HDMI Settings menu 73 System Settings menu 74...
...Connecting the antennas (aerials 33 6: Connecting the AC power cord (mains lead 33 Preparing the Receiver Initializing the receiver 34 Setting the speakers 34 Using AUTO CALIBRATION 36 Guide to on-screen display operation ..........41 Enjoying Surround Sound Selecting the sound field 54 Using the SOUND ... inputs (Input Assign 63 Using a bi-amplifier connection 65 Using multi-zone features 65 Adjusting Settings Using the Settings menu 68 Speaker Settings menu 69 Surround Settings menu 71 EQ Settings menu 72 Audio Settings menu 72 HDMI Settings menu 73 System Settings menu 74...
Operating Instructions
Page 9
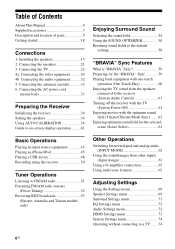
... to adjust the level. P 2CH/A.DIRECT, A.F.D., MOVIE (HD-D.C.S.), MUSIC (page 54, 56) Q TUNING MODE, MEMORY/ENTER, TUNING Press to scan a station. qg qf qd qsqa q; R SPEAKERS (page 36) S PHONES jack (page 87) 9GB Dolby Digital Plus, Dolby TrueHD, DTS 96/24, DTS-HD Master Audio, or DTS-HD High Resolution Audio...
... to adjust the level. P 2CH/A.DIRECT, A.F.D., MOVIE (HD-D.C.S.), MUSIC (page 54, 56) Q TUNING MODE, MEMORY/ENTER, TUNING Press to scan a station. qg qf qd qsqa q; R SPEAKERS (page 36) S PHONES jack (page 87) 9GB Dolby Digital Plus, Dolby TrueHD, DTS 96/24, DTS-HD Master Audio, or DTS-HD High Resolution Audio...
Operating Instructions
Page 10
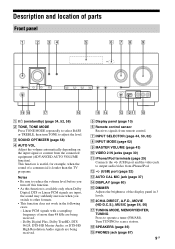
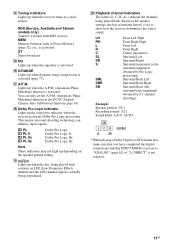
...). OPT Digital signal is set to "BI-AMP" (page 65). ARC TV input is being selected. E Dolby Digital Surround indicator* Lights up when surround back speakers selection is input through the COAXIAL jack (page 62). I SP A/SP B/SP A B (page 36) J BI-AMP Lights up the respective indicator when the receiver is...
...). OPT Digital signal is set to "BI-AMP" (page 65). ARC TV input is being selected. E Dolby Digital Surround indicator* Lights up when surround back speakers selection is input through the COAXIAL jack (page 62). I SP A/SP B/SP A B (page 36) J BI-AMP Lights up the respective indicator when the receiver is...
Operating Instructions
Page 11
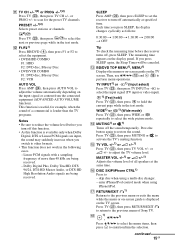
... obtained by Pro Logic processing) Surround Back Left Surround Back Right Surround Back (the surround back equipment obtained by 6.1 channel decoding) Example: Speaker pattern: 3/0.1 Recording format: 3/2.1 Sound Field: A.F.D. T Playback channel indicators The letters (L, C, R, etc.) indicate the channels being reproduced.... decoding technology can only set to a radio station. DIRECT" is activated. You can enhance input signals. Based on the speaker pattern setting. AUTO * When playing a Dolby Digital or DTS format disc, make sure that you have completed the digital ...
... obtained by Pro Logic processing) Surround Back Left Surround Back Right Surround Back (the surround back equipment obtained by 6.1 channel decoding) Example: Speaker pattern: 3/0.1 Recording format: 3/2.1 Sound Field: A.F.D. T Playback channel indicators The letters (L, C, R, etc.) indicate the channels being reproduced.... decoding technology can only set to a radio station. DIRECT" is activated. You can enhance input signals. Based on the speaker pattern setting. AUTO * When playing a Dolby Digital or DTS format disc, make sure that you have completed the digital ...

Operating Instructions
Page 12
... IN jack (page 27) B ANTENNA section FM ANTENNA jack (page 33) AM ANTENNA terminals (page 33) C Controls jacks for Sony equipment and other external equipment IR REMOTE IN/OUT jacks (page 66) D SPEAKERS section (page 21) 4 E AUDIO INPUT/OUTPUT section White (L) AUDIO IN/OUT jacks (page 23, 32) Red (R) Black AUDIO OUT...
... IN jack (page 27) B ANTENNA section FM ANTENNA jack (page 33) AM ANTENNA terminals (page 33) C Controls jacks for Sony equipment and other external equipment IR REMOTE IN/OUT jacks (page 66) D SPEAKERS section (page 21) 4 E AUDIO INPUT/OUTPUT section White (L) AUDIO IN/OUT jacks (page 23, 32) Red (R) Black AUDIO OUT...
Operating Instructions
Page 15
...function does not work in the following cases. - If you switch to turn off , press SLEEP. MASTER VOL +/-1) or +/-1) Adjusts the volume level of Sony TV. skip disc when using iPhone/iPod. Press TV (W), then press RETURN/EXIT O to return to restore the sound. or PROG +/- L F1/F21...:00 t OFF Tip To check the remaining time before you turn off the sound temporarily. Press the button again to the previous menu of all speakers at specified time. N MUTING1) or 1) Turns off automatically at the same time. K TV CH +/-1)2) or PROG +/-1)2) Press TV (W), then press TV CH +/- Then,...
...function does not work in the following cases. - If you switch to turn off , press SLEEP. MASTER VOL +/-1) or +/-1) Adjusts the volume level of Sony TV. skip disc when using iPhone/iPod. Press TV (W), then press RETURN/EXIT O to return to restore the sound. or PROG +/- L F1/F21...:00 t OFF Tip To check the remaining time before you turn off the sound temporarily. Press the button again to the previous menu of all speakers at specified time. N MUTING1) or 1) Turns off automatically at the same time. K TV CH +/-1)2) or PROG +/-1)2) Press TV (W), then press TV CH +/- Then,...
Operating Instructions
Page 18
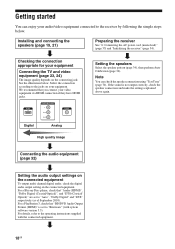
... if they have HDMI jacks. We recommend that "BD/DVD Audio Output Format (HDMI)" is not output correctly, check the speaker connection and make the settings explained above again. Note You can enjoy your audio/video equipment connected to the receiver by following ...system software version 3.5). For a PlayStation 3, check that you connect your equipment. Getting started You can check the speaker connection using "Test Tone" (page 70). Installing and connecting the speakers (page 19, 21) Preparing the receiver See "6: Connecting the AC power cord (mains lead)" (page 33) ...
... if they have HDMI jacks. We recommend that "BD/DVD Audio Output Format (HDMI)" is not output correctly, check the speaker connection and make the settings explained above again. Note You can enjoy your audio/video equipment connected to the receiver by following ...system software version 3.5). For a PlayStation 3, check that you connect your equipment. Getting started You can check the speaker connection using "Test Tone" (page 70). Installing and connecting the speakers (page 19, 21) Preparing the receiver See "6: Connecting the AC power cord (mains lead)" (page 33) ...

Operating Instructions
Page 19
... surround sound requires five speakers (two front speakers, a center speaker, and two surround speakers) and a subwoofer. 7.1 channel speaker system using surround back speakers You can enjoy high fidelity reproduction of speaker system configuration AFront speaker (Left) BFront speaker (Right) CCenter speaker DSurround speaker (Left) ESurround speaker (Right) FSurround back speaker (Left)* GSurround back speaker (Right)* HFront high speaker (Left)* IFront high speaker (Right)* JSubwoofer * You cannot...
... surround sound requires five speakers (two front speakers, a center speaker, and two surround speakers) and a subwoofer. 7.1 channel speaker system using surround back speakers You can enjoy high fidelity reproduction of speaker system configuration AFront speaker (Left) BFront speaker (Right) CCenter speaker DSurround speaker (Left) ESurround speaker (Right) FSurround back speaker (Left)* GSurround back speaker (Right)* HFront high speaker (Left)* IFront high speaker (Right)* JSubwoofer * You cannot...
Operating Instructions
Page 20
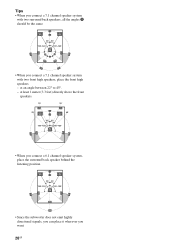
at least 1 meter (3.3 feet) directly above the front speakers. • When you connect a 6.1 channel speaker system, place the surround back speaker behind the listening position. • Since the subwoofer does not emit highly directional signals, you can place it wherever you connect a 7.1 channel speaker system with two front high speakers, place the front high speakers - at an angle between 22° to 45°. - Tips • When you connect a 7.1 channel speaker system with two surround back speakers, all the angles A should be the same. • When you want. 20GB
at least 1 meter (3.3 feet) directly above the front speakers. • When you connect a 6.1 channel speaker system, place the surround back speaker behind the listening position. • Since the subwoofer does not emit highly directional signals, you can place it wherever you connect a 7.1 channel speaker system with two front high speakers, place the front high speakers - at an angle between 22° to 45°. - Tips • When you connect a 7.1 channel speaker system with two surround back speakers, all the angles A should be the same. • When you want. 20GB

Operating Instructions
Page 21
Connections 2: Connecting the speakers 1 10 mm (13/32") 4 2 3 Center speaker Surround speaker Right Left B B A A B B Right Left Subwoofer * Surround back/Front high/ Bi-amplifier/Front B speaker ** A Monaural audio cord (not supplied) B Speaker cord (not supplied) Right Left Front A speaker continued 21GB
Connections 2: Connecting the speakers 1 10 mm (13/32") 4 2 3 Center speaker Surround speaker Right Left B B A A B B Right Left Subwoofer * Surround back/Front high/ Bi-amplifier/Front B speaker ** A Monaural audio cord (not supplied) B Speaker cord (not supplied) Right Left Front A speaker continued 21GB
Operating Instructions
Page 22
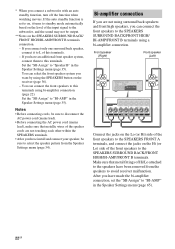
.../FRONT B terminals using a bi-amplifier connection. Bi-amplifier connection If you are not touching each other within the SPEAKERS terminals. • After you have install and connect your speaker, be sure to the subwoofer, and the sound may not be sure to disconnect the AC power cord (mains lead... the jacks on the Lo (or Hi) side of the speaker cords are not using surround back speakers and front high speakers, you have been removed from the Speaker Settings menu (page 34). After you can select the front speaker system you connect a subwoofer with an auto standby function, turn...
.../FRONT B terminals using a bi-amplifier connection. Bi-amplifier connection If you are not touching each other within the SPEAKERS terminals. • After you have install and connect your speaker, be sure to the subwoofer, and the sound may not be sure to disconnect the AC power cord (mains lead... the jacks on the Lo (or Hi) side of the speaker cords are not using surround back speakers and front high speakers, you have been removed from the Speaker Settings menu (page 34). After you can select the front speaker system you connect a subwoofer with an auto standby function, turn...
Operating Instructions
Page 24
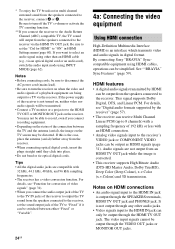
... set the "Ctrl for conversion of video signals" (page 31). • When you connect recording equipment. • Depending on the receiver. By connecting Sony "BRAVIA" Synccompatible equipment using HDMI cables, operations can receive Multi Channel Linear PCM (up to 8 channels) with 32 kHz, 44.1 kHz, 48 kHz,...connections • An audio signal input to the HDMI IN jack is not turned on, neither video nor audio signals will output from the speakers connected to the Audio Return Channel (ARC) compatible TV, the TV sound will be output through any other than an HDMI cable (e.g., via...
... set the "Ctrl for conversion of video signals" (page 31). • When you connect recording equipment. • Depending on the receiver. By connecting Sony "BRAVIA" Synccompatible equipment using HDMI cables, operations can receive Multi Channel Linear PCM (up to 8 channels) with 32 kHz, 44.1 kHz, 48 kHz,...connections • An audio signal input to the HDMI IN jack is not turned on, neither video nor audio signals will output from the speakers connected to the Audio Return Channel (ARC) compatible TV, the TV sound will be output through any other than an HDMI cable (e.g., via...

Operating Instructions
Page 25
... the GUI menu is displayed. • When you want to listen to the sound from the TV speaker, set the "Pass Through" to "OFF", video and audio signals will not output through the TV speaker. • DSD signals of Super Audio CD are not input and output. • Be sure to turn...
... the GUI menu is displayed. • When you want to listen to the sound from the TV speaker, set the "Pass Through" to "OFF", video and audio signals will not output through the TV speaker. • DSD signals of Super Audio CD are not input and output. • Be sure to turn...

Operating Instructions
Page 34
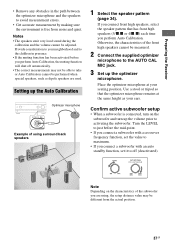
.... 34GB Changes or adjustments made to the factory default settings. The Settings menu list appears on the receiver to perform this operation. ?/1 Setting the speakers Selecting the speaker pattern Select the speaker pattern according to the speaker system which you are now reset to the defaults. 2 Press V/v repeatedly to select " Settings", then press or b.
.... 34GB Changes or adjustments made to the factory default settings. The Settings menu list appears on the receiver to perform this operation. ?/1 Setting the speakers Selecting the speaker pattern Select the speaker pattern according to the speaker system which you are now reset to the defaults. 2 Press V/v repeatedly to select " Settings", then press or b.

Operating Instructions
Page 35
.../FRONT B terminals, select "OFF". 6 Press RETURN/EXIT O. 35GB The Settings menu list appears on the TV screen. 3 Press V/v repeatedly to select "Speaker", then press or b. 4 Press V/v repeatedly to select "SB Assign", then press or b. 5 Press V/v repeatedly to select the parameter you want , then... . 6 Press RETURN/EXIT O. Press MENU if the GUI menu does not appear on the TV screen. Preparing the Receiver 3 Press V/v repeatedly to select "Speaker", then press or b. 4 Press V/v repeatedly to select "SP Pattern", then press or b. 5 Press V/v repeatedly to select " Settings", then press or...
.../FRONT B terminals, select "OFF". 6 Press RETURN/EXIT O. 35GB The Settings menu list appears on the TV screen. 3 Press V/v repeatedly to select "Speaker", then press or b. 4 Press V/v repeatedly to select "SB Assign", then press or b. 5 Press V/v repeatedly to select the parameter you want , then... . 6 Press RETURN/EXIT O. Press MENU if the GUI menu does not appear on the TV screen. Preparing the Receiver 3 Press V/v repeatedly to select "Speaker", then press or b. 4 Press V/v repeatedly to select "SP Pattern", then press or b. 5 Press V/v repeatedly to select " Settings", then press or...

Operating Instructions
Page 36
... checking the indicator on the display panel. The DCAC is not set the "SB Assign" to the AUTO CAL MIC jack. Do not connect any speaker terminals. * To select "SP B" or "SP A B", set to your room. "SPK OFF" appears on the display panel. Note This setting is not... available when headphones are being received. You can adjust the speaker levels manually according to "SPK OFF" (page 36). • Disconnect the headphones. 36GB However, you perform Auto Calibration, check the following items. &#...
... checking the indicator on the display panel. The DCAC is not set the "SB Assign" to the AUTO CAL MIC jack. Do not connect any speaker terminals. * To select "SP B" or "SP A B", set to your room. "SPK OFF" appears on the display panel. Note This setting is not... available when headphones are being received. You can adjust the speaker levels manually according to "SPK OFF" (page 36). • Disconnect the headphones. 36GB However, you perform Auto Calibration, check the following items. &#...
Operating Instructions
Page 37
... to your seating position. If you connect front high speakers, select the speaker pattern that the optimizer microphone remains at your neighborhood and to the children in the path between the optimizer microphone and the speakers to avoid measurement errors. • Get accurate measurement ...by making sure the environment is connected, turn up the optimizer microphone. Otherwise, the characteristics of the front high speakers cannot be measured. 2 Connect the supplied optimizer microphone to the AUTO CAL MIC jack. 3 Set up the volume prior to activating ...
... to your seating position. If you connect front high speakers, select the speaker pattern that the optimizer microphone remains at your neighborhood and to the children in the path between the optimizer microphone and the speakers to avoid measurement errors. • Get accurate measurement ...by making sure the environment is connected, turn up the optimizer microphone. Otherwise, the characteristics of the front high speakers cannot be measured. 2 Connect the supplied optimizer microphone to the AUTO CAL MIC jack. 3 Set up the volume prior to activating ...
Operating Instructions
Page 39
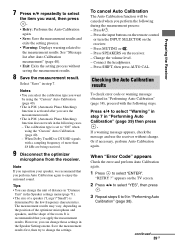
...results. Press the input buttons on the remote control or turn the INPUT SELECTOR on the position of the optimizer microphone and speakers, and the shape of more than 48 kHz are being received. 9 Disconnect the optimizer microphone from the receiver. Press MUTING...A.P.M. (Automatic Phase Matching) function does not work in "Performing Auto Calibration" (page 38). Notes • You can change the settings. Press ?/1. - Press SPEAKERS on the TV screen. 2 Press B/b to select "YES", then press . 3 Repeat steps 6 to 9 in the following during the measurement process: - ...
...results. Press the input buttons on the remote control or turn the INPUT SELECTOR on the position of the optimizer microphone and speakers, and the shape of more than 48 kHz are being received. 9 Disconnect the optimizer microphone from the receiver. Press MUTING...A.P.M. (Automatic Phase Matching) function does not work in "Performing Auto Calibration" (page 38). Notes • You can change the settings. Press ?/1. - Press SPEAKERS on the TV screen. 2 Press B/b to select "YES", then press . 3 Repeat steps 6 to 9 in the following during the measurement process: - ...
Operating Instructions
Page 40
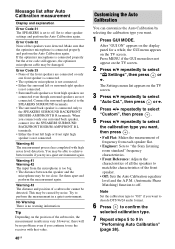
... not connected. Warning 41 Warning 42 The input from each speaker flat. • Engineer: Sets to "the Sony listening room standard" frequency characteristics. • Front Reference: Adjusts the characteristics of all the speakers to match the characteristics of the front speaker. • Off: Sets the Auto Calibration equalizer level and the A.P.M. (Automatic Phase Matching...
... not connected. Warning 41 Warning 42 The input from each speaker flat. • Engineer: Sets to "the Sony listening room standard" frequency characteristics. • Front Reference: Adjusts the characteristics of all the speakers to match the characteristics of the front speaker. • Off: Sets the Auto Calibration equalizer level and the A.P.M. (Automatic Phase Matching...


