Operating Instructions
Page 6
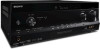
... 5: Connecting the antennas (aerials 33 6: Connecting the AC power cord (mains lead 33 Preparing the Receiver Initializing the receiver 34 Setting the speakers 34 Using AUTO CALIBRATION 36 Guide to on-screen display operation ..........41 Enjoying Surround Sound Selecting the sound field 54 Using the SOUND OPTIMIZER 58 Resetting sound fields to...
... 5: Connecting the antennas (aerials 33 6: Connecting the AC power cord (mains lead 33 Preparing the Receiver Initializing the receiver 34 Setting the speakers 34 Using AUTO CALIBRATION 36 Guide to on-screen display operation ..........41 Enjoying Surround Sound Selecting the sound field 54 Using the SOUND OPTIMIZER 58 Resetting sound fields to...
Operating Instructions
Page 11
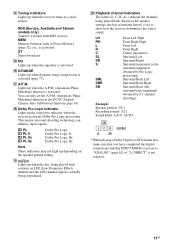
... back. Q A.P.M. DIRECT" is activated. Lights up when the equalizer is not set the A.P.M. (Automatic Phase Matching) function in the DCAC (Digital Cinema Auto Calibration) function (page 36). You can enhance input signals. LH RH L R C SL SR S SBL SBR SB Front Left High Front Right High Front.... MEM Memory function, such as Preset Memory (page 52), etc., is not selected. 11GB Based on the speaker pattern setting. AUTO * When playing a Dolby Digital or DTS format disc, make sure that you have completed the digital connections and that INPUT MODE is activated....
... back. Q A.P.M. DIRECT" is activated. Lights up when the equalizer is not set the A.P.M. (Automatic Phase Matching) function in the DCAC (Digital Cinema Auto Calibration) function (page 36). You can enhance input signals. LH RH L R C SL SR S SBL SBR SB Front Left High Front Right High Front.... MEM Memory function, such as Preset Memory (page 52), etc., is not selected. 11GB Based on the speaker pattern setting. AUTO * When playing a Dolby Digital or DTS format disc, make sure that you have completed the digital connections and that INPUT MODE is activated....
Operating Instructions
Page 16
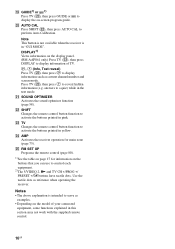
... to display information such as current channel number and screen mode. Use the tactile dots as examples. • Depending on -screen program guide. T AUTO CAL Press SHIFT (V), then press AUTO CAL to display the on the model of TV. , (Info, Text reveal) Press TV (W), then press to reveal hidden information (e.g. answers to... to a quiz) while in this section may not work with the supplied remote control. 16GB S GUIDE1) or 1) Press TV (W), then press GUIDE or to perform Auto Calibration.
... to display information such as current channel number and screen mode. Use the tactile dots as examples. • Depending on -screen program guide. T AUTO CAL Press SHIFT (V), then press AUTO CAL to display the on the model of TV. , (Info, Text reveal) Press TV (W), then press to reveal hidden information (e.g. answers to... to a quiz) while in this section may not work with the supplied remote control. 16GB S GUIDE1) or 1) Press TV (W), then press GUIDE or to perform Auto Calibration.
Operating Instructions
Page 18
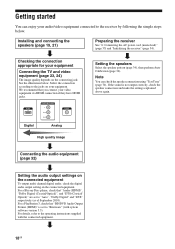
...HDMI COMPONENT VIDEO Y PB/CB PR/CR VIDEO Digital Analog High quality image Setting the speakers Select the speaker pattern (page 34), then perform Auto Calibration (page 36). Note You can enjoy your equipment. For a PlayStation 3, check that "BD/DVD Audio Output Format (HDMI)" is not ...and make the settings explained above again. If the sound is set to the jacks on the connecting jack. Select the connection according to "Auto", "Dolby Digital" and "DTS" respectively (as of September 2010). See the illustration below . Installing and connecting the speakers (page 19...
...HDMI COMPONENT VIDEO Y PB/CB PR/CR VIDEO Digital Analog High quality image Setting the speakers Select the speaker pattern (page 34), then perform Auto Calibration (page 36). Note You can enjoy your equipment. For a PlayStation 3, check that "BD/DVD Audio Output Format (HDMI)" is not ...and make the settings explained above again. If the sound is set to the jacks on the connecting jack. Select the connection according to "Auto", "Dolby Digital" and "DTS" respectively (as of September 2010). See the illustration below . Installing and connecting the speakers (page 19...

Operating Instructions
Page 35
... V/v repeatedly to select "Speaker", then press or b. 4 Press V/v repeatedly to select "SP Pattern", then press or b. 5 Press V/v repeatedly to select the speaker pattern you perform Auto Calibration. 1 Press GUI MODE.
... V/v repeatedly to select "Speaker", then press or b. 4 Press V/v repeatedly to select "SP Pattern", then press or b. 5 Press V/v repeatedly to select the speaker pattern you perform Auto Calibration. 1 Press GUI MODE.

Operating Instructions
Page 36
... for your room. However, you can confirm the selected speakers terminals by checking the indicator on the display panel. Before you perform Auto Calibration Before you want to drive. You can adjust the speaker levels manually according to your seating position.1) • Measure the speaker size... are connected. DIRECT" is selected. 2)The measurement result is not utilized when Dolby TrueHD or DTS-HD signals with DCAC (Digital Cinema Auto Calibration) function which allows you want to both the SPEAKER FRONT A and SPEAKER SURROUND BACK/ FRONT HIGH/BI-AMP/FRONT B terminals (parallel ...
... for your room. However, you can confirm the selected speakers terminals by checking the indicator on the display panel. Before you perform Auto Calibration Before you want to drive. You can adjust the speaker levels manually according to your seating position.1) • Measure the speaker size... are connected. DIRECT" is selected. 2)The measurement result is not utilized when Dolby TrueHD or DTS-HD signals with DCAC (Digital Cinema Auto Calibration) function which allows you want to both the SPEAKER FRONT A and SPEAKER SURROUND BACK/ FRONT HIGH/BI-AMP/FRONT B terminals (parallel ...
Operating Instructions
Page 37
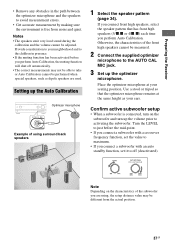
...3 Set up the optimizer microphone. Use a stool or tripod so that has front high speakers (5/x.x or 4/x.x) each time you perform Auto Calibration. Place the optimizer microphone at the same height as dipole speakers are using surround back speakers 1 Select the speaker pattern (page 34...). Turn the LEVEL to just before you perform Auto Calibration, the muting function will shut off (deactivated). Preparing the Receiver • Remove any obstacles in presence. • If the muting ...
...3 Set up the optimizer microphone. Use a stool or tripod so that has front high speakers (5/x.x or 4/x.x) each time you perform Auto Calibration. Place the optimizer microphone at the same height as dipole speakers are using surround back speakers 1 Select the speaker pattern (page 34...). Turn the LEVEL to just before you perform Auto Calibration, the muting function will shut off (deactivated). Preparing the Receiver • Remove any obstacles in presence. • If the muting ...
Operating Instructions
Page 38
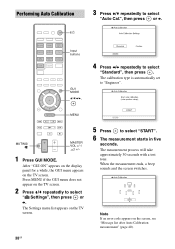
...MODE V/v/B/b, 4 Press B/b repeatedly to select "Auto Cal.", then press or b. The measurement process will take approximately 30 seconds with a test tone. The Settings menu list appears on the screen, see "Message list after Auto Calibration measurement" (page 40). When the measurement ...beep sounds and the screen switches. MENU MUTING/ MASTER VOL +/-/ 2 +/- 1 Press GUI MODE. Performing Auto Calibration ?/1 3 Press V/v repeatedly to select "Standard", then press . The calibration type is automatically set to select "START". 6 The measurement starts in five seconds. Note If an ...
...MODE V/v/B/b, 4 Press B/b repeatedly to select "Auto Cal.", then press or b. The measurement process will take approximately 30 seconds with a test tone. The Settings menu list appears on the screen, see "Message list after Auto Calibration measurement" (page 40). When the measurement ...beep sounds and the screen switches. MENU MUTING/ MASTER VOL +/-/ 2 +/- 1 Press GUI MODE. Performing Auto Calibration ?/1 3 Press V/v repeatedly to select "Standard", then press . The calibration type is automatically set to select "START". 6 The measurement starts in five seconds. Note If an ...
Operating Instructions
Page 39
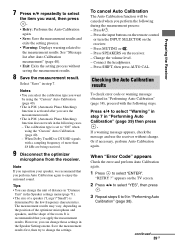
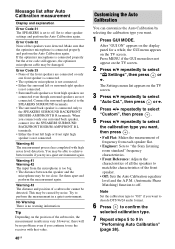
... the unit of the room. "RETRY ?" Press V/v to select "Warning" in step 7 in "Performing Auto Calibration" (page 38), proceed with a sampling frequency of a speaker ("Large"/"Small") is determined by using the "Custom" Auto Calibration (page 40). - Press ?/1. - To cancel Auto Calibration The Auto Calibration function will be canceled when you want by the low frequency characteristics. Checking the...
... the unit of the room. "RETRY ?" Press V/v to select "Warning" in step 7 in "Performing Auto Calibration" (page 38), proceed with a sampling frequency of a speaker ("Large"/"Small") is determined by using the "Custom" Auto Calibration (page 40). - Press ?/1. - To cancel Auto Calibration The Auto Calibration function will be canceled when you want by the low frequency characteristics. Checking the...
Operating Instructions
Page 40
Warning 41 Warning 42 The input from each speaker flat. • Engineer: Sets to "the Sony listening room standard" frequency characteristics. • Front Reference: Adjusts the characteristics of all the speakers to match the characteristics of frequency from the ... back speaker, connect it to off . Warning 40 The measurement process has completed with that the optimizer microphone is connected properly and perform the Auto Calibration again. No Warning There is no problems even if you try in a quiet environment again. Set to the SPEAKERS SURROUND BACK/FRONT HIGH/BI...
Warning 41 Warning 42 The input from each speaker flat. • Engineer: Sets to "the Sony listening room standard" frequency characteristics. • Front Reference: Adjusts the characteristics of all the speakers to match the characteristics of frequency from the ... back speaker, connect it to off . Warning 40 The measurement process has completed with that the optimizer microphone is connected properly and perform the Auto Calibration again. No Warning There is no problems even if you try in a quiet environment again. Set to the SPEAKERS SURROUND BACK/FRONT HIGH/BI...

Operating Instructions
Page 44
... of up or down quickly: turn the MASTER VOLUME on the receiver. You can enter a name of time you turn off the receiver. • Perform Auto Calibration. Tips • You can turn INPUT SELECTOR on the receiver or press input buttons on the remote control to select the equipment you want to...
... of up or down quickly: turn the MASTER VOLUME on the receiver. You can enter a name of time you turn off the receiver. • Perform Auto Calibration. Tips • You can turn INPUT SELECTOR on the receiver or press input buttons on the remote control to select the equipment you want to...

Operating Instructions
Page 58
After Auto Calibration is performed, the sound level is set to suit your environment. "S.F. CLEAR" appears on the receiver to perform this operation. ?/1 Press SOUND OPTIMIZER to select "SOUND.OP. It automatically calibrates the sound which cannot be heard well when you turn off as you enjoy clear and dynamic sound at low volume...
After Auto Calibration is performed, the sound level is set to suit your environment. "S.F. CLEAR" appears on the receiver to perform this operation. ?/1 Press SOUND OPTIMIZER to select "SOUND.OP. It automatically calibrates the sound which cannot be heard well when you turn off as you enjoy clear and dynamic sound at low volume...
Operating Instructions
Page 65
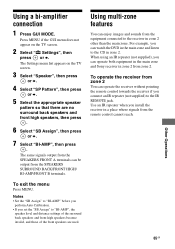
... in the main zone and Sony receiver in zone 2 from the equipment connected to the CD in zone 2. To operate the receiver from zone 2 You can be output from the remote control cannot reach. Notes • Set the "SB Assign" to "BI-AMP" before you perform Auto Calibration. • If you can watch...
... in the main zone and Sony receiver in zone 2 from the equipment connected to the CD in zone 2. To operate the receiver from zone 2 You can be output from the remote control cannot reach. Notes • Set the "SB Assign" to "BI-AMP" before you perform Auto Calibration. • If you can watch...

Operating Instructions
Page 69
...B terminals for a bi-amplifier or speakers front B connection. • Speaker B • BI-AMP • OFF Note When you perform Auto Calibration. Note When one of the sound fields for music is selected, no sound is selected. the digital input signal contains LFE signals. - continued 69GB..."Dist". 3 Set the distance of the selected speaker, then press . Notes • Depending on the screen for which you have performed the Auto Calibration and saved the measurement result. x SP Pattern (Speaker Pattern) Select "SP Pattern" according to the speaker system which you want to adjust the ...
...B terminals for a bi-amplifier or speakers front B connection. • Speaker B • BI-AMP • OFF Note When you perform Auto Calibration. Note When one of the sound fields for music is selected, no sound is selected. the digital input signal contains LFE signals. - continued 69GB..."Dist". 3 Set the distance of the selected speaker, then press . Notes • Depending on the screen for which you have performed the Auto Calibration and saved the measurement result. x SP Pattern (Speaker Pattern) Select "SP Pattern" according to the speaker system which you want to adjust the ...
Operating Instructions
Page 70
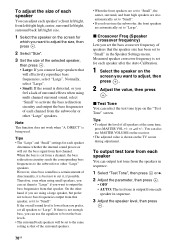
...enough bass, you can use MASTER VOLUME on the receiver. • The adjusted value is lower than you prefer, set for each speaker after the Auto Calibration. 1 Select the speaker on the screen you can set to the subwoofer or other "Large" speakers. Tips • To adjust the level of ...surround back speakers will be set to "Small" in sequence. 1 Select "Test Tone", then press or b. 2 Adjust the parameter, then press . • OFF • AUTO: The test tone is best not to cut it to output the bass frequencies from each speaker in sequence. 3 Adjust the speaker level, then press...
...enough bass, you can use MASTER VOLUME on the receiver. • The adjusted value is lower than you prefer, set for each speaker after the Auto Calibration. 1 Select the speaker on the screen you can set to the subwoofer or other "Large" speakers. Tips • To adjust the level of ...surround back speakers will be set to "Small" in sequence. 1 Select "Test Tone", then press or b. 2 Adjust the parameter, then press . • OFF • AUTO: The test tone is best not to cut it to output the bass frequencies from each speaker in sequence. 3 Adjust the speaker level, then press...
Operating Instructions
Page 76
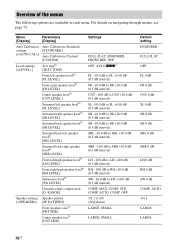
... pattern [SP PATTERN] Front speakers sizeb) [FRT SIZE] Center speaker sizeb) [CNT SIZE] Settings FULL FLAT, ENGINEER, FRONT REF, OFF OFF, AUTO xxxc) FL -10.0 dB to FL +10.0 dB (0.5 dB interval) FR -10.0 dB to FR +10.0 dB (0.5 dB interval) CNT...dB SW 0 dB COMP. MAX, COMP. OFF 5/2.1 to SW +10.0 dB (0.5 dB interval) COMP. Menu [Display] Parameters [Display] Auto Calibration settings [] Level settings [] Auto Calibration (Standard) [STANDARD] Auto Calibration (Custom) [CUSTOM] Test toneb) [TEST TONE] Front left speaker levelb) [FL LEVEL] Front right speaker levelb) [FR LEVEL] Center speaker...
... pattern [SP PATTERN] Front speakers sizeb) [FRT SIZE] Center speaker sizeb) [CNT SIZE] Settings FULL FLAT, ENGINEER, FRONT REF, OFF OFF, AUTO xxxc) FL -10.0 dB to FL +10.0 dB (0.5 dB interval) FR -10.0 dB to FR +10.0 dB (0.5 dB interval) CNT...dB SW 0 dB COMP. MAX, COMP. OFF 5/2.1 to SW +10.0 dB (0.5 dB interval) COMP. Menu [Display] Parameters [Display] Auto Calibration settings [] Level settings [] Auto Calibration (Standard) [STANDARD] Auto Calibration (Custom) [CUSTOM] Test toneb) [TEST TONE] Front left speaker levelb) [FL LEVEL] Front right speaker levelb) [FR LEVEL] Center speaker...
Operating Instructions
Page 79
a)You can only select this parameter after you have performed the Auto Calibration and saved the measurement result. d)You can only select this parameter if you have performed Auto Calibration. h)You can only select this parameter if your speaker is not set to a setting with surround back or front high speakers (page 34). continued 79GB...
a)You can only select this parameter after you have performed the Auto Calibration and saved the measurement result. d)You can only select this parameter if you have performed Auto Calibration. h)You can only select this parameter if your speaker is not set to a setting with surround back or front high speakers (page 34). continued 79GB...
Operating Instructions
Page 86
...you remedy the problem. If you have any questions or problems concerning your receiver, please consult your nearest Sony dealer. 86GB Troubleshooting If you experience any of the following difficulties while using the receiver, use any problem persist, consult your nearest... Sony dealer. The surround effect cannot be retained. Power The receiver is turned off and unplug the receiver. On operation Before connecting other equipment, be sure to turn off automatically. • "Auto Standby" is set the calibration type to "Off" and perform Auto Calibration again (page...
...you remedy the problem. If you have any questions or problems concerning your receiver, please consult your nearest Sony dealer. 86GB Troubleshooting If you experience any of the following difficulties while using the receiver, use any problem persist, consult your nearest... Sony dealer. The surround effect cannot be retained. Power The receiver is turned off and unplug the receiver. On operation Before connecting other equipment, be sure to turn off automatically. • "Auto Standby" is set the calibration type to "Off" and perform Auto Calibration again (page...

Operating Instructions
Page 87
... the headphones, the front speaker may not be connected to verify that the "A. Refer to the operating instructions supplied with each speaker correctly, using the Auto Calibration menu or "SP Pattern" in the Speaker Settings menu. If both L and R jack connections. Check the connection of the front speaker which is not outputting...
... the headphones, the front speaker may not be connected to verify that the "A. Refer to the operating instructions supplied with each speaker correctly, using the Auto Calibration menu or "SP Pattern" in the Speaker Settings menu. If both L and R jack connections. Check the connection of the front speaker which is not outputting...
Operating Instructions
Page 93
Check the iPhone/iPod or USB device, then unplug it and turn off after Auto Calibration measurement" (page 40), "iPhone/iPod message list" (page 47) and "USB message list" (page 50). Amplifier section USA model1) Minimum RMS Output Power (8 ohms, 20 ...
Check the iPhone/iPod or USB device, then unplug it and turn off after Auto Calibration measurement" (page 40), "iPhone/iPod message list" (page 47) and "USB message list" (page 50). Amplifier section USA model1) Minimum RMS Output Power (8 ohms, 20 ...


