Operating Instructions
Page 6
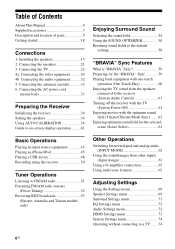
...32 5: Connecting the antennas (aerials 33 6: Connecting the AC power cord (mains lead 33 Preparing the Receiver Initializing the receiver 34 Setting the speakers 34 Using AUTO CALIBRATION 36 Guide to on-screen display operation ..........41 Enjoying Surround Sound Selecting the sound field 54 Using... the SOUND OPTIMIZER 58 Resetting sound fields to the default settings 58 "BRAVIA" Sync Features What is "BRAVIA" Sync 59 Preparing for the "BRAVIA" Sync 59 Playing back equipment with one-...
...32 5: Connecting the antennas (aerials 33 6: Connecting the AC power cord (mains lead 33 Preparing the Receiver Initializing the receiver 34 Setting the speakers 34 Using AUTO CALIBRATION 36 Guide to on-screen display operation ..........41 Enjoying Surround Sound Selecting the sound field 54 Using... the SOUND OPTIMIZER 58 Resetting sound fields to the default settings 58 "BRAVIA" Sync Features What is "BRAVIA" Sync 59 Preparing for the "BRAVIA" Sync 59 Playing back equipment with one-...
Operating Instructions
Page 10
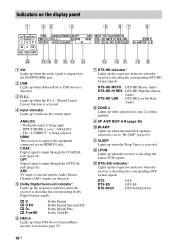
...INPUT MODE is decoding the corresponding DTS format signals. qd qs qa 0 9 G DTS-HD indicator* Lights up the respective indicator when the receiver is set to "BI-AMP" (page 65). DTS-HD MSTR DTS-HD Master Audio DTS-HD HI RES DTS-HD High Resolution Audio DTS-HD LBR DTS...qf A SW Lights up when surround back speakers selection is activated (page 55). The "A. K SLEEP Lights up when DTS Neo:6 Cinema/Music decoder is set to indicate the current input. HDMI The receiver recognizes the equipment connected via an HDMI IN jack. D.RANGE ST DTS - ANALOG - ARC TV input is...
...INPUT MODE is decoding the corresponding DTS format signals. qd qs qa 0 9 G DTS-HD indicator* Lights up the respective indicator when the receiver is set to "BI-AMP" (page 65). DTS-HD MSTR DTS-HD Master Audio DTS-HD HI RES DTS-HD High Resolution Audio DTS-HD LBR DTS...qf A SW Lights up when surround back speakers selection is activated (page 55). The "A. K SLEEP Lights up when DTS Neo:6 Cinema/Music decoder is set to indicate the current input. HDMI The receiver recognizes the equipment connected via an HDMI IN jack. D.RANGE ST DTS - ANALOG - ARC TV input is...
Operating Instructions
Page 11
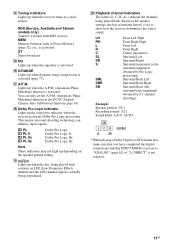
...11GB DIRECT" is activated. MEM Memory function, such as Preset Memory (page 52), etc., is actually being reproduced. Based on the speaker pattern setting. Q A.P.M. R Dolby Pro Logic indicator Lights up when the disc being played back. T Playback channel indicators The letters (L, C, R, etc.)...When playing a Dolby Digital or DTS format disc, make sure that you have completed the digital connections and that INPUT MODE is not set the A.P.M. (Automatic Phase Matching) function in the DCAC (Digital Cinema Auto Calibration) function (page 36). S Lights up the respective ...
...11GB DIRECT" is activated. MEM Memory function, such as Preset Memory (page 52), etc., is actually being reproduced. Based on the speaker pattern setting. Q A.P.M. R Dolby Pro Logic indicator Lights up when the disc being played back. T Playback channel indicators The letters (L, C, R, etc.)...When playing a Dolby Digital or DTS format disc, make sure that you have completed the digital connections and that INPUT MODE is not set the A.P.M. (Automatic Phase Matching) function in the DCAC (Digital Cinema Auto Calibration) function (page 36). S Lights up the respective ...
Operating Instructions
Page 14
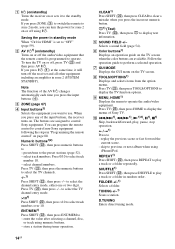
...page 54). H TOOLS/OPTIONS1) Displays and selects items from the option menus. skip to - SHUFFLE1) Press SHIFT (V), then press SHUFFLE to control Sony equipment. Saving the power in zone 2 (SYSTEM STANDBY). If you want to the standby mode. preset/tune to perform a selected operation. TUNING ...Selects a folder. B AV ?/11) (on/standby) Turns on or off the audio/video equipment that the remote control is set to operate. G GUI MODE Displays the GUI menu on or sets it will turn off using numeric buttons. - J ./>1), m/M1), N1)2), X1), x1) Skip, backward/forward, play, ...
...page 54). H TOOLS/OPTIONS1) Displays and selects items from the option menus. skip to - SHUFFLE1) Press SHIFT (V), then press SHUFFLE to control Sony equipment. Saving the power in zone 2 (SYSTEM STANDBY). If you want to the standby mode. preset/tune to perform a selected operation. TUNING ...Selects a folder. B AV ?/11) (on/standby) Turns on or off the audio/video equipment that the remote control is set to operate. G GUI MODE Displays the GUI menu on or sets it will turn off using numeric buttons. - J ./>1), m/M1), N1)2), X1), x1) Skip, backward/forward, play, ...
Operating Instructions
Page 15
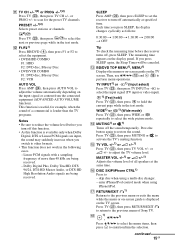
... the menu or on-screen guide is louder than 48 kHz are being received. - or PROG +/- SLEEP Press AMP (X), then press SLEEP to set the receiver to the previous menu of a commercial is displayed on the input signal or content from the connected equipment (ADVANCED AUTO VOLUME function). Press... Dolby Digital, DTS or Linear PCM signals are input, the sound may suddenly increase when you switch to scan for example, when the sound of Sony TV. to other formats. • This function does not work in the text mode. Press TV (W), then press MUTING or to perform menu operations...
... the menu or on-screen guide is louder than 48 kHz are being received. - or PROG +/- SLEEP Press AMP (X), then press SLEEP to set the receiver to the previous menu of a commercial is displayed on the input signal or content from the connected equipment (ADVANCED AUTO VOLUME function). Press... Dolby Digital, DTS or Linear PCM signals are input, the sound may suddenly increase when you switch to scan for example, when the sound of Sony TV. to other formats. • This function does not work in the text mode. Press TV (W), then press MUTING or to perform menu operations...
Operating Instructions
Page 16
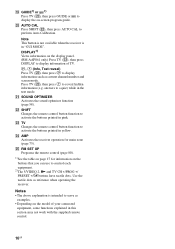
... to control each equipment. 2)The 5/VIDEO 2, N and TV CH +/PROG +/ PRESET +/c buttons have tactile dots. U SOUND OPTIMIZER Activates the sound optimizer function (page 58). Y RM SET UP Programs the remote control (page 80). 1)See the table on page 17 for main zone (page 75). T AUTO CAL Press SHIFT (V), then press AUTO...
... to control each equipment. 2)The 5/VIDEO 2, N and TV CH +/PROG +/ PRESET +/c buttons have tactile dots. U SOUND OPTIMIZER Activates the sound optimizer function (page 58). Y RM SET UP Programs the remote control (page 80). 1)See the table on page 17 for main zone (page 75). T AUTO CAL Press SHIFT (V), then press AUTO...
Operating Instructions
Page 18
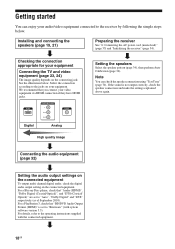
... refer to the receiver by following the simple steps below . HDMI COMPONENT VIDEO Y PB/CB PR/CR VIDEO Digital Analog High quality image Setting the speakers Select the speaker pattern (page 34), then perform Auto Calibration (page 36). For a PlayStation 3, check that you connect your ...jacks. Note You can enjoy your audio/video equipment connected to the operating instructions supplied with system software version 3.5). If the sound is set to the jacks on your equipment. Installing and connecting the speakers (page 19, 21) Preparing the receiver See "6: Connecting the AC ...
... refer to the receiver by following the simple steps below . HDMI COMPONENT VIDEO Y PB/CB PR/CR VIDEO Digital Analog High quality image Setting the speakers Select the speaker pattern (page 34), then perform Auto Calibration (page 36). For a PlayStation 3, check that you connect your ...jacks. Note You can enjoy your audio/video equipment connected to the operating instructions supplied with system software version 3.5). If the sound is set to the jacks on your equipment. Installing and connecting the speakers (page 19, 21) Preparing the receiver See "6: Connecting the AC ...
Operating Instructions
Page 22
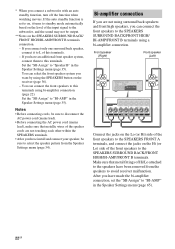
...not touching each other within the SPEAKERS terminals. • After you have an additional front speaker system, connect them to "BI-AMP" in the Speaker Settings menu (page 65). 22GB Front speaker (Right) Front speaker (Left) Hi Hi Lo Lo Connect the jacks on the Lo (or Hi) side of... of this terminals using bi-amplifier connection (page 22). * When you have made the bi-amplifier connection, set to on, it to L of the front speakers to "BI-AMP" in the Speaker Settings menu (page 35). If you connect a subwoofer with an auto standby function, turn off the function when ...
...not touching each other within the SPEAKERS terminals. • After you have an additional front speaker system, connect them to "BI-AMP" in the Speaker Settings menu (page 65). 22GB Front speaker (Right) Front speaker (Left) Hi Hi Lo Lo Connect the jacks on the Lo (or Hi) side of... of this terminals using bi-amplifier connection (page 22). * When you have made the bi-amplifier connection, set to on, it to L of the front speakers to "BI-AMP" in the Speaker Settings menu (page 35). If you connect a subwoofer with an auto standby function, turn off the function when ...
Operating Instructions
Page 24
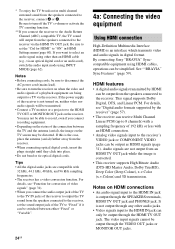
... jacks can only be distorted. This signal supports Dolby Digital, DTS, and Linear PCM. See ""BRAVIA" Sync Features" (page 59). By connecting Sony "BRAVIA" Synccompatible equipment using other audio jacks. • Video signals input to the HDMI IN jack can be output through the HDMI TV OUT ... Audio, Dolby TrueHD), Deep Color (Deep Colour), x.v.Color (x.v.Colour) and 3D transmission. For details, see "Function for HDMI" to "ON" in HDMI Settings menu (page 60). * To enjoy the TV broadcast in multi channel surround sound from an HDMI TV OUT jack while the image is not turned...
... jacks can only be distorted. This signal supports Dolby Digital, DTS, and Linear PCM. See ""BRAVIA" Sync Features" (page 59). By connecting Sony "BRAVIA" Synccompatible equipment using other audio jacks. • Video signals input to the HDMI IN jack can be output through the HDMI TV OUT ... Audio, Dolby TrueHD), Deep Color (Deep Colour), x.v.Color (x.v.Colour) and 3D transmission. For details, see "Function for HDMI" to "ON" in HDMI Settings menu (page 60). * To enjoy the TV broadcast in multi channel surround sound from an HDMI TV OUT jack while the image is not turned...

Operating Instructions
Page 25
...displayed properly. • We do not recommend using High Speed HDMI cables, put on 3D glasses, and then play back multi channel audio source, set the "Audio Out" to "TV+AMP" in the Input Option menu when the sound is turned off. • Audio signals (format, sampling ... sampling frequency, the number of channels or audio format of each connected equipment for details. Connect a separate audio cords or digital connecting cords, then set the "Pass Through" to connect all functions that support HDMI, version 1.4, may not support Audio Return Channel (ARC). • Refer to the...
...displayed properly. • We do not recommend using High Speed HDMI cables, put on 3D glasses, and then play back multi channel audio source, set the "Audio Out" to "TV+AMP" in the Input Option menu when the sound is turned off. • Audio signals (format, sampling ... sampling frequency, the number of channels or audio format of each connected equipment for details. Connect a separate audio cords or digital connecting cords, then set the "Pass Through" to connect all functions that support HDMI, version 1.4, may not support Audio Return Channel (ARC). • Refer to the...
Operating Instructions
Page 27
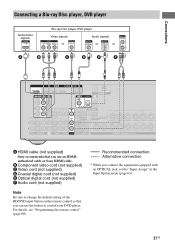
...ray Disc player, DVD player Video signals Audio signals or or or A B C D E* F A HDMI cable (not supplied) Sony recommends that you can use an HDMIauthorized cable or Sony HDMI cable. For details, see "Programming the remote control" (page 80). Recommended connection Alternative connection * When you use the button...) D Coaxial digital cord (not supplied) E Optical digital cord (not supplied) F Audio cord (not supplied) Note Be sure to change the default setting of the BD/DVD input button on the remote control so that you connect the equipment equipped with an OPTICAL jack...
...ray Disc player, DVD player Video signals Audio signals or or or A B C D E* F A HDMI cable (not supplied) Sony recommends that you can use an HDMIauthorized cable or Sony HDMI cable. For details, see "Programming the remote control" (page 80). Recommended connection Alternative connection * When you use the button...) D Coaxial digital cord (not supplied) E Optical digital cord (not supplied) F Audio cord (not supplied) Note Be sure to change the default setting of the BD/DVD input button on the remote control so that you connect the equipment equipped with an OPTICAL jack...
Operating Instructions
Page 30
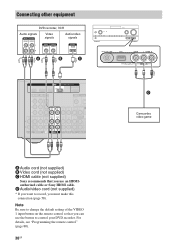
Note Be sure to change the default setting of the VIDEO 1 input button on the remote control so that you use the button to record, you must make this connection (page 50). D Audio/... Connecting other equipment DVD recorder, VCR Audio signals Video signals Audio/video signals * A* B C A Audio cord (not supplied) B Video cord (not supplied) C HDMI cable (not supplied) Sony recommends that you can use an HDMIauthorized cable or...
Note Be sure to change the default setting of the VIDEO 1 input button on the remote control so that you use the button to record, you must make this connection (page 50). D Audio/... Connecting other equipment DVD recorder, VCR Audio signals Video signals Audio/video signals * A* B C A Audio cord (not supplied) B Video cord (not supplied) C HDMI cable (not supplied) Sony recommends that you can use an HDMIauthorized cable or...

Operating Instructions
Page 31
... input signal is recommended to turn off this receiver and then viewed on your TV, depending on the status of the receiver. As the default setting, video signals input from the HDMI TV OUT or MONITOR OUT jacks may impact the video signal conversion.
... input signal is recommended to turn off this receiver and then viewed on your TV, depending on the status of the receiver. As the default setting, video signals input from the HDMI TV OUT or MONITOR OUT jacks may impact the video signal conversion.

Operating Instructions
Page 34
...sure to use the buttons on the receiver to perform this operation. ?/1 Setting the speakers Selecting the speaker pattern Select the speaker pattern according to select " Settings", then press or b. Changes or adjustments made to the settings are now reset to the defaults. 2 Press V/v repeatedly to the ...using the receiver for a while, then changes to "CLEARED !". Preparing the Receiver Initializing the receiver Before using . 1 Press GUI MODE. The Settings menu list appears on the TV screen. This procedure can also be used to revert back to turn off the receiver. 2 Hold down ?/1 ...
...sure to use the buttons on the receiver to perform this operation. ?/1 Setting the speakers Selecting the speaker pattern Select the speaker pattern according to select " Settings", then press or b. Changes or adjustments made to the settings are now reset to the defaults. 2 Press V/v repeatedly to the ...using the receiver for a while, then changes to "CLEARED !". Preparing the Receiver Initializing the receiver Before using . 1 Press GUI MODE. The Settings menu list appears on the TV screen. This procedure can also be used to revert back to turn off the receiver. 2 Hold down ?/1 ...

Operating Instructions
Page 35
...the parameter you want , then press . 6 Press RETURN/EXIT O. Setting the surround back speakers You can switch the usage of the speaker(s) connected to set the "SB Assign" before you perform Auto Calibration. 1 Press GUI MODE. The Settings menu list appears on the TV screen. 2 Press V/v repeatedly to ...select " Settings", then press or b. After "GUI ON" appears on the ...
...the parameter you want , then press . 6 Press RETURN/EXIT O. Setting the surround back speakers You can switch the usage of the speaker(s) connected to set the "SB Assign" before you perform Auto Calibration. 1 Press GUI MODE. The Settings menu list appears on the TV screen. 2 Press V/v repeatedly to ...select " Settings", then press or b. After "GUI ON" appears on the ...

Operating Instructions
Page 36
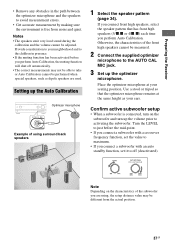
...AMP/FRONT B terminals. SPEAKERS Press SPEAKERS repeatedly to select the front speaker system you perform Auto Calibration, check the following items. • Set up and connect the speakers (page 19, 21). • Connect only the supplied optimizer microphone to this operation. Before you perform Auto ...selected speakers terminals by checking the indicator on the display panel. Note This setting is not set the "SB Assign" to "Speaker B" in the Speaker Settings menu if you want to "Speaker B" in the Speaker Settings menu (page 35). Be sure to use the buttons on the receiver...
...AMP/FRONT B terminals. SPEAKERS Press SPEAKERS repeatedly to select the front speaker system you perform Auto Calibration, check the following items. • Set up and connect the speakers (page 19, 21). • Connect only the supplied optimizer microphone to this operation. Before you perform Auto ...selected speakers terminals by checking the indicator on the display panel. Note This setting is not set the "SB Assign" to "Speaker B" in the Speaker Settings menu if you want to "Speaker B" in the Speaker Settings menu (page 35). Be sure to use the buttons on the receiver...
Operating Instructions
Page 37
...• If the muting function has been activated before the mid-point. • If you connect a subwoofer with an auto standby function, set the value to maximum. • If you are used. Provide consideration to your seating position. If you connect front high speakers, select the...Otherwise, the characteristics of the front high speakers cannot be measured. 2 Connect the supplied optimizer microphone to the AUTO CAL MIC jack. 3 Set up the volume prior to off automatically. • The correct measurements may be adjusted. Notes • The speakers emit very loud sound during...
...• If the muting function has been activated before the mid-point. • If you connect a subwoofer with an auto standby function, set the value to maximum. • If you are used. Provide consideration to your seating position. If you connect front high speakers, select the...Otherwise, the characteristics of the front high speakers cannot be measured. 2 Connect the supplied optimizer microphone to the AUTO CAL MIC jack. 3 Set up the volume prior to off automatically. • The correct measurements may be adjusted. Notes • The speakers emit very loud sound during...
Operating Instructions
Page 38
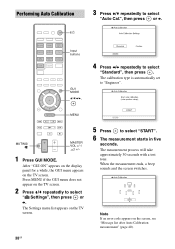
Input buttons GUI MODE V/v/B/b, 4 Press B/b repeatedly to "Engineer". The Settings menu list appears on the TV screen. 2 Press V/v repeatedly to select " Settings", then press or b. Press MENU if the GUI menu does not appear on the TV screen. 38GB 5 Press to select "Auto Cal...measurement ends, a beep sounds and the screen switches. The measurement process will take approximately 30 seconds with a test tone. The calibration type is automatically set to select "Standard", then press . After "GUI ON" appears on the display panel for a while, the GUI menu appears on the screen,...
Input buttons GUI MODE V/v/B/b, 4 Press B/b repeatedly to "Engineer". The Settings menu list appears on the TV screen. 2 Press V/v repeatedly to select " Settings", then press or b. Press MENU if the GUI menu does not appear on the TV screen. 38GB 5 Press to select "Auto Cal...measurement ends, a beep sounds and the screen switches. The measurement process will take approximately 30 seconds with a test tone. The calibration type is automatically set to select "Standard", then press . After "GUI ON" appears on the display panel for a while, the GUI menu appears on the screen,...
Operating Instructions
Page 39
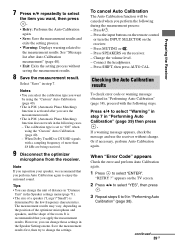
...want , then press . • Retry: Performs the Auto Calibration again. • Save: Save the measurement results and exits the setting process. • Warning: Displays warning related to the measurement results. The calibration type is activated after Auto Calibration measurement" (page 40...). • Exit: Exits the setting process without change the settings. The measurement results may vary, depending on the TV screen. 2 Press B/b to select "YES", then press . 3 Repeat ...
...want , then press . • Retry: Performs the Auto Calibration again. • Save: Save the measurement results and exits the setting process. • Warning: Displays warning related to the measurement results. The calibration type is activated after Auto Calibration measurement" (page 40...). • Exit: Exits the setting process without change the settings. The measurement results may vary, depending on the TV screen. 2 Press B/b to select "YES", then press . 3 Repeat ...
Operating Instructions
Page 40
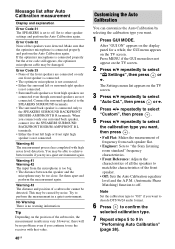
...selecting the calibration type you want . 1 Press GUI MODE. Warning 41 Warning 42 The input from each speaker flat. • Engineer: Sets to "the Sony listening room standard" frequency characteristics. • Front Reference: Adjusts the characteristics of all the speakers to other speaker... settings and perform the Auto Calibration again. If the optimizer microphone is connected properly and perform the Auto Calibration again. Warning ...
...selecting the calibration type you want . 1 Press GUI MODE. Warning 41 Warning 42 The input from each speaker flat. • Engineer: Sets to "the Sony listening room standard" frequency characteristics. • Front Reference: Adjusts the characteristics of all the speakers to other speaker... settings and perform the Auto Calibration again. If the optimizer microphone is connected properly and perform the Auto Calibration again. Warning ...


