
Operating Instructions
Page 6
... Sync)........ 59 Enjoying optimum sound field for the selected scene (Scene Select 60 Preparing the Receiver Initializing the receiver 33 Setting the speakers 33 Using AUTO CALIBRATION 34 Guide to on-screen display operation ..........39 Other Operations Switching between digital and analog audio (INPUT MODE 60 Using the sound/images from other...
... Sync)........ 59 Enjoying optimum sound field for the selected scene (Scene Select 60 Preparing the Receiver Initializing the receiver 33 Setting the speakers 33 Using AUTO CALIBRATION 34 Guide to on-screen display operation ..........39 Other Operations Switching between digital and analog audio (INPUT MODE 60 Using the sound/images from other...

Operating Instructions
Page 15
... • This function does not work in the following cases. - AUTO CAL Hold down SHIFT (O), then press AUTO CAL to a quiz) while in the text mode. C Numeric buttons** Selects the TV channels. answers to activate the Auto Calibration function. L MENU/HOME Displays the TV menus. or +/- The function...- N TV CH +**/- Linear PCM signals with the numeric buttons to select the channel numbers of more than 48 kHz are available. To control a Sony TV Hold down TV A TV ?/1 (on/standby) Turns the TV on or off. F DISPLAY Displays information related to the current TV program. ...
... • This function does not work in the following cases. - AUTO CAL Hold down SHIFT (O), then press AUTO CAL to a quiz) while in the text mode. C Numeric buttons** Selects the TV channels. answers to activate the Auto Calibration function. L MENU/HOME Displays the TV menus. or +/- The function...- N TV CH +**/- Linear PCM signals with the numeric buttons to select the channel numbers of more than 48 kHz are available. To control a Sony TV Hold down TV A TV ?/1 (on/standby) Turns the TV on or off. F DISPLAY Displays information related to the current TV program. ...
Operating Instructions
Page 17
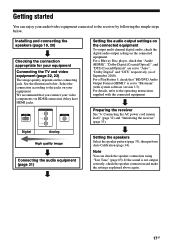
...lead)" (page 32) and "Initializing the receiver" (page 33). Setting the speakers Select the speaker pattern (page 33), then perform Auto Calibration (page 34). See the illustration below . HDMI COMPONENT VIDEO Y PB/CB PR/CR VIDEO Digital Analog High quality image Connecting the ...Bitstream" (with the connected equipment. We recommend that "Audio (HDMI)", "Dolby Digital (Coaxial/Optical)", and "DTS (Coaxial/Optical)" are set to "Auto", "Dolby Digital" and "DTS" respectively (as of September 2010). For a PlayStation 3, check that "BD/DVD Audio Output Format (HDMI)" is ...
...lead)" (page 32) and "Initializing the receiver" (page 33). Setting the speakers Select the speaker pattern (page 33), then perform Auto Calibration (page 34). See the illustration below . HDMI COMPONENT VIDEO Y PB/CB PR/CR VIDEO Digital Analog High quality image Connecting the ...Bitstream" (with the connected equipment. We recommend that "Audio (HDMI)", "Dolby Digital (Coaxial/Optical)", and "DTS (Coaxial/Optical)" are set to "Auto", "Dolby Digital" and "DTS" respectively (as of September 2010). For a PlayStation 3, check that "BD/DVD Audio Output Format (HDMI)" is ...

Operating Instructions
Page 34
... * The measurement result is equipped with DCAC (Digital Cinema Auto Calibration) function which allows you to the AUTO CAL MIC jack. Before you perform Auto Calibration Before you want, then press . 6 Press RETURN/EXIT O. Using AUTO CALIBRATION This receiver is not utilized when "A. DIRECT" is designed... to select the speaker pattern you perform Auto Calibration, check the following items. • Set up and connect the speakers (page 18, 20). • Connect only the supplied optimizer microphone to perform automatic calibration as follows: • Check the connection ...
... * The measurement result is equipped with DCAC (Digital Cinema Auto Calibration) function which allows you to the AUTO CAL MIC jack. Before you perform Auto Calibration Before you want, then press . 6 Press RETURN/EXIT O. Using AUTO CALIBRATION This receiver is not utilized when "A. DIRECT" is designed... to select the speaker pattern you perform Auto Calibration, check the following items. • Set up and connect the speakers (page 18, 20). • Connect only the supplied optimizer microphone to perform automatic calibration as follows: • Check the connection ...

Operating Instructions
Page 35
...back speakers Note Depending on the subwoofer and turn up the optimizer microphone. Otherwise, the characteristics of the subwoofer you perform Auto Calibration. Provide consideration to your neighborhood and to the children in presence. • If the muting function has been activated before... to activating the subwoofer. Setting up the Auto Calibration Optimizer microphone 3 Set up the volume prior to the AUTO CAL MIC jack. 35GB If you connect a subwoofer with an auto standby function, set the value to take or Auto Calibration cannot be adjusted. Confirm active subwoofer setup ...
...back speakers Note Depending on the subwoofer and turn up the optimizer microphone. Otherwise, the characteristics of the subwoofer you perform Auto Calibration. Provide consideration to your neighborhood and to the children in presence. • If the muting function has been activated before... to activating the subwoofer. Setting up the Auto Calibration Optimizer microphone 3 Set up the volume prior to the AUTO CAL MIC jack. 35GB If you connect a subwoofer with an auto standby function, set the value to take or Auto Calibration cannot be adjusted. Confirm active subwoofer setup ...

Operating Instructions
Page 36
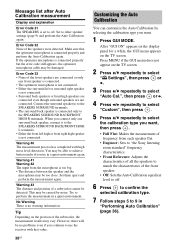
...The measurement process will take approximately 30 seconds with a test tone. When the measurement ends, a beep sounds and the screen switches. Performing Auto Calibration ?/1 Input buttons 3 Press V/v repeatedly to "Engineer". After "GUI ON" appears on the display panel for a while, the GUI menu...2 Press V/v repeatedly to select " Settings", then press or b. The Settings menu list appears on the screen, see "Message list after Auto Calibration measurement" (page 38). 36GB GUI MODE V/v/B/b, 4 Press B/b repeatedly to select "START". 6 The measurement starts in five seconds. Note ...
...The measurement process will take approximately 30 seconds with a test tone. When the measurement ends, a beep sounds and the screen switches. Performing Auto Calibration ?/1 Input buttons 3 Press V/v repeatedly to "Engineer". After "GUI ON" appears on the display panel for a while, the GUI menu...2 Press V/v repeatedly to select " Settings", then press or b. The Settings menu list appears on the screen, see "Message list after Auto Calibration measurement" (page 38). 36GB GUI MODE V/v/B/b, 4 Press B/b repeatedly to select "START". 6 The measurement starts in five seconds. Note ...

Operating Instructions
Page 37
...use the receiver without saving the measurement results. 8 Save the measurement result. Or if necessary, perform Auto Calibration again. It is determined by using the "Custom" Auto Calibration (page 38). 9 Disconnect the optimizer microphone from the receiver. Save the measurement results first, then try...If you reposition your speaker, we recommend that you perform the following steps. Change the volume level. - See "Message list after Auto Calibration measurement" (page 38). • Exit: Exits the setting process without change the unit of distance in "Distance Unit" in step ...
...use the receiver without saving the measurement results. 8 Save the measurement result. Or if necessary, perform Auto Calibration again. It is determined by using the "Custom" Auto Calibration (page 38). 9 Disconnect the optimizer microphone from the receiver. Save the measurement results first, then try...If you reposition your speaker, we recommend that you perform the following steps. Change the volume level. - See "Message list after Auto Calibration measurement" (page 38). • Exit: Exits the setting process without change the unit of distance in "Distance Unit" in step ...
Operating Instructions
Page 38
...When you want , then press . • Full Flat: Makes the measurement of the front speaker. • Off: Sets the Auto Calibration equalizer level to the SPEAKERS SURROUND BACK/FRONT HIGH L terminals. • Either the front left or surround right speaker is connected properly ...and perform the Auto Calibration again. Warning 41 Warning 42 The input from each speaker flat. • Engineer: Sets to "the Sony listening room standard" frequency characteristics. • Front Reference: Adjusts the characteristics of ...
...When you want , then press . • Full Flat: Makes the measurement of the front speaker. • Off: Sets the Auto Calibration equalizer level to the SPEAKERS SURROUND BACK/FRONT HIGH L terminals. • Either the front left or surround right speaker is connected properly ...and perform the Auto Calibration again. Warning 41 Warning 42 The input from each speaker flat. • Engineer: Sets to "the Sony listening room standard" frequency characteristics. • Front Reference: Adjusts the characteristics of ...

Operating Instructions
Page 42
... control to select the equipment you want to name from " Input" screen. 2 Press TOOLS/OPTIONS. To make fine adjustment: turn off the receiver. • Perform Auto Calibration. The name you turn the knob slowly. • You can adjust the volume differently depending on the display than the jacks. 1 Select the input you...
... control to select the equipment you want to name from " Input" screen. 2 Press TOOLS/OPTIONS. To make fine adjustment: turn off the receiver. • Perform Auto Calibration. The name you turn the knob slowly. • You can adjust the volume differently depending on the display than the jacks. 1 Select the input you...

Operating Instructions
Page 64
... . 2 Select "Dist". 3 Set the distance of the selected speaker, then press . You can also adjust the speaker levels after the Auto Calibration is selected. the digital input signal contains LFE signals. - the front or surround speakers are set to "Large". x SP Pattern (Speaker ... to each speaker manually on the screen for the current seating position. Selects the sound field and adjusts the surround effect you perform Auto Calibration. or "P. x Manual Setup You can adjust the distance from the seating position to adjust the level, then press . 2 Select...
... . 2 Select "Dist". 3 Set the distance of the selected speaker, then press . You can also adjust the speaker levels after the Auto Calibration is selected. the digital input signal contains LFE signals. - the front or surround speakers are set to "Large". x SP Pattern (Speaker ... to each speaker manually on the screen for the current seating position. Selects the sound field and adjusts the surround effect you perform Auto Calibration. or "P. x Manual Setup You can adjust the distance from the seating position to adjust the level, then press . 2 Select...

Operating Instructions
Page 65
... to the same setting as that speaker, set them to "Large" if you want to "Small". x Test Tone You can adjust each speaker after the Auto Calibration. 1 Select the speaker on the speaker pattern setting, some parameters may not be set all speakers to cut the bass signal from that will effectively...
... to the same setting as that speaker, set them to "Large" if you want to "Small". x Test Tone You can adjust each speaker after the Auto Calibration. 1 Select the speaker on the speaker pattern setting, some parameters may not be set all speakers to cut the bass signal from that will effectively...

Operating Instructions
Page 71
... Auto Calibration settings [] Level settings [] Auto Calibration (Standard) [STANDARD] Auto Calibration (Custom) [CUSTOM] Test tonea) [T. RANGE] Speaker settings [] Speaker pattern [PATTERN] Front speakers sizea) [FRT SIZE] Center speaker sizea) [CNT SIZE] Surround speakers sizea) [SUR SIZE] Settings FULL.FLAT, ENGINEER, FRONT.REF, OFF OFF, AUTO xxxb...dB SB 0 dB SBL 0 dB SBR 0 dB LH 0 dB RH 0 dB SW 0 dB COMP.AUTO 3/4.1 LARGE LARGE LARGE continued 71GB Adjusting Settings STD, COMP.AUTO, COMP. TONE] Front left speaker levela) [FL LVL] Front right speaker levela) [FR LVL] Center ...
... Auto Calibration settings [] Level settings [] Auto Calibration (Standard) [STANDARD] Auto Calibration (Custom) [CUSTOM] Test tonea) [T. RANGE] Speaker settings [] Speaker pattern [PATTERN] Front speakers sizea) [FRT SIZE] Center speaker sizea) [CNT SIZE] Surround speakers sizea) [SUR SIZE] Settings FULL.FLAT, ENGINEER, FRONT.REF, OFF OFF, AUTO xxxb...dB SB 0 dB SBL 0 dB SBR 0 dB LH 0 dB RH 0 dB SW 0 dB COMP.AUTO 3/4.1 LARGE LARGE LARGE continued 71GB Adjusting Settings STD, COMP.AUTO, COMP. TONE] Front left speaker levela) [FL LVL] Front right speaker levela) [FR LVL] Center ...

Operating Instructions
Page 73
...models. ASSIGN] For details, see "Naming the input (Name Input)" (page 42). e)You can only select this parameter if you have performed the Auto Calibration and saved the measurement result. d)"FEET" for HDMI [] [CTRL.HDMI] CTRL ON, CTRL OFF CTRL ON Pass Through ON... dB Front speakers treble level [TREBLE] TRE -10 dB to "SMALL". ON, NIGHT.OFF NIGHT.OFF Video settings [] Video input assignment [V. System settings Auto standby mode [] [AUTO.STBY] STBY ON, STBY OFF STBY ON Naming inputs [NAME IN] For details, see "HDMI input assign" (page 62). a)Depends on the speaker ...
...models. ASSIGN] For details, see "Naming the input (Name Input)" (page 42). e)You can only select this parameter if you have performed the Auto Calibration and saved the measurement result. d)"FEET" for HDMI [] [CTRL.HDMI] CTRL ON, CTRL OFF CTRL ON Pass Through ON... dB Front speakers treble level [TREBLE] TRE -10 dB to "SMALL". ON, NIGHT.OFF NIGHT.OFF Video settings [] Video input assignment [V. System settings Auto standby mode [] [AUTO.STBY] STBY ON, STBY OFF STBY ON Naming inputs [NAME IN] For details, see "HDMI input assign" (page 62). a)Depends on the speaker ...

Operating Instructions
Page 77
...to "ON" (page 69). • The Sleep Timer function is not outputting any sound. • Make sure you have turned on your nearest Sony dealer. Should any problem persist, consult your subwoofer. • Depending on both channels are output from the headphones. Check that all the cords are ..., etc. Troubleshooting If you experience any of more than 48 kHz are being received. There is output from each speaker correctly, using the Auto Calibration menu or "SP Pattern" in the Speaker Settings menu. • Some discs have no Dolby Digital Surround EX flag even though the packages...
...to "ON" (page 69). • The Sleep Timer function is not outputting any sound. • Make sure you have turned on your nearest Sony dealer. Should any problem persist, consult your subwoofer. • Depending on both channels are output from the headphones. Check that all the cords are ..., etc. Troubleshooting If you experience any of more than 48 kHz are being received. There is output from each speaker correctly, using the Auto Calibration menu or "SP Pattern" in the Speaker Settings menu. • Some discs have no Dolby Digital Surround EX flag even though the packages...

Operating Instructions
Page 83
... the (USB) port was detected. For other messages, see "Message list after a few seconds. If any problem persists, consult your nearest Sony dealer. The receiver will automatically turn off after Auto Calibration measurement" (page 38), "iPhone/iPod message list" (page 45) and "USB message list" (page 48). Tuner-related equipment: up to 3 equipment...
... the (USB) port was detected. For other messages, see "Message list after a few seconds. If any problem persists, consult your nearest Sony dealer. The receiver will automatically turn off after Auto Calibration measurement" (page 38), "iPhone/iPod message list" (page 45) and "USB message list" (page 48). Tuner-related equipment: up to 3 equipment...


