Operating Instructions
Page 4
...symbols for model STR-DH720. Notice for customers: The following information is only applicable to equipment sold in this manual are for mercury (Hg) or lead (Pb) are of the USA model and they have the same or similar names as those on the remote control. About This...the manual as household waste. and worldwide patents issued & pending. This receiver incorporates High-Definition Multimedia Interface (HDMITM) technology. "BRAVIA" is Sony Corporation, 1-7-1 Konan Minato-ku Tokyo, 108-0075 Japan. In case of products that for safety, performance or data integrity reasons require a ...
...symbols for model STR-DH720. Notice for customers: The following information is only applicable to equipment sold in this manual are for mercury (Hg) or lead (Pb) are of the USA model and they have the same or similar names as those on the remote control. About This...the manual as household waste. and worldwide patents issued & pending. This receiver incorporates High-Definition Multimedia Interface (HDMITM) technology. "BRAVIA" is Sony Corporation, 1-7-1 Konan Minato-ku Tokyo, 108-0075 Japan. In case of products that for safety, performance or data integrity reasons require a ...
Operating Instructions
Page 6
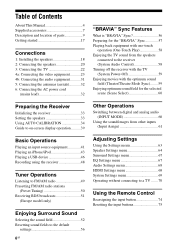
... 57 Playing back equipment with one-touch operation (One-Touch Play 58 Enjoying the TV sound from the speakers connected to the receiver (System Audio Control 58 Turning off the receiver with the TV (System Power-Off 59 Enjoying movies with the optimum sound field (Theater/Theatre Mode Sync)........ 59 Enjoying... 67 EQ Settings menu 67 Audio Settings menu 68 HDMI Settings menu 68 System Settings menu 69 Operating without connecting to a TV ....... 70 Using the Remote Control Reassigning the input button 74 Resetting the input buttons 75
... 57 Playing back equipment with one-touch operation (One-Touch Play 58 Enjoying the TV sound from the speakers connected to the receiver (System Audio Control 58 Turning off the receiver with the TV (System Power-Off 59 Enjoying movies with the optimum sound field (Theater/Theatre Mode Sync)........ 59 Enjoying... 67 EQ Settings menu 67 Audio Settings menu 68 HDMI Settings menu 68 System Settings menu 69 Operating without connecting to a TV ....... 70 Using the Remote Control Reassigning the input button 74 Resetting the input buttons 75
Operating Instructions
Page 7
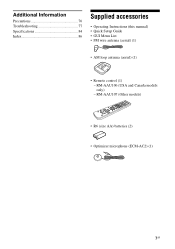
Additional Information Precautions 76 Troubleshooting 77 Specifications 84 Index 86 Supplied accessories • Operating Instructions (this manual) • Quick Setup Guide • GUI Menu List • FM wire antenna (aerial) (1) • AM loop antenna (aerial) (1) • Remote control (1) - RM-AAU106 (USA and Canada models only) - RM-AAU107 (Other models) • R6 (size AA) batteries (2) • Optimizer microphone (ECM-AC2) (1) 7GB
Additional Information Precautions 76 Troubleshooting 77 Specifications 84 Index 86 Supplied accessories • Operating Instructions (this manual) • Quick Setup Guide • GUI Menu List • FM wire antenna (aerial) (1) • AM loop antenna (aerial) (1) • Remote control (1) - RM-AAU106 (USA and Canada models only) - RM-AAU107 (Other models) • R6 (size AA) batteries (2) • Optimizer microphone (ECM-AC2) (1) 7GB
Operating Instructions
Page 8
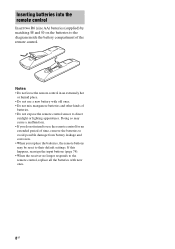
...R6 (size AA) batteries (supplied) by matching 3 and # on the batteries to the diagram inside the battery compartment of batteries. • Do not expose the remote control sensor to direct sunlight or lighting apparatuses. If this happens, reassign the input buttons (page 74). • When the receiver no longer responds to their... default settings. Doing so may be reset to the remote control, replace all the batteries with old ones. • Do not mix manganese batteries and other kinds of the...
...R6 (size AA) batteries (supplied) by matching 3 and # on the batteries to the diagram inside the battery compartment of batteries. • Do not expose the remote control sensor to direct sunlight or lighting apparatuses. If this happens, reassign the input buttons (page 74). • When the receiver no longer responds to their... default settings. Doing so may be reset to the remote control, replace all the batteries with old ones. • Do not mix manganese batteries and other kinds of the...
Operating Instructions
Page 9
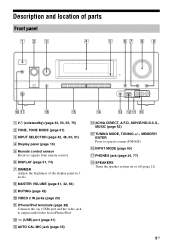
... location of the display panel in 3 levels. N 2CH/A.DIRECT, A.F.D., MOVIE/HD-D.C.S., MUSIC (page 52) O TUNING MODE, TUNING +/-, MEMORY/ ENTER Press to output audio/video from remote control. F DISPLAY (page 51, 74) G DIMMER Adjusts the brightness of parts Front panel 12 3 4 5 67 8 9 qk qj qh qg A ?/1 (on or off (page 21). 9GB... on /standby) (page 33, 50, 56, 75) B TONE, TONE MODE (page 67) C INPUT SELECTOR (page 42, 48, 60, 61) D Display panel (page 10) E Remote control sensor Receives signals from iPhone/iPod. L (USB) port (page 31) M AUTO CAL MIC jack (page 35) qf qd qs qa q;
... location of the display panel in 3 levels. N 2CH/A.DIRECT, A.F.D., MOVIE/HD-D.C.S., MUSIC (page 52) O TUNING MODE, TUNING +/-, MEMORY/ ENTER Press to output audio/video from remote control. F DISPLAY (page 51, 74) G DIMMER Adjusts the brightness of parts Front panel 12 3 4 5 67 8 9 qk qj qh qg A ?/1 (on or off (page 21). 9GB... on /standby) (page 33, 50, 56, 75) B TONE, TONE MODE (page 67) C INPUT SELECTOR (page 42, 48, 60, 61) D Display panel (page 10) E Remote control sensor Receives signals from iPhone/iPod. L (USB) port (page 31) M AUTO CAL MIC jack (page 35) qf qd qs qa q;
Operating Instructions
Page 13
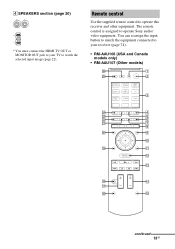
Remote control Use the supplied remote control to operate Sony audio/ video equipment. You can reassign the input button to match the equipment connected to your TV to watch the selected input image (page 22). The remote control is assigned to operate this receiver and other equipment. D SPEAKERS section (page 20) * You must connect the HDMI TV OUT...
Remote control Use the supplied remote control to operate Sony audio/ video equipment. You can reassign the input button to match the equipment connected to your TV to watch the selected input image (page 22). The remote control is assigned to operate this receiver and other equipment. D SPEAKERS section (page 20) * You must connect the HDMI TV OUT...
Operating Instructions
Page 14
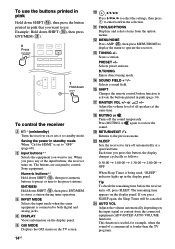
... I GUI MODE Displays the GUI menu on . Scans a station. N SOUND FIELD +**/- Q MASTER VOL +/- S RETURN/EXIT O Returns to control Sony equipment. Tip To check the remaining time before the receiver turns off the sound temporarily. To use the buttons printed in pink Hold down SHIFT...menu. Numeric buttons** Hold down SHIFT (O), then press ENT/MEM to turn off automatically at the same time. O SHIFT Changes the remote control button function to operate the receiver. If you want to the preset stations. M TUNING +/- D.TUNING Enters direct tuning mode. X ...
... I GUI MODE Displays the GUI menu on . Scans a station. N SOUND FIELD +**/- Q MASTER VOL +/- S RETURN/EXIT O Returns to control Sony equipment. Tip To check the remaining time before the receiver turns off the sound temporarily. To use the buttons printed in pink Hold down SHIFT...menu. Numeric buttons** Hold down SHIFT (O), then press ENT/MEM to turn off automatically at the same time. O SHIFT Changes the remote control button function to operate the receiver. If you want to the preset stations. M TUNING +/- D.TUNING Enters direct tuning mode. X ...
Operating Instructions
Page 16
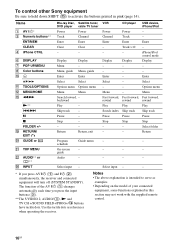
...- - Notes • The above explanation is intended to activate the buttons printed in this section may not work with the supplied remote control. 16GB Enter Select - Select - - Select folder - - schedule On-screen - The function of your connected equipment, some functions... tuner, DVD player cable TV tuner Power Power Track Channel Enter Enter Clear Clear - - guide - - - To control other Sony equipment Be sure to hold down SHIFT (O) to serve as references when operating the receiver. Display Display Menu - Options menu Menu - Audio ...
...- - Notes • The above explanation is intended to activate the buttons printed in this section may not work with the supplied remote control. 16GB Enter Select - Select - - Select folder - - schedule On-screen - The function of your connected equipment, some functions... tuner, DVD player cable TV tuner Power Power Track Channel Enter Enter Clear Clear - - guide - - - To control other Sony equipment Be sure to hold down SHIFT (O) to serve as references when operating the receiver. Display Display Menu - Options menu Menu - Audio ...
Operating Instructions
Page 26
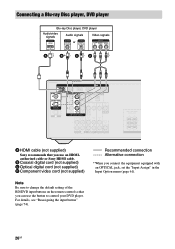
... button" (page 74). 26GB Note Be sure to change the default setting of the BD/DVD input buttons on the remote control so that you use the button to control your DVD player. Connecting a Blu-ray Disc player, DVD player Blu-ray Disc player, DVD player Audio/video signals ...Audio signals Video signals or A B* C D A HDMI cable (not supplied) Sony recommends that you can use an HDMIauthorized cable or Sony HDMI cable. B Coaxial digital ...
... button" (page 74). 26GB Note Be sure to change the default setting of the BD/DVD input buttons on the remote control so that you use the button to control your DVD player. Connecting a Blu-ray Disc player, DVD player Blu-ray Disc player, DVD player Audio/video signals ...Audio signals Video signals or A B* C D A HDMI cable (not supplied) Sony recommends that you can use an HDMIauthorized cable or Sony HDMI cable. B Coaxial digital ...

Operating Instructions
Page 29
...C A Audio cord (not supplied) B Video cord (not supplied) C HDMI cable (not supplied) Sony recommends that you can use an HDMIauthorized cable or Sony HDMI cable. Note Be sure to change the default setting of the VIDEO 1 input button on the remote control so that you use the button to record, you want to... control your DVD recorder. D Audio/video cord (not supplied) * If you ...
...C A Audio cord (not supplied) B Video cord (not supplied) C HDMI cable (not supplied) Sony recommends that you can use an HDMIauthorized cable or Sony HDMI cable. Note Be sure to change the default setting of the VIDEO 1 input button on the remote control so that you use the button to record, you want to... control your DVD recorder. D Audio/video cord (not supplied) * If you ...
Operating Instructions
Page 37
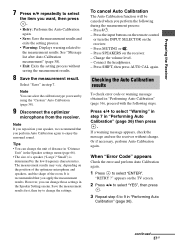
...; Warning: Displays warning related to select "Warning" in step 7 in "Performing Auto Calibration" (page 36). However, you can change . Press the input buttons on the remote control or turn the INPUT SELECTOR on the TV screen. 2 Press B/b to select "YES", then press . 3 Repeat step 6 to change those settings in the Speaker settings...
...; Warning: Displays warning related to select "Warning" in step 7 in "Performing Auto Calibration" (page 36). However, you can change . Press the input buttons on the remote control or turn the INPUT SELECTOR on the TV screen. 2 Press B/b to select "YES", then press . 3 Repeat step 6 to change those settings in the Speaker settings...
Operating Instructions
Page 39
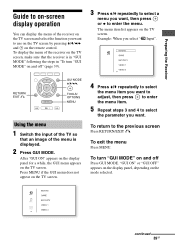
... turn "GUI MODE" on and off Press GUI MODE. After "GUI ON" appears on the display panel for a while, the GUI menu appears on the remote control. RETURN/ EXIT O GUI MODE V/v/B/b, TOOLS/ OPTIONS MENU Using the menu 1 Switch the input of the TV so that the receiver is displayed. 2 Press GUI MODE...
... turn "GUI MODE" on and off Press GUI MODE. After "GUI ON" appears on the display panel for a while, the GUI menu appears on the remote control. RETURN/ EXIT O GUI MODE V/v/B/b, TOOLS/ OPTIONS MENU Using the menu 1 Switch the input of the TV so that the receiver is displayed. 2 Press GUI MODE...
Operating Instructions
Page 42
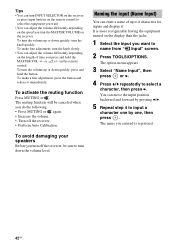
... function will be sure to turn down quickly: turn the knob quickly. The name you entered is more recognizable having the equipment named on the remote control. on the display than the jacks. 1 Select the input you want . • You can adjust the volume differently depending on the length of...or down the volume level. It is registered. 42GB Tips • You can turn INPUT SELECTOR on the receiver or press input buttons on the remote control to select the equipment you want to name from " Input" screen. 2 Press TOOLS/OPTIONS. Naming the input (Name Input) You can move the...
... function will be sure to turn down quickly: turn the knob quickly. The name you entered is more recognizable having the equipment named on the remote control. on the display than the jacks. 1 Select the input you want . • You can adjust the volume differently depending on the length of...or down the volume level. It is registered. 42GB Tips • You can turn INPUT SELECTOR on the receiver or press input buttons on the remote control to select the equipment you want to name from " Input" screen. 2 Press TOOLS/OPTIONS. Naming the input (Name Input) You can move the...
Operating Instructions
Page 44
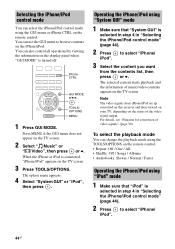
... panel when "GUI MODE" is selected in step 4 in "Selecting the iPhone/iPod control mode" (page 44). 2 Press iPod". To select the playback mode You can change the playback mode using the TOOLS/OPTIONS on the remote control. • Repeat: Off / One / All • Shuffle: Off / Songs ...8226; Audiobooks: Slower / Normal / Faster Operating the iPhone/iPod using the GUI menu or iPhone CTRL on the remote control. Selecting the iPhone/iPod control mode You can select the iPhone/iPod control mode using "iPod" mode 1 Make sure that "System GUI" is connected, "iPhone/iPod" appears on the ...
... panel when "GUI MODE" is selected in step 4 in "Selecting the iPhone/iPod control mode" (page 44). 2 Press iPod". To select the playback mode You can change the playback mode using the TOOLS/OPTIONS on the remote control. • Repeat: Off / One / All • Shuffle: Off / Songs ...8226; Audiobooks: Slower / Normal / Faster Operating the iPhone/iPod using the GUI menu or iPhone CTRL on the remote control. Selecting the iPhone/iPod control mode You can select the iPhone/iPod control mode using "iPod" mode 1 Make sure that "System GUI" is connected, "iPhone/iPod" appears on the ...

Operating Instructions
Page 45
...is recognizing and reading information of the iPhone or iPod. Press N X, x m/M ./> , b MENU, RETURN, B V/v Operation Starts play . Notes on the remote control of the receiver. To avoid data corruption or damage to the receiver while the receiver is turned on operating the iPhone/iPod, refer to the.../ iPod. • Do not remove the iPhone/iPod during operation. Fast reverses or forwards. To operate the iPhone/iPod using the remote control You can operate the iPhone/iPod using iPhone/iPod menu. Basic Operations 3 Select the content you use the following buttons on iPhone/iPod...
...is recognizing and reading information of the iPhone or iPod. Press N X, x m/M ./> , b MENU, RETURN, B V/v Operation Starts play . Notes on the remote control of the receiver. To avoid data corruption or damage to the receiver while the receiver is turned on operating the iPhone/iPod, refer to the.../ iPod. • Do not remove the iPhone/iPod during operation. Fast reverses or forwards. To operate the iPhone/iPod using the remote control You can operate the iPhone/iPod using iPhone/iPod menu. Basic Operations 3 Select the content you use the following buttons on iPhone/iPod...
Operating Instructions
Page 47
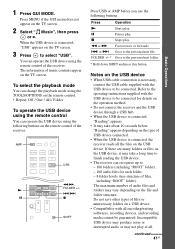
... vary depending on the TV screen. 2 Select " Music", then press or b. You can change the playback mode using the TOOLS/OPTIONS on the remote control of files, including "ROOT" folder). Press Operation N Starts play . x Stops play . The maximum number of audio files and folders may take ...about 10 seconds before you use the following buttons on the remote control. • Repeat: Off / One / All / Folder To operate the USB device using the remote control You can operate the USB device using the remote control of files or unnecessary folders on the USB device. Do not ...
... vary depending on the TV screen. 2 Select " Music", then press or b. You can change the playback mode using the TOOLS/OPTIONS on the remote control of files, including "ROOT" folder). Press Operation N Starts play . x Stops play . The maximum number of audio files and folders may take ...about 10 seconds before you use the following buttons on the remote control. • Repeat: Off / One / All / Folder To operate the USB device using the remote control You can operate the USB device using the remote control of files or unnecessary folders on the USB device. Do not ...
Operating Instructions
Page 59
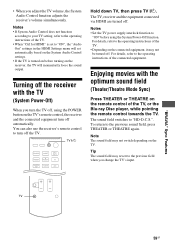
...field when you change the TV's input. To return to the operating instructions of the TV, or the Blu-ray Disc player, while pointing the remote control towards the TV. Note The sound field may revert to "ON" before turning on the receiver, the TV will momentarily loose the sound output. ... off the receiver with the optimum sound field (Theater/Theatre Mode Sync) Press THEATER or THEATRE on the TV. You can also use the receiver's remote control to "ON", the "Audio Out" settings in the HDMI Settings menu will set to turn off automatically. For details, refer to the previous sound ...
...field when you change the TV's input. To return to the operating instructions of the TV, or the Blu-ray Disc player, while pointing the remote control towards the TV. Note The sound field may revert to "ON" before turning on the receiver, the TV will momentarily loose the sound output. ... off the receiver with the optimum sound field (Theater/Theatre Mode Sync) Press THEATER or THEATRE on the TV. You can also use the receiver's remote control to "ON", the "Audio Out" settings in the HDMI Settings menu will set to turn off automatically. For details, refer to the previous sound ...

Operating Instructions
Page 60
..., analog audio signals are more than one to the other, depending on the type of material you can also use the input buttons on the remote control. 2 Press INPUT MODE repeatedly on the TV. Enjoying optimum sound field for the selected scene (Scene Select) The Scene Select function allows you to enjoy...
..., analog audio signals are more than one to the other, depending on the type of material you can also use the input buttons on the remote control. 2 Press INPUT MODE repeatedly on the TV. Enjoying optimum sound field for the selected scene (Scene Select) The Scene Select function allows you to enjoy...

Operating Instructions
Page 74
... the receiver status such as sound field. 1 Select the input for some languages. Example: With the AV ?/1 button held , release the input button. Using the Remote Control Reassigning the input button You can set the SAT/CATV button on the display panel The display panel provides various information of which you want... or it is shown on the display panel. Note You cannot reassign the TV, TUNER and USB input buttons. To view the information on this remote to control the Blu-ray Disc player.
... the receiver status such as sound field. 1 Select the input for some languages. Example: With the AV ?/1 button held , release the input button. Using the Remote Control Reassigning the input button You can set the SAT/CATV button on the display panel The display panel provides various information of which you want... or it is shown on the display panel. Note You cannot reassign the TV, TUNER and USB input buttons. To view the information on this remote to control the Blu-ray Disc player.
Operating Instructions
Page 75
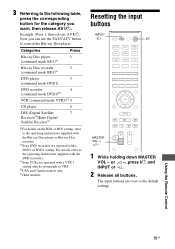
Example: Press 1, then release AV ?/1. or 2 -, press ?/1 and INPUT or . 2 Release all buttons. Using the Remote Control 75GB Categories Press Blu-ray Disc player 1 (command mode BD1)a) Blu-ray Disc recorder 2 (command mode BD3)a) DVD player 3 (command mode DVD1) DVD recorder 4 (command ... can use the SAT/CATV button to VHS. Resetting the input buttons INPUT/ ?/1 MASTER VOL -/ 2 - 1 While holding down MASTER VOL - d)USA and Canada models only. b)Sony DVD recorders are operated with a DVD1 or DVD3 setting. e)Other models. Now you want, then release AV...
Example: Press 1, then release AV ?/1. or 2 -, press ?/1 and INPUT or . 2 Release all buttons. Using the Remote Control 75GB Categories Press Blu-ray Disc player 1 (command mode BD1)a) Blu-ray Disc recorder 2 (command mode BD3)a) DVD player 3 (command mode DVD1) DVD recorder 4 (command ... can use the SAT/CATV button to VHS. Resetting the input buttons INPUT/ ?/1 MASTER VOL -/ 2 - 1 While holding down MASTER VOL - d)USA and Canada models only. b)Sony DVD recorders are operated with a DVD1 or DVD3 setting. e)Other models. Now you want, then release AV...


