
Operating Instructions
Page 12
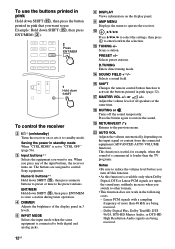
... on the display panel. When you press any of a commercial is louder than 48 kHz are assigned to control Sony equipment. Scans a station. Adjust the volume level of the display panel in 3 levels. ENT/MEM Hold down SHIFT (O), then press the button printed in ...Hold down SHIFT To control the receiver B ?/1* (on/standby) Turns the receiver on the input signal or content from the connected equipment (ADVANCED AUTO VOLUME function). Selects a sound field. This function is available only when Dolby Digital, DTS or Linear PCM signals are being received. - Selects preset ...
... on the display panel. When you press any of a commercial is louder than 48 kHz are assigned to control Sony equipment. Scans a station. Adjust the volume level of the display panel in 3 levels. ENT/MEM Hold down SHIFT (O), then press the button printed in ...Hold down SHIFT To control the receiver B ?/1* (on/standby) Turns the receiver on the input signal or content from the connected equipment (ADVANCED AUTO VOLUME function). Selects a sound field. This function is available only when Dolby Digital, DTS or Linear PCM signals are being received. - Selects preset ...
Operating Instructions
Page 13
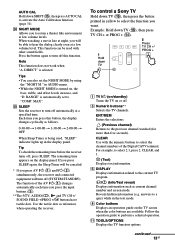
..., the Sleep Timer will be canceled. * If you will turn off automatically at a low volume level. answers to the previous channel watched (for more than five seconds). Tip To check the...color buttons are available. The remaining time appears on or off (SYSTEM STANDBY). To control a Sony TV Hold down TV (P), then press the button printed in AUDIO menu. • While ...press TV CH + or PROG + (N). 2 Press TV CH +/ PROG + 1 Hold down SHIFT (O), then press AUTO CAL to hear the dialog clearly even at a specified time. For example, to perform a selected operation. Reveals hidden information...
..., the Sleep Timer will be canceled. * If you will turn off automatically at a low volume level. answers to the previous channel watched (for more than five seconds). Tip To check the...color buttons are available. The remaining time appears on or off (SYSTEM STANDBY). To control a Sony TV Hold down TV (P), then press the button printed in AUDIO menu. • While ...press TV CH + or PROG + (N). 2 Press TV CH +/ PROG + 1 Hold down SHIFT (O), then press AUTO CAL to hear the dialog clearly even at a specified time. For example, to perform a selected operation. Reveals hidden information...
Operating Instructions
Page 31
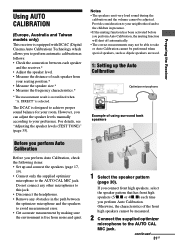
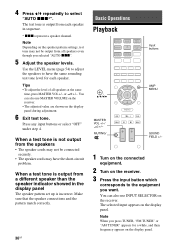
... you to perform automatic calibration as dipole speakers are used. 1: Setting up the Auto Calibration Optimizer microphone Example of using surround back speakers Before you perform Auto Calibration Before you perform Auto Calibration, check the following items: • Set up and connect the speakers (...page 17, 19). • Connect only the supplied optimizer microphone to the AUTO CAL MIC jack. However, you perform Auto Calibration. Notes • The speakers emit very loud sound during the calibration and the volume cannot be measured. 2 Connect the supplied optimizer microphone to the...
... you to perform automatic calibration as dipole speakers are used. 1: Setting up the Auto Calibration Optimizer microphone Example of using surround back speakers Before you perform Auto Calibration Before you perform Auto Calibration, check the following items: • Set up and connect the speakers (...page 17, 19). • Connect only the supplied optimizer microphone to the AUTO CAL MIC jack. However, you perform Auto Calibration. Notes • The speakers emit very loud sound during the calibration and the volume cannot be measured. 2 Connect the supplied optimizer microphone to the...
Operating Instructions
Page 32
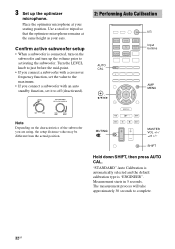
...MUTING/ MASTER VOL +/-/ 2 +/- Turn the LEVEL knob to just before the mid-point. • If you connect a subwoofer with an auto standby function, set the value to the maximum. • If you are using, the setup distance value may be different from the actual ... a subwoofer with a crossover frequency function, set it to off (deactivated). 2: Performing Auto Calibration ?/1 Input buttons AUTO CAL , V/v/B/b AMP MENU Note Depending on the subwoofer and turn up the optimizer microphone. 3 Set up the volume prior to activating the subwoofer. SHIFT Hold down SHIFT, then press...
...MUTING/ MASTER VOL +/-/ 2 +/- Turn the LEVEL knob to just before the mid-point. • If you connect a subwoofer with an auto standby function, set the value to the maximum. • If you are using, the setup distance value may be different from the actual ... a subwoofer with a crossover frequency function, set it to off (deactivated). 2: Performing Auto Calibration ?/1 Input buttons AUTO CAL , V/v/B/b AMP MENU Note Depending on the subwoofer and turn up the optimizer microphone. 3 Set up the volume prior to activating the subwoofer. SHIFT Hold down SHIFT, then press...
Operating Instructions
Page 33
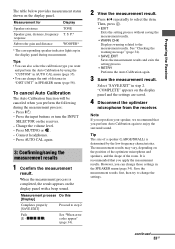
... depending on the receiver. - continued 33GB To cancel Auto Calibration The Auto Calibration function will be canceled when you can change the unit of distance in "DIST.UNIT" in SPEAKER menu (page 58). Change the volume level. - Then, press . • EXIT Exits...optimizer microphone from the receiver. xxx xx] See "When error codes appear" (page 34). 2 View the measurement result. S. Press AUTO CAL again. 3: Confirming/saving the measurement results 1 Confirm the measurement result. Measurement for Display Speaker existence TONE Speaker gain, distance, ...
... depending on the receiver. - continued 33GB To cancel Auto Calibration The Auto Calibration function will be canceled when you can change the unit of distance in "DIST.UNIT" in SPEAKER menu (page 58). Change the volume level. - Then, press . • EXIT Exits...optimizer microphone from the receiver. xxx xx] See "When error codes appear" (page 34). 2 View the measurement result. S. Press AUTO CAL again. 3: Confirming/saving the measurement results 1 Confirm the measurement result. Measurement for Display Speaker existence TONE Speaker gain, distance, ...
Operating Instructions
Page 36
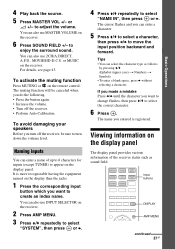
...repeatedly to the equipment you want. You can also use MASTER VOLUME on the receiver. • The adjusted value are shown ...different speaker than the speaker indicator showed in sequence. * xxx represent a speaker channel. Note When you selected "AUTO xxx". 5 Adjust the speaker levels. The test tone is incorrect. Press any input buttons or select "OFF...while, and then frequency appears on the receiver. 3 Press the input button which corresponds to select "AUTO xxx*". Make sure that the speaker connections and the pattern match correctly. 36GB Basic Operations Playback Input ...
...repeatedly to the equipment you want. You can also use MASTER VOLUME on the receiver. • The adjusted value are shown ...different speaker than the speaker indicator showed in sequence. * xxx represent a speaker channel. Note When you selected "AUTO xxx". 5 Adjust the speaker levels. The test tone is incorrect. Press any input buttons or select "OFF...while, and then frequency appears on the receiver. 3 Press the input button which corresponds to select "AUTO xxx*". Make sure that the speaker connections and the pattern match correctly. 36GB Basic Operations Playback Input ...
Operating Instructions
Page 37
...the corresponding input button which you want to change flashes, then press V/v to adjust the volume. To avoid damaging your speakers Before you turn off the receiver. • Perform Auto Calibration. It is registered. Input buttons DISPLAY AMP MENU continued 37GB Basic Operations The muting ...can also use 2CH/A.DIRECT, A.F.D., MOVIE/HD-D.C.S. For details, see page 43. to select the correct character. 6 Press . You can also use MASTER VOLUME on the receiver. 2 Press AMP MENU. 3 Press V/v repeatedly to select "SYSTEM", then press or b. 4 Press V/v repeatedly to move the input...
...the corresponding input button which you want to change flashes, then press V/v to adjust the volume. To avoid damaging your speakers Before you turn off the receiver. • Perform Auto Calibration. It is registered. Input buttons DISPLAY AMP MENU continued 37GB Basic Operations The muting ...can also use 2CH/A.DIRECT, A.F.D., MOVIE/HD-D.C.S. For details, see page 43. to select the correct character. 6 Press . You can also use MASTER VOLUME on the receiver. 2 Press AMP MENU. 3 Press V/v repeatedly to select "SYSTEM", then press or b. 4 Press V/v repeatedly to move the input...
Operating Instructions
Page 38
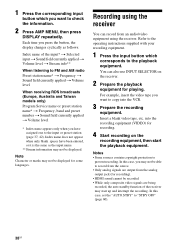
... of the receiver may not be recorded. • While only composite video signals are being recorded, the auto standby function of the input* t Selected input t Sound field currently applied t Volume level t Stream info** When listening to FM and AM radio Preset station name* t Frequency t Sound ...preset station name* t Frequency, band and preset number t Sound field currently applied t Volume level * Index name appears only when you have assigned one to the playback equipment. In this case, set the "AUTO.STBY" to check the information. 2 Press AMP MENU, then press DISPLAY repeatedly. ...
... of the receiver may not be recorded. • While only composite video signals are being recorded, the auto standby function of the input* t Selected input t Sound field currently applied t Volume level t Stream info** When listening to FM and AM radio Preset station name* t Frequency t Sound ...preset station name* t Frequency, band and preset number t Sound field currently applied t Volume level * Index name appears only when you have assigned one to the playback equipment. In this case, set the "AUTO.STBY" to check the information. 2 Press AMP MENU, then press DISPLAY repeatedly. ...
Operating Instructions
Page 43
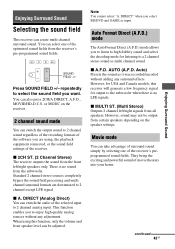
... decoding mode for USA and Canada models, this function, only the volume and front speaker level can be output from all speakers. SOUND FIELD +/- This function enables you want. Press SOUND FIELD +/- AUTO (A.F.D. They bring the exciting and powerful sound of the receiver's preprogrammed...fields. You can create multi channel surround sound. x A.F.D. x MULTI ST. (Multi Stereo) Outputs 2 channel left /right speakers only. Auto) Presets the sound as multi channel sound. Movie mode You can switch the audio of the optimized sound fields from the receiver's pre-programmed...
... decoding mode for USA and Canada models, this function, only the volume and front speaker level can be output from all speakers. SOUND FIELD +/- This function enables you want. Press SOUND FIELD +/- AUTO (A.F.D. They bring the exciting and powerful sound of the receiver's preprogrammed...fields. You can create multi channel surround sound. x A.F.D. x MULTI ST. (Multi Stereo) Outputs 2 channel left /right speakers only. Auto) Presets the sound as multi channel sound. Movie mode You can switch the audio of the optimized sound fields from the receiver's pre-programmed...
Operating Instructions
Page 49
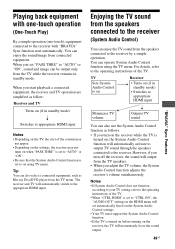
...; When "CTRL.HDMI" is set to "CTRL ON", the "AUDIO.OUT" settings in standby mode) • Switches to appropriate HDMI input Minimizes TV volume Outputs TV sound You can also select a connected equipment, such as follow: Receiver and TV Turns on (if in standby mode. When you adjust the... Control function will automatically activate to output TV sound through the speakers connected to the receiver. However, if you set "PASS.THRU" to "AUTO" or "ON", sound and image can operate System Audio Control function using TV menu. The receiver and TV will automatically switch to the operating...
...; When "CTRL.HDMI" is set to "CTRL ON", the "AUDIO.OUT" settings in standby mode) • Switches to appropriate HDMI input Minimizes TV volume Outputs TV sound You can also select a connected equipment, such as follow: Receiver and TV Turns on (if in standby mode. When you adjust the... Control function will automatically activate to output TV sound through the speakers connected to the receiver. However, if you set "PASS.THRU" to "AUTO" or "ON", sound and image can operate System Audio Control function using TV menu. The receiver and TV will automatically switch to the operating...
Operating Instructions
Page 57
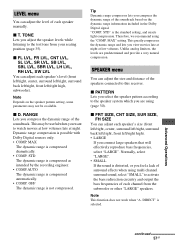
... range information included in the Dolby Digital signal. STD The dynamic range is compressed as intended by the recording engineer. • COMP.AUTO The dynamic range is the standard setting, and enacts light compression. STD" is compressed automatically. • COMP. Normally, select "LARGE...or other "LARGE" speakers. Tip Dynamic range compressor lets you adjust the speaker levels while listening to watch movies at low volumes late at low volumes. Dynamic range compression is not compressed. Therefore, we recommend using (page 30). x FRT SIZE, CNT SIZE, SUR SIZE...
... range information included in the Dolby Digital signal. STD The dynamic range is compressed as intended by the recording engineer. • COMP.AUTO The dynamic range is the standard setting, and enacts light compression. STD" is compressed automatically. • COMP. Normally, select "LARGE...or other "LARGE" speakers. Tip Dynamic range compressor lets you adjust the speaker levels while listening to watch movies at low volumes late at low volumes. Dynamic range compression is not compressed. Therefore, we recommend using (page 30). x FRT SIZE, CNT SIZE, SUR SIZE...


