

Operating Instructions
Page 3
.... Instead it shall be handed over . 13)Unplug this equipment does cause harmful interference to avoid injury from the apparatus and the speakers. These limits are cautioned that interference will not occur in a particular installation. Reorient or relocate the receiving antenna. - When a cart...countries with the instructions, may not comply with the limits for a Class B digital device, pursuant to touch the core of speaker cord by hand. CAUTION You are designed to qualified service personnel. continued 3GB However, there is damaged, liquid has been spilled...
.... Instead it shall be handed over . 13)Unplug this equipment does cause harmful interference to avoid injury from the apparatus and the speakers. These limits are cautioned that interference will not occur in a particular installation. Reorient or relocate the receiving antenna. - When a cart...countries with the instructions, may not comply with the limits for a Class B digital device, pursuant to touch the core of speaker cord by hand. CAUTION You are designed to qualified service personnel. continued 3GB However, there is damaged, liquid has been spilled...
Operating Instructions
Page 5
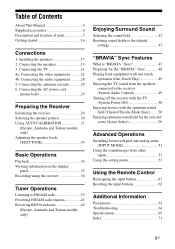
Table of Contents About This Manual 4 Supplied accessories 6 Description and location of parts 7 Getting started 16 Connections 1: Installing the speakers 17 2: Connecting the speakers 19 3: Connecting the TV 21 4a: Connecting the video equipment ...........22 4b: Connecting the audio equipment...........28 5: Connecting the ...for the "BRAVIA" Sync 48 Playing back equipment with one-touch operation (One-Touch Play 49 Enjoying the TV sound from the speakers connected to the receiver (System Audio Control 49 Turning off the receiver with the TV (System Power-Off 50 Enjoying movies with...
Table of Contents About This Manual 4 Supplied accessories 6 Description and location of parts 7 Getting started 16 Connections 1: Installing the speakers 17 2: Connecting the speakers 19 3: Connecting the TV 21 4a: Connecting the video equipment ...........22 4b: Connecting the audio equipment...........28 5: Connecting the ...for the "BRAVIA" Sync 48 Playing back equipment with one-touch operation (One-Touch Play 49 Enjoying the TV sound from the speakers connected to the receiver (System Audio Control 49 Turning off the receiver with the TV (System Power-Off 50 Enjoying movies with...
Operating Instructions
Page 8
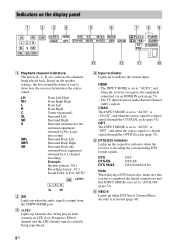
...the surround equipment obtained by Pro Logic processing) Surround Back Left Surround Back Right Surround Back (the surround back equipment obtained by 6.1 channel decoding) Example: Speaker pattern: 3/0.1 Recording format: 3/2.1 Sound Field: A.F.D. C LFE Lights up to indicate the current input. COAX The INPUT MODE is set to "AUTO"... or "OPT", and when the source signal is activated (page 44). 8GB Indicators on the speaker settings, the box around the letter(s) vary to show how the receiver downmixes the source sound. The INPUT MODE is not set to "...
...the surround equipment obtained by Pro Logic processing) Surround Back Left Surround Back Right Surround Back (the surround back equipment obtained by 6.1 channel decoding) Example: Speaker pattern: 3/0.1 Recording format: 3/2.1 Sound Field: A.F.D. C LFE Lights up to indicate the current input. COAX The INPUT MODE is set to "AUTO"... or "OPT", and when the source signal is activated (page 44). 8GB Indicators on the speaker settings, the box around the letter(s) vary to show how the receiver downmixes the source sound. The INPUT MODE is not set to "...
Operating Instructions
Page 9
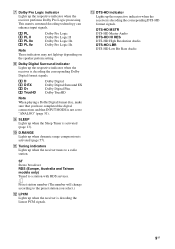
... up when the receiver tunes to the preset station you have completed the digital connections and that you select.) L LPCM Lights up depending on the speaker pattern setting. D D EX D+ TrueHD Dolby Digital Dolby Digital Surround EX Dolby Digital Plus Dolby TrueHD Note When playing a Dolby Digital format disc, make sure that...
... up when the receiver tunes to the preset station you have completed the digital connections and that you select.) L LPCM Lights up depending on the speaker pattern setting. D D EX D+ TrueHD Dolby Digital Dolby Digital Surround EX Dolby Digital Plus Dolby TrueHD Note When playing a Dolby Digital format disc, make sure that...
Operating Instructions
Page 11
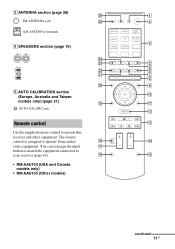
... receiver (page 61). You can reassign the input qj button to match the equipment connected to operate Sony audio/ qk qf video equipment. C ANTENNA section (page 28) wh 1 FM ANTENNA jack wg 2 AM ANTENNA terminals 3 D SPEAKERS section (page 19) wf wd 4 5 ws 6 wa 7 8 w; 9 E AUTO CALIBRATION section 0 (Europe, Australia and Taiwan models only...
... receiver (page 61). You can reassign the input qj button to match the equipment connected to operate Sony audio/ qk qf video equipment. C ANTENNA section (page 28) wh 1 FM ANTENNA jack wg 2 AM ANTENNA terminals 3 D SPEAKERS section (page 19) wf wd 4 5 ws 6 wa 7 8 w; 9 E AUTO CALIBRATION section 0 (Europe, Australia and Taiwan models only...
Operating Instructions
Page 12
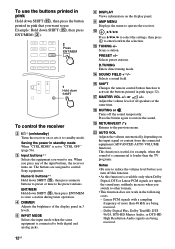
... button printed in pink that you want to enter/confirm the selection. M TUNING +/- Scans a station. Q MASTER VOL +/- Linear PCM signals with a sampling frequency of all speakers at the same time. Press the button again to use . J , V/v/B/b Press V/v/B /b to select the settings, then press to use . C Input buttons** Selects the ...equipment you want to restore the sound. Numeric buttons** Hold down SHIFT (O), then press numeric buttons to preset or tune to control Sony equipment. The buttons are being received. - Selects preset stations.
... button printed in pink that you want to enter/confirm the selection. M TUNING +/- Scans a station. Q MASTER VOL +/- Linear PCM signals with a sampling frequency of all speakers at the same time. Press the button again to use . J , V/v/B/b Press V/v/B /b to select the settings, then press to use . C Input buttons** Selects the ...equipment you want to restore the sound. Numeric buttons** Hold down SHIFT (O), then press numeric buttons to preset or tune to control Sony equipment. The buttons are being received. - Selects preset stations.

Operating Instructions
Page 16
... (Coaxial/Optical)" are set to the operating instructions supplied with system software version 3.5). Setting the speakers (USA and Canada models only) Select the speaker pattern (page 30), then check the speaker connection using "T. TONE" in LEVEL menu (page 35). HDMI COMPONENT VIDEO Y PB/CB PR...your audio/video equipment connected to "Auto", "Dolby Digital" and "DTS" respectively (as of September 2010). Installing and connecting the speakers (page 17, 19) Checking the connection appropriate for your video equipment via HDMI connection if they have HDMI jacks. We recommend that...
... (Coaxial/Optical)" are set to the operating instructions supplied with system software version 3.5). Setting the speakers (USA and Canada models only) Select the speaker pattern (page 30), then check the speaker connection using "T. TONE" in LEVEL menu (page 35). HDMI COMPONENT VIDEO Y PB/CB PR...your audio/video equipment connected to "Auto", "Dolby Digital" and "DTS" respectively (as of September 2010). Installing and connecting the speakers (page 17, 19) Checking the connection appropriate for your video equipment via HDMI connection if they have HDMI jacks. We recommend that...

Operating Instructions
Page 17
continued 17GB AFront speaker (Left) BFront speaker (Right) CCenter speaker DSurround speaker (Left) ESurround speaker (Right) FSurround back speaker (Left)* GSurround back speaker (Right)* HFront high speaker (Left)* IFront high speaker (Right)* JSubwoofer * You cannot use a 7.1 channel system (7 speakers and one surround back speaker (6.1 channel) or two surround back speakers (7.1 channel). 7.1 channel speaker system using surround back speakers You can enjoy vertical sound effects by...
continued 17GB AFront speaker (Left) BFront speaker (Right) CCenter speaker DSurround speaker (Left) ESurround speaker (Right) FSurround back speaker (Left)* GSurround back speaker (Right)* HFront high speaker (Left)* IFront high speaker (Right)* JSubwoofer * You cannot use a 7.1 channel system (7 speakers and one surround back speaker (6.1 channel) or two surround back speakers (7.1 channel). 7.1 channel speaker system using surround back speakers You can enjoy vertical sound effects by...
Operating Instructions
Page 18
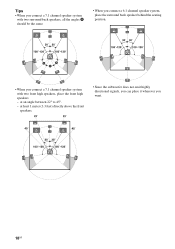
Tips • When you connect a 7.1 channel speaker system with two surround back speakers, all the angles A should be the same. • When you connect a 6.1 channel speaker system, place the surround back speaker behind the seating position. • When you want. 18GB at an angle between 22° to 45°. - at least 1 meter (3.3 feet) directly above the front speakers. • Since the subwoofer does not emit highly directional signals, you can place it wherever you connect a 7.1 channel speaker system with two front high speakers, place the front high speakers -
Tips • When you connect a 7.1 channel speaker system with two surround back speakers, all the angles A should be the same. • When you connect a 6.1 channel speaker system, place the surround back speaker behind the seating position. • When you want. 18GB at an angle between 22° to 45°. - at least 1 meter (3.3 feet) directly above the front speakers. • Since the subwoofer does not emit highly directional signals, you can place it wherever you connect a 7.1 channel speaker system with two front high speakers, place the front high speakers -
Operating Instructions
Page 19
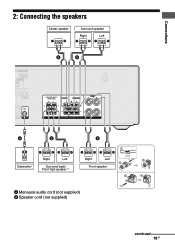
Connections 2: Connecting the speakers Center speaker Surround speaker Right Left B B A B Subwoofer * Right Left Surround back/ Front high speaker** B 1 10 mm (13/32") Right Left 4 2 3 Front speaker 2 4 3 A Monaural audio cord (not supplied) B Speaker cord (not supplied) continued 19GB
Connections 2: Connecting the speakers Center speaker Surround speaker Right Left B B A B Subwoofer * Right Left Surround back/ Front high speaker** B 1 10 mm (13/32") Right Left 4 2 3 Front speaker 2 4 3 A Monaural audio cord (not supplied) B Speaker cord (not supplied) continued 19GB
Operating Instructions
Page 20
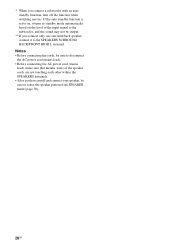
... power cord (mains lead), make sure that metalic wires of the input signal to the subwoofer, and the sound may not be sure to the SPEAKERS SURROUND BACK/FRONT HIGH L terminal. If the auto standby function is set to on, it turns to standby mode automatically based on the level of... the speaker cords are not touching each other within the SPEAKERS terminals. • After you have install and connect your speaker, be output. **If you connect a subwoofer with an auto standby function, turn off the function ...
... power cord (mains lead), make sure that metalic wires of the input signal to the subwoofer, and the sound may not be sure to the SPEAKERS SURROUND BACK/FRONT HIGH L terminal. If the auto standby function is set to on, it turns to standby mode automatically based on the level of... the speaker cords are not touching each other within the SPEAKERS terminals. • After you have install and connect your speaker, be output. **If you connect a subwoofer with an auto standby function, turn off the function ...
Operating Instructions
Page 22
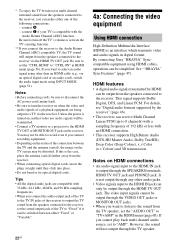
... Sync Features" (page 47). If this is the case, place the antenna (aerial) farther away from the speakers connected to the receiver via the HDMI TV OUT jack. By connecting Sony "BRAVIA" Synccompatible equipment using INPUT MODE (page 51). Notes on the TV screen may not be able to record... equipment are compatible with the Audio Return Channel (ARC) function. For details, see "Digital audio formats supported by HDMI can be output from the TV speaker, set the "AUDIO.OUT" to "TV+AMP" in the HDMI menu (page 60). HDMI features • A digital audio signals transmitted by the ...
... Sync Features" (page 47). If this is the case, place the antenna (aerial) farther away from the speakers connected to the receiver via the HDMI TV OUT jack. By connecting Sony "BRAVIA" Synccompatible equipment using INPUT MODE (page 51). Notes on the TV screen may not be able to record... equipment are compatible with the Audio Return Channel (ARC) function. For details, see "Digital audio formats supported by HDMI can be output from the TV speaker, set the "AUDIO.OUT" to "TV+AMP" in the HDMI menu (page 60). HDMI features • A digital audio signals transmitted by the ...
Operating Instructions
Page 28
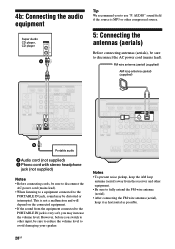
...) Notes • Before connecting cords, be sure to disconnect the AC power cord (mains lead). • When listening to a equipment connected to avoid damaging your speaker. This is not a malfunction and will depend on the connected equipment. • If the sound from the receiver and other equipment. • Be sure to...
...) Notes • Before connecting cords, be sure to disconnect the AC power cord (mains lead). • When listening to a equipment connected to avoid damaging your speaker. This is not a malfunction and will depend on the connected equipment. • If the sound from the receiver and other equipment. • Be sure to...
Operating Instructions
Page 30
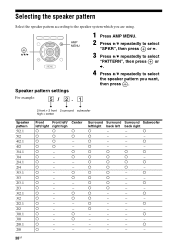
... 1 Press AMP MENU. 2 Press V/v repeatedly to select "SPKR", then press or b. 3 Press V/v repeatedly to select "PATTERN", then press or b. 4 Press V/v repeatedly to select the speaker pattern you want, then press . a a - - a a a - - a - - a a a a a a a - a a - a a a - - a a - a - - - - - - - a a - - Surround Surround Surround Subwoofer left/right back left / right high a a a a Center a a - - a a - - - - - - a - - a a a a a a a - a a - - - For example: 5 / 2. 1 2 front + 2 front 2 surround subwoofer high...
... 1 Press AMP MENU. 2 Press V/v repeatedly to select "SPKR", then press or b. 3 Press V/v repeatedly to select "PATTERN", then press or b. 4 Press V/v repeatedly to select the speaker pattern you want, then press . a a - - a a a - - a - - a a a a a a a - a a - a a a - - a a - a - - - - - - - a a - - Surround Surround Surround Subwoofer left/right back left / right high a a a a Center a a - - a a - - - - - - a - - a a a a a a a - a a - - - For example: 5 / 2. 1 2 front + 2 front 2 surround subwoofer high...
Operating Instructions
Page 31
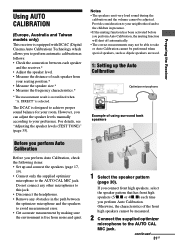
... DCAC is designed to achieve proper sound balance for your preference. However, you perform Auto Calibration. Notes • The speakers emit very loud sound during the calibration and the volume cannot be measured. 2 Connect the supplied optimizer microphone to the ...the distance of each time you can adjust the speaker levels manually according to your room. If you connect front high speakers, select the speaker pattern that has front high speakers (5/x.x or 4/x.x) each speaker from noise and quiet. 1 Select the speaker pattern (page 30). continued 31GB Preparing the Receiver ...
... DCAC is designed to achieve proper sound balance for your preference. However, you perform Auto Calibration. Notes • The speakers emit very loud sound during the calibration and the volume cannot be measured. 2 Connect the supplied optimizer microphone to the ...the distance of each time you can adjust the speaker levels manually according to your room. If you connect front high speakers, select the speaker pattern that has front high speakers (5/x.x or 4/x.x) each speaker from noise and quiet. 1 Select the speaker pattern (page 30). continued 31GB Preparing the Receiver ...
Operating Instructions
Page 33
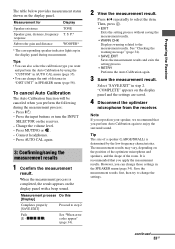
...Save the measurement result. However, you can also select the calibration type you perform the following during measurement. Measurement for Display Speaker existence TONE Speaker gain, distance, frequency response Subwoofer gain and distance T. Press MUTING or . - xxx xx] See "When error codes ... Confirming/saving the measurement results 1 Confirm the measurement result. Change the volume level. - Note If you reposition your speaker, we recommend that you perform Auto Calibration again to the measurement results. continued 33GB Preparing the Receiver The table below ...
...Save the measurement result. However, you can also select the calibration type you perform the following during measurement. Measurement for Display Speaker existence TONE Speaker gain, distance, frequency response Subwoofer gain and distance T. Press MUTING or . - xxx xx] See "When error codes ... Confirming/saving the measurement results 1 Confirm the measurement result. Change the volume level. - Note If you reposition your speaker, we recommend that you perform Auto Calibration again to the measurement results. continued 33GB Preparing the Receiver The table below ...
Operating Instructions
Page 34
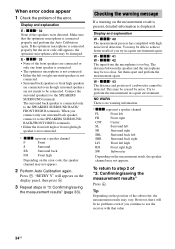
... panel, then press . 3 Repeat steps in a quiet environment again. "RETRY Y" will be no warning information. * xxx represent a speaker channel FL Front left FR Front right CNT Center SL Surround left SR Surround right SBL Surround back left SBR Surround back right LH Front...This may vary. Display and explanation E - If the optimizer microphone is not connected. • Surround back speakers or front high speakers are connected even though surround speakers are not meant to use the receiver with high noise level detection. Checking the warning message If a warning on...
... panel, then press . 3 Repeat steps in a quiet environment again. "RETRY Y" will be no warning information. * xxx represent a speaker channel FL Front left FR Front right CNT Center SL Surround left SR Surround right SBL Surround back left SBR Surround back right LH Front...This may vary. Display and explanation E - If the optimizer microphone is not connected. • Surround back speakers or front high speakers are connected even though surround speakers are not meant to use the receiver with high noise level detection. Checking the warning message If a warning on...
Operating Instructions
Page 35
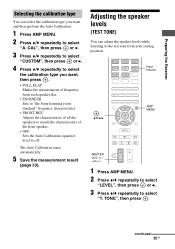
...", then press or b. 3 Press V/v repeatedly to the test tone from each speaker flat. • ENGINEER Sets to "the Sony listening room standard" frequency characteristics. • FRONT.REF Adjusts the characteristics of all the speakers to match the characteristics of the front speaker. • OFF Sets the Auto Calibration equalizer level to select "A. TONE", then...
...", then press or b. 3 Press V/v repeatedly to the test tone from each speaker flat. • ENGINEER Sets to "the Sony listening room standard" frequency characteristics. • FRONT.REF Adjusts the characteristics of all the speakers to match the characteristics of the front speaker. • OFF Sets the Auto Calibration equalizer level to select "A. TONE", then...
Operating Instructions
Page 36
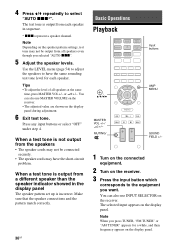
... press TUNER, "FM TUNER" or "AM TUNER" appears for each speaker in the display panel The speaker pattern set up is output from a different speaker than the speaker indicator showed in sequence. * xxx represent a speaker channel. You can also use MASTER VOLUME on the receiver. •... receiver. Note When you selected "AUTO xxx". 5 Adjust the speaker levels. The test tone is not output from the speakers • The speaker cords may not be connected securely. • The speaker cords may not be output from each speaker. or 2 +/-. Press any input buttons or select "OFF" ...
... press TUNER, "FM TUNER" or "AM TUNER" appears for each speaker in the display panel The speaker pattern set up is output from a different speaker than the speaker indicator showed in sequence. * xxx represent a speaker channel. You can also use MASTER VOLUME on the receiver. •... receiver. Note When you selected "AUTO xxx". 5 Adjust the speaker levels. The test tone is not output from the speakers • The speaker cords may not be connected securely. • The speaker cords may not be output from each speaker. or 2 +/-. Press any input buttons or select "OFF" ...
Operating Instructions
Page 37
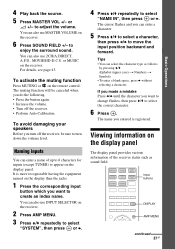
... off the receiver, be canceled when you want to select the correct character. 6 Press . 4 Play back the source. 5 Press MASTER VOL +/- To avoid damaging your speakers Before you entered is more recognizable having the equipment named on the display panel. Alphabet (upper case) t Numbers t Symbols • To enter a blank space, press...
... off the receiver, be canceled when you want to select the correct character. 6 Press . 4 Play back the source. 5 Press MASTER VOL +/- To avoid damaging your speakers Before you entered is more recognizable having the equipment named on the display panel. Alphabet (upper case) t Numbers t Symbols • To enter a blank space, press...


