Operating Instructions
Page 3
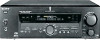
... SWITCHED 120W/1A MAX AC 120V 60Hz AC OUTLET 4-XXX-XXX-XX AA Area code Any differences in operation, according to the area code, are for illustration purposes unless stated otherwise. This receiver incorporates Dolby* Digital and Pro Logic Surround and the DTS** Digital Surround System. ...Inc. All Rights Reserved. You can also use the controls on the supplied remote if they have the same or similar names as those on the receiver. • The following icon is used for the STR-DE975, and STR-DE875. Confidential unpublished Works. © 1992-1997 Dolby Laboratories. No. 5,451...
... SWITCHED 120W/1A MAX AC 120V 60Hz AC OUTLET 4-XXX-XXX-XX AA Area code Any differences in operation, according to the area code, are for illustration purposes unless stated otherwise. This receiver incorporates Dolby* Digital and Pro Logic Surround and the DTS** Digital Surround System. ...Inc. All Rights Reserved. You can also use the controls on the supplied remote if they have the same or similar names as those on the receiver. • The following icon is used for the STR-DE975, and STR-DE875. Confidential unpublished Works. © 1992-1997 Dolby Laboratories. No. 5,451...
Operating Instructions
Page 4
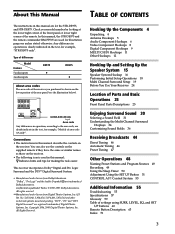
...-coded pins to yellow; Hooking Up the Components This chapter describes how to connect various audio and video components to white; When the remote no longer operates the receiver,...received the following items with the receiver: • FM wire antenna (1) • AM loop antenna (1) • R6 (size-AA) batteries (2) • Audio/video/control S connecting cord (1) • Control S connecting cord (1) • STR-DE975 only • Remote commander RM-PP505L (remote) (1) • STR-DE875 only • Remote commander RM-PP505 (remote) (1) Inserting batteries into the remote...
...-coded pins to yellow; Hooking Up the Components This chapter describes how to connect various audio and video components to white; When the remote no longer operates the receiver,...received the following items with the receiver: • FM wire antenna (1) • AM loop antenna (1) • R6 (size-AA) batteries (2) • Audio/video/control S connecting cord (1) • Control S connecting cord (1) • STR-DE975 only • Remote commander RM-PP505L (remote) (1) • STR-DE875 only • Remote commander RM-PP505 (remote) (1) Inserting batteries into the remote...

Operating Instructions
Page 44
...Tuning or Automatic Tuning, you can let the receiver scan all the stations that you want directly by entering its 2-character code (see page 5). 44 Before you begin, make sure you have : • Connected an FM and AM antenna to the receiver (see page 46). Preset Tuning After you ... you can preset them to the receiver (see page 47). You can be preset. Receiving Broadcasts This chapter describes how to receive FM or AM broadcasts and how to 30 FM or AM stations can tune in stations on the remote (see page 47). The receiver will also scan all available stations in...
...Tuning or Automatic Tuning, you can let the receiver scan all the stations that you want directly by entering its 2-character code (see page 5). 44 Before you begin, make sure you have : • Connected an FM and AM antenna to the receiver (see page 46). Preset Tuning After you ... you can preset them to the receiver (see page 47). You can be preset. Receiving Broadcasts This chapter describes how to receive FM or AM broadcasts and how to 30 FM or AM stations can tune in stations on the remote (see page 47). The receiver will also scan all available stations in...

Operating Instructions
Page 47
...tuned in. 2 Press PRESET TUNING + or PRESET TUNING - Before tuning to preset stations, be sure to preset using the numeric buttons on the supplied remote. "MEMORY" appears in the corresponding order and direction as follows: nA1˜A2˜...˜A0˜B1˜B2˜...˜B0N nC0˜...;...C2˜C1N Using the preset codes 1 Rotate FUNCTION to receive broadcasts" on page 45. Do Steps 4 to 6 before you want to preset them by pressing PRESET TUNING + or PRESET TUNING -. Preset ...
...tuned in. 2 Press PRESET TUNING + or PRESET TUNING - Before tuning to preset stations, be sure to preset using the numeric buttons on the supplied remote. "MEMORY" appears in the corresponding order and direction as follows: nA1˜A2˜...˜A0˜B1˜B2˜...˜B0N nC0˜...;...C2˜C1N Using the preset codes 1 Rotate FUNCTION to receive broadcasts" on page 45. Do Steps 4 to 6 before you want to preset them by pressing PRESET TUNING + or PRESET TUNING -. Preset ...
Operating Instructions
Page 66
... any step. Press the programmed button to control other codes. z If programming is normally unable to control non-Sony components by changing the code. Since the remote signal that a component accepts differs depending on the numeric code(s) corresponding to factory settings. See the tables on pages...you can operate the programmed component without changing the function of the codes, try using one numeric code may not be assigned to the component and the maker of the component, more than one of the receiver. 1 Press AV ?/1 while pressing down USE MODE. Start again...
... any step. Press the programmed button to control other codes. z If programming is normally unable to control non-Sony components by changing the code. Since the remote signal that a component accepts differs depending on the numeric code(s) corresponding to factory settings. See the tables on pages...you can operate the programmed component without changing the function of the codes, try using one numeric code may not be assigned to the component and the maker of the component, more than one of the receiver. 1 Press AV ?/1 while pressing down USE MODE. Start again...

Operating Instructions
Page 68
...- VOL + n N MUTING X D. DIRECT AV MENU ON SCREEN MUTING ENTER/ EXEC MASTER MAIN VOL MENU EXIT/ RETURN Additional Information 68 SUB CH + POSITION SWAP m M.> - Remote Button Description To control a DVD player Maker Code(s) SONY 401 PANASONIC 402, 406 PHILIPS 407 PIONEER 403 TOSHIBA 404 DENON 405 To control a TV Maker... 545 535 523, 536, 537, 538 530, 537, 539 535, 540, 541 542, 543 To control a satellite tuner or cable box Maker Code(s) SONY 801, 802, 803 JERROLD/G.I. 806, 807, 808, 809, 810, 811, 812, 813, 814 PANASONIC 818 RCA 804, 805 S.
...- VOL + n N MUTING X D. DIRECT AV MENU ON SCREEN MUTING ENTER/ EXEC MASTER MAIN VOL MENU EXIT/ RETURN Additional Information 68 SUB CH + POSITION SWAP m M.> - Remote Button Description To control a DVD player Maker Code(s) SONY 401 PANASONIC 402, 406 PHILIPS 407 PIONEER 403 TOSHIBA 404 DENON 405 To control a TV Maker... 545 535 523, 536, 537, 538 530, 537, 539 535, 540, 541 542, 543 To control a satellite tuner or cable box Maker Code(s) SONY 801, 802, 803 JERROLD/G.I. 806, 807, 808, 809, 810, 811, 812, 813, 814 PANASONIC 818 RCA 804, 805 S.

Operating Instructions
Page 69
...indicator lights twice slowly and the learned code is pressed, then blinks slowly. 4 Point the remote control code receiver section of the remote toward the receiver/transmitter on the remote control to be learned. 5-15 cm 5 Press the appropriate button on the remote control to be used. To clear ...the memory of the remote To clear all programmed and learned...
...indicator lights twice slowly and the learned code is pressed, then blinks slowly. 4 Point the remote control code receiver section of the remote toward the receiver/transmitter on the remote control to be learned. 5-15 cm 5 Press the appropriate button on the remote control to be used. To clear ...the memory of the remote To clear all programmed and learned...

Operating Instructions
Page 70
...valid button is cleared. The remote automatically exits the macro setting mode. To delay the output of an IR code Start over from step 1. To clear the programmed IR codes Clear each macro step individually. 1 Press MACRO1 or MACRO2 (in which the IR code you want to the receiver, press the function button (...including MONITOR) first, then press the button for the operation. To program the operation (IR code) of the receiver, press the button for the operation. For example, to press MACRO1 or MACRO2 for each operation. DIRECT, ON SCREEN, MUTING, MAIN MENU, MASTER...
...valid button is cleared. The remote automatically exits the macro setting mode. To delay the output of an IR code Start over from step 1. To clear the programmed IR codes Clear each macro step individually. 1 Press MACRO1 or MACRO2 (in which the IR code you want to the receiver, press the function button (...including MONITOR) first, then press the button for the operation. To program the operation (IR code) of the receiver, press the button for the operation. For example, to press MACRO1 or MACRO2 for each operation. DIRECT, ON SCREEN, MUTING, MAIN MENU, MASTER...


