Operating Instructions
Page 6
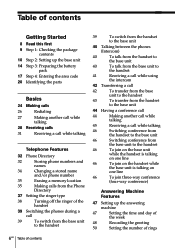
...while talking 28 Receiving calls 31 Receiving a call while talking Telephone Features 32 Phone Directory 32 Storing phone numbers and names 34 Changing a stored name and/or phone number 35 Erasing a memory location 35 Making calls from the Phone Directory 37 Setting the ringer type 38 Turning off the ...handset while the base unit is talking on one line 46 To join three-way conference (four-way conference) Answering Machine Features 47 Setting up the answering machine 47 Setting the time and day of the week 48 Recording the greeting 50 Setting the number of ...
...while talking 28 Receiving calls 31 Receiving a call while talking Telephone Features 32 Phone Directory 32 Storing phone numbers and names 34 Changing a stored name and/or phone number 35 Erasing a memory location 35 Making calls from the Phone Directory 37 Setting the ringer type 38 Turning off the ...handset while the base unit is talking on one line 46 To join three-way conference (four-way conference) Answering Machine Features 47 Setting up the answering machine 47 Setting the time and day of the week 48 Recording the greeting 50 Setting the number of ...
Operating Instructions
Page 7
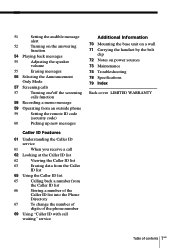
...52 Turning on the answering function 54 Playing back messages 55 Adjusting the speaker volume 55 Erasing messages 56 Selecting the Announcement Only Mode 57 Screening calls 57 Turning on/off the screening calls function 58 Recording a memo message 59 Operating from an outside phone 59 Setting the ... Calling back a number from the Caller ID list 66 Storing a number of the Caller ID list into the Phone Directory 67 To change the number of digits of the phone number 69 Using "Caller ID with call waiting" service Additional Information 70 Mounting the base unit on a wall...
...52 Turning on the answering function 54 Playing back messages 55 Adjusting the speaker volume 55 Erasing messages 56 Selecting the Announcement Only Mode 57 Screening calls 57 Turning on/off the screening calls function 58 Recording a memo message 59 Operating from an outside phone 59 Setting the ... Calling back a number from the Caller ID list 66 Storing a number of the Caller ID list into the Phone Directory 67 To change the number of digits of the phone number 69 Using "Caller ID with call waiting" service Additional Information 70 Mounting the base unit on a wall...
Operating Instructions
Page 8
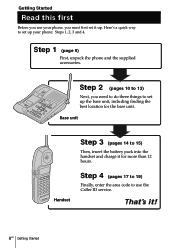
... to set up . Here's a quick way to 15) Then, insert the battery pack into the handset and charge it up your phone, you need to do three things to use your phone: Steps 1, 2, 3 and 4. Base unit Step 3 (pages 14 to set up the base unit, including finding the best location for more... than 12 hours. That's it! 8US Getting Started Step 1 (page 9) First, unpack the phone and the supplied accessories. Step 2 (pages 10 to 13) Next, you must first set it for the base unit.
... to set up . Here's a quick way to 15) Then, insert the battery pack into the handset and charge it up your phone, you need to do three things to use your phone: Steps 1, 2, 3 and 4. Base unit Step 3 (pages 14 to set up the base unit, including finding the best location for more... than 12 hours. That's it! 8US Getting Started Step 1 (page 9) First, unpack the phone and the supplied accessories. Step 2 (pages 10 to 13) Next, you must first set it for the base unit.
Operating Instructions
Page 13
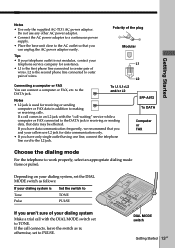
...close to the L2 jack. Polarity of wires. to work properly, select an appropriate dialing mode (tone or pulse). SPP-A972 To DATA Computer or FAX Choose the dialing mode For the telephone to the DATA jack. L2 Connecting a computer or FAX You can unplug the AC power adaptor easily. + - L2...the "call connects, leave the switch as is not modular, contact your telephone service company for receiving or sending computer or FAX data in on your dialing system, set to TONE. L1 • L1 is the first phone line connected to the DATA jack is Tone Pulse Set the switch to...
...close to the L2 jack. Polarity of wires. to work properly, select an appropriate dialing mode (tone or pulse). SPP-A972 To DATA Computer or FAX Choose the dialing mode For the telephone to the DATA jack. L2 Connecting a computer or FAX You can unplug the AC power adaptor easily. + - L2...the "call connects, leave the switch as is not modular, contact your telephone service company for receiving or sending computer or FAX data in on your dialing system, set to TONE. L1 • L1 is the first phone line connected to the DATA jack is Tone Pulse Set the switch to...

Operating Instructions
Page 14
... can place it with contacts facing down) into the battery compartment. Charge the battery pack for more than 12 hours before you start using your phone. 1 Slide open the battery compartment lid of the base unit. BP-T23 2 Insert the battery pack (with either side facing up when the handset is...
... can place it with contacts facing down) into the battery compartment. Charge the battery pack for more than 12 hours before you start using your phone. 1 Slide open the battery compartment lid of the base unit. BP-T23 2 Insert the battery pack (with either side facing up when the handset is...
Operating Instructions
Page 17
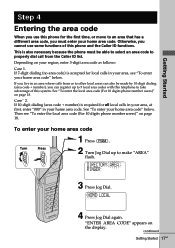
... on page 18. Turn Press 2 Turn Jog Dial up to 5 local area codes with this telephone to make "AREA" flash. continued Getting Started 17US See "To enter the local area code (For 10 digits phone number users)" on page 18. To enter your home area code. Getting Started Step 4 Entering the...for local calls in your home area code" below . If you can register up to take advantage of this system. DIRECTORY AREA RINGER 3 Press Jog Dial. This is also necessary because the phone must enter your home area code" below . Then see "To enter your home area code. If 10-...
... on page 18. Turn Press 2 Turn Jog Dial up to 5 local area codes with this telephone to make "AREA" flash. continued Getting Started 17US See "To enter the local area code (For 10 digits phone number users)" on page 18. To enter your home area code. Getting Started Step 4 Entering the...for local calls in your home area code" below . If you can register up to take advantage of this system. DIRECTORY AREA RINGER 3 Press Jog Dial. This is also necessary because the phone must enter your home area code" below . Then see "To enter your home area code. If 10-...

Operating Instructions
Page 18
... page 17. You will hear a long confirmation beep. Notes • If the home area code is already entered, it appears on the display in this phone.) 1 Perform steps 1 to 3 on the display for about 20 seconds. Step 4: Entering the area code (continued) 5 Enter three digits of (PGM) in step 6. &#... current home area code, perform steps 1 to 4. To enter the local area code (For 10 digits phone numbers users) If a call does not match one of the local area codes you entered, the phone number will be registered with 11 digits in the Caller ID list (area code + number). If a...
... page 17. You will hear a long confirmation beep. Notes • If the home area code is already entered, it appears on the display in this phone.) 1 Perform steps 1 to 3 on the display for about 20 seconds. Step 4: Entering the area code (continued) 5 Enter three digits of (PGM) in step 6. &#... current home area code, perform steps 1 to 4. To enter the local area code (For 10 digits phone numbers users) If a call does not match one of the local area codes you entered, the phone number will be registered with 11 digits in the Caller ID list (area code + number). If a...

Operating Instructions
Page 22
...) 8 TONE button (p. 25) Allows you to switch temporarily to tone dialing. 9 CONF (conference) button (p. 44) Lets you to change the number of digits of the phone number in the Caller ID list. 22US Getting Started qd Dialing keys (p. 24) qf # button (p. 67) Used to disconnect the call .
...) 8 TONE button (p. 25) Allows you to switch temporarily to tone dialing. 9 CONF (conference) button (p. 44) Lets you to change the number of digits of the phone number in the Caller ID list. 22US Getting Started qd Dialing keys (p. 24) qf # button (p. 67) Used to disconnect the call .
Operating Instructions
Page 23
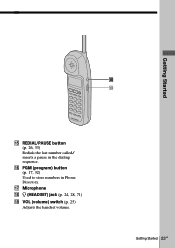
qh PGM (program) button (p. 17, 32) Used to store numbers in the dialing sequence. Getting Started 23US qj Microphone qk I (HEADSET) jack (p. 24, 28, 71) ql VOL (volume) switch (p. 25) Adjusts the handset volume. Getting Started qk ql qg REDIAL/PAUSE button (p. 26, 33) Redials the last number called/ inserts a pause in Phone Directory.
qh PGM (program) button (p. 17, 32) Used to store numbers in the dialing sequence. Getting Started 23US qj Microphone qk I (HEADSET) jack (p. 24, 28, 71) ql VOL (volume) switch (p. 25) Adjusts the handset volume. Getting Started qk ql qg REDIAL/PAUSE button (p. 26, 33) Redials the last number called/ inserts a pause in Phone Directory.
Operating Instructions
Page 24
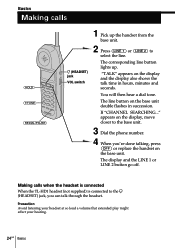
... 2 button go off. The corresponding line button lights up the handset from the base unit. 2 Press (LINE 1) or (LINE 2) to the base unit. 3 Dial the phone number. 4 When you can talk through the headset.
... 2 button go off. The corresponding line button lights up the handset from the base unit. 2 Press (LINE 1) or (LINE 2) to the base unit. 3 Dial the phone number. 4 When you can talk through the headset.
Operating Instructions
Page 25
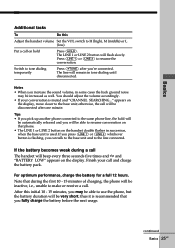
... the base unit is flashing, you 're connected. If the battery becomes weak during the first 10 - 15 minutes of charging, the phone will flash slowly. continued Basics 25US The line will beep every three seconds five times and E and "BATTERY LOW" appears on the handset...flashes in tone dialing until disconnected. Note that you may be able to resume the conversation. Press (LINE 1) or (LINE 2) to resume conversation on that phone. • The LINE 1 or LINE 2 button on the display. If you press (LINE 1) or (LINE 2) whichever button is used. For optimum...
... the base unit is flashing, you 're connected. If the battery becomes weak during the first 10 - 15 minutes of charging, the phone will flash slowly. continued Basics 25US The line will beep every three seconds five times and E and "BATTERY LOW" appears on the handset...flashes in tone dialing until disconnected. Note that you may be able to resume the conversation. Press (LINE 1) or (LINE 2) to resume conversation on that phone. • The LINE 1 or LINE 2 button on the display. If you press (LINE 1) or (LINE 2) whichever button is used. For optimum...
Operating Instructions
Page 26
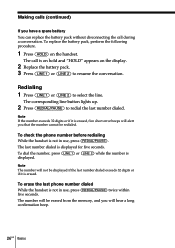
.... 1 Press (HOLD) on the display. 2 Replace the battery pack. 3 Press (LINE 1) or (LINE 2) to resume the conversation. To erase the last phone number dialed While the handset is erased, five short error beeps will be redialed. The corresponding line button lights up. 2 Press (REDIAL/PAUSE) to select... 1) or (LINE 2) while the number is on hold and "HOLD" appears on the handset. The call during a conversation. To check the phone number before redialing While the handset is not in use , press (REDIAL/PAUSE). The number will alert you that the number cannot be erased from...
.... 1 Press (HOLD) on the display. 2 Replace the battery pack. 3 Press (LINE 1) or (LINE 2) to resume the conversation. To erase the last phone number dialed While the handset is erased, five short error beeps will be redialed. The corresponding line button lights up. 2 Press (REDIAL/PAUSE) to select... 1) or (LINE 2) while the number is on hold and "HOLD" appears on the handset. The call during a conversation. To check the phone number before redialing While the handset is not in use , press (REDIAL/PAUSE). The number will alert you that the number cannot be erased from...

Operating Instructions
Page 27
... the conversation on line 1 1 Press (HOLD) while talking. Basics 27US The line 1 is put on hold and the LINE 1 button flashes slowly. 2 Press (LINE 2). 3 Dial a phone number for the second party. Basics Making another call while talking Example: Making a call " on line 1, press (HOLD), and then (LINE 1). Now you do not...
... the conversation on line 1 1 Press (HOLD) while talking. Basics 27US The line 1 is put on hold and the LINE 1 button flashes slowly. 2 Press (LINE 2). 3 Dial a phone number for the second party. Basics Making another call while talking Example: Making a call " on line 1, press (HOLD), and then (LINE 1). Now you do not...
Operating Instructions
Page 28
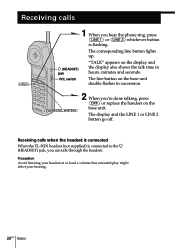
.... 28US Basics Receiving calls when the headset is connected When the TL-HD1 headset (not supplied) is flashing. Receiving calls (HOLD) 1 When you hear the phone ring, press (LINE 1) or (LINE 2) whichever button is connected to the I (HEADSET) jack VOL switch "TALK" appears on the base unit.
.... 28US Basics Receiving calls when the headset is connected When the TL-HD1 headset (not supplied) is flashing. Receiving calls (HOLD) 1 When you hear the phone ring, press (LINE 1) or (LINE 2) whichever button is connected to the I (HEADSET) jack VOL switch "TALK" appears on the base unit.
Operating Instructions
Page 29
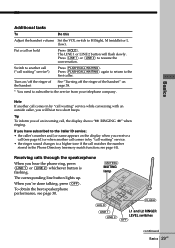
...or L (low). Press (LINE 1) or (LINE 2) to a higher tone if the call waiting" service*) Press (FLASH/CALL WAITING). When you hear the phone ring, press (LINE 1) or (LINE 2) whichever button is flashing. If you have subscribed to the Caller ID service; • the caller's number and/...will hear two short beeps. Basics Additional tasks To Do this Adjust the handset volume Set the VOL switch to the service from your telephone company. Put a call waiting" service. • the ringer sound changes to resume the conversation. Receiving calls through the speakerphone When...
...or L (low). Press (LINE 1) or (LINE 2) to a higher tone if the call waiting" service*) Press (FLASH/CALL WAITING). When you hear the phone ring, press (LINE 1) or (LINE 2) whichever button is flashing. If you have subscribed to the Caller ID service; • the caller's number and/...will hear two short beeps. Basics Additional tasks To Do this Adjust the handset volume Set the VOL switch to the service from your telephone company. Put a call waiting" service. • the ringer sound changes to resume the conversation. Receiving calls through the speakerphone When...
Operating Instructions
Page 32
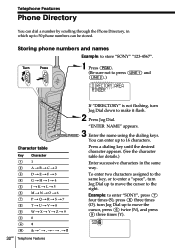
... (O), turn Jog Dial up to make it flash. 2 Press Jog Dial. SONY (#) & t ' t , t - t # 32US Telephone Features You can enter up to store "SONY" "123-4567". Storing phone numbers and names Example: to 16 characters. t . Telephone Features Phone Directory You can dial a number by scrolling through the Phone Directory, in the same way. (3) D t E t F t 3 (4) G t H t I t 4 (5) J t K t L t 5 (6) M t N t O t 6 (7) P t Q t R t S t 7 (8) T t U t V t 8 (9) W t X t Y t Z t 9 (0) 0 (*) * To enter two characters assigned to...
... (O), turn Jog Dial up to make it flash. 2 Press Jog Dial. SONY (#) & t ' t , t - t # 32US Telephone Features You can enter up to store "SONY" "123-4567". Storing phone numbers and names Example: to 16 characters. t . Telephone Features Phone Directory You can dial a number by scrolling through the Phone Directory, in the same way. (3) D t E t F t 3 (4) G t H t I t 4 (5) J t K t L t 5 (6) M t N t O t 6 (7) P t Q t R t S t 7 (8) T t U t V t 8 (9) W t X t Y t Z t 9 (0) 0 (*) * To enter two characters assigned to...
Operating Instructions
Page 33
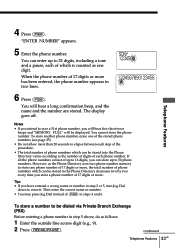
... To store a number to store one digit. SONY 1234567 1234567890123456 12 6 Press (PGM). The display goes off. You cannot store the phone number. However, as the Phone Directory uses two-phone number memory to be displayed. When the phone number of which is counted as follows: 1 ... or 5, turn Jog Dial down to save a 51st phone number, you store a phone number of each of 17 digits or more . "ENTER NUMBER" appears. 5 Enter the phone number. Notes • If you intend to erase it. continued Telephone Features 33US Then enter the correct name or number. •...
... To store a number to store one digit. SONY 1234567 1234567890123456 12 6 Press (PGM). The display goes off. You cannot store the phone number. However, as the Phone Directory uses two-phone number memory to be displayed. When the phone number of which is counted as follows: 1 ... or 5, turn Jog Dial down to save a 51st phone number, you store a phone number of each of 17 digits or more . "ENTER NUMBER" appears. 5 Enter the phone number. Notes • If you intend to erase it. continued Telephone Features 33US Then enter the correct name or number. •...
Operating Instructions
Page 34
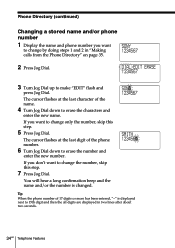
..." on page 35. DIAL EDIT ERASE 1234567 3 Turn Jog Dial up to make "EDIT" flash and press Jog Dial. SONY 1234567 SMITH 1234567 Tip When the phone number of the name. 4 Turn Jog Dial down to erase the number and enter the new number. If you want to change only the...skip this step. 7 Press Jog Dial. If you don't want to change by doing steps 1 and 2 in two lines after about two seconds. 34US Telephone Features Phone Directory (continued) Changing a stored name and/or phone number 1 Display the name and phone number you want to change the number, skip this step. 5 Press Jog Dial...
..." on page 35. DIAL EDIT ERASE 1234567 3 Turn Jog Dial up to make "EDIT" flash and press Jog Dial. SONY 1234567 SMITH 1234567 Tip When the phone number of the name. 4 Turn Jog Dial down to erase the number and enter the new number. If you want to change only the...skip this step. 7 Press Jog Dial. If you don't want to change by doing steps 1 and 2 in two lines after about two seconds. 34US Telephone Features Phone Directory (continued) Changing a stored name and/or phone number 1 Display the name and phone number you want to change the number, skip this step. 5 Press Jog Dial...
Operating Instructions
Page 35
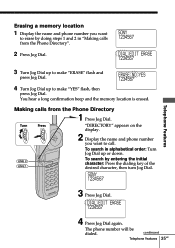
... of the desired character, then turn Jog Dial. SONY 1234567 3 Press Jog Dial. Making calls from the Phone Directory". 2 Press Jog Dial. The phone number will be dialed. DIAL EDIT ERASE 1234567 4 Press Jog Dial again. continued Telephone Features 35US To search in alphabetical order: Turn Jog...up or down. (LINE 2) (LINE 1) To search by doing steps 1 and 2 in "Making calls from the Phone Directory 1 Press Jog Dial. SONY 1234567 DIAL EDIT ERASE 1234567 Telephone Features 3 Turn Jog Dial up to make "ERASE" flash and press Jog Dial. You hear a long confirmation beep and...
... of the desired character, then turn Jog Dial. SONY 1234567 3 Press Jog Dial. Making calls from the Phone Directory". 2 Press Jog Dial. The phone number will be dialed. DIAL EDIT ERASE 1234567 4 Press Jog Dial again. continued Telephone Features 35US To search in alphabetical order: Turn Jog...up or down. (LINE 2) (LINE 1) To search by doing steps 1 and 2 in "Making calls from the Phone Directory 1 Press Jog Dial. SONY 1234567 DIAL EDIT ERASE 1234567 Telephone Features 3 Turn Jog Dial up to make "ERASE" flash and press Jog Dial. You hear a long confirmation beep and...
Operating Instructions
Page 36
... the following order when you press Jog Dial in use, line 1 is automatically connected. When neither line is in step 4, the vacant line is connected. t t Phone Directory (continued) Tips • You may press (LINE 1) or (LINE 2) to make a call instead of doing steps 3 and 4. • When you turn Jog ...Dial up or down. • Alphabetical order: ABC...XYZ y symbols y * y # y 0 - 9 • Initial character: To search for "SONY" for example, press (7) and then turn Jog Dial to search through the names starting with P, Q, R, S or 7. 36US...
... the following order when you press Jog Dial in use, line 1 is automatically connected. When neither line is in step 4, the vacant line is connected. t t Phone Directory (continued) Tips • You may press (LINE 1) or (LINE 2) to make a call instead of doing steps 3 and 4. • When you turn Jog ...Dial up or down. • Alphabetical order: ABC...XYZ y symbols y * y # y 0 - 9 • Initial character: To search for "SONY" for example, press (7) and then turn Jog Dial to search through the names starting with P, Q, R, S or 7. 36US...


