
Instruction Manual (Large File - 12.49 MB)
Page 12
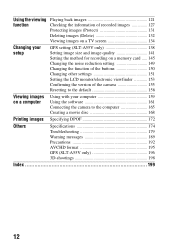
... of recorded images 127 Protecting images (Protect 131 Deleting images (Delete 132 Viewing images on a TV screen 134 Changing your setup GPS setting (SLT-A55V only 138 Setting image size and image quality 141 Setting the method for recording on a memory card ..... 145 Changing the noise reduction setting 149 Changing the function of the buttons 150 Changing other settings 151 Setting the LCD monitor/electronic viewfinder 153 Confirming the version of the camera 155 Resetting to the default 156 Viewing images on a computer Using with your computer 159 Using the software 161...
... of recorded images 127 Protecting images (Protect 131 Deleting images (Delete 132 Viewing images on a TV screen 134 Changing your setup GPS setting (SLT-A55V only 138 Setting image size and image quality 141 Setting the method for recording on a memory card ..... 145 Changing the noise reduction setting 149 Changing the function of the buttons 150 Changing other settings 151 Setting the LCD monitor/electronic viewfinder 153 Confirming the version of the camera 155 Resetting to the default 156 Viewing images on a computer Using with your computer 159 Using the software 161...

Instruction Manual (Large File - 12.49 MB)
Page 33
... after the CHARGE lamp goes out. - Note that the actual numbers may be recorded using a battery pack The approximate number of use the camera with a battery pack at full capacity. Using Sony "Memory Stick PRO Duo" media (sold separately). 33 Preparing the camera The number of images that is selected). At an ambient temperature of 25°C (77°F). - Using the battery pack that can record more images than those indicated depending...
... after the CHARGE lamp goes out. - Note that the actual numbers may be recorded using a battery pack The approximate number of use the camera with a battery pack at full capacity. Using Sony "Memory Stick PRO Duo" media (sold separately). 33 Preparing the camera The number of images that is selected). At an ambient temperature of 25°C (77°F). - Using the battery pack that can record more images than those indicated depending...
Instruction Manual (Large File - 12.49 MB)
Page 48
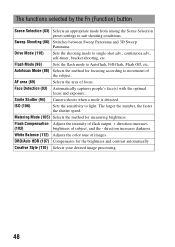
... single-shot adv., continuous adv., self-timer, bracket shooting, etc. direction increases darkness. Face Detection (93) Automatically captures people's face(s) with the optimal focus and exposure. The larger the number, the faster the shutter speed. Creative Style (110) Selects your desired image processing. 48 Drive Mode (116) Sets the shooting mode to light. AF area (89) Selects the area of images. White Balance (112) Adjusts the color tone of focus. Flash Mode (96) Sets the flash mode to...
... single-shot adv., continuous adv., self-timer, bracket shooting, etc. direction increases darkness. Face Detection (93) Automatically captures people's face(s) with the optimal focus and exposure. The larger the number, the faster the shutter speed. Creative Style (110) Selects your desired image processing. 48 Drive Mode (116) Sets the shooting mode to light. AF area (89) Selects the area of images. White Balance (112) Adjusts the color tone of focus. Flash Mode (96) Sets the flash mode to...

Instruction Manual (Large File - 12.49 MB)
Page 51
... (Delete) button to save all the images that were (62) shot continuously in AUTO+ (62) mode. Display Rec. Advance Sets whether or not to shoot continuously in AUTO+ mode. 51 Sets auto review. Custom menu Eye-Start AF (39) FINDER/LCD Setting (154) AEL button (150) Focus Hold Button (150) Focus Magnifier (150) Red Eye Reduction (98) Release w/oLens (151) Sets whether or not to use . Auto+ Cont. Sets the operation method of the AE lock button for switching between the viewfinder and LCD monitor. Sets whether shutter can open when lens...
... (Delete) button to save all the images that were (62) shot continuously in AUTO+ (62) mode. Display Rec. Advance Sets whether or not to shoot continuously in AUTO+ mode. 51 Sets auto review. Custom menu Eye-Start AF (39) FINDER/LCD Setting (154) AEL button (150) Focus Hold Button (150) Focus Magnifier (150) Red Eye Reduction (98) Release w/oLens (151) Sets whether or not to use . Auto+ Cont. Sets the operation method of the AE lock button for switching between the viewfinder and LCD monitor. Sets whether shutter can open when lens...

Instruction Manual (Large File - 12.49 MB)
Page 54
... working. Version (155) Displays the camera software version. Reset Default (156) Restores the settings to use the beep sound when the focus is achieved or the self-timer is inserted in the camera. 54 Viewfinder Bright. Setup menu LCD Brightness (153) Sets the brightness of the camera when using an Eye-Fi card. Language (152) Selects the language. Upload Settings (147)* USB Connection (165) Sets the upload function of the LCD monitor. CTRL FOR HDMI (136) Operates the camera from a TV that support "BRAVIA" Sync. Cleaning Mode (36) Starts the cleaning mode...
... working. Version (155) Displays the camera software version. Reset Default (156) Restores the settings to use the beep sound when the focus is achieved or the self-timer is inserted in the camera. 54 Viewfinder Bright. Setup menu LCD Brightness (153) Sets the brightness of the camera when using an Eye-Fi card. Language (152) Selects the language. Upload Settings (147)* USB Connection (165) Sets the upload function of the LCD monitor. CTRL FOR HDMI (136) Operates the camera from a TV that support "BRAVIA" Sync. Cleaning Mode (36) Starts the cleaning mode...
Instruction Manual (Large File - 12.49 MB)
Page 61
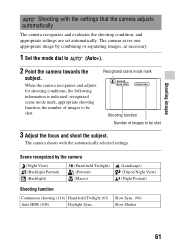
... shooting conditions, the following information is indicated: recognized scene mode mark, appropriate shooting function, the number of images to be shot. Recognized scene mode mark Shooting function Number of images to (Auto+). 2 Point the camera towards the subject. The camera shoots with the settings that the camera adjusts automatically The camera recognizes and evaluates the shooting condition, and appropriate settings are set automatically. Shooting images Shooting with the automatically selected settings. The camera saves one appropriate image by the camera (Night View...
... shooting conditions, the following information is indicated: recognized scene mode mark, appropriate shooting function, the number of images to be shot. Recognized scene mode mark Shooting function Number of images to (Auto+). 2 Point the camera towards the subject. The camera shoots with the settings that the camera adjusts automatically The camera recognizes and evaluates the shooting condition, and appropriate settings are set automatically. Shooting images Shooting with the automatically selected settings. The camera saves one appropriate image by the camera (Night View...
Instruction Manual (Large File - 12.49 MB)
Page 71
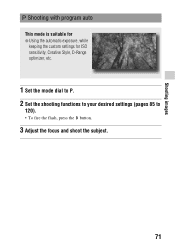
Shooting images Shooting with program auto This mode is suitable for z Using the automatic exposure, while keeping the custom settings for ISO sensitivity, Creative Style, D-Range optimizer, etc. 1 Set the mode dial to P. 2 Set the shooting functions to your desired settings (pages 85 to 120). • To fire the flash, press the button. 3 Adjust the focus and shoot the subject. 71
Shooting images Shooting with program auto This mode is suitable for z Using the automatic exposure, while keeping the custom settings for ISO sensitivity, Creative Style, D-Range optimizer, etc. 1 Set the mode dial to P. 2 Set the shooting functions to your desired settings (pages 85 to 120). • To fire the flash, press the button. 3 Adjust the focus and shoot the subject. 71

Instruction Manual (Large File - 12.49 MB)
Page 78
... shoot with the flash, check the flash range (page 98). Rotate the control dial while pressing the AEL button to the aperture value. The b B arrow appears if the set . • Check the exposure value on the exposure compensation indicator. In M mode, the ISO setting [AUTO] is in manual exposure mode. • When the mode dial is set to [100]. Toward -: Images become brighter. Manual shift You can change the shutter speed and aperture value combination without changing the exposure...
... shoot with the flash, check the flash range (page 98). Rotate the control dial while pressing the AEL button to the aperture value. The b B arrow appears if the set . • Check the exposure value on the exposure compensation indicator. In M mode, the ISO setting [AUTO] is in manual exposure mode. • When the mode dial is set to [100]. Toward -: Images become brighter. Manual shift You can change the shutter speed and aperture value combination without changing the exposure...

Instruction Manual (Large File - 12.49 MB)
Page 80
...; Set the focus to infinity in the same general area, then shoot them. • Use the Wireless Remote Commander (sold separately), you cannot set the shutter speed to [BULB]. • If the Smile Shutter or Auto HDR function is set to press and hold the shutter button for the same amount of time that you start BULB shooting after the temperature of the camera drops to prevent the quality of the image from...
...; Set the focus to infinity in the same general area, then shoot them. • Use the Wireless Remote Commander (sold separately), you cannot set the shutter speed to [BULB]. • If the Smile Shutter or Auto HDR function is set to press and hold the shutter button for the same amount of time that you start BULB shooting after the temperature of the camera drops to prevent the quality of the image from...

Instruction Manual (Large File - 12.49 MB)
Page 83
... the approximate total recording times using a memory card formatted with this camera. The temperature inside the camera has increased to an unacceptable level. • For details on shooting conditions and the memory card used. • When is indicated, stop recording the movie. "Memory Stick PRO Duo" SLT-A55/A55V File format/ Size Capacity AVCHD 1920 × 1080 MP4 1440 × 1080 MP4 VGA 2GB 0:14:00 0:20:40 1:15:10 SLT-A33 File format/ Size Capacity AVCHD 1920...
... the approximate total recording times using a memory card formatted with this camera. The temperature inside the camera has increased to an unacceptable level. • For details on shooting conditions and the memory card used. • When is indicated, stop recording the movie. "Memory Stick PRO Duo" SLT-A55/A55V File format/ Size Capacity AVCHD 1920 × 1080 MP4 1440 × 1080 MP4 VGA 2GB 0:14:00 0:20:40 1:15:10 SLT-A33 File format/ Size Capacity AVCHD 1920...
Instruction Manual (Large File - 12.49 MB)
Page 99
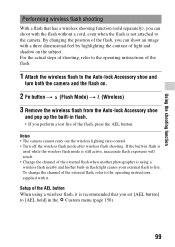
... camera cannot carry out the wireless lighting ratio control. • Turn off the wireless flash mode after wireless flash shooting. Setup of the AEL button When using a wireless flash nearby and his/her built-in flash light causes your external flash to [AEL hold] in the Custom menu (page 150). 99 By changing the position of the flash, you perform a test fire of the external flash when another photographer is using a wireless flash, it . If the built-in flash. • If you can shoot with the flash...
... camera cannot carry out the wireless lighting ratio control. • Turn off the wireless flash mode after wireless flash shooting. Setup of the AEL button When using a wireless flash nearby and his/her built-in flash light causes your external flash to [AEL hold] in the Custom menu (page 150). 99 By changing the position of the flash, you perform a test fire of the external flash when another photographer is using a wireless flash, it . If the built-in flash. • If you can shoot with the flash...

Instruction Manual (Large File - 12.49 MB)
Page 100
... enough and lock the exposure before shooting. The spot where you lock the exposure. 1 Fn button t (Metering Mode) t (Spot) 2 Adjust the focus on the portion you want to shoot a brighter image of the entire image. To make the subject brighter, point the camera forwards a spot that is brighter than the subject and use the light meter to lock the exposure of the big difference in lighting between the subject and the background. This...
... enough and lock the exposure before shooting. The spot where you lock the exposure. 1 Fn button t (Metering Mode) t (Spot) 2 Adjust the focus on the portion you want to shoot a brighter image of the entire image. To make the subject brighter, point the camera forwards a spot that is brighter than the subject and use the light meter to lock the exposure of the big difference in lighting between the subject and the background. This...

Instruction Manual (Large File - 12.49 MB)
Page 104
... Integration TTL: Through the lens • When [ADI flash] is selected, using more accurate flash compensation by using a lens that is also changed. This method is outside the maximum range of the flash, factoring in the focus distance information and light metering data from the reflection off the subject. Exposure compensation and flash compensation Exposure compensation changes the shutter speed, aperture, and ISO sensitivity (when [AUTO] is very close, the...
... Integration TTL: Through the lens • When [ADI flash] is selected, using more accurate flash compensation by using a lens that is also changed. This method is outside the maximum range of the flash, factoring in the focus distance information and light metering data from the reflection off the subject. Exposure compensation and flash compensation Exposure compensation changes the shutter speed, aperture, and ISO sensitivity (when [AUTO] is very close, the...
Instruction Manual (Large File - 12.49 MB)
Page 116
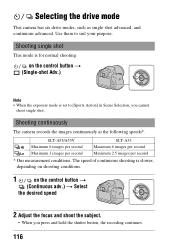
... SLT-A33 Maximum 6 images per second Maximum 6 images per second Maximum 3 images per second Maximum 2.5 images per second * Our measurement conditions. Use them to [Sports Action] in Scene Selection, you press and hold the shutter button, the recording continues. 116 on the control button t (Continuous adv.) t Select the desired speed 2 Adjust the focus and shoot the subject. • When you cannot shoot single shot. Selecting the drive mode This camera...
... SLT-A33 Maximum 6 images per second Maximum 6 images per second Maximum 3 images per second Maximum 2.5 images per second * Our measurement conditions. Use them to [Sports Action] in Scene Selection, you press and hold the shutter button, the recording continues. 116 on the control button t (Continuous adv.) t Select the desired speed 2 Adjust the focus and shoot the subject. • When you cannot shoot single shot. Selecting the drive mode This camera...

Instruction Manual (Large File - 12.49 MB)
Page 143
.... Image: Quality MENU button t setting 1 t [Image: Quality] t Select the desired (RAW) (RAW & JPEG) (Fine) (Standard) File format: RAW (Records using the RAW compression format.) + JPEG A RAW image and a JPEG image are created at the same time. Since the compression rate of (Standard) is higher than that of . Changing your setup 143 This is suitable when you need two image files, a JPEG for viewing, and a RAW for professional purposes. • The image size is set to the maximum size. The image size...
.... Image: Quality MENU button t setting 1 t [Image: Quality] t Select the desired (RAW) (RAW & JPEG) (Fine) (Standard) File format: RAW (Records using the RAW compression format.) + JPEG A RAW image and a JPEG image are created at the same time. Since the compression rate of (Standard) is higher than that of . Changing your setup 143 This is suitable when you need two image files, a JPEG for viewing, and a RAW for professional purposes. • The image size is set to the maximum size. The image size...

Instruction Manual (Large File - 12.49 MB)
Page 148
... the operating manual supplied with the law of the countries/regions where you upload an image that you use a brand-new Eye-Fi card for the first time, copy the install file of EyeFi manager recorded on an airplane. To prevent this product have "Endless Memory Mode" turned off then turn on the power again. Make sure that Eye-Fi cards that was recorded with the Eye-Fi card. • The power save function...
... the operating manual supplied with the law of the countries/regions where you upload an image that you use a brand-new Eye-Fi card for the first time, copy the install file of EyeFi manager recorded on an airplane. To prevent this product have "Endless Memory Mode" turned off then turn on the power again. Make sure that Eye-Fi cards that was recorded with the Eye-Fi card. • The power save function...

Instruction Manual (Large File - 12.49 MB)
Page 153
... too bright. MENU button t 1 t [Viewfinder Bright.] t [Manual] t Select the desired setting Note • When using the camera with the AC-PW20 AC Adaptor (sold separately), the brightness of the viewfinder is always set to the brightest setting even if you select [Auto]. • Set it is set to [Auto], do not cover the light sensor with your setup Setting the LCD monitor/electronic viewfinder Setting the brightness of the LCD monitor The brightness...
... too bright. MENU button t 1 t [Viewfinder Bright.] t [Manual] t Select the desired setting Note • When using the camera with the AC-PW20 AC Adaptor (sold separately), the brightness of the viewfinder is always set to the brightest setting even if you select [Auto]. • Set it is set to [Auto], do not cover the light sensor with your setup Setting the LCD monitor/electronic viewfinder Setting the brightness of the LCD monitor The brightness...

Instruction Manual (Large File - 12.49 MB)
Page 156
... Exposure compensation (101) Recording information display (40) Playback display (121) Drive mode (116) Flash Mode (96) Autofocus Mode (88) AF area (89) Face Detection (93) Smile Shutter (94) ISO (106) Metering Mode (105) Flash Compensation (103) White Balance (112) Color Temp./Color Filter (113) Custom white balance (114) DRO/Auto HDR (107) Creative Style (110) Scene Selection (63) Recording menu Reset to the default You can reset the main functions of the camera. Resetting to ±0.0 Graphic Display Single-image screen (with recording information) Single-shot...
... Exposure compensation (101) Recording information display (40) Playback display (121) Drive mode (116) Flash Mode (96) Autofocus Mode (88) AF area (89) Face Detection (93) Smile Shutter (94) ISO (106) Metering Mode (105) Flash Compensation (103) White Balance (112) Color Temp./Color Filter (113) Custom white balance (114) DRO/Auto HDR (107) Creative Style (110) Scene Selection (63) Recording menu Reset to the default You can reset the main functions of the camera. Resetting to ±0.0 Graphic Display Single-image screen (with recording information) Single-shot...
Instruction Manual (Large File - 12.49 MB)
Page 189
...). Charge the battery pack or use memory card. Memory Card Error • An incompatible memory card is being used the camera for the same amount of recording and playing normally. • The inserted memory card cannot be displayed. Memory card locked. • You are using a memory card with a computer may not be able to complete the format. Warning messages If the following messages appear, follow the instructions below. Power insufficient. • You tried to perform [Cleaning Mode] when the battery level is set...
...). Charge the battery pack or use memory card. Memory Card Error • An incompatible memory card is being used the camera for the same amount of recording and playing normally. • The inserted memory card cannot be displayed. Memory card locked. • You are using a memory card with a computer may not be able to complete the format. Warning messages If the following messages appear, follow the instructions below. Power insufficient. • You tried to perform [Cleaning Mode] when the battery level is set...
Instruction Manual (Large File - 12.49 MB)
Page 201
... Movie File Format 82 Multi segment 105 N New Folder 146 Night Portrait 63 Night View 63 Noise reduction 149 Number of recordable images 32, 33 P PlaybackDisplay 121 PMB 163 PMB Launcher 162 Portrait 63 Power Save 151 Preset white balance 112 Pressing halfway down 60 Preview 74 Print 172 Program auto 71 Protect 131 Q Quality 143 R RAW 143 Rear sync 96 Recording movies 81 Recover Image DB 147 Red eye reduc 98 Reducing camera shake 56 Remote...
... Movie File Format 82 Multi segment 105 N New Folder 146 Night Portrait 63 Night View 63 Noise reduction 149 Number of recordable images 32, 33 P PlaybackDisplay 121 PMB 163 PMB Launcher 162 Portrait 63 Power Save 151 Preset white balance 112 Pressing halfway down 60 Preview 74 Print 172 Program auto 71 Protect 131 Q Quality 143 R RAW 143 Rear sync 96 Recording movies 81 Recover Image DB 147 Red eye reduc 98 Reducing camera shake 56 Remote...


