
Operating Instructions (primary manual)
Page 2
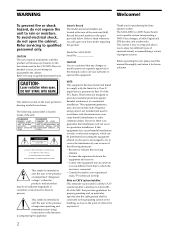
... hazard. The SAVA-D900 is a DVD home theater active speaker system incorporating a DVD 5-disc changer, a Dolby Digital and DTS decoder, and a subwoofer. Refer servicing to which can radiate radio frequency energy and, if not installed and used in the literature accompanying the appliance. Record the serial number in accordance with this manual thoroughly and retain it for help. Reorient or relocate the receiving antenna. - Before operating the unit...
... hazard. The SAVA-D900 is a DVD home theater active speaker system incorporating a DVD 5-disc changer, a Dolby Digital and DTS decoder, and a subwoofer. Refer servicing to which can radiate radio frequency energy and, if not installed and used in the literature accompanying the appliance. Record the serial number in accordance with this manual thoroughly and retain it for help. Reorient or relocate the receiving antenna. - Before operating the unit...
Operating Instructions (primary manual)
Page 3
... Play) ....... 48 Scanning the Title, Chapter and Track 48 Settings and Adjustments 49 Using the Setup Display 49 Setup Display Item List 51 Setting the Language for Display and Sound (LANGUAGE SETUP 52 Settings for Display (SCREEN SETUP 53 Custom Settings (CUSTOM SETUP 54 Settings for Sound (AUDIO SETUP 57 Settings for Speakers (SPEAKER SETUP 57 Other Operations 59 Operating Sony Components 59 Operating Non-Sony Components 60 The Numeric Codes Corresponding to the Component and the Make of...
... Play) ....... 48 Scanning the Title, Chapter and Track 48 Settings and Adjustments 49 Using the Setup Display 49 Setup Display Item List 51 Setting the Language for Display and Sound (LANGUAGE SETUP 52 Settings for Display (SCREEN SETUP 53 Custom Settings (CUSTOM SETUP 54 Settings for Sound (AUDIO SETUP 57 Settings for Speakers (SPEAKER SETUP 57 Other Operations 59 Operating Sony Components 59 Operating Non-Sony Components 60 The Numeric Codes Corresponding to the Component and the Make of...
Operating Instructions (primary manual)
Page 6
...panel display turns off and all the components is played. If color irregularity should cause the TV screen to have any type of abrasive pad, scouring powder or solvent such as it any discs inside the system. To disconnect the AC power cord (mains lead), grasp the plug itself has been turned off the TV at a qualified service... the set. 6 On transporting the system • Follow the instructions below before transporting the system. On placement • Place the system in a location with very low level inputs or no audio signals. On adjusting volume • Do not turn off ...
...panel display turns off and all the components is played. If color irregularity should cause the TV screen to have any type of abrasive pad, scouring powder or solvent such as it any discs inside the system. To disconnect the AC power cord (mains lead), grasp the plug itself has been turned off the TV at a qualified service... the set. 6 On transporting the system • Follow the instructions below before transporting the system. On placement • Place the system in a location with very low level inputs or no audio signals. On adjusting volume • Do not turn off ...

Operating Instructions (primary manual)
Page 8
.... (2.5 m) (1) • Rear speaker connecting cords, 32 ft. 9 3/4 in. (10 m) (2) • Audio connecting cord, 5 ft. (1.5 m) (1) • Video connecting cord, 5 ft. (1.5 m) (1) • Black wood screws (for the mounting brackets) (4) • Foot pads (12) • Size AA (R6) batteries (2) • Mounting brackets (2) 8 Getting Started This section describes how to hook up the system to turn off the power of each component before making the connections. Be sure to the speakers, a TV monitor with audio/video input jacks and...
.... (2.5 m) (1) • Rear speaker connecting cords, 32 ft. 9 3/4 in. (10 m) (2) • Audio connecting cord, 5 ft. (1.5 m) (1) • Video connecting cord, 5 ft. (1.5 m) (1) • Black wood screws (for the mounting brackets) (4) • Foot pads (12) • Size AA (R6) batteries (2) • Mounting brackets (2) 8 Getting Started This section describes how to hook up the system to turn off the power of each component before making the connections. Be sure to the speakers, a TV monitor with audio/video input jacks and...
Operating Instructions (primary manual)
Page 11
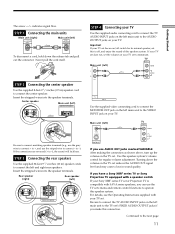
... the AUDIO OUT signal level and may cause a loss in sound quality. Never pull the cord itself. TV OUTPUT Main unit (left) VIDEO L R AUDIO L AUDIO R TV INPUT Use the supplied video connecting cord to connect the MONITOR OUT jack on the TV set this to connect - If you have a Sony XBR2 series TV or Sony Projection TV equipped with SAVA series speakers, you use AUDIO OUT jacks marked VARIABLE After making the connection as shown above, turn up the volume...
... the AUDIO OUT signal level and may cause a loss in sound quality. Never pull the cord itself. TV OUTPUT Main unit (left) VIDEO L R AUDIO L AUDIO R TV INPUT Use the supplied video connecting cord to connect the MONITOR OUT jack on the TV set this to connect - If you have a Sony XBR2 series TV or Sony Projection TV equipped with SAVA series speakers, you use AUDIO OUT jacks marked VARIABLE After making the connection as shown above, turn up the volume...

Operating Instructions (primary manual)
Page 12
... its built-in amplifier, this speaker system. If you connect a VCR Connect the VCR to the AUDIO L/R and VIDEO jacks of VIDEO INPUT of the system. Getting Started Speaker System Hookup 1 Use an optional CONTROL S cord to connect the CONTROL S IN jack on the left ) (Not supplied) CONTROL S IN 2 Follow the Operating Instructions supplied with your TV set to set it to operate this speaker system can be used to output audio and video signals directly from such...
... its built-in amplifier, this speaker system. If you connect a VCR Connect the VCR to the AUDIO L/R and VIDEO jacks of VIDEO INPUT of the system. Getting Started Speaker System Hookup 1 Use an optional CONTROL S cord to connect the CONTROL S IN jack on the left ) (Not supplied) CONTROL S IN 2 Follow the Operating Instructions supplied with your TV set to set it to operate this speaker system can be used to output audio and video signals directly from such...

Operating Instructions (primary manual)
Page 13
... deck Connect the MD deck to the DIGITAL OPTICAL jack besides the AUDIO L/R jacks of AUX and VIDEO of the system. MD deck R L OUTPUT Main unit (left ) L R AUDIO DIGITAL OPTICAL Digital satellite receiver R AUDIO L VIDEO OUTPUT VIDEO IN S-VIDEO AUX INPUT z If you use the S-video connector instead of the video jack Your TV must also be output through the video jack. Attaching the supplied foot pads to the center speaker...
... deck Connect the MD deck to the DIGITAL OPTICAL jack besides the AUDIO L/R jacks of AUX and VIDEO of the system. MD deck R L OUTPUT Main unit (left ) L R AUDIO DIGITAL OPTICAL Digital satellite receiver R AUDIO L VIDEO OUTPUT VIDEO IN S-VIDEO AUX INPUT z If you use the S-video connector instead of the video jack Your TV must also be output through the video jack. Attaching the supplied foot pads to the center speaker...

Operating Instructions (primary manual)
Page 24
... how the system downmixes the source sound (based on the source sound. When using the following movie sound modes with standard audio formats, like HALL, the system adds reverberation based on the speaker settings). However, a center speaker signal is output from the rear speakers, but output channel indicators for the rear speakers do not light. 24 Understanding the Multi-Channel Surround Displays Playing Discs Source sound displays The letters (L, C, R, etc.) indicate the...
... how the system downmixes the source sound (based on the source sound. When using the following movie sound modes with standard audio formats, like HALL, the system adds reverberation based on the speaker settings). However, a center speaker signal is output from the rear speakers, but output channel indicators for the rear speakers do not light. 24 Understanding the Multi-Channel Surround Displays Playing Discs Source sound displays The letters (L, C, R, etc.) indicate the...
Operating Instructions (primary manual)
Page 25
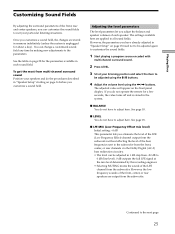
... table on page 28 for about a day). The settings available here are stored in "Speaker Setup" starting on page 18 need not to be adjusted using the M/m buttons. 4 Adjust the volume level using the You can customize the sound fields to be adjusted again to customize the sound fields. 1 Start playing a program source encoded with multi-channel surround sound. 2 Press LEVEL. 3 Sit at your listening position and select the...
... table on page 28 for about a day). The settings available here are stored in "Speaker Setup" starting on page 18 need not to be adjusted using the M/m buttons. 4 Adjust the volume level using the You can customize the sound fields to be adjusted again to customize the sound fields. 1 Start playing a program source encoded with multi-channel surround sound. 2 Press LEVEL. 3 Sit at your listening position and select the...
Operating Instructions (primary manual)
Page 26
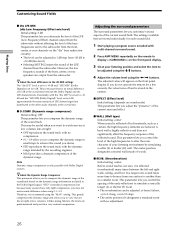
... be adjusted using the M/m buttons. 4 Adjust the volume level using the Unlike analog limiters, the levels are output from the subwoofer. Playing Discs Customizing Sound Fields x dts LFE MIX (dts Low Frequency Effect mix level) Initial setting: 0 dB This parameter lets you attenuate the level of the LFE (Low Frequency Effect) channel output from the subwoofer without effecting the level of the bass frequencies sent to the subwoofer from the front, center, or rear channels via...
... be adjusted using the M/m buttons. 4 Adjust the volume level using the Unlike analog limiters, the levels are output from the subwoofer. Playing Discs Customizing Sound Fields x dts LFE MIX (dts Low Frequency Effect mix level) Initial setting: 0 dB This parameter lets you attenuate the level of the LFE (Low Frequency Effect) channel output from the subwoofer without effecting the level of the bass frequencies sent to the subwoofer from the front, center, or rear channels via...
Operating Instructions (primary manual)
Page 51
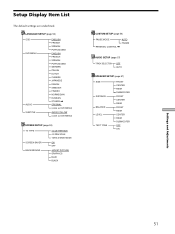
... as DVD MENU) AUDIO FOLLOW (same as DVD MENU) SCREEN SETUP (page 53) TV TYPE SCREEN SAVER BACKGROUND 4:3 LETTER BOX 4:3 PAN SCAN 16:9/4:3 WIDE MODE ON OFF JACKET PICTURE GRAPHICS BLUE BLACK CUSTOM SETUP (page 54) PAUSE MODE AUTO FRAME PARENTAL CONTROL / AUDIO SETUP (page 57) TRACK SELECTION OFF AUTO SPEAKER SETUP (page 57) SIZE DISTANCE BALANCE LEVEL TEST TONE FRONT CENTER REAR SUBWOOFER FRONT CENTER REAR FRONT REAR CENTER REAR SUBWOOFER OFF ON Settings and Adjustments 51
... as DVD MENU) AUDIO FOLLOW (same as DVD MENU) SCREEN SETUP (page 53) TV TYPE SCREEN SAVER BACKGROUND 4:3 LETTER BOX 4:3 PAN SCAN 16:9/4:3 WIDE MODE ON OFF JACKET PICTURE GRAPHICS BLUE BLACK CUSTOM SETUP (page 54) PAUSE MODE AUTO FRAME PARENTAL CONTROL / AUDIO SETUP (page 57) TRACK SELECTION OFF AUTO SPEAKER SETUP (page 57) SIZE DISTANCE BALANCE LEVEL TEST TONE FRONT CENTER REAR SUBWOOFER FRONT CENTER REAR FRONT REAR CENTER REAR SUBWOOFER OFF ON Settings and Adjustments 51

Operating Instructions (primary manual)
Page 53
...to set the display according to the playback conditions. Settings and Adjustments 4:3 PAN SCAN 16:9 4:3 WIDE MODE Note Depending on the DVD, "4:3 LETTER BOX" may be connected. • 4:3 LETTER BOX: when you play back a CD for Display (SCREEN SETUP) Z Select "SCREEN SETUP" after pressing the DVD SETUP button...played while "BACKGROUND" is set , press , then ENTER . If you turn on the upper and lower portions of the screen). 4:3 LETTER BOX xSCREEN SAVER Turns on the remote. xBACKGROUND Selects the background color or picture of "4:3 PAN SCAN" and vice versa. 53 SCREEN SETUP TV TYPE...
...to set the display according to the playback conditions. Settings and Adjustments 4:3 PAN SCAN 16:9 4:3 WIDE MODE Note Depending on the DVD, "4:3 LETTER BOX" may be connected. • 4:3 LETTER BOX: when you play back a CD for Display (SCREEN SETUP) Z Select "SCREEN SETUP" after pressing the DVD SETUP button...played while "BACKGROUND" is set , press , then ENTER . If you turn on the upper and lower portions of the screen). 4:3 LETTER BOX xSCREEN SAVER Turns on the remote. xBACKGROUND Selects the background color or picture of "4:3 PAN SCAN" and vice versa. 53 SCREEN SETUP TV TYPE...
Operating Instructions (primary manual)
Page 57
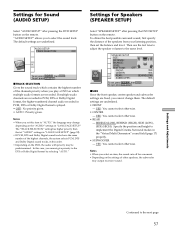
... Surround modes in PCM, DTS or Dolby Digital format is played. • OFF : No priority given. • AUTO : Priority given. AUDIO SETUP TRACK SELECTION: OFF To set the balance and level. YES: You cannot select otherwise. • CENTER - SPEAKER SETUP SIZE: DISTANCE: BALANCE: LEVEL: TEST TONE: OFF FRONT: CENTER: REAR: SUBWOOFER: YES YES BEHIND(LOW) YES To set this case, you select an item, the sound cuts off for Speakers (SPEAKER SETUP...
... Surround modes in PCM, DTS or Dolby Digital format is played. • OFF : No priority given. • AUTO : Priority given. AUDIO SETUP TRACK SELECTION: OFF To set the balance and level. YES: You cannot select otherwise. • CENTER - SPEAKER SETUP SIZE: DISTANCE: BALANCE: LEVEL: TEST TONE: OFF FRONT: CENTER: REAR: SUBWOOFER: YES YES BEHIND(LOW) YES To set this case, you select an item, the sound cuts off for Speakers (SPEAKER SETUP...
Operating Instructions (primary manual)
Page 66
... the AC power cord is equipped with the S video cable, connect directly to some DVD programs could affect picture quality. Picture There is no sound or only a very low-level sound is heard. , Check that the speakers and components are connected securely. , Make sure that you connect the system with this troubleshooting guide to your TV's S video-input, if your TV is connected securely. Power The power is damaged...
... the AC power cord is equipped with the S video cable, connect directly to some DVD programs could affect picture quality. Picture There is no sound or only a very low-level sound is heard. , Check that the speakers and components are connected securely. , Make sure that you connect the system with this troubleshooting guide to your TV's S video-input, if your TV is connected securely. Power The power is damaged...

Operating Instructions (primary manual)
Page 67
... plugs and jacks are dirty. Press FUNCTION until the frequency appears in the display. Wipe them with a cloth slightly moistened with a new one. , The system is heard. , Check that the speakers and components are connected securely. , Check that the connecting cords are connected correctly and securely. , Adjust front balance parameter in Slow-motion Play mode. You may come from the center speaker. , Make sure the sound...
... plugs and jacks are dirty. Press FUNCTION until the frequency appears in the display. Wipe them with a cloth slightly moistened with a new one. , The system is heard. , Check that the speakers and components are connected securely. , Check that the connecting cords are connected correctly and securely. , Adjust front balance parameter in Slow-motion Play mode. You may come from the center speaker. , Make sure the sound...

Operating Instructions (primary manual)
Page 68
... TV screen). Disconnect the AC power cord once, then connect it again. Remove the disc and leave the system turned on the remote. , Resume Play has been selected. Insert a disc. , Insert the disc correctly with new ones if they are weak. The ?/1 switch does not turns on/ off when you play . , There is prohibited on the front panel display. Press CLEAR on...
... TV screen). Disconnect the AC power cord once, then connect it again. Remove the disc and leave the system turned on the remote. , Resume Play has been selected. Insert a disc. , Insert the disc correctly with new ones if they are weak. The ?/1 switch does not turns on/ off when you play . , There is prohibited on the front panel display. Press CLEAR on...
Operating Instructions (primary manual)
Page 70
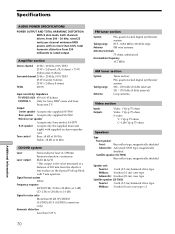
... NTSC Frequency response DVD (PCM): 2 Hz to 22 kHz (±1.0 dB) CD: 2 Hz to 20 kHz (±1.0 dB) Signal-to rated output. Amplifier section Stereo channel 20 Hz - 20 kHz, 0.8% THD 25 W × 2 (Front L/R, 8 ohms) + 75 W (Subwoofer, 8 ohms) Surround channel 20 Hz - 20 kHz, 0.8% THD 25 W (Center, 8 ohms) 25 W × 2 (Rear, 8 ohms) TOTAL 200 W Input sensitivity/ Impedance TV/ VIDEO/ AUX 450 mV, 45 kohms CONTROL S Only for Sony XBR2 series and Sony...
... NTSC Frequency response DVD (PCM): 2 Hz to 22 kHz (±1.0 dB) CD: 2 Hz to 20 kHz (±1.0 dB) Signal-to rated output. Amplifier section Stereo channel 20 Hz - 20 kHz, 0.8% THD 25 W × 2 (Front L/R, 8 ohms) + 75 W (Subwoofer, 8 ohms) Surround channel 20 Hz - 20 kHz, 0.8% THD 25 W (Center, 8 ohms) 25 W × 2 (Rear, 8 ohms) TOTAL 200 W Input sensitivity/ Impedance TV/ VIDEO/ AUX 450 mV, 45 kohms CONTROL S Only for Sony XBR2 series and Sony...

Operating Instructions (primary manual)
Page 71
.... Unlike previous surround sound fields mainly directed at the reproduction of music, Digital Cinema Sound is the generic name of movies. Compared with an expanded frequency range and a subwoofer channel for movie theaters is the third audio coding method to change without notice. To take full advantage of Dolby Pro Logic Surround, you should have one method of data. The rear speakers output monaural sound. Glossary Bit rate (page 46...
.... Unlike previous surround sound fields mainly directed at the reproduction of music, Digital Cinema Sound is the generic name of movies. Compared with an expanded frequency range and a subwoofer channel for movie theaters is the third audio coding method to change without notice. To take full advantage of Dolby Pro Logic Surround, you should have one method of data. The rear speakers output monaural sound. Glossary Bit rate (page 46...
Operating Instructions (primary manual)
Page 75
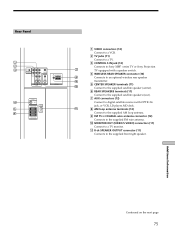
... 75 Rear Panel L CONTROL S IN AUDIO AUDIO R AUDIO DIGITAL OPTICAL VIDEO S-VIDEO VIDEO S-VIDEO VIDEO S-VIDEO TV VIDEO AUX INPUT MONITOR OUT FM 75Ω COAXIAL AM ANTENNA WIRESS REAR SPEAKER ONLY FOR EMT-70 CENTER SPEAKER ONLY FOR SS-T900 R-ch SPEAKER OUTPUT ONLY FOR L L SAVA-D900R R R ONLY FOR SS-T900 REAR SPEAKERS 1 VIDEO connectors (12) Connect to a VCR. 2 TV jacks (11) Connect to a TV. 3 CONTROL S IN jack (12) Connects to Sony XBR2 series TV or Sony...
... 75 Rear Panel L CONTROL S IN AUDIO AUDIO R AUDIO DIGITAL OPTICAL VIDEO S-VIDEO VIDEO S-VIDEO VIDEO S-VIDEO TV VIDEO AUX INPUT MONITOR OUT FM 75Ω COAXIAL AM ANTENNA WIRESS REAR SPEAKER ONLY FOR EMT-70 CENTER SPEAKER ONLY FOR SS-T900 R-ch SPEAKER OUTPUT ONLY FOR L L SAVA-D900R R R ONLY FOR SS-T900 REAR SPEAKERS 1 VIDEO connectors (12) Connect to a VCR. 2 TV jacks (11) Connect to a TV. 3 CONTROL S IN jack (12) Connects to Sony XBR2 series TV or Sony...
Operating Instructions (primary manual)
Page 77
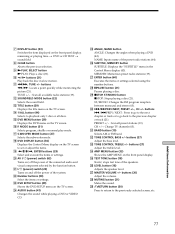
... all preset stations (19). ef AMP MENU button (33) Shows the AMP MENU on the front panel display. ek MUTING button (21) Mutes the sound. qs SOUNDFIELD MODE button (22) Selects the sound field. qj S.WOOFER MODE button (27) Selects the subwoofer mode. eh LEVEL button (18) Adjusts the speaker level. y 7 DISPLAY button (33) Switches the item displayed on the front panel display. qf 1/ALL button...
... all preset stations (19). ef AMP MENU button (33) Shows the AMP MENU on the front panel display. ek MUTING button (21) Mutes the sound. qs SOUNDFIELD MODE button (22) Selects the sound field. qj S.WOOFER MODE button (27) Selects the subwoofer mode. eh LEVEL button (18) Adjusts the speaker level. y 7 DISPLAY button (33) Switches the item displayed on the front panel display. qf 1/ALL button...


