
Operating Instructions
Page 2
... time, remove the batteries to replace batteries Under normal conditions, the batteries should last for model RM-LJ304. z When to avoid possible damage from battery leakage and corrosion. 2 Before You Use Your Remote Check that you have it checked by looking at the remote sensor on the receiver. ] }] } } ] About This Manual The instructions in an extremely hot or humid place. • Do not use the remote for making...
... time, remove the batteries to replace batteries Under normal conditions, the batteries should last for model RM-LJ304. z When to avoid possible damage from battery leakage and corrosion. 2 Before You Use Your Remote Check that you have it checked by looking at the remote sensor on the receiver. ] }] } } ] About This Manual The instructions in an extremely hot or humid place. • Do not use the remote for making...
Operating Instructions
Page 3
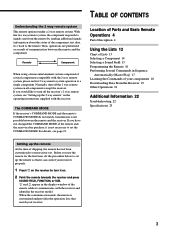
... like to turn it communicates with the receiver. Location of Parts and Basic Remote Operations 4 Parts Description 4 Using the Lists 12 Chart of Lists 13 Selecting a Component 14 Selecting a Sound Field 15 Programming the Remote 16 Performing Several Commands in Sequence Automatically (Macro Play) 17 Learning the Commands of your components 18 Downloading Data From the Receiver 19 Other Operations 21 Additional Information 22 Troubleshooting 22 Specifications 23 Setting up the remote so that...
... like to turn it communicates with the receiver. Location of Parts and Basic Remote Operations 4 Parts Description 4 Using the Lists 12 Chart of Lists 13 Selecting a Component 14 Selecting a Sound Field 15 Programming the Remote 16 Performing Several Commands in Sequence Automatically (Macro Play) 17 Learning the Commands of your components 18 Downloading Data From the Receiver 19 Other Operations 21 Additional Information 22 Troubleshooting 22 Specifications 23 Setting up the remote so that...

Operating Instructions
Page 5
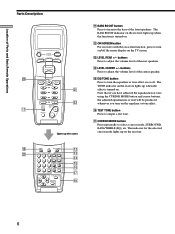
.... 8 SET UP button Press to display the set up when the sound is programmed to operate. buttons Press to adjust the volume level of all speakers at the same time, it will turn off the components that you turn on the receiver, make sure that the remote is muted. 7 FUNCTION button Press to display the sound field list. See the table on page 9 for information on the buttons you can use to control each time...
.... 8 SET UP button Press to display the set up when the sound is programmed to operate. buttons Press to adjust the volume level of all speakers at the same time, it will turn off the components that you turn on the receiver, make sure that the remote is muted. 7 FUNCTION button Press to display the sound field list. See the table on page 9 for information on the buttons you can use to control each time...
Operating Instructions
Page 6
...), etc. Note that if you have adjusted the equalization or tone using the CURSOR MODE button and cursor buttons, the adjusted equalization or tone will be produced whenever you turn on/off the menu display on or off. qa AV ?/1 SYSTEM STANDBY SOUND FIELD FUNCTION ?/1 SET UP PUSH ENTER h SUB H X x . > m M CH/PRESET/D.SKIP - + BASS BOOST MASTER VOL + MUTING - qk w; wa ws v Open...
...), etc. Note that if you have adjusted the equalization or tone using the CURSOR MODE button and cursor buttons, the adjusted equalization or tone will be produced whenever you turn on/off the menu display on or off. qa AV ?/1 SYSTEM STANDBY SOUND FIELD FUNCTION ?/1 SET UP PUSH ENTER h SUB H X x . > m M CH/PRESET/D.SKIP - + BASS BOOST MASTER VOL + MUTING - qk w; wa ws v Open...
Operating Instructions
Page 7
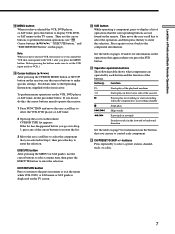
... receiver, use to control each button and the function of the buttons. Note When you have selected the VCR, DVD player, or SAT tuner, press this button to display VCR, DVD, or SAT menu on the TV screen. buttons Press repeatedly to enter the selection. ql Cursor buttons (V/v/B/b) After pressing the CURSOR MODE button or SET UP button on to Step 3, press any of the cursor buttons to restore the list. 3 Move the easy scroll key to select the component...
... receiver, use to control each button and the function of the buttons. Note When you have selected the VCR, DVD player, or SAT tuner, press this button to display VCR, DVD, or SAT menu on the TV screen. buttons Press repeatedly to enter the selection. ql Cursor buttons (V/v/B/b) After pressing the CURSOR MODE button or SET UP button on to Step 3, press any of the cursor buttons to restore the list. 3 Move the easy scroll key to select the component...

Operating Instructions
Page 8
... presetting radio stations or tuning to the operation manual supplied with the respective components. On some components, pressing 0 selects 10. wg wf wd MENU SUB ON SCREEN 1 4 7 SHIFT >10 - / -- LEVEL 2 3 + + REAR CENTER 5 6 - - If you selected VCR, TV, tape deck, LD player, video CD player, MD deck, or CD player: Press before inputting a channel, disc, or track number of Parts and Basic Remote Operations Parts Description AV ?/1 SYSTEM STANDBY SOUND FIELD FUNCTION ?/1 SET UP PUSH ENTER...
... presetting radio stations or tuning to the operation manual supplied with the respective components. On some components, pressing 0 selects 10. wg wf wd MENU SUB ON SCREEN 1 4 7 SHIFT >10 - / -- LEVEL 2 3 + + REAR CENTER 5 6 - - If you selected VCR, TV, tape deck, LD player, video CD player, MD deck, or CD player: Press before inputting a channel, disc, or track number of Parts and Basic Remote Operations Parts Description AV ?/1 SYSTEM STANDBY SOUND FIELD FUNCTION ?/1 SET UP PUSH ENTER...

Operating Instructions
Page 9
...VCR Satellite DVD LD TV Cable Tuner Video CD CD MD DAT Tape Projector tuner player player box player player deck deck deck (A and B) z z z z z z z z z z z z z z z z z z z z z z z H z z z z z z z z X z z z z z z z z x z ./> z z z z z z z z z z z z z z z2) m/M z z z z z z z z CH z z z z PRESET z D.SKIP +/- 3) z z z z Cursor buttons z z z z MENU z z z Numeric buttons z z z z z z z z z z z SHIFT z >10 z z z z z z -/-- Note, however, that are marked with circles. z D.TUNING z ENTER...
...VCR Satellite DVD LD TV Cable Tuner Video CD CD MD DAT Tape Projector tuner player player box player player deck deck deck (A and B) z z z z z z z z z z z z z z z z z z z z z z z H z z z z z z z z X z z z z z z z z x z ./> z z z z z z z z z z z z z z z2) m/M z z z z z z z z CH z z z z PRESET z D.SKIP +/- 3) z z z z Cursor buttons z z z z MENU z z z Numeric buttons z z z z z z z z z z z SHIFT z >10 z z z z z z -/-- Note, however, that are marked with circles. z D.TUNING z ENTER...

Operating Instructions
Page 10
... - Parts Description Location of Parts and Basic Remote Operations Table of operations that appear when you press the SUB button Press the SUB button to display a list of operations that the corresponding buttons are not found on the TV screen Changes the input mode of the TV Activates the picture-in each item. For details on the menu operation, see "To perform title and set up menu. Changes the input mode of the VCR ANT TV/VTR...
... - Parts Description Location of Parts and Basic Remote Operations Table of operations that appear when you press the SUB button Press the SUB button to display a list of operations that the corresponding buttons are not found on the TV screen Changes the input mode of the TV Activates the picture-in each item. For details on the menu operation, see "To perform title and set up menu. Changes the input mode of the VCR ANT TV/VTR...

Operating Instructions
Page 11
... list, then press the key to enter the selection. 5 Use the cursor buttons and the EXECUTE button to control non-Sony components, note the following: - For details, see "qk MENU button" on the remote. 2 Press SUB. 3 Move the easy scroll key to select "TITLE" or "SET UP", then press the key to SUB1 through SUB5 Select when you select a component. - b) Only with Sony TVs with the picture-in the program...
... list, then press the key to enter the selection. 5 Use the cursor buttons and the EXECUTE button to control non-Sony components, note the following: - For details, see "qk MENU button" on the remote. 2 Press SUB. 3 Move the easy scroll key to select "TITLE" or "SET UP", then press the key to SUB1 through SUB5 Select when you select a component. - b) Only with Sony TVs with the picture-in the program...
Operating Instructions
Page 13
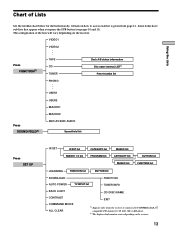
... USER2 MACRO1 Press SOUND FIELD2) MACRO2 2ND AV/2ND AUDIO Sound field list Press SET UP IR SET IR SET list MACRO 1/2 list CATEGORY list PROGRAM list MAKER list CATEGORY list MAKER list BUTTON list FUNCTION list LEARNING FUNCTION list BUTTON list DOWNLOAD FUNCTION AUTO POWER TV INPUT list TUNER INFO BACK LIGHT CONTRAST COMMAND MODE ALL CLEAR CD DISC NAME EXIT 1) Appears only when the receiver is connected to access each list is given from page 14. Details on how to CONTROL A1/A1 compatible CD changer (5, 50...
... USER2 MACRO1 Press SOUND FIELD2) MACRO2 2ND AV/2ND AUDIO Sound field list Press SET UP IR SET IR SET list MACRO 1/2 list CATEGORY list PROGRAM list MAKER list CATEGORY list MAKER list BUTTON list FUNCTION list LEARNING FUNCTION list BUTTON list DOWNLOAD FUNCTION AUTO POWER TV INPUT list TUNER INFO BACK LIGHT CONTRAST COMMAND MODE ALL CLEAR CD DISC NAME EXIT 1) Appears only when the receiver is connected to access each list is given from page 14. Details on how to CONTROL A1/A1 compatible CD changer (5, 50...

Operating Instructions
Page 14
... changed the contents of the preset station memory of the disc name, track number, and track name tape deck, CD player, or MD deck The current deck operation (N, X or x) to a preset station. The preset station list appears. 2 Move the easy scroll key to select the preset station, then press the key to the jacks on the receiver. The current status of the component...
... changed the contents of the preset station memory of the disc name, track number, and track name tape deck, CD player, or MD deck The current deck operation (N, X or x) to a preset station. The preset station list appears. 2 Move the easy scroll key to select the preset station, then press the key to the jacks on the receiver. The current status of the component...

Operating Instructions
Page 15
... the model. 15 Selecting a Sound Field Do the procedure below to select either "2CH STEREO" or "A.F.D." in the sound field list in each time you selected the tape deck Move the easy scroll key to control a non-Sony tape deck, the following may not be displayed. Using the Lists If you press the easy scroll key, etc. Note Depending on the receiver. 1 Press SOUND FIELD. A display...
... the model. 15 Selecting a Sound Field Do the procedure below to select either "2CH STEREO" or "A.F.D." in the sound field list in each time you selected the tape deck Move the easy scroll key to control a non-Sony tape deck, the following may not be displayed. Using the Lists If you press the easy scroll key, etc. Note Depending on the receiver. 1 Press SOUND FIELD. A display...
Operating Instructions
Page 16
... cancel programming Move the easy scroll key to select "EXIT" from the IR SET list, or "CANCEL" from Step 3 in this case, "LD"), then press the key to control Sony component Select "Sony." Note If you begin note that button will be changed to control non-Sony components and also Sony components that the remote is used in which a Kenwood LD player is connected to enter the selection. Furthermore, if the cleared learned button...
... cancel programming Move the easy scroll key to select "EXIT" from the IR SET list, or "CANCEL" from Step 3 in this case, "LD"), then press the key to control Sony component Select "Sony." Note If you begin note that button will be changed to control non-Sony components and also Sony components that the remote is used in which a Kenwood LD player is connected to enter the selection. Furthermore, if the cleared learned button...

Operating Instructions
Page 17
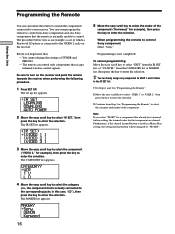
... button directly, instead of the learned codes. IR SET LEARNING DOWNLOAD AUTO POWER 2 Move the easy scroll key to select "IR SET," then press the key to enter selection. The FUNCTION list appears. To use learned codes under the Macro Play function Move the easy scroll key to select "Button" in step 4, then press the key to enter the selection. This allows you to specify a 1 to enter the selection. The set up to 8 IR codes for the operation...
... button directly, instead of the learned codes. IR SET LEARNING DOWNLOAD AUTO POWER 2 Move the easy scroll key to select "IR SET," then press the key to enter selection. The FUNCTION list appears. To use learned codes under the Macro Play function Move the easy scroll key to select "Button" in step 4, then press the key to enter the selection. This allows you to specify a 1 to enter the selection. The set up to 8 IR codes for the operation...

Operating Instructions
Page 18
... ENTER SUB CH/PRESET/D.SKIP MUTING - The function list appears. The function list appears. [VIDEO 1 ] [VIDEO 2 ] [VIDEO 3 ] 2 Move the easy scroll key to select the function you want to use for this commander to enter the selection. Using the Lists Performing Several Commands in Sequence Automatically (Macro Play) z In step 6, when "*" is displayed in front of the following buttons during a macro play operation will be changed to be learned. SOUND FIELD - The button list appears. The codes...
... ENTER SUB CH/PRESET/D.SKIP MUTING - The function list appears. The function list appears. [VIDEO 1 ] [VIDEO 2 ] [VIDEO 3 ] 2 Move the easy scroll key to select the function you want to use for this commander to enter the selection. Using the Lists Performing Several Commands in Sequence Automatically (Macro Play) z In step 6, when "*" is displayed in front of the following buttons during a macro play operation will be changed to be learned. SOUND FIELD - The button list appears. The codes...

Operating Instructions
Page 19
... button will jump to learn that component are displayed. Using a command that has been learned When selecting a learned function, press the button used to the same button. The remote can program up list appears. 2 Move the easy scroll key to select "DOWNLOAD," then press the key to enter the selection. 6 Press the appropriate button on the remote control to turn on the display window. Furthermore, if the cleared learned button is displayed. Be sure to send the remote control code. FUNCTION...
... button will jump to learn that component are displayed. Using a command that has been learned When selecting a learned function, press the button used to the same button. The remote can program up list appears. 2 Move the easy scroll key to select "DOWNLOAD," then press the key to enter the selection. 6 Press the appropriate button on the remote control to turn on the display window. Furthermore, if the cleared learned button is displayed. Be sure to send the remote control code. FUNCTION...

Operating Instructions
Page 20
... SET list to match the corresponding player's COMMAND MODE selector position (see page 16). The SORT menu appears in conjunction with Sony CD players Program the remote to "CD 1" or "CD 2". When COMMAND MODE is completed, set the category setting of the CONTROL A1/A1 -compatible CD player to "CD2" and set to control the non-Sony CD player (see page 16). When multiple CONTROL A1/A1 -compatible Sony CD players are connected to the receiver Set the COMMAND MODE...
... SET list to match the corresponding player's COMMAND MODE selector position (see page 16). The SORT menu appears in conjunction with Sony CD players Program the remote to "CD 1" or "CD 2". When COMMAND MODE is completed, set the category setting of the CONTROL A1/A1 -compatible CD player to "CD2" and set to control the non-Sony CD player (see page 16). When multiple CONTROL A1/A1 -compatible Sony CD players are connected to the receiver Set the COMMAND MODE...

Operating Instructions
Page 21
... "AUTO POWER", then press the key to the selected input mode. Other Operations Using the Lists Using the auto power function With the auto power function turned on all Sony TVs. The AUTO POWER list appears . TV-VIDEO1 TV-VIDEO2 TV-VIDEO3 Note Switching to VIDEO 1~4 input may not be automatic on , the commander sends numerous codes to turn on . If you do the procedure below to the appropriate Sony AV components when you have done IR setting turn off Each time you press a button...
... "AUTO POWER", then press the key to the selected input mode. Other Operations Using the Lists Using the auto power function With the auto power function turned on all Sony TVs. The AUTO POWER list appears . TV-VIDEO1 TV-VIDEO2 TV-VIDEO3 Note Switching to VIDEO 1~4 input may not be automatic on , the commander sends numerous codes to turn on . If you do the procedure below to the appropriate Sony AV components when you have done IR setting turn off Each time you press a button...

Operating Instructions
Page 22
... error has occurred. The SOUND FIELD button does not work. , If the receiver has the 5.1CH (/DVD) INPUT jacks, the SOUND FIELD button becomes inoperable whenever you operate a programmed non-Sony component, the remote may not function properly depending on the model and the make of the remote. , The batteries are weak. / If the receiver's COMMAND MODE and the remote's COMMAND MODE do not correspond to the receiver via CONTROL A1/A1 jacks, Auto Function does not work properly. , Reprogram the remote...
... error has occurred. The SOUND FIELD button does not work. , If the receiver has the 5.1CH (/DVD) INPUT jacks, the SOUND FIELD button becomes inoperable whenever you operate a programmed non-Sony component, the remote may not function properly depending on the model and the make of the remote. , The batteries are weak. / If the receiver's COMMAND MODE and the remote's COMMAND MODE do not correspond to the receiver via CONTROL A1/A1 jacks, Auto Function does not work properly. , Reprogram the remote...

Operating Instructions
Page 23
Additional Information 23 Specifications General Remote control system Infrared control Power requirements 4.5 V DC with three LR6 (sizeAA) alkaline batteries Dimensions 175 × 62 × 33 mm Mass (approx.) 135 g excluding batteries Design and specifications are subject to change without notice.
Additional Information 23 Specifications General Remote control system Infrared control Power requirements 4.5 V DC with three LR6 (sizeAA) alkaline batteries Dimensions 175 × 62 × 33 mm Mass (approx.) 135 g excluding batteries Design and specifications are subject to change without notice.


