Operating Instructions (primary manual)
Page 3
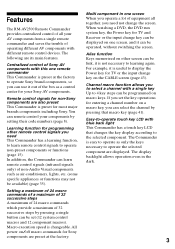
Features The RM-AV2500 Remote Commander provides centralized control of all together, you need This Commander has a learning function, to learn remote control signals (infrared signals only) of non-Audio Visual components such as a control center for TV and Receiver ... a single remote commander and saves the trouble of 32 successive steps by setting their code numbers (page 8). Channel macro function allows you to the selected component. Macro execution speed is preset for Sony components are also preset This Commander is changeable. All power on/off macro commands for most...
Features The RM-AV2500 Remote Commander provides centralized control of all together, you need This Commander has a learning function, to learn remote control signals (infrared signals only) of non-Audio Visual components such as a control center for TV and Receiver ... a single remote commander and saves the trouble of 32 successive steps by setting their code numbers (page 8). Channel macro function allows you to the selected component. Macro execution speed is preset for Sony components are also preset This Commander is changeable. All power on/off macro commands for most...
Operating Instructions (primary manual)
Page 4
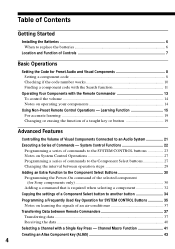
... ...40 Selecting a Channel with the Remote Commander 13 To control the volume ...14 Notes on operating your components 14 Using Non-Preset Remote Control Operations - Table of Contents Getting Started Installing the Batteries ...6 When to replace the batteries 6 Location and Function of Controls 7 Basic Operations Setting the Code for SYSTEM CONTROL Buttons 35 Notes...
... ...40 Selecting a Channel with the Remote Commander 13 To control the volume ...14 Notes on operating your components 14 Using Non-Preset Remote Control Operations - Table of Contents Getting Started Installing the Batteries ...6 When to replace the batteries 6 Location and Function of Controls 7 Basic Operations Setting the Code for SYSTEM CONTROL Buttons 35 Notes...
Operating Instructions (primary manual)
Page 6
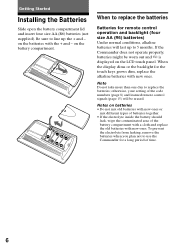
...you plan not to line up to 5 months. Be sure to use the Commander for a long period of the code numbers (page 8) and learned remote control signals (page 15) will last up the + and - If the Commander does not operate properly, batteries might be erased. When the display dims or... the backlight for remote control operation and backlight (four size AA (R6) batteries) Under ...
...you plan not to line up to 5 months. Be sure to use the Commander for a long period of the code numbers (page 8) and learned remote control signals (page 15) will last up the + and - If the Commander does not operate properly, batteries might be erased. When the display dims or... the backlight for remote control operation and backlight (four size AA (R6) batteries) Under ...
Operating Instructions (primary manual)
Page 8
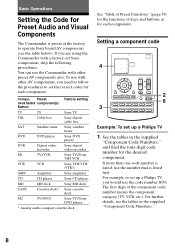
...Philips TV, you would use the Commander with other AV components, you are using the Commander with other preset AV components also. Basic Operations Setting the Code for Preset Audio and Visual Components The Commander is preset at the factory to operate Sony brand AV components (see the ...tables in the supplied "Component Code Numbers," and find the four-digit code number for the desired component. Preset ...
...Philips TV, you would use the Commander with other AV components, you are using the Commander with other preset AV components also. Basic Operations Setting the Code for Preset Audio and Visual Components The Commander is preset at the factory to operate Sony brand AV components (see the ...tables in the supplied "Component Code Numbers," and find the four-digit code number for the desired component. Preset ...

Operating Instructions (primary manual)
Page 9
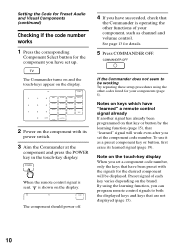
..., etc.). Continued 9 Notes • If you do not input anything into the Commander for the desired component. The component corresponding to 5. A beep sounds, and the code number and "ENTER" appear twice. The code number and "ENTER" appear twice. The selected component remains displayed, and the 0... 9, ENTER and DISPLAY keys flash. 4 Press the four-digit component code number followed by the ENTER key on the table in Step 4. To set a code for another component, repeat Steps 3 and 4. 6 Press COMMANDER OFF. 3 Press the Component Select button for over two minutes between each...
..., etc.). Continued 9 Notes • If you do not input anything into the Commander for the desired component. The component corresponding to 5. A beep sounds, and the code number and "ENTER" appear twice. The code number and "ENTER" appear twice. The selected component remains displayed, and the 0... 9, ENTER and DISPLAY keys flash. 4 Press the four-digit component code number followed by the ENTER key on the table in Step 4. To set a code for another component, repeat Steps 3 and 4. 6 Press COMMANDER OFF. 3 Press the Component Select button for over two minutes between each...
Operating Instructions (primary manual)
Page 10
.... See page 13 for the desired component will work even after you set the component code number. If the Commander does not seem to be working Try repeating these setup procedures using the learning function, you can program remote control signals to both the displayed keys and keys that "learned" signal will be...
.... See page 13 for the desired component will work even after you set the component code number. If the Commander does not seem to be working Try repeating these setup procedures using the learning function, you can program remote control signals to both the displayed keys and keys that "learned" signal will be...
Operating Instructions (primary manual)
Page 11
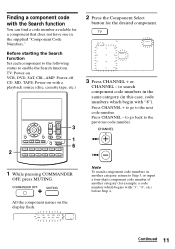
... or input a four-digit component code number of another category (for example, a code number which begin with a playback source (disc, cassette tape, etc.) 2 VOLUME CHANNEL OK MENU EXIT SYSTEM CONTROL A B C MORE MUTING RECALL LIGHT COMMANDER OFF TV CBL SAT DVR VCR M1...CHANNEL - Before starting the Search function Set each component to the following status to search component code numbers in the same category (in another category, return to the previous code number. 1 While pressing COMMANDER OFF, press MUTING. to enable the Search function. Continued 11
... or input a four-digit component code number of another category (for example, a code number which begin with a playback source (disc, cassette tape, etc.) 2 VOLUME CHANNEL OK MENU EXIT SYSTEM CONTROL A B C MORE MUTING RECALL LIGHT COMMANDER OFF TV CBL SAT DVR VCR M1...CHANNEL - Before starting the Search function Set each component to the following status to search component code numbers in the same category (in another category, return to the previous code number. 1 While pressing COMMANDER OFF, press MUTING. to enable the Search function. Continued 11
Operating Instructions (primary manual)
Page 12
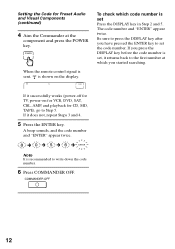
.... If it does not, repeat Steps 3 and 4. 5 Press the ENTER key. To check which you started searching. Setting the Code for CD, MD, TAPE), go to Step 5. When the remote control signal is sent, is shown on for VCR, DVD, SAT, CBL, AMP, and playback for Preset Audio and Visual Components... (continued) 4 Aim the Commander at which code number is recommended to set Press the DISPLAY key in Step 2 and 5. Note It is...
.... If it does not, repeat Steps 3 and 4. 5 Press the ENTER key. To check which you started searching. Setting the Code for CD, MD, TAPE), go to Step 5. When the remote control signal is sent, is shown on for VCR, DVD, SAT, CBL, AMP, and playback for Preset Audio and Visual Components... (continued) 4 Aim the Commander at which code number is recommended to set Press the DISPLAY key in Step 2 and 5. Note It is...
Operating Instructions (primary manual)
Page 13
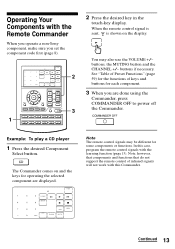
... may be different for each component. 3 When you set the component code first (page 8). 2 3 1 2 Press the desired key in the touch-key display. In this case, program the remote control signals with this Commander. Operating Your Components with the Remote Commander When you operate a non-Sony component, make sure you are displayed. Note, however, that components...
... may be different for each component. 3 When you set the component code first (page 8). 2 3 1 2 Press the desired key in the touch-key display. In this case, program the remote control signals with this Commander. Operating Your Components with the Remote Commander When you operate a non-Sony component, make sure you are displayed. Note, however, that components...
Operating Instructions (primary manual)
Page 14
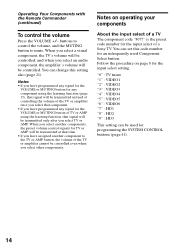
... other components. You can change this code number for TV or AMP will be transmitted at that component. • If you select another component to mute. You can set this setting also (page 21). Operating Your Components with the Remote Commander (continued) To control the volume Press... the VOLUME +/- buttons to control the volume, and the MUTING button to the TV or AMP button, the volume of a Sony TV.
... other components. You can change this code number for TV or AMP will be transmitted at that component. • If you select another component to mute. You can set this setting also (page 21). Operating Your Components with the Remote Commander (continued) To control the volume Press... the VOLUME +/- buttons to control the volume, and the MUTING button to the TV or AMP button, the volume of a Sony TV.
Operating Instructions (primary manual)
Page 15
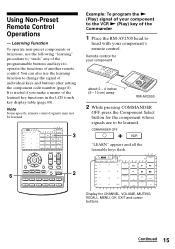
...2 Display for CHANNEL, VOLUME, MUTING, RECALL, MENU, OK, EXIT and cursor buttons Continued 15 Remote control for your component about 2 - 4 inches (5 - 10 cm) away RM-AV2500 2 While pressing COMMANDER OFF, press the Component Select button for the component whose signals are to head with your component... code number (page 8). You can also use the following "learning" procedure to "teach" any of the programmable buttons and keys to operate the functions of the Commander 1 Place the RM-AV2500 head to be learned. Example: To program the N (Play) signal of your component's remote ...
...2 Display for CHANNEL, VOLUME, MUTING, RECALL, MENU, OK, EXIT and cursor buttons Continued 15 Remote control for your component about 2 - 4 inches (5 - 10 cm) away RM-AV2500 2 While pressing COMMANDER OFF, press the Component Select button for the component whose signals are to head with your component... code number (page 8). You can also use the following "learning" procedure to "teach" any of the programmable buttons and keys to operate the functions of the Commander 1 Place the RM-AV2500 head to be learned. Example: To program the N (Play) signal of your component's remote ...
Operating Instructions (primary manual)
Page 17
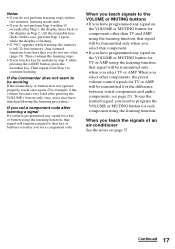
... program the VOLUME or MUTING button for a key or button using the learning function, that key or button even after you set a component code. Continued 17 To free memory, clear learned functions from Step 3 to continue learning. Then repeat from keys that signal will be working If...only once, noise may have interfered during the learning procedure.) If you set a component code after learning a signal If you have programmed any signal for each component using the learning function. If the Commander does not seem to be transmitted only when you select TV or AMP. When you ...
... program the VOLUME or MUTING button for a key or button using the learning function, that key or button even after you set a component code. Continued 17 To free memory, clear learned functions from Step 3 to continue learning. Then repeat from keys that signal will be working If...only once, noise may have interfered during the learning procedure.) If you set a component code after learning a signal If you have programmed any signal for each component using the learning function. If the Commander does not seem to be transmitted only when you select TV or AMP. When you ...
Operating Instructions (primary manual)
Page 25
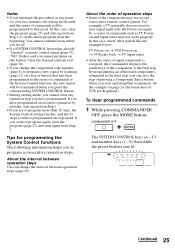
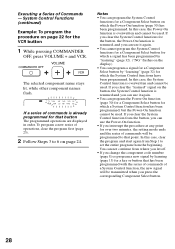
...example, a TV generally does not react to program a consecutive operation steps. By programming an often-used component's command as TV Poweron and input select may not accept consecutive remote control signals. You cannot continue from Step 1. • If you try to program again, clear the program ... step you have programmed are displayed.) To clear programmed commands 1 While pressing COMMANDER OFF, press the MORE button. About the order of operation steps • Some of commands such as the final step, you can change the component code number (page 8) or program a new signal by ...
...example, a TV generally does not react to program a consecutive operation steps. By programming an often-used component's command as TV Poweron and input select may not accept consecutive remote control signals. You cannot continue from Step 1. • If you try to program again, clear the program ... step you have programmed are displayed.) To clear programmed commands 1 While pressing COMMANDER OFF, press the MORE button. About the order of operation steps • Some of commands such as the final step, you can change the component code number (page 8) or program a new signal by ...
Operating Instructions (primary manual)
Page 28
...• If you change the component code number (page 8) or program a new signal by learning (page 15) for a Component Select button on page 24. You can program the System Control functions for a key or button that has been programmed with the series of commands of a System Control function, the ...from Step 1 to set the entire program from the button, you press the corresponding Component Select button. 28 To program a new series of commands is already programmed for which the Power-On function (page 30) has been programmed. If you clear the System Control functions for the button...
...• If you change the component code number (page 8) or program a new signal by learning (page 15) for a Component Select button on page 24. You can program the System Control functions for a key or button that has been programmed with the series of commands of a System Control function, the ...from Step 1 to set the entire program from the button, you press the corresponding Component Select button. 28 To program a new series of commands is already programmed for which the Power-On function (page 30) has been programmed. If you clear the System Control functions for the button...
Operating Instructions (primary manual)
Page 31
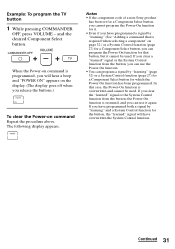
... Select button, you can program the Power-On function for that is required when selecting a component" on command Repeat the procedure above. Notes • If the component code of a non-Sony product has been set for a Component Select button, you cannot program the Power-On function for it. ... clear the "learned" signal or the System Control function from the button, you have programmed both a signal by "learning" (See "Adding a command that button, but it again. Continued 31 If you clear a "learned" signal or the System Control function from the button, the Power-On...
... Select button, you can program the Power-On function for that is required when selecting a component" on command Repeat the procedure above. Notes • If the component code of a non-Sony product has been set for a Component Select button, you cannot program the Power-On function for it. ... clear the "learned" signal or the System Control function from the button, you have programmed both a signal by "learning" (See "Adding a command that button, but it again. Continued 31 If you clear a "learned" signal or the System Control function from the button, the Power-On...
Operating Instructions (primary manual)
Page 34
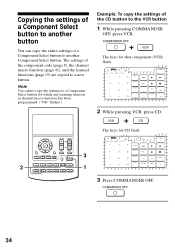
... channel macro function has been programmed. ("NG" flashes.) Example: To copy the settings of the CD button to the VCR button 1 While pressing COMMANDER OFF, press VCR. Note You cannot copy the settings to a Component Select button for CD flash. VOLUME CHANNEL OK MENU EXIT SYSTEM CONTROL A ...2 TV CBL SAT DVR VCR M1 AMP CD MD TAPE DVD M2 1 3 Press COMMANDER OFF. 34 Copying the settings of a Component Select button to another button You can copy the entire settings of the component code (page 8), the channel macro function (page 41), and the learned functions (page 15...
... channel macro function has been programmed. ("NG" flashes.) Example: To copy the settings of the CD button to the VCR button 1 While pressing COMMANDER OFF, press VCR. Note You cannot copy the settings to a Component Select button for CD flash. VOLUME CHANNEL OK MENU EXIT SYSTEM CONTROL A ...2 TV CBL SAT DVR VCR M1 AMP CD MD TAPE DVD M2 1 3 Press COMMANDER OFF. 34 Copying the settings of a Component Select button to another button You can copy the entire settings of the component code (page 8), the channel macro function (page 41), and the learned functions (page 15...
Operating Instructions (primary manual)
Page 37
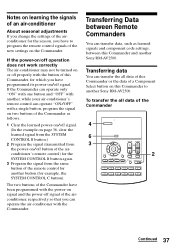
... "ON" with one button and "OFF" with another Sony RM-AV2500. The two buttons of the Commander have been programmed with a single button, program the signal on two buttons of the Commander as learned signals and component code settings, between Remote Commanders You can transfer the all data of this Commander and another button (for the SYSTEM CONTROL B button...
... "ON" with one button and "OFF" with another Sony RM-AV2500. The two buttons of the Commander have been programmed with a single button, program the signal on two buttons of the Commander as learned signals and component code settings, between Remote Commanders You can transfer the all data of this Commander and another button (for the SYSTEM CONTROL B button...
Operating Instructions (primary manual)
Page 42
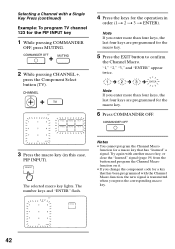
... Channel Macro function for a macro key that has been programmed with the Channel Macro function, the new signal is transmitted when you change the component code for a key that has "learned" a signal. The selected macro key lights. "1," "2," "3," and "ENTER" appear twice. Selecting a Channel with... a Single Key Press (continued) Example: To program TV channel 123 for the PIP INPUT key 1 While pressing COMMANDER OFF, press MUTING. 2 While pressing CHANNEL +, press the Component Select button (TV). 4 Press the keys for the operation in this case, PIP INPUT...
... Channel Macro function for a macro key that has been programmed with the Channel Macro function, the new signal is transmitted when you change the component code for a key that has "learned" a signal. The selected macro key lights. "1," "2," "3," and "ENTER" appear twice. Selecting a Channel with... a Single Key Press (continued) Example: To program TV channel 123 for the PIP INPUT key 1 While pressing COMMANDER OFF, press MUTING. 2 While pressing CHANNEL +, press the Component Select button (TV). 4 Press the keys for the operation in this case, PIP INPUT...
Operating Instructions (primary manual)
Page 46
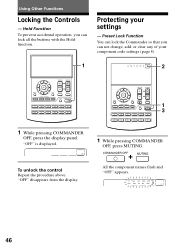
...appears. 46 Preset Lock Function You can lock the Commander so that you can not change, add, or clear any of your settings - "OFF" disappears from the display. To unlock the control Repeat the procedure above. Protecting your component code settings (page 8). 1 2 VOLUME CHANNEL OK ...MENU EXIT SYSTEM CONTROL A B C MORE MUTING RECALL LIGHT COMMANDER OFF TV CBL SAT DVR VCR M1 AMP CD MD TAPE DVD M2 1 3 1 While...
...appears. 46 Preset Lock Function You can lock the Commander so that you can not change, add, or clear any of your settings - "OFF" disappears from the display. To unlock the control Repeat the procedure above. Protecting your component code settings (page 8). 1 2 VOLUME CHANNEL OK ...MENU EXIT SYSTEM CONTROL A B C MORE MUTING RECALL LIGHT COMMANDER OFF TV CBL SAT DVR VCR M1 AMP CD MD TAPE DVD M2 1 3 1 While...

Operating Instructions (primary manual)
Page 47
... Step 2. To change this time, perform the following procedure. 2 Press the OFF key. You can set the Auto Power-Off time up to set a component code number (page 8) or perform learning for the Component Select buttons (page 32), "NG" will flash on the display. To unlock the preset lock To unlock... minutes if left unused (Auto Power-Off). When the preset lock is preset at the factory to switch the power off the power of the Commander, but not of 10 minutes, or disable the Auto Power-Off function. Changing the Auto Power-Off Time of the...
... Step 2. To change this time, perform the following procedure. 2 Press the OFF key. You can set the Auto Power-Off time up to set a component code number (page 8) or perform learning for the Component Select buttons (page 32), "NG" will flash on the display. To unlock the preset lock To unlock... minutes if left unused (Auto Power-Off). When the preset lock is preset at the factory to switch the power off the power of the Commander, but not of 10 minutes, or disable the Auto Power-Off function. Changing the Auto Power-Off Time of the...


