Operating Instructions
Page 16
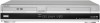
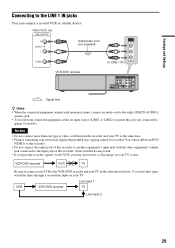
... connection, be sure to connect the audio cord to the LINE IN (AUDIO L/R) jacks at the same time. • During DVD recording, you cannot watch VHS pictures by pressing VIDEO, as the S VIDEO OUT jack will cause unwanted noise to LINE OUT (VIDEO/AUDIO L/R) AUDIO OUT COMPONENT VIDEO...VIDEO (yellow) S video cord (not supplied) S VIDEO OUT LINE 1 IN LINE OUT VIDEO VIDEO (yellow) Audio/video cord (supplied) to S VIDEO OUT VCR-DVD recorder L R AUDIO AUDIO (white) (red) to come from your TV's audio output jacks to the LINE OUT (AUDIO L/R) jacks. Step 3: Connecting to Your TV ...
... connection, be sure to connect the audio cord to the LINE IN (AUDIO L/R) jacks at the same time. • During DVD recording, you cannot watch VHS pictures by pressing VIDEO, as the S VIDEO OUT jack will cause unwanted noise to LINE OUT (VIDEO/AUDIO L/R) AUDIO OUT COMPONENT VIDEO...VIDEO (yellow) S video cord (not supplied) S VIDEO OUT LINE 1 IN LINE OUT VIDEO VIDEO (yellow) Audio/video cord (supplied) to S VIDEO OUT VCR-DVD recorder L R AUDIO AUDIO (white) (red) to come from your TV's audio output jacks to the LINE OUT (AUDIO L/R) jacks. Step 3: Connecting to Your TV ...
Operating Instructions
Page 17
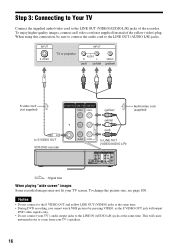
...video input jacks Connect the COMPONENT VIDEO OUT jacks using this connection and then set "Progressive" of the same kind and length. Note During DVD recording, you must use this connection, be sure to connect the audio cord to LINE OUT (AUDIO L/R) AUDIO OUT COMPONENT VIDEO OUT S ...AUDIO OUT R OUT AUDIO AUDIO VCR-DVD recorder : Signal flow z Hint Video signal can also be output from the COMPONENT VIDEO OUT jack when playing a VHS tape. Hookups and Settings If your TV accepts progressive 480p format signals, you cannot watch VHS pictures by pressing VIDEO, as the COMPONENT ...
...video input jacks Connect the COMPONENT VIDEO OUT jacks using this connection and then set "Progressive" of the same kind and length. Note During DVD recording, you must use this connection, be sure to connect the audio cord to LINE OUT (AUDIO L/R) AUDIO OUT COMPONENT VIDEO OUT S ...AUDIO OUT R OUT AUDIO AUDIO VCR-DVD recorder : Signal flow z Hint Video signal can also be output from the COMPONENT VIDEO OUT jack when playing a VHS tape. Hookups and Settings If your TV accepts progressive 480p format signals, you cannot watch VHS pictures by pressing VIDEO, as the COMPONENT ...
Operating Instructions
Page 24
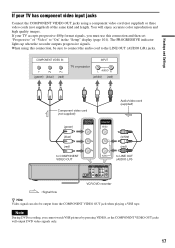
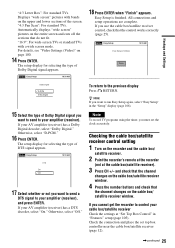
...No Disc Easy Setup 10:10 AM Select your cable box to step 7. 9 Select "OK," and press ENTER. See the instructions supplied with this recorder? (Changes to the current setting will receive channels. No Disc Easy Setup Enter the brand code of the connected TV appears. 13 Select the setting... that matches your cable box/satellite receiver. No Disc Easy Setup 10:10 AM Searching for selecting the picture size of your cable box or satellite receiver to the recorder's audio/video input (page 13), select "Line1" or "Line2" and press ENTER, then go to step 11. 8 Press the...
...No Disc Easy Setup 10:10 AM Select your cable box to step 7. 9 Select "OK," and press ENTER. See the instructions supplied with this recorder? (Changes to the current setting will receive channels. No Disc Easy Setup Enter the brand code of the connected TV appears. 13 Select the setting... that matches your cable box/satellite receiver. No Disc Easy Setup 10:10 AM Searching for selecting the picture size of your cable box or satellite receiver to the recorder's audio/video input (page 13), select "Line1" or "Line2" and press ENTER, then go to step 11. 8 Press the...
Operating Instructions
Page 25
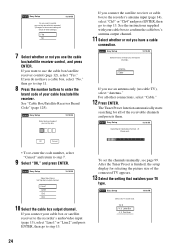
... 16 Press ENTER. If your AV amplifier (receiver) has a Dolby Digital decoder, select "Dolby Digital." z Hint If you cannot get the recorder to control your cable box/satellite receiver Check the settings at the cable box/satellite receiver). 3 Press CH +/- If you want to your amplifier...do not fit. To return to your amplifier (receiver), and press ENTER. Automatically displays "wide screen" pictures on the recorder and the cable box/ satellite receiver. 2 Point the recorder's remote at the recorder (not at "Set Top Box Control" in the "Setup" display (page 108). If you want ...
... 16 Press ENTER. If your AV amplifier (receiver) has a Dolby Digital decoder, select "Dolby Digital." z Hint If you cannot get the recorder to control your cable box/satellite receiver Check the settings at the cable box/satellite receiver). 3 Press CH +/- If you want to your amplifier...do not fit. To return to your amplifier (receiver), and press ENTER. Automatically displays "wide screen" pictures on the recorder and the cable box/ satellite receiver. 2 Point the recorder's remote at the recorder (not at "Set Top Box Control" in the "Setup" display (page 108). If you want ...
Operating Instructions
Page 29
... the tapes through a second line input on your TV in the order shown below. LINE OUTPUT R AUDIO L Audio/video cord (not supplied) VIDEO VCR-DVD recorder LINE 1 IN VIDEO AUDIO to LINE 1 IN AUDIO OUT COMPONENT VIDEO OUT S VIDEO OUT LINE 1 IN LINE OUT VIDEO VIDEO VHF/UHF L Y IN...connect a second VCR or similar device. Noise (feedback) may not receive a clear image on your TV at the same time. • Pictures containing copy protection signals that prohibit any copying cannot be recorded. Hookups and Settings Connecting to (pages 56 and 86). Other VCR, etc.
... the tapes through a second line input on your TV in the order shown below. LINE OUTPUT R AUDIO L Audio/video cord (not supplied) VIDEO VCR-DVD recorder LINE 1 IN VIDEO AUDIO to LINE 1 IN AUDIO OUT COMPONENT VIDEO OUT S VIDEO OUT LINE 1 IN LINE OUT VIDEO VIDEO VHF/UHF L Y IN...connect a second VCR or similar device. Noise (feedback) may not receive a clear image on your TV at the same time. • Pictures containing copy protection signals that prohibit any copying cannot be recorded. Hookups and Settings Connecting to (pages 56 and 86). Other VCR, etc.
Operating Instructions
Page 48
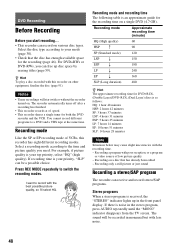
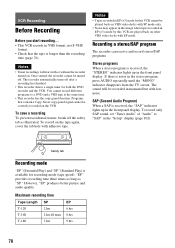
... EP recording mode of low picture quality - Select a recording mode according to a DVD and a VHS tape at ×1 speed. • This recorder shares a single tuner for the recording (page 46). DVD Recording Before Recording Before you start with this recorder has eight different recording modes. Recording a program with less noise. 48 Recording only a still picture or just sound Recording a stereo/SAP program The recorder can be recorded in...
... EP recording mode of low picture quality - Select a recording mode according to a DVD and a VHS tape at ×1 speed. • This recorder shares a single tuner for the recording (page 46). DVD Recording Before Recording Before you start with this recorder has eight different recording modes. Recording a program with less noise. 48 Recording only a still picture or just sound Recording a stereo/SAP program The recorder can be recorded in...
Operating Instructions
Page 49
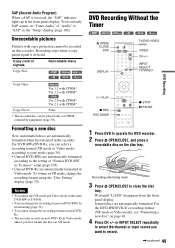
Unrecordable pictures Pictures with CPRM* Copy-Never None * The recorded disc can be recorded on CPRM compatible equipment (page 30). To format in the front panel display. Copy control signals Recordable discs Copy-Free +RW +R -RWVR -RWVideo -RVR -RVideo Copy-Once -RWVR Ver.1.1 with ... SELECT TV/VIDEO H PLAY z REC REC MODE x STOP X PAUSE 1 Press DVD to record. ,continued 49 DVD Recording Without the Timer +RW -RWVR -RWVideo +R -RVR -RVideo Z OPEN/ CLOSE DVD TV/DVD·VIDEO switch VIDEO CH +/- Unused discs are automatically formatted when first inserted in ...
Unrecordable pictures Pictures with CPRM* Copy-Never None * The recorded disc can be recorded on CPRM compatible equipment (page 30). To format in the front panel display. Copy control signals Recordable discs Copy-Free +RW +R -RWVR -RWVideo -RVR -RVideo Copy-Once -RWVR Ver.1.1 with ... SELECT TV/VIDEO H PLAY z REC REC MODE x STOP X PAUSE 1 Press DVD to record. ,continued 49 DVD Recording Without the Timer +RW -RWVR -RWVideo +R -RVR -RVideo Z OPEN/ CLOSE DVD TV/DVD·VIDEO switch VIDEO CH +/- Unused discs are automatically formatted when first inserted in ...
Operating Instructions
Page 65
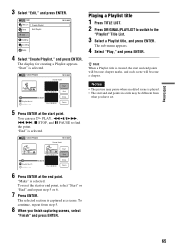
DVD Editing 3 Select "Edit," and press ENTER. Create Playlist 10:10 AM Scene No.01 T Playlist No. 01 Start 00:00:00 00:00:07 End ...:00:00 Start End Make Finish 5 Press ENTER at the end point. "End" is captured as a scene. The selected section is selected. Notes • The picture may be different from step 5. 8 When you have set. 65 Edit Title List Timer Create Playlist Edit Playlist Edit Dubbing Disc Setting Setup 10:10...
DVD Editing 3 Select "Edit," and press ENTER. Create Playlist 10:10 AM Scene No.01 T Playlist No. 01 Start 00:00:00 00:00:07 End ...:00:00 Start End Make Finish 5 Press ENTER at the end point. "End" is captured as a scene. The selected section is selected. Notes • The picture may be different from step 5. 8 When you have set. 65 Edit Title List Timer Create Playlist Edit Playlist Edit Dubbing Disc Setting Setup 10:10...

Operating Instructions
Page 72
... • The counter stops counting when it reaches the end. The power will turn off but picture quality is not guaranteed. • The counter resets to "On" in EP (3x) mode is...:00." Playback starts automatically if you want to the VCR while playing a disc, DVD playback stops. • The VCR does not record in the front panel display resets to operate the VCR. 2 Insert a tape. ...Notes • During playback, the VCR automatically detects the recording system (S-VHS/VHS) and the recording mode (SP or EP) from the tape. To use the time counter Press ...
... • The counter stops counting when it reaches the end. The power will turn off but picture quality is not guaranteed. • The counter resets to "On" in EP (3x) mode is...:00." Playback starts automatically if you want to the VCR while playing a disc, DVD playback stops. • The VCR does not record in the front panel display resets to operate the VCR. 2 Insert a tape. ...Notes • During playback, the VCR automatically detects the recording system (S-VHS/VHS) and the recording mode (SP or EP) from the tape. To use the time counter Press ...

Operating Instructions
Page 73
on the recorder at the same time for more than ten seconds. Tracking Tracking meter To resume automatic tracking Press TRACKING + and TRACKING - repeatedly until the distortion disappears. VCR Playback Adjusting the picture (tracking) You can manually adjust tracking if the recording quality is too poor to be remedied by the VCR's automatic tracking (a tracking meter appears during the automatic tracking). The tracking meter appears. Press TRACKING +/- Press TRACKING +/-. Or, eject the tape and reinsert it. 73
on the recorder at the same time for more than ten seconds. Tracking Tracking meter To resume automatic tracking Press TRACKING + and TRACKING - repeatedly until the distortion disappears. VCR Playback Adjusting the picture (tracking) You can manually adjust tracking if the recording quality is too poor to be remedied by the VCR's automatic tracking (a tracking meter appears during the automatic tracking). The tracking meter appears. Press TRACKING +/- Press TRACKING +/-. Or, eject the tape and reinsert it. 73

Operating Instructions
Page 74
... mode. To resume normal playback, press H PLAY. When you hold down during fast reverse or fast forward, you can view the picture. • Plays at various speeds. • The picture may show noise during playback, the high-speed play . 74 Notes • The sound is muted during playback at high speed when...
... mode. To resume normal playback, press H PLAY. When you hold down during fast reverse or fast forward, you can view the picture. • Plays at various speeds. • The picture may show noise during playback, the high-speed play . 74 Notes • The sound is muted during playback at high speed when...

Operating Instructions
Page 77
...front panel display when you play a tape without Hi-fi recording. Monaural sound is recorded onto the main track along the edge of the AUDIO setting. Hi-fi audio is recorded onto the normal audio track along with the picture. To listen to On-screen display Front panel display Stereo... Hi-Fi STEREO Left channel Left STEREO Right channel Right STEREO Monaural sound on a video tape The VCR records sound onto two separate tracks.
...front panel display when you play a tape without Hi-fi recording. Monaural sound is recorded onto the main track along the edge of the AUDIO setting. Hi-fi audio is recorded onto the normal audio track along with the picture. To listen to On-screen display Front panel display Stereo... Hi-Fi STEREO Left channel Left STEREO Right channel Right STEREO Monaural sound on a video tape The VCR records sound onto two separate tracks.
Operating Instructions
Page 78
...). However, "SP" produces better picture and audio quality. Notes • Tapes recorded in the front panel display. To record only SAP sound, set "Tuner Audio" of "Audio" to a DVD and a VHS tape at the same time. • This recorder has the copy guard function. Recording a stereo/SAP program The recorder can receive and record stereo/SAP programs. Stereo programs...
...). However, "SP" produces better picture and audio quality. Notes • Tapes recorded in the front panel display. To record only SAP sound, set "Tuner Audio" of "Audio" to a DVD and a VHS tape at the same time. • This recorder has the copy guard function. Recording a stereo/SAP program The recorder can receive and record stereo/SAP programs. Stereo programs...

Operating Instructions
Page 88
... stops. - Unauthorized editing of the dubbed disc is not a malfunction. To select the recording mode, SP or EP, press REC MODE repeatedly (see page 78). 88 using a non-recordable DVD. - You can record (dub) a DVD title to a tape, picture may differ slightly from VHS tapes and other copyrighted material are not displayed during dubbing. the disc remaining...
... stops. - Unauthorized editing of the dubbed disc is not a malfunction. To select the recording mode, SP or EP, press REC MODE repeatedly (see page 78). 88 using a non-recordable DVD. - You can record (dub) a DVD title to a tape, picture may differ slightly from VHS tapes and other copyrighted material are not displayed during dubbing. the disc remaining...
Operating Instructions
Page 89
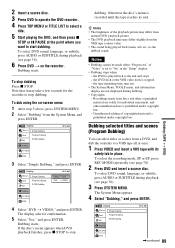
...Dubbing Dubbing Disc Setting Setup 10:10 AM ,continued 89 Note that it may differ slightly from normal DVD playback picture. • The DVD playback time may take a few seconds for the recorder to the end and stops. - Dubbing Title List Timer Edit Simple Dubbing Program Dubbing DV/D8 ... page 36). 3 Press SYSTEM MENU. 2 Insert a source disc. 3 Press DVD to operate the DVD recorder. 4 Press TOP MENU or TITLE LIST to select a title. 5 Start playing the DVD, and then press x STOP or X PAUSE at once. 1 Press VIDEO and insert a VHS tape with its end. If the disc's menu appears when...
...Dubbing Dubbing Disc Setting Setup 10:10 AM ,continued 89 Note that it may differ slightly from normal DVD playback picture. • The DVD playback time may take a few seconds for the recorder to the end and stops. - Dubbing Title List Timer Edit Simple Dubbing Program Dubbing DV/D8 ... page 36). 3 Press SYSTEM MENU. 2 Insert a source disc. 3 Press DVD to operate the DVD recorder. 4 Press TOP MENU or TITLE LIST to select a title. 5 Start playing the DVD, and then press x STOP or X PAUSE at once. 1 Press VIDEO and insert a VHS tape with its end. If the disc's menu appears when...

Operating Instructions
Page 91
... finalizing, you want to play on it may differ slightly from the recorder. the DVD is necessary in order to edit or record on equipment other DVD equipment. the DVD deck or the VHS video deck is necessary in order to the end and stops. - ...Recordings made from discs and other unauthorized use is prohibited under copyright law. • Once you finalize a DVD+RW/DVD-RW (Video mode)/DVD+R/DVD-R (Video mode), a DVD menu will be automatically created, which can be made when "Progressive" of the playback picture may differ from normal DVD playback picture. • The DVD...
... finalizing, you want to play on it may differ slightly from the recorder. the DVD is necessary in order to edit or record on equipment other DVD equipment. the DVD deck or the VHS video deck is necessary in order to the end and stops. - ...Recordings made from discs and other unauthorized use is prohibited under copyright law. • Once you finalize a DVD+RW/DVD-RW (Video mode)/DVD+R/DVD-R (Video mode), a DVD menu will be automatically created, which can be made when "Progressive" of the playback picture may differ from normal DVD playback picture. • The DVD...
Operating Instructions
Page 95
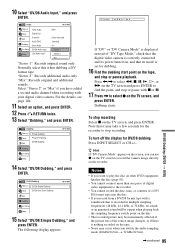
... DRC Scan Audio DV/D8 Audio Input Line Audio Input : Main 10:10 AM : Dolby Surround : Standard : On : Stereo 1 : Stereo 2 Mix "Stereo 1": Records original sound only. DV/D8 Dubbing Title List Timer DV/D8 Simple Dubbing DV/D8 One Touch Dubbing Edit Dubbing Disc Setting Setup 10:10... AM 15 Select "DV/D8 Simple Dubbing," and press ENTER. Normally select this when dubbing a DV format tape. "Mix": Records original and additional sounds. For the details, see page 104. 11 Select an option, and press ENTER. 12 Press O RETURN twice. 13 Select "Dubbing...
... DRC Scan Audio DV/D8 Audio Input Line Audio Input : Main 10:10 AM : Dolby Surround : Standard : On : Stereo 1 : Stereo 2 Mix "Stereo 1": Records original sound only. DV/D8 Dubbing Title List Timer DV/D8 Simple Dubbing DV/D8 One Touch Dubbing Edit Dubbing Disc Setting Setup 10:10... AM 15 Select "DV/D8 Simple Dubbing," and press ENTER. Normally select this when dubbing a DV format tape. "Mix": Records original and additional sounds. For the details, see page 104. 11 Select an option, and press ENTER. 12 Press O RETURN twice. 13 Select "Dubbing...
Operating Instructions
Page 97
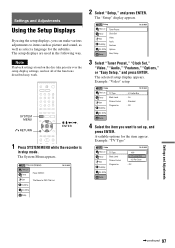
The setup displays are used in the following way. Note Playback settings stored on the disc take priority over the setup display settings, and not all of the functions described may work. SYSTEM MENU O RETURN M/m/ Settings and Adjustments Using the Setup Displays By using the setup displays, you can make various adjustments to items such as picture and sound, as well as select a language for the subtitles.
The setup displays are used in the following way. Note Playback settings stored on the disc take priority over the setup display settings, and not all of the functions described may work. SYSTEM MENU O RETURN M/m/ Settings and Adjustments Using the Setup Displays By using the setup displays, you can make various adjustments to items such as picture and sound, as well as select a language for the subtitles.
Operating Instructions
Page 98
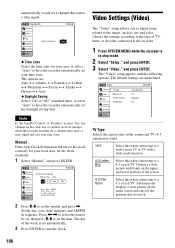
... UHF channels. Create the password Title List 10:10 AM Timer Edit Create the password. Video Title List Timer Edit Dubbing TV Type Black Level Picture Control Progressive Disc Setting Setup : 16:9 : On : Standard : Off 10:10 AM To return to 125. Example: When "Parental" in "Options..." setup is in the "Setup" display. The recorder can receive VHF channels 2 to 13, UHF channels 14 to 69, and unscrambled CATV channels 1 to the previous display Press O RETURN. Some items display a dialog...
... UHF channels. Create the password Title List 10:10 AM Timer Edit Create the password. Video Title List Timer Edit Dubbing TV Type Black Level Picture Control Progressive Disc Setting Setup : 16:9 : On : Standard : Off 10:10 AM To return to 125. Example: When "Parental" in "Options..." setup is in the "Setup" display. The recorder can receive VHF channels 2 to 13, UHF channels 14 to 69, and unscrambled CATV channels 1 to the previous display Press O RETURN. Some items display a dialog...
Operating Instructions
Page 100
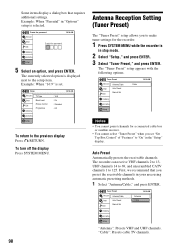
...the time zone for your area, or select "Auto" to "On," the channel on the cable box or satellite receiver changes when the recorder searches for your time zone. Clock Set Title List Timer Set the time and date. automatically search for a channel that carries a time ...signal and sets your time zone. Manual If the Auto Clock Set function did not set to have the recorder automatically set the month, and press ,. The options are: Auto y Atlantic y Eastern y Central y Mountain y Pacific y Alaska y Hawaii y Auto ◆ Daylight Saving Select...
...the time zone for your area, or select "Auto" to "On," the channel on the cable box or satellite receiver changes when the recorder searches for your time zone. Clock Set Title List Timer Set the time and date. automatically search for a channel that carries a time ...signal and sets your time zone. Manual If the Auto Clock Set function did not set to have the recorder automatically set the month, and press ,. The options are: Auto y Atlantic y Eastern y Central y Mountain y Pacific y Alaska y Hawaii y Auto ◆ Daylight Saving Select...
