Quick Start Guide
Page 1
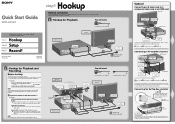
... all power cords last! To record TV programs on the DVD recorder from a connected tuner, make recordings on your DVD recorder. ©2007 Sony Corporation Printed in the Operating Instructions. Cable With No Cable Box Please contact your cable service to get a cable box or satellite receiver with video/ audio output. a S video cord or b Component video cords or c HDMI cord For further explanations, see "Connecting to ask cable box or satellite receiver with digital cords will enjoy high quality images. Connect the Set Top Box controller (supplied), and select...
... all power cords last! To record TV programs on the DVD recorder from a connected tuner, make recordings on your DVD recorder. ©2007 Sony Corporation Printed in the Operating Instructions. Cable With No Cable Box Please contact your cable service to get a cable box or satellite receiver with video/ audio output. a S video cord or b Component video cords or c HDMI cord For further explanations, see "Connecting to ask cable box or satellite receiver with digital cords will enjoy high quality images. Connect the Set Top Box controller (supplied), and select...

Quick Start Guide
Page 2
... OPEN/CLOSE again to operate the DVD recorder will determine how "widescreen" images are shown on your TV and any other than the above, see above "Record a TV program." The Title List menu appears. OPEN/ CLOSE CH/ TRACKING 123 456 INPUT 789 ANGLE TOP MENU 0 MENU SET TIME/TEXT AUDIO SUBTITLE SYSTEM MENU DISPLAY TITLE LIST TIMER ORIGINAL/ PLAYLIST ENTER RETURN OPTIONS PREV REPLAY ADVANCE NEXT PLAY CLEAR PAUSE STOP REC SYNCHRO REC REC MODE TV VOL CH DIGITAL/ ANALOG INPUT Playback the Recorded DVD Disc 1 Press TITLE LIST.
... OPEN/CLOSE again to operate the DVD recorder will determine how "widescreen" images are shown on your TV and any other than the above, see above "Record a TV program." The Title List menu appears. OPEN/ CLOSE CH/ TRACKING 123 456 INPUT 789 ANGLE TOP MENU 0 MENU SET TIME/TEXT AUDIO SUBTITLE SYSTEM MENU DISPLAY TITLE LIST TIMER ORIGINAL/ PLAYLIST ENTER RETURN OPTIONS PREV REPLAY ADVANCE NEXT PLAY CLEAR PAUSE STOP REC SYNCHRO REC REC MODE TV VOL CH DIGITAL/ ANALOG INPUT Playback the Recorded DVD Disc 1 Press TITLE LIST.

Operating Instructions
Page 2
... before operating the recorder. • Do not place the recorder on a circuit different from the wall outlet. never pull the cord. VISIBLE AND INVISIBLE LASER RADIATION WHEN OPEN AVOID DIRECT EXPOSURE TO BEAM CLASS 3B VISIBLE AND INVISIBLE LASER RADIATION WHEN OPEN. This symbol is intended to alert the user to the presence of important operating and maintenance (servicing) instructions in a particular installation. RDR-GX355 Serial...
... before operating the recorder. • Do not place the recorder on a circuit different from the wall outlet. never pull the cord. VISIBLE AND INVISIBLE LASER RADIATION WHEN OPEN AVOID DIRECT EXPOSURE TO BEAM CLASS 3B VISIBLE AND INVISIBLE LASER RADIATION WHEN OPEN. This symbol is intended to alert the user to the presence of important operating and maintenance (servicing) instructions in a particular installation. RDR-GX355 Serial...

Operating Instructions
Page 6
... Quick Guide to Disc Types 30 Recordable and Playable Discs 30 Playable Discs 33 Playback 35 Playing Discs 35 Playback Options 36 Playing a Title From the Title List 39 Searching for a Title/Chapter/Track, etc 40 Playing MP3 Audio Tracks and JPEG Image Files 41 Displaying the Playing Time and Play Information 44 Recording 46 Before Recording 46 Recording From Connected Equipment Without the Timer 47 Timer Recording From Connected Equipment 49 Recording From Connected Equipment With a Timer (Synchro Rec 51 Changing or Canceling Timer Settings (Timer List 53 Recording From a VCR...
... Quick Guide to Disc Types 30 Recordable and Playable Discs 30 Playable Discs 33 Playback 35 Playing Discs 35 Playback Options 36 Playing a Title From the Title List 39 Searching for a Title/Chapter/Track, etc 40 Playing MP3 Audio Tracks and JPEG Image Files 41 Displaying the Playing Time and Play Information 44 Recording 46 Before Recording 46 Recording From Connected Equipment Without the Timer 47 Timer Recording From Connected Equipment 49 Recording From Connected Equipment With a Timer (Synchro Rec 51 Changing or Canceling Timer Settings (Timer List 53 Recording From a VCR...

Operating Instructions
Page 10
How to Use the On-Screen Menus The following three displays are mainly used to use. SYSTEM MENU 123 456 789 0 O RETURN M/m/ Once you become familiar with the basic operations, you will find the recorder easy to operate this recorder.
How to Use the On-Screen Menus The following three displays are mainly used to use. SYSTEM MENU 123 456 789 0 O RETURN M/m/ Once you become familiar with the basic operations, you will find the recorder easy to operate this recorder.

Operating Instructions
Page 13
... 1 IN). Wall Set top box controller (supplied) Cable box/ satellite receiver AUDIO OUT R L VIDEO OUT ANT IN TO TV Antenna cable (not supplied) to antenna input TV Audio/video cord (not supplied) to SET TOP BOX CONTROL SETTOP BOX CONTROL LINE 1 IN VIDEO to use the Synchro-Rec function (page 51). This connection is necessary to LINE 1 IN DVD recorder SETTOP HDMI OUT BOX CONTROL AUDIO OUT COMPONENT VIDEO OUT S VIDEO OUT LINE 1 IN LINE OUT L Y VIDEO VIDEO R PB L PR OPTICAL COAXIAL DIGITAL AUDIO OUT R AUDIO AUDIO AUDIO : Signal flow About...
... 1 IN). Wall Set top box controller (supplied) Cable box/ satellite receiver AUDIO OUT R L VIDEO OUT ANT IN TO TV Antenna cable (not supplied) to antenna input TV Audio/video cord (not supplied) to SET TOP BOX CONTROL SETTOP BOX CONTROL LINE 1 IN VIDEO to use the Synchro-Rec function (page 51). This connection is necessary to LINE 1 IN DVD recorder SETTOP HDMI OUT BOX CONTROL AUDIO OUT COMPONENT VIDEO OUT S VIDEO OUT LINE 1 IN LINE OUT L Y VIDEO VIDEO R PB L PR OPTICAL COAXIAL DIGITAL AUDIO OUT R AUDIO AUDIO AUDIO : Signal flow About...
Operating Instructions
Page 15
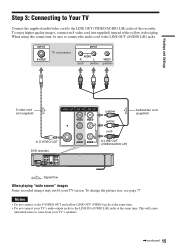
... projector INPUT AUDIO R L (red) (white) VIDEO (yellow) S video cord (not supplied) S VIDEO OUT LINE 1 IN LINE OUT VIDEO VIDEO L (yellow) (white) (red) to S VIDEO OUT DVD recorder SETTOP HDMI OUT BOX CONTROL AUDIO OUT COMPONENT VIDEO OUT S VIDEO OUT LINE 1 IN LINE OUT L Y VIDEO VIDEO R PB L PR OPTICAL COAXIAL DIGITAL AUDIO OUT R AUDIO AUDIO R AUDIO AUDIO to the LINE OUT (AUDIO L/R) jacks. To change the picture size, see page 77. When using this connection, be sure to connect the audio cord to LINE OUT (VIDEO/AUDIO L/R) Audio/video cord (supplied) : Signal...
... projector INPUT AUDIO R L (red) (white) VIDEO (yellow) S video cord (not supplied) S VIDEO OUT LINE 1 IN LINE OUT VIDEO VIDEO L (yellow) (white) (red) to S VIDEO OUT DVD recorder SETTOP HDMI OUT BOX CONTROL AUDIO OUT COMPONENT VIDEO OUT S VIDEO OUT LINE 1 IN LINE OUT L Y VIDEO VIDEO R PB L PR OPTICAL COAXIAL DIGITAL AUDIO OUT R AUDIO AUDIO R AUDIO AUDIO to the LINE OUT (AUDIO L/R) jacks. To change the picture size, see page 77. When using this connection, be sure to connect the audio cord to LINE OUT (VIDEO/AUDIO L/R) Audio/video cord (supplied) : Signal...

Operating Instructions
Page 17
... VIDEO OUT Y (blue) PB (red) PR to COMPONENT VIDEO OUT LINE OUT VIDEO L (white) R AUDIO (red) to the LINE OUT (AUDIO L/R) jacks. Hookups and Settings If your TV accepts progressive 480p format signals, you must use this connection, be sure to connect the audio cord to LINE OUT (AUDIO L/R) SETTOP HDMI OUT BOX CONTROL AUDIO OUT COMPONENT VIDEO OUT S VIDEO OUT LINE 1 IN LINE OUT L Y VIDEO VIDEO R PB L PR OPTICAL COAXIAL DIGITAL AUDIO OUT R AUDIO AUDIO DVD recorder : Signal flow...
... VIDEO OUT Y (blue) PB (red) PR to COMPONENT VIDEO OUT LINE OUT VIDEO L (white) R AUDIO (red) to the LINE OUT (AUDIO L/R) jacks. Hookups and Settings If your TV accepts progressive 480p format signals, you must use this connection, be sure to connect the audio cord to LINE OUT (AUDIO L/R) SETTOP HDMI OUT BOX CONTROL AUDIO OUT COMPONENT VIDEO OUT S VIDEO OUT LINE 1 IN LINE OUT L Y VIDEO VIDEO R PB L PR OPTICAL COAXIAL DIGITAL AUDIO OUT R AUDIO AUDIO DVD recorder : Signal flow...
Operating Instructions
Page 20
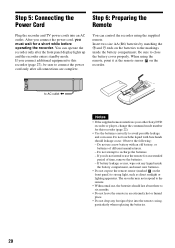
... not attempt to close the battery cover properly. You can operate the recorder only after all connections are complete. LINE OUT VIDEO L R AUDIO to AC outlet < Notes • If the supplied remote interferes your other Sony DVD recorder or player, change the command mode number for this recorder (page 27), be sure to the remote. • With normal use the remote for a short while before operating the recorder. If you must...
... not attempt to close the battery cover properly. You can operate the recorder only after all connections are complete. LINE OUT VIDEO L R AUDIO to AC outlet < Notes • If the supplied remote interferes your other Sony DVD recorder or player, change the command mode number for this recorder (page 27), be sure to the remote. • With normal use the remote for a short while before operating the recorder. If you must...

Operating Instructions
Page 22
... 07, 18 03, 04, 12 12 14, 15 If you have a Sony DVD player or more than one that differs from the other Sony DVD recorder or player, set the command mode number for this recorder and the supplied remote to one Sony DVD recorder If the supplied remote interferes with your other Sony DVD recorder or player after you have completed "Step 7: Easy Setup." The default command mode setting for this recorder and the supplied remote is DVD 3.
... 07, 18 03, 04, 12 12 14, 15 If you have a Sony DVD player or more than one that differs from the other Sony DVD recorder or player, set the command mode number for this recorder and the supplied remote to one Sony DVD recorder If the supplied remote interferes with your other Sony DVD recorder or player after you have completed "Step 7: Easy Setup." The default command mode setting for this recorder and the supplied remote is DVD 3.
Operating Instructions
Page 24
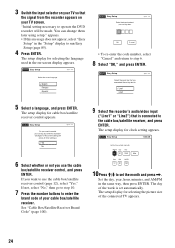
... Setup 12:00 AM Set the time and date manually. 3 Switch the input selector on your TV so that the signal from the recorder appears on -screen display appears. The setup display for selecting the picture size of your cable box/satellite receiver. Line1 Line2 5 Select a language, and press ENTER. "Initial setting necessary to operate the DVD recorder will erase all timer settings.) Yes No 6 Select whether or not you want to use the cable box/satellite receiver control...
... Setup 12:00 AM Set the time and date manually. 3 Switch the input selector on your TV so that the signal from the recorder appears on -screen display appears. The setup display for selecting the picture size of your cable box/satellite receiver. Line1 Line2 5 Select a language, and press ENTER. "Initial setting necessary to operate the DVD recorder will erase all timer settings.) Yes No 6 Select whether or not you want to use the cable box/satellite receiver control...

Operating Instructions
Page 49
... use the Synchro Rec function (page 51). Select the interval, "5 Min" (default) or "15 Min" in "DVD Auto Chapter" of "Features" in the front panel display. Contents beyond this time will automatically divide a recording (a title) into chapters by inserting chapter marks at 5 or 15-minute intervals during recording. Z OPEN/ CLOSE SYSTEM MENU 123 456 789 0 TIMER M/m/ The information display appears. Press TIME/TEXT repeatedly to divide titles, select "Off." Creating chapters in advance. If you record from connected...
... use the Synchro Rec function (page 51). Select the interval, "5 Min" (default) or "15 Min" in "DVD Auto Chapter" of "Features" in the front panel display. Contents beyond this time will automatically divide a recording (a title) into chapters by inserting chapter marks at 5 or 15-minute intervals during recording. Z OPEN/ CLOSE SYSTEM MENU 123 456 789 0 TIMER M/m/ The information display appears. Press TIME/TEXT repeatedly to divide titles, select "Off." Creating chapters in advance. If you record from connected...
Operating Instructions
Page 61
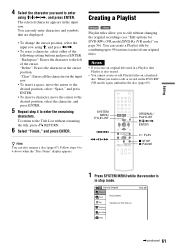
Editing 4 Select the character you want to enter using M/m/
Editing 4 Select the character you want to enter using M/m/
Operating Instructions
Page 73
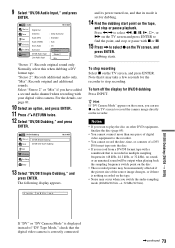
... 2": Records additional audio only. and its power turned on, and that its mode is set for dubbing. 14 Find the dubbing start point on the tape, and stop or pause playback. DV/D8 Dubbing Title List Timer DV/D8 Simple Dubbing DV/D8 One Touch Dubbing Edit DV/D8 Dubbing Disc Setting Setup 10:10 AM 13 Select "DV/D8 Simple Dubbing," and press ENTER. Press Normally select this when dubbing a DV format tape. The following display appears. 9 Select "DV/D8 Audio Input...
... 2": Records additional audio only. and its power turned on, and that its mode is set for dubbing. 14 Find the dubbing start point on the tape, and stop or pause playback. DV/D8 Dubbing Title List Timer DV/D8 Simple Dubbing DV/D8 One Touch Dubbing Edit DV/D8 Dubbing Disc Setting Setup 10:10 AM 13 Select "DV/D8 Simple Dubbing," and press ENTER. Press Normally select this when dubbing a DV format tape. The following display appears. 9 Select "DV/D8 Audio Input...

Operating Instructions
Page 75
SYSTEM MENU 123 456 789 0 O RETURN M/m/ The setup displays are used in the following way. Settings and Adjustments Using the Setup Displays By using the setup displays, you can make various adjustments to items such as picture and sound, as well as select a language for the subtitles. Note Playback settings stored on the disc take priority over the setup display settings, and not all of the functions described may work.
SYSTEM MENU 123 456 789 0 O RETURN M/m/ The setup displays are used in the following way. Settings and Adjustments Using the Setup Displays By using the setup displays, you can make various adjustments to items such as picture and sound, as well as select a language for the subtitles. Note Playback settings stored on the disc take priority over the setup display settings, and not all of the functions described may work.
Operating Instructions
Page 79
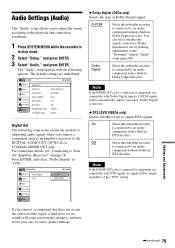
... to output DTS signals. Audio 10:10 AM Title List Timer Edit DV/D8 Dubbing Disc Setting Setup Digital Out Downmix Audio DRC Audio (HDMI) Scan Audio Surround DV/D8 Audio Input Line Audio Input : Dolby Surround : Standard : Auto : On : Off : Stereo 1 : Stereo Digital Out The following options. For connection details, see "Connecting to equipment not compatible with a built-in stop mode. 2 Select "Setup," and press ENTER. 3 Select "Audio," and press ENTER. Press ENTER, and select "Dolby Digital" or "DTS." Dolby Digital Select this when the recorder is...
... to output DTS signals. Audio 10:10 AM Title List Timer Edit DV/D8 Dubbing Disc Setting Setup Digital Out Downmix Audio DRC Audio (HDMI) Scan Audio Surround DV/D8 Audio Input Line Audio Input : Dolby Surround : Standard : Auto : On : Off : Stereo 1 : Stereo Digital Out The following options. For connection details, see "Connecting to equipment not compatible with a built-in stop mode. 2 Select "Setup," and press ENTER. 3 Select "Audio," and press ENTER. Press ENTER, and select "Dolby Digital" or "DTS." Dolby Digital Select this when the recorder is...
Operating Instructions
Page 84
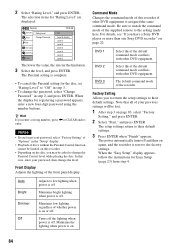
... to the factory settings. The Parental setting is assigned the same command mode. z Hint If you have a Sony DVD player or more than one Sony DVD recorder" on page 83, select "Factory Setting," and press ENTER. 2 Select "Start," and press ENTER. Note that all of "Options" in step 2, and press ENTER. 2 Select "Rating Level," and press ENTER. DVD 1 DVD 2 DVD 3 Select this recorder. • Depending on . 84 Parental Title List Timer Rating Level Change Password Edit DV/D8 Dubbing Disc Setting Setup 10...
... to the factory settings. The Parental setting is assigned the same command mode. z Hint If you have a Sony DVD player or more than one Sony DVD recorder" on page 83, select "Factory Setting," and press ENTER. 2 Select "Start," and press ENTER. Note that all of "Options" in step 2, and press ENTER. 2 Select "Rating Level," and press ENTER. DVD 1 DVD 2 DVD 3 Select this recorder. • Depending on . 84 Parental Title List Timer Rating Level Change Password Edit DV/D8 Dubbing Disc Setting Setup 10...

Operating Instructions
Page 86
.... Power The power does not turn on. , Check that the AC power cord is not HDCP compliant (page 16). Change the "HDMI Resolution" setting in "Features" setup (page 82). Picture There is no picture. , Re-connect all connecting cords securely. , The connecting cords are connected to a combination TV/VIDEO player, the copy-protection signal applied to some DVD programs could affect picture quality. In this troubleshooting guide to help remedy the problem before requesting repairs. In this problem even when you connect your recorder directly...
.... Power The power does not turn on. , Check that the AC power cord is not HDCP compliant (page 16). Change the "HDMI Resolution" setting in "Features" setup (page 82). Picture There is no picture. , Re-connect all connecting cords securely. , The connecting cords are connected to a combination TV/VIDEO player, the copy-protection signal applied to some DVD programs could affect picture quality. In this troubleshooting guide to help remedy the problem before requesting repairs. In this problem even when you connect your recorder directly...

Operating Instructions
Page 87
... DVD-RWs (VR mode)/DVD-Rs (VR mode), set "Line Audio Input" in "Audio" setup to the audio signal format. Additional Information ,continued 87 Disconnect the playback equipment in "Video" setup to some DVDs. See the instruction manual supplied with the labeled side facing up. , The disc is set "Audio DRC" in "Audio" setup to your TV, the copy-protection signal applied to fit the aspect ratio of the operations above. Insert the disc with the disc. , While the recorder is upside down. The picture...
... DVD-RWs (VR mode)/DVD-Rs (VR mode), set "Line Audio Input" in "Audio" setup to the audio signal format. Additional Information ,continued 87 Disconnect the playback equipment in "Video" setup to some DVDs. See the instruction manual supplied with the labeled side facing up. , The disc is set "Audio DRC" in "Audio" setup to your TV, the copy-protection signal applied to fit the aspect ratio of the operations above. Insert the disc with the disc. , While the recorder is upside down. The picture...

Operating Instructions
Page 105
... Cleaning discs 90 Clock Set settings 76 "Combine Titles" 64 "Command Mode" 22, 84 COMPONENT VIDEO OUT 17 Connecting the cable box/satellite receiver 12 to your AV/amplifier (receiver) 18 to your TV 15 "Connections" 82 Controlling TVs with the remote 21 "Copy" 66 Copy protection 47, 97 Copy-Free 47 Copy-Never 47 Copy-Once 47 CPRM 30 "Create Playlist" 62 Creating chapters 49 D "Digital Out" 79 "Disc Finalize" 67, 69 "Disc Format" 67 "Disc Information" 67 "Disc Menu" 83 "Disc...
... Cleaning discs 90 Clock Set settings 76 "Combine Titles" 64 "Command Mode" 22, 84 COMPONENT VIDEO OUT 17 Connecting the cable box/satellite receiver 12 to your AV/amplifier (receiver) 18 to your TV 15 "Connections" 82 Controlling TVs with the remote 21 "Copy" 66 Copy protection 47, 97 Copy-Free 47 Copy-Never 47 Copy-Once 47 CPRM 30 "Create Playlist" 62 Creating chapters 49 D "Digital Out" 79 "Disc Finalize" 67, 69 "Disc Format" 67 "Disc Information" 67 "Disc Menu" 83 "Disc...

