

Primary User Manual
Page 1
3-864-750-11(1) Stereo Turntable System Operating Instructions PS-LX350H © 1998 by Sony Corporation 1
3-864-750-11(1) Stereo Turntable System Operating Instructions PS-LX350H © 1998 by Sony Corporation 1
Primary User Manual
Page 2
... problem concerning your unit that any further. • Unplug the unit from the AC power source (mains) as long as a television, hair dryer, or fluorescent lamp) which may be used for an extended period of your nearest Sony dealer. Never pull the cord itself has been turned off. • The nameplate indicating operating voltage, power consumption, etc. Record these numbers...
... problem concerning your unit that any further. • Unplug the unit from the AC power source (mains) as long as a television, hair dryer, or fluorescent lamp) which may be used for an extended period of your nearest Sony dealer. Never pull the cord itself has been turned off. • The nameplate indicating operating voltage, power consumption, etc. Record these numbers...

Primary User Manual
Page 3
... weight (1) • Cartridge and headshell (1) • 45 r/min adaptor (1) • Audio connecting cord (1) 3 TABLE OF CONTENTS Getting Started Unpacking 3 Assembling the Turntable 4 Hooking up the Turntable 5 Adjusting the Turntable 6 Operations Playing a Record 7 Additional Information Maintenance 8 Troubleshooting 9 Specifications 9 Parts and Controls 10 Unpacking Check that you for making the task easier. Thank you received the following icon is used in this manual thoroughly and retain it for future reference. Before...
... weight (1) • Cartridge and headshell (1) • 45 r/min adaptor (1) • Audio connecting cord (1) 3 TABLE OF CONTENTS Getting Started Unpacking 3 Assembling the Turntable 4 Hooking up the Turntable 5 Adjusting the Turntable 6 Operations Playing a Record 7 Additional Information Maintenance 8 Troubleshooting 9 Specifications 9 Parts and Controls 10 Unpacking Check that you for making the task easier. Thank you received the following icon is used in this manual thoroughly and retain it for future reference. Before...
Primary User Manual
Page 4
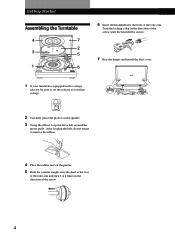
... shaft at the rear of the tone arm and turn 3 or 4 times in the direction of the arrow until the headshell is secure. 7 Rise the hinges and install the dust cover. 1 If your turntable is equipped with a voltage selector, be sure to set the selector to remove the ribbon. 4 Place the rubber mat on the spindle. 3 Using the ribbon...
... shaft at the rear of the tone arm and turn 3 or 4 times in the direction of the arrow until the headshell is secure. 7 Rise the hinges and install the dust cover. 1 If your turntable is equipped with a voltage selector, be sure to set the selector to remove the ribbon. 4 Place the rubber mat on the spindle. 3 Using the ribbon...
Primary User Manual
Page 5
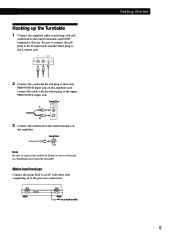
... result in a humming noise from the turntable. Amplifier PHONO L IN R 3 Connect the earth lead to the earth terminals on the amplifier and connect the cable with the red plug to the lower PHONO IN R input jack on the amplifier. R L GND 2 Connect the cord with the white plug to the output terminals and GND terminal at the rear. Hooking up the Turntable 1 Connect the supplied audio connecting cord and earth lead to the upper...
... result in a humming noise from the turntable. Amplifier PHONO L IN R 3 Connect the earth lead to the earth terminals on the amplifier and connect the cable with the red plug to the lower PHONO IN R input jack on the amplifier. R L GND 2 Connect the cord with the white plug to the output terminals and GND terminal at the rear. Hooking up the Turntable 1 Connect the supplied audio connecting cord and earth lead to the upper...
Primary User Manual
Page 6
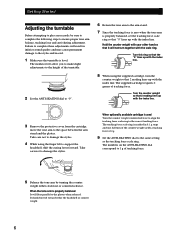
.... 1 Make sure the turntable is properly balanced It will not turn of the counter weight yields a tracking force of 4 g. 9 Set the ANTI-SKATING dial to the platter when released. The supplied cartridge requires 2 grams of tracking force. Failure to complete these adjustments will result in 0.1 g steps and one full turn together with the index line. The numbers on...
.... 1 Make sure the turntable is properly balanced It will not turn of the counter weight yields a tracking force of 4 g. 9 Set the ANTI-SKATING dial to the platter when released. The supplied cartridge requires 2 grams of tracking force. Failure to complete these adjustments will result in 0.1 g steps and one full turn together with the index line. The numbers on...
Primary User Manual
Page 7
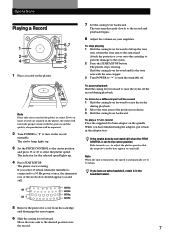
... to 33 r/min. To play a 17-cm record Place the supplied 45 r/min adaptor on , the speed is set to the record and playback begins. 8 Adjust the volume on the record turntable. Note When the unit is connected to a 50 Hz power source, the innermost row of reproduction will not make proper contact with the arm stopper. 3 Turn POWER to "•" to...
... to 33 r/min. To play a 17-cm record Place the supplied 45 r/min adaptor on , the speed is set to the record and playback begins. 8 Adjust the volume on the record turntable. Note When the unit is connected to a 50 Hz power source, the innermost row of reproduction will not make proper contact with the arm stopper. 3 Turn POWER to "•" to...

Primary User Manual
Page 8
...in the slanting direction. 4 Insert the new stylus by pulling on the shell terminals. The terminal polarity of the lead wires on the new cartridge and connect the lead wires accordingly. Shell terminals Cleaning the Cabinet and Dust Cover Clean the cabinet and dust cover periodically using a good ...the cartridge to the tone arm. To replace the stylus 1 Turn off the turntable and amplifier. 2 Turn the locking collar and remove the cartridge from the tone arm. 3 Grasp the stylus holder and pull it away from the tone arm and wipe the terminals lightly with a small pair of the stylus...
...in the slanting direction. 4 Insert the new stylus by pulling on the shell terminals. The terminal polarity of the lead wires on the new cartridge and connect the lead wires accordingly. Shell terminals Cleaning the Cabinet and Dust Cover Clean the cabinet and dust cover periodically using a good ...the cartridge to the tone arm. To replace the stylus 1 Turn off the turntable and amplifier. 2 Turn the locking collar and remove the cartridge from the tone arm. 3 Grasp the stylus holder and pull it away from the tone arm and wipe the terminals lightly with a small pair of the stylus...
Primary User Manual
Page 9
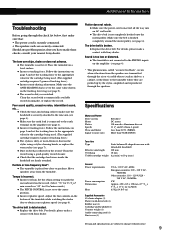
... instructions on page 5 and set to the appropriate value for the cartridge being used . (The supplied cartridge requires 2 grams of the turntable while watching the strobo dots to change without notice. 9 Tempo is inserted all the way into an AC wall outlet. b Make sure the power cord is incorrect. Adjust the fine controls on the amplifier (see page 4). b The drive belt is hooked...
... instructions on page 5 and set to the appropriate value for the cartridge being used . (The supplied cartridge requires 2 grams of the turntable while watching the strobo dots to change without notice. 9 Tempo is inserted all the way into an AC wall outlet. b Make sure the power cord is incorrect. Adjust the fine controls on the amplifier (see page 4). b The drive belt is hooked...
Primary User Manual
Page 10
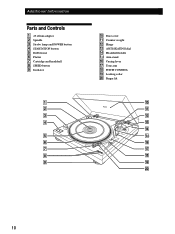
Additional Information Parts and Controls 1 45 r/min adaptor 2 Spindle 3 Strobo lamp and POWER button 4 START/STOP button 5 Rubber mat 6 Platter 7 Cartridge and headshell 8 SPEED button 9 Insulator 1 2 3 4 5 6 7 8 9 !º Dust cover !¡ Counter weight !™ Hinge !£ ANTI-SKATING dial !¢ Headshell holder !∞ Arm stand !§ Cueing lever !¶ Tone arm !• PITCH CONTROL !ª Locking collar @º Finger lift 10
Additional Information Parts and Controls 1 45 r/min adaptor 2 Spindle 3 Strobo lamp and POWER button 4 START/STOP button 5 Rubber mat 6 Platter 7 Cartridge and headshell 8 SPEED button 9 Insulator 1 2 3 4 5 6 7 8 9 !º Dust cover !¡ Counter weight !™ Hinge !£ ANTI-SKATING dial !¢ Headshell holder !∞ Arm stand !§ Cueing lever !¶ Tone arm !• PITCH CONTROL !ª Locking collar @º Finger lift 10


