Primary User Manual
Page 2
... for about 30 minutes without being connected to charge the built-in a particular installation. PHC-Z10 Serial No Information For customers in a residential installation. These limits are located at the ...off and on batteries. However, there is connected. -Consult the dealer or an experienced radio/TV technician for about one or more of optical instruments with the instructions, may be...FCC Rules. Model No. Record the serial number in this manual could void your Sony dealer regarding this equipment. Refer to these numbers whenever you disconnect the AC power cord...
... for about 30 minutes without being connected to charge the built-in a particular installation. PHC-Z10 Serial No Information For customers in a residential installation. These limits are located at the ...off and on batteries. However, there is connected. -Consult the dealer or an experienced radio/TV technician for about one or more of optical instruments with the instructions, may be...FCC Rules. Model No. Record the serial number in this manual could void your Sony dealer regarding this equipment. Refer to these numbers whenever you disconnect the AC power cord...
Primary User Manual
Page 3
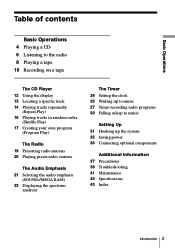
... a tape 10 Recording on a tape The CD Player 12 Using the display 13 Locating a specific track 14 Playing tracks repeatedly (Repeat Play) 16 Playing tracks in random order (Shuffle Play) 17 Creating your own program (Program Play) The Radio 19 Presetting radio stations 20 Playing preset radio stations The Audio Emphasis 21 Selecting the...
... a tape 10 Recording on a tape The CD Player 12 Using the display 13 Locating a specific track 14 Playing tracks repeatedly (Repeat Play) 16 Playing tracks in random order (Shuffle Play) 17 Creating your own program (Program Play) The Radio 19 Presetting radio stations 20 Playing preset radio stations The Audio Emphasis 21 Selecting the...

Primary User Manual
Page 6
... step by step. The player automatically scans MTAPE the radio frequencies and stops when it finds a clear station. Indicates an FM stereo broadcast. 6 Basic Operations CD MULTI JOG > . CD + PRESET Hold down + TUNE or TUNE - If you want appears in the display. TAPE m PRESET - M CD + TUNE until the band you can't tune in a station...
... step by step. The player automatically scans MTAPE the radio frequencies and stops when it finds a clear station. Indicates an FM stereo broadcast. 6 Basic Operations CD MULTI JOG > . CD + PRESET Hold down + TUNE or TUNE - If you want appears in the display. TAPE m PRESET - M CD + TUNE until the band you can't tune in a station...

Primary User Manual
Page 7
... the previous station. AM: Keep the AM loop antenna as far as possible and reorient it . Press POWER. The player turns on /off the radio Do this Turn VOLUME (press VOL +, - Basic Operations 7 To improve broadcast reception FM: Keep the FM lead antenna as horizontal as possible from ...the player and reorient it . If the FM broadcast is noisy, press MODE until "MONO" appears in the display and the radio will play in monaural. • Next time you want separately in "FM1" and "FM2". • If the FM broadcast is still noisy, disconnect...
... the previous station. AM: Keep the AM loop antenna as far as possible and reorient it . Press POWER. The player turns on /off the radio Do this Turn VOLUME (press VOL +, - Basic Operations 7 To improve broadcast reception FM: Keep the FM lead antenna as horizontal as possible from ...the player and reorient it . If the FM broadcast is noisy, press MODE until "MONO" appears in the display and the radio will play in monaural. • Next time you want separately in "FM1" and "FM2". • If the FM broadcast is still noisy, disconnect...
Primary User Manual
Page 10
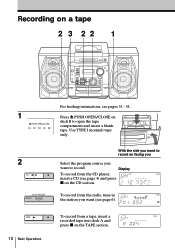
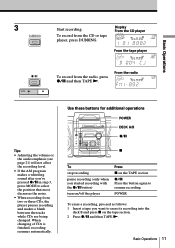
... the station you want to record. Recording on a tape 2 3 22 1 For hookup instructions, see pages 31 - 34. 1 Press Z PUSH OPEN/CLOSE on the CD section. B 2 CD AUTO PRESET RADIO BAND With the side you want (see page 4) and press x on Z PUSH OPEN/CLOSE deck B to record on the TAPE section. Display To record... facing you Select the program source you want to open the tape compartment and insert a blank tape. TAPE 10 Basic Operations To record from the CD player, insert a CD (see page 6).
... the station you want to record. Recording on a tape 2 3 22 1 For hookup instructions, see pages 31 - 34. 1 Press Z PUSH OPEN/CLOSE on the CD section. B 2 CD AUTO PRESET RADIO BAND With the side you want (see page 4) and press x on Z PUSH OPEN/CLOSE deck B to record on the TAPE section. Display To record... facing you Select the program source you want to open the tape compartment and insert a blank tape. TAPE 10 Basic Operations To record from the CD player, insert a CD (see page 6).
Primary User Manual
Page 11
...press MODE to select the position that most decreases the noise. • When recording from the CD or tape player, press DUBBING. When changing of CDs is finished, recording resumes automatically. From the radio Tips • Adjusting the volume or the audio emphasis (see page 21) will not affect the... recording level. • If the AM program makes a whistling sound after you want to resume recording. To record from two or three CDs, the player pauses recording ...
...press MODE to select the position that most decreases the noise. • When recording from the CD or tape player, press DUBBING. When changing of CDs is finished, recording resumes automatically. From the radio Tips • Adjusting the volume or the audio emphasis (see page 21) will not affect the... recording level. • If the AM program makes a whistling sound after you want to resume recording. To record from two or three CDs, the player pauses recording ...
Primary User Manual
Page 13
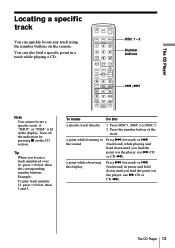
... playing and hold down until you locate a track numbered over 10, press >10 first, then the corresponding number buttons. CD OPEN/ POWER CLOSE SLEEP DISC 1 DISC 2 DISC 3 CD/RADIO VOL DISPLAY SURROUND SOUND CD REPEAT RADIO BAND TAPE TUNE DECK A/B LINE COUNTER SPCANL RESET DISC 1 - 3 Number buttons ., > Note You cannot locate a specific track if "SHUF...
... playing and hold down until you locate a track numbered over 10, press >10 first, then the corresponding number buttons. CD OPEN/ POWER CLOSE SLEEP DISC 1 DISC 2 DISC 3 CD/RADIO VOL DISPLAY SURROUND SOUND CD REPEAT RADIO BAND TAPE TUNE DECK A/B LINE COUNTER SPCANL RESET DISC 1 - 3 Number buttons ., > Note You cannot locate a specific track if "SHUF...
Primary User Manual
Page 19
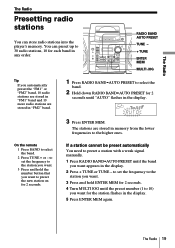
...MULTI JOG Tip If you automatically preset the "FM1" or "FM2" band, 10 radio stations are stored in "FM1" band and 10 more radio stations are stored in memory from the lower frequencies to the higher ones. If a...MEM for 2 seconds until the preset number (1 to select the band. 2 Hold down RADIO BAND•AUTO PRESET for 2 seconds. 4 Turn MULTI JOG until "AUTO" flashes in the display. 5 Press ENTER MEM... again. The Radio 19 to set the frequency to the station you want to select the band. 2 Press TUNE + ...
...MULTI JOG Tip If you automatically preset the "FM1" or "FM2" band, 10 radio stations are stored in "FM1" band and 10 more radio stations are stored in memory from the lower frequencies to the higher ones. If a...MEM for 2 seconds until the preset number (1 to select the band. 2 Hold down RADIO BAND•AUTO PRESET for 2 seconds. 4 Turn MULTI JOG until "AUTO" flashes in the display. 5 Press ENTER MEM... again. The Radio 19 to set the frequency to the station you want to select the band. 2 Press TUNE + ...

Primary User Manual
Page 20
Playing preset radio stations Once you've preset the stations, use MULTI JOG on the player or the number buttons on the remote to tune in to tune in the stored station. 1 Press RADIO BAND•AUTO PRESET to select the band. 2 Turn MULTI JOG to your favorite stations. RADIO BAND AUTO PRESET MULTI JOG On the remote 1 Press BAND to select the band. 2 Press the number button to tune in the stored station. 20 The Radio
Playing preset radio stations Once you've preset the stations, use MULTI JOG on the player or the number buttons on the remote to tune in to tune in the stored station. 1 Press RADIO BAND•AUTO PRESET to select the band. 2 Turn MULTI JOG to your favorite stations. RADIO BAND AUTO PRESET MULTI JOG On the remote 1 Press BAND to select the band. 2 Press the number button to tune in the stored station. 20 The Radio

Primary User Manual
Page 23
.... The Audio Emphasis Displaying the spectrum analyzer You can display 3 different patterns of each band The Audio Emphasis 23 CD OPEN/ POWER CLOSE SLEEP DISC 1 DISC 2 DISC 3 CD/RADIO VOL DISPLAY SURROUND SOUND CD REPEAT RADIO BAND TAPE TUNE DECK A/B LINE COUNTER SPCANL RESET SPCANL Displaying the audio signal pattern Press SPCANL to display the...
.... The Audio Emphasis Displaying the spectrum analyzer You can display 3 different patterns of each band The Audio Emphasis 23 CD OPEN/ POWER CLOSE SLEEP DISC 1 DISC 2 DISC 3 CD/RADIO VOL DISPLAY SURROUND SOUND CD REPEAT RADIO BAND TAPE TUNE DECK A/B LINE COUNTER SPCANL RESET SPCANL Displaying the audio signal pattern Press SPCANL to display the...
Primary User Manual
Page 25
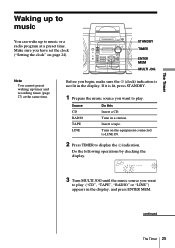
...in a station. Tune in the display. continued The Timer 25 Source CD RADIO TAPE LINE Do this Insert a CD. Make sure you want to play . STANDBY TIMER ENTER MEM MULTI JOG Note You cannot preset waking up to music or a radio program at the same time. Turn on page 24). Do the ... the clock ("Setting the clock" on the equipment connected to LINE IN. 2 Press TIMER to display the indication. Before you want to play ("CD", "TAPE", "RADIO" or "LINE") appears in the display, and press ENTER MEM. The Timer Waking up to music You can wake up timer and recording timer ...
...in a station. Tune in the display. continued The Timer 25 Source CD RADIO TAPE LINE Do this Insert a CD. Make sure you want to play . STANDBY TIMER ENTER MEM MULTI JOG Note You cannot preset waking up to music or a radio program at the same time. Turn on page 24). Do the ... the clock ("Setting the clock" on the equipment connected to LINE IN. 2 Press TIMER to display the indication. Before you want to play ("CD", "TAPE", "RADIO" or "LINE") appears in the display, and press ENTER MEM. The Timer Waking up to music You can wake up timer and recording timer ...

Primary User Manual
Page 26
... the player before the preset time. Each time you press ENTER MEM, a stored setting is different from the one you tuned in case of the radio, if you reset them. 26 The Timer 7 Press STANDBY. To change the setting, display the setting you want to change the waking up and the...
... the player before the preset time. Each time you press ENTER MEM, a stored setting is different from the one you tuned in case of the radio, if you reset them. 26 The Timer 7 Press STANDBY. To change the setting, display the setting you want to change the waking up and the...

Primary User Manual
Page 27
... by checking the display window. 3 Turn MULTI JOG to select the position that most decreases the noise. Before you have set timer to record the radio at the same time. • When recording from the component connected to the LINE IN jacks of the component. The Timer Timer-recording... TIMER ENTER MEM Notes • You cannot preset recording timer and waking up timer (page 25) at a certain time. If so, press MODE to display "RADIO" and "REC", and press ENTER MEM. continued The Timer 27 When recording from the component connected to the LINE IN jacks of the player, refer...
... by checking the display window. 3 Turn MULTI JOG to select the position that most decreases the noise. Before you have set timer to record the radio at the same time. • When recording from the component connected to the LINE IN jacks of the component. The Timer Timer-recording... TIMER ENTER MEM Notes • You cannot preset recording timer and waking up timer (page 25) at a certain time. If so, press MODE to display "RADIO" and "REC", and press ENTER MEM. continued The Timer 27 When recording from the component connected to the LINE IN jacks of the player, refer...
Primary User Manual
Page 28
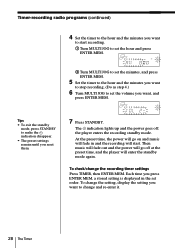
... goes off at the preset time, and the player will go off ; To change the recording timer settings Press TIMER, then ENTER MEM. Timer-recording radio programs (continued) 4 Set the timer to the hour and the minutes you want to start . To check/change the setting, display the setting you want...
... goes off at the preset time, and the player will go off ; To change the recording timer settings Press TIMER, then ENTER MEM. Timer-recording radio programs (continued) 4 Set the timer to the hour and the minutes you want to start . To check/change the setting, display the setting you want...

Primary User Manual
Page 30
... goes off automatically after you press the button, the indication changes as follows: "60" t "90"t "120" t "OFF" t "10" t "20" t "30." However, you cannot store different radio stations. 1 Play the music source you to fall asleep and wake up timer first (see page 25), turn off automatically. Set the waking up to...
... goes off automatically after you press the button, the indication changes as follows: "60" t "90"t "120" t "OFF" t "10" t "20" t "30." However, you cannot store different radio stations. 1 Play the music source you to fall asleep and wake up timer first (see page 25), turn off automatically. Set the waking up to...
Primary User Manual
Page 39
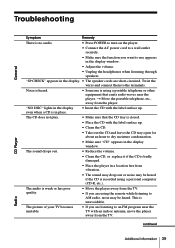
...you want to use appears in a location free from the player. Twist the wires and connect them to AM radio, noise may be heard. "SP CHECK" appears in place. • Insert the CD with an indoor antenna, move the player away from the TV. • If you are short-circuited. ... volume. • Unplug the headphones when listening through speakers. The CD does not play. • Make sure that emits radio waves near the TV with the label surface up . • Clean the CD. • Take out the CD and leave the CD tray open for about an hour to dry moisture condensation. •...
...you want to use appears in a location free from the player. Twist the wires and connect them to AM radio, noise may be heard. "SP CHECK" appears in place. • Insert the CD with an indoor antenna, move the player away from the TV. • If you are short-circuited. ... volume. • Unplug the headphones when listening through speakers. The CD does not play. • Make sure that emits radio waves near the TV with the label surface up . • Clean the CD. • Take out the CD and leave the CD tray open for about an hour to dry moisture condensation. •...
Primary User Manual
Page 42
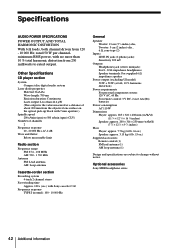
... channels 2 Frequency response 20 - 20 000 Hz +1/-2 dB Wow and flutter Below measurable limit Radio section Frequency range FM: 87.6 - 108 MHz AM: 530 - 1 710 kHz Antenna FM... antenna Cassette-corder section Recording system 4-track 2 channel stereo Fast winding time Approx. 100 s (sec.) with Sony cassette C-60 Frequency response TYPE I (normal): 100 - 10 000 Hz General Speaker Woofer: 13 cm (5 ...AM loop antenna (1) Design and specifications are subject to rated output. Other Specifications CD player section System Compact disc digital audio system Laser diode properties Material: GaAlAs Wave ...
... channels 2 Frequency response 20 - 20 000 Hz +1/-2 dB Wow and flutter Below measurable limit Radio section Frequency range FM: 87.6 - 108 MHz AM: 530 - 1 710 kHz Antenna FM... antenna Cassette-corder section Recording system 4-track 2 channel stereo Fast winding time Approx. 100 s (sec.) with Sony cassette C-60 Frequency response TYPE I (normal): 100 - 10 000 Hz General Speaker Woofer: 13 cm (5 ...AM loop antenna (1) Design and specifications are subject to rated output. Other Specifications CD player section System Compact disc digital audio system Laser diode properties Material: GaAlAs Wave ...

Primary User Manual
Page 43
... the tape heads 41 Demonstration mode 34 Display 12 I, J, K Improving broadcast reception 7 L Listening to the radio 6 Locating a specific track 13 M, N, O MEGA BASS 22 P, Q Playing a CD 4 a tape 8 preset radio stations 20 tracks repeatedly 14 Presetting radio stations 19 Program Play 17 R Radio stations playing 20 presetting 19 Recording on a tape 10 programed tracks 18 timer-recording...
... the tape heads 41 Demonstration mode 34 Display 12 I, J, K Improving broadcast reception 7 L Listening to the radio 6 Locating a specific track 13 M, N, O MEGA BASS 22 P, Q Playing a CD 4 a tape 8 preset radio stations 20 tracks repeatedly 14 Presetting radio stations 19 Program Play 17 R Radio stations playing 20 presetting 19 Recording on a tape 10 programed tracks 18 timer-recording...


