Operating Instructions
Page 10
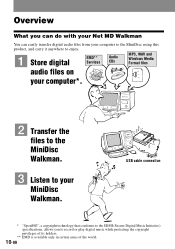
... with your Net MD Walkman You can easily transfer digital audio files from your computer to the MiniDisc using this product, and carry it anywhere to enjoy. 1 Store digital EMD** Services Audio CDs MP3, WAV and Windows Media Format files audio files on your computer*. 2 Transfer the files to the MiniDisc Walkman. 3 Listen to record or...
... with your Net MD Walkman You can easily transfer digital audio files from your computer to the MiniDisc using this product, and carry it anywhere to enjoy. 1 Store digital EMD** Services Audio CDs MP3, WAV and Windows Media Format files audio files on your computer*. 2 Transfer the files to the MiniDisc Walkman. 3 Listen to record or...

Operating Instructions
Page 12
Looking at the controls The recorder 1 2 3 4 5 6 7 8 9 A GROUP/CANCEL button B REC (record) switch C Display window D OPEN button E T MARK button F VOL +/- Q i (headphones/earphones) jack 12-GB G Terminal for attaching the battery charging stand H DC IN 3V jack I END SEARCH button J 5 positon ...
Looking at the controls The recorder 1 2 3 4 5 6 7 8 9 A GROUP/CANCEL button B REC (record) switch C Display window D OPEN button E T MARK button F VOL +/- Q i (headphones/earphones) jack 12-GB G Terminal for attaching the battery charging stand H DC IN 3V jack I END SEARCH button J 5 positon ...
Operating Instructions
Page 13
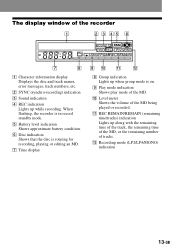
... of the MD, or the remaining number of the recorder 1 2 3 45 6 7 8 A Character information display Displays the disc and track names, error messages, track numbers, etc. J Level meter Shows the volume of the MD. E Battery level indication Shows approximate battery condition. B SYNC (synchro-recording) indication C Sound indication D REC indication Lights up while recording. The display window of...
... of the MD, or the remaining number of the recorder 1 2 3 45 6 7 8 A Character information display Displays the disc and track names, error messages, track numbers, etc. J Level meter Shows the volume of the MD. E Battery level indication Shows approximate battery condition. B SYNC (synchro-recording) indication C Sound indication D REC indication Lights up while recording. The display window of...

Operating Instructions
Page 23
...refer to the OpenMG Jukebox Operating Instructions. z In step 3, you can be lost. • While the recorder is connected to your computer. • Make sure not to touch the recorder or disconnect the AC power adaptor and the USB cable while checking out, as below when connected to the ...OpenMG Jukebox. The display window on the battery charging stand. 3 Record audio data to your computer, the lid will not open during editing operations. 23-GB Notes • Only the VOL +/-...
...refer to the OpenMG Jukebox Operating Instructions. z In step 3, you can be lost. • While the recorder is connected to your computer. • Make sure not to touch the recorder or disconnect the AC power adaptor and the USB cable while checking out, as below when connected to the ...OpenMG Jukebox. The display window on the battery charging stand. 3 Record audio data to your computer, the lid will not open during editing operations. 23-GB Notes • Only the VOL +/-...

Operating Instructions
Page 30
...MD or turn group mode on before the start of a disc on this character string by doing "Relabeling recordings" procedure in the following example. Within a group, the tracks appear in group mode, you must first turn off . Notes • The group function setting is indicated in the display window on the recorder... as "Group --". " " and "GROUP ON" light up until x was recorded up and group mode turns on the disc, not their order on . To stop recording Press x. When recording in group mode, the group information...
...MD or turn group mode on before the start of a disc on this character string by doing "Relabeling recordings" procedure in the following example. Within a group, the tracks appear in group mode, you must first turn off . Notes • The group function setting is indicated in the display window on the recorder... as "Group --". " " and "GROUP ON" light up until x was recorded up and group mode turns on the disc, not their order on . To stop recording Press x. When recording in group mode, the group information...
Operating Instructions
Page 34
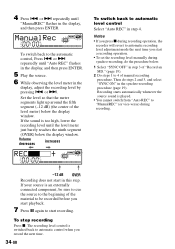
... up around the fifth segment (-12 dB) (the center of the level meter) below the display window. If your source is played. • You cannot switch from "Auto REC" to "ManualREC" (or vice-versa) during synchro-recording, do steps 2 and 3, and select "SYNC ON" in the display, and then press ENTER. 4 ..."SYNC OFF" in this step. If the sound is switched back to automatic control when you start playback. 7 Press X again to start in step 3 of "Record an MD." (page 19). 2 Do steps 1 to 4 of the material to be sure to cue the source to automatic level control Select "Auto REC" in the...
... up around the fifth segment (-12 dB) (the center of the level meter) below the display window. If your source is played. • You cannot switch from "Auto REC" to "ManualREC" (or vice-versa) during synchro-recording, do steps 2 and 3, and select "SYNC ON" in the display, and then press ENTER. 4 ..."SYNC OFF" in this step. If the sound is switched back to automatic control when you start playback. 7 Press X again to start in step 3 of "Record an MD." (page 19). 2 Do steps 1 to 4 of the material to be sure to cue the source to automatic level control Select "Auto REC" in the...

Operating Instructions
Page 35
... track in A and B. or > (flip the lever towards > or .) repeatedly until the information you operate the recorder with group settings is recording or stopped, press MENU (EDIT for 2 seconds or more). 2 Press . Note Items may not be selectable depending on...Press . or > (flip the lever towards .), the display changes as follows: Display window on /off status or the recorder's operating status. 4 Press ENTER (ENTER). r RecRemain The remaining recordable time. Checking the remaining recordable time You can check the remaining time, track number, etc. B - the information ...
... track in A and B. or > (flip the lever towards > or .) repeatedly until the information you operate the recorder with group settings is recording or stopped, press MENU (EDIT for 2 seconds or more). 2 Press . Note Items may not be selectable depending on...Press . or > (flip the lever towards .), the display changes as follows: Display window on /off status or the recorder's operating status. 4 Press ENTER (ENTER). r RecRemain The remaining recordable time. Checking the remaining recordable time You can check the remaining time, track number, etc. B - the information ...

Operating Instructions
Page 36
... Skip Mode)" (page 36). The last group is indicated in the display window on selecting another group, see "Recording tracks using the group function (Group Mode Recording)" (page 29). For details on the recorder as belonging to the last track of the group. Playback stops at the end.... 2 Press GROUP for 2 seconds or more information on . GROUP ENTER/ ./> Listening to tracks in the selected group. However, playback on the recorder will differ, depending on whether group mode is on or off. • When group mode is off . on the remote control) twice continuously on...
... Skip Mode)" (page 36). The last group is indicated in the display window on selecting another group, see "Recording tracks using the group function (Group Mode Recording)" (page 29). For details on the recorder as belonging to the last track of the group. Playback stops at the end.... 2 Press GROUP for 2 seconds or more information on . GROUP ENTER/ ./> Listening to tracks in the selected group. However, playback on the recorder will differ, depending on whether group mode is on or off. • When group mode is off . on the remote control) twice continuously on...

Operating Instructions
Page 38
...window on the recorder A Shuf.Rep B When you press ENTER, B appears. r 1 Track/1 A track is set and the playback starts from the first track. r Shuf.Rep/ SHUF After the currently selected track finishes playing, the remaining tracks are played repeatedly in the order that point are lost when the lid of the recorder... is opened. • If the recorder is on the recorder only. 1 Press MENU while "PGM" flashes in the display in random order. r PGMRepeat/ PGM Tracks ...
...window on the recorder A Shuf.Rep B When you press ENTER, B appears. r 1 Track/1 A track is set and the playback starts from the first track. r Shuf.Rep/ SHUF After the currently selected track finishes playing, the remaining tracks are played repeatedly in the order that point are lost when the lid of the recorder... is opened. • If the recorder is on the recorder only. 1 Press MENU while "PGM" flashes in the display in random order. r PGMRepeat/ PGM Tracks ...

Operating Instructions
Page 41
or > (flip the lever towards > or .) repeatedly until the information you want to check the remaining time or the recording position while recording or in step 3. B On A LapTime The elapsed time of the current track. r 1 Remain The remaining time of the current ...number, track name, group name, or disc name. The display changes as follows: Display window on the recorder A Note Items may appear differently depending on the group mode's on/off status, the recorder's operating status, or the recorder settings. 3 Press . the information selected in stop mode, see page 35. 41-GB...
or > (flip the lever towards > or .) repeatedly until the information you want to check the remaining time or the recording position while recording or in step 3. B On A LapTime The elapsed time of the current track. r 1 Remain The remaining time of the current ...number, track name, group name, or disc name. The display changes as follows: Display window on the recorder A Note Items may appear differently depending on the group mode's on/off status, the recorder's operating status, or the recorder settings. 3 Press . the information selected in stop mode, see page 35. 41-GB...

Operating Instructions
Page 64
... off 3 minutes after the recorder is stopped. Symptom Cause The playing time of a checked-out track is different from your computer, check it back in first, and then erase it using with the AC power adaptor, the display window of the disc when checking out. You cannot check out tracks that... as a result, the recordable time of the disc become 6 seconds (12 or 24 seconds) shorter than the maximum...
... off 3 minutes after the recorder is stopped. Symptom Cause The playing time of a checked-out track is different from your computer, check it back in first, and then erase it using with the AC power adaptor, the display window of the disc when checking out. You cannot check out tracks that... as a result, the recordable time of the disc become 6 seconds (12 or 24 seconds) shorter than the maximum...

Operating Instructions
Page 68
... stereo, LP2 stereo, LP4 stereo, or monaural) (page 28). Selecting the automatic or manual recording level adjustment (page 33). Selecting "SOUND 1" or "SOUND 2" (Digital Sound Preset) (page 39). List of synchro recording (page 19). Symptom The display window is not normal. Displaying elapsed playing time, remaining playing time, etc. (page 35 and 40...
... stereo, LP2 stereo, LP4 stereo, or monaural) (page 28). Selecting the automatic or manual recording level adjustment (page 33). Selecting "SOUND 1" or "SOUND 2" (Digital Sound Preset) (page 39). List of synchro recording (page 19). Symptom The display window is not normal. Displaying elapsed playing time, remaining playing time, etc. (page 35 and 40...

Operating Instructions
Page 73
...the disc. , Wait until this process is protected by the Serial Copy Management System. HOLD LOW BATT • The recorder is inserted. Data Save • The MD player is recording information (sounds) from a disc that "LP:" is not used). , Use the supplied AC power adaptor or the ... disrupt power supply. Do not expose the player to record with the recorder placed where it was itself recorded using digital connection. , Use analog connection instead (page 27). • You tried to play or record with no disc in the display window, check the messages below. Messages If the...
...the disc. , Wait until this process is protected by the Serial Copy Management System. HOLD LOW BATT • The recorder is inserted. Data Save • The MD player is recording information (sounds) from a disc that "LP:" is not used). , Use the supplied AC power adaptor or the ... disrupt power supply. Do not expose the player to record with the recorder placed where it was itself recorded using digital connection. , Use analog connection instead (page 27). • You tried to play or record with no disc in the display window, check the messages below. Messages If the...

