
Operating Instructions (primary manual)
Page 2
MZ-B100 Serial No. These limits are cautioned that may cause harmful interference to provide reasonable protection against harmful interference... energy and, if not installed and used to radio or television reception, which the receiver is connected. - If this equipment does cause harmful interference to power this product will not occur in this manual could void your Sony dealer regarding this equipment. Consult the... of the disc compartment lid and the model number is located at the top and bottom. Owner's Record The serial number is located at the rear of the FCC Rules...
MZ-B100 Serial No. These limits are cautioned that may cause harmful interference to provide reasonable protection against harmful interference... energy and, if not installed and used to radio or television reception, which the receiver is connected. - If this equipment does cause harmful interference to power this product will not occur in this manual could void your Sony dealer regarding this equipment. Consult the... of the disc compartment lid and the model number is located at the top and bottom. Owner's Record The serial number is located at the rear of the FCC Rules...
Operating Instructions (primary manual)
Page 4
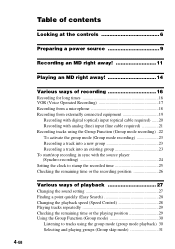
... times 16 VOR (Voice Operated Recording 17 Recording from a microphone 18 Recording from externally connected equipment 19 Recording with digital (optical) input (optical cable required) ......20 Recording with analog (line) input (line cable required 21 Recording tracks using the Group Function (Group mode recording) .22 To activate the group mode (Group mode recording 23 Recording a track into a new group 23...
... times 16 VOR (Voice Operated Recording 17 Recording from a microphone 18 Recording from externally connected equipment 19 Recording with digital (optical) input (optical cable required) ......20 Recording with analog (line) input (line cable required 21 Recording tracks using the Group Function (Group mode recording) .22 To activate the group mode (Group mode recording 23 Recording a track into a new group 23...
Operating Instructions (primary manual)
Page 5
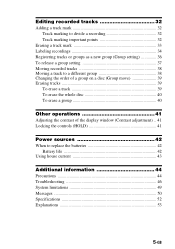
... Registering tracks or groups as a new group (Group setting 36 To release a group setting 37 Moving recorded tracks 38 Moving a track to a different group 38 Changing the order of a group on a disc (Group move 39 Erasing tracks 39 To erase a track 39 ... contrast of the display window (Contrast adjustment) .. 41 Locking the controls (HOLD 41 Power sources 42 When to replace the batteries 42 Battery life 42 Using house current 43 Additional information 44 Precautions 44 Troubleshooting 46 System limitations 49 Messages 50 Specifications 52 Explanations 53 5-GB
... Registering tracks or groups as a new group (Group setting 36 To release a group setting 37 Moving recorded tracks 38 Moving a track to a different group 38 Changing the order of a group on a disc (Group move 39 Erasing tracks 39 To erase a track 39 ... contrast of the display window (Contrast adjustment) .. 41 Locking the controls (HOLD 41 Power sources 42 When to replace the batteries 42 Battery life 42 Using house current 43 Additional information 44 Precautions 44 Troubleshooting 46 System limitations 49 Messages 50 Specifications 52 Explanations 53 5-GB
Operating Instructions (primary manual)
Page 9
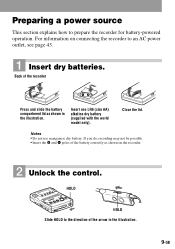
...one LR6 (size AA) alkaline dry battery (supplied with the world model only). Notes • Do not use manganese dry battery. For information on the recorder. 2 Unlock the control. If you do, recording may not be possible. • Insert the e and E poles of the battery correctly as shown in ... page 43. 1 Insert dry batteries. HOLD HOLD Slide HOLD to the direction of the recorder Ee Press and slide the battery compartment lid as shown on connecting the recorder to prepare the recorder for battery-powered operation. Close the lid. Back of the arrow in the illustration.
...one LR6 (size AA) alkaline dry battery (supplied with the world model only). Notes • Do not use manganese dry battery. For information on the recorder. 2 Unlock the control. If you do, recording may not be possible. • Insert the e and E poles of the battery correctly as shown in ... page 43. 1 Insert dry batteries. HOLD HOLD Slide HOLD to the direction of the recorder Ee Press and slide the battery compartment lid as shown on connecting the recorder to prepare the recorder for battery-powered operation. Close the lid. Back of the arrow in the illustration.
Operating Instructions (primary manual)
Page 10
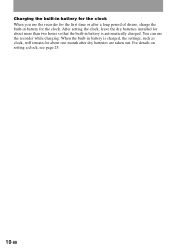
For details on setting a clock, see page 25. 10-GB You can use the recorder for the first time or after dry batteries are taken out. After setting the clock, leave the dry batteries installed for about one month after a long period of disuse, charge the built-in battery for the clock. When the built-in battery is charged, the settings, such as clock, will remain for about more than two hours so that the built-in battery is automatically charged. Charging the built-in battery for the clock When you use the recorder while charging.
For details on setting a clock, see page 25. 10-GB You can use the recorder for the first time or after dry batteries are taken out. After setting the clock, leave the dry batteries installed for about one month after a long period of disuse, charge the built-in battery for the clock. When the built-in battery is charged, the settings, such as clock, will remain for about more than two hours so that the built-in battery is automatically charged. Charging the built-in battery for the clock When you use the recorder while charging.
Operating Instructions (primary manual)
Page 11
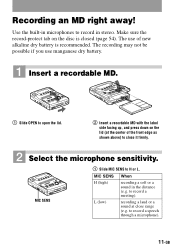
...on the disc is recommended. to record a meeting). Make sure the record-protect tab on the lid (at close it firmly. 2 Select the microphone sensitivity. The use manganese dry battery. 1 Insert a recordable MD. 1 Slide OPEN to close range (e.g. L (low) recording a laud or a sound at the... center of new alkaline dry battery is closed (page 54). Use the built-in microphones to H or L. MIC ...
...on the disc is recommended. to record a meeting). Make sure the record-protect tab on the lid (at close it firmly. 2 Select the microphone sensitivity. The use manganese dry battery. 1 Insert a recordable MD. 1 Slide OPEN to close range (e.g. L (low) recording a laud or a sound at the... center of new alkaline dry battery is closed (page 54). Use the built-in microphones to H or L. MIC ...
Operating Instructions (primary manual)
Page 12
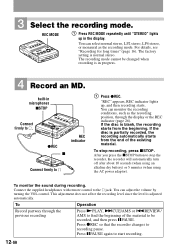
... factory setting is adjusted automatically. To stop the recorder, the recorder will automatically turn off after about 10 seconds (when using an alkaline dry battery) or 5 minutes (when using the AC power adaptor). Connect the supplied headphones with remote control to start recording. 12-GB To Operation Record partway through the display or the REC indicator...
... factory setting is adjusted automatically. To stop the recorder, the recorder will automatically turn off after about 10 seconds (when using an alkaline dry battery) or 5 minutes (when using the AC power adaptor). Connect the supplied headphones with remote control to start recording. 12-GB To Operation Record partway through the display or the REC indicator...
Operating Instructions (primary manual)
Page 13
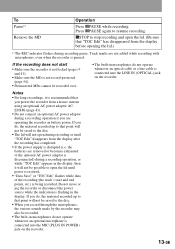
...completed. • If the power supply is disrupted (i.e. Notes • For long recordings, it is recommended that point will not be possible to open the lid. (Be sure that "TOC Edit" has disappeared from a house current using an optional AC power adaptor ACE30HG (page 43). • Do not connect an... optional AC power adaptor during a recording operation, or while "TOC Edit" appears in the display, then it will not be...
...completed. • If the power supply is disrupted (i.e. Notes • For long recordings, it is recommended that point will not be possible to open the lid. (Be sure that "TOC Edit" has disappeared from a house current using an optional AC power adaptor ACE30HG (page 43). • Do not connect an... optional AC power adaptor during a recording operation, or while "TOC Edit" appears in the display, then it will not be...
Operating Instructions (primary manual)
Page 14
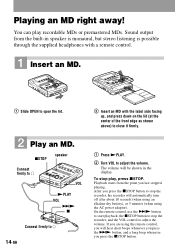
... press the xSTOP button. On the remote control, use the >N button to start playback, the xSTOP button to stop the recorder, the recorder will automatically turn off after about 10 seconds (when using an alkaline dry battery), or 5 minutes (when using the remote control, you are using the AC power adaptor). Playback starts from the built...) to close it firmly. 1 Press NPLAY. 2 Turn VOL to adjust the volume. After you last stopped playing. Playing an MD right away! To stop play recordable MDs or premastered MDs. Sound output from the point you press the xSTOP button to stop the...
... press the xSTOP button. On the remote control, use the >N button to start playback, the xSTOP button to stop the recorder, the recorder will automatically turn off after about 10 seconds (when using an alkaline dry battery), or 5 minutes (when using the remote control, you are using the AC power adaptor). Playback starts from the built...) to close it firmly. 1 Press NPLAY. 2 Turn VOL to adjust the volume. After you last stopped playing. Playing an MD right away! To stop play recordable MDs or premastered MDs. Sound output from the point you press the xSTOP button to stop the...

Operating Instructions (primary manual)
Page 15
... when the recorder is operating, the lid may skip during the last track of the disc, the recorder goes to ...Playback will change to start Make sure the recorder is not locked (pages 9 and 41). To Operation on the recorder Operation on the disc. 3) Once you reach...and open until you press >CUE/AMS during playback when the recorder is exposed to the beginning of the last track on the ...the first track of the disc, the recorder goes to continuous vibration, such as while jogging. • If the ...is restored. 15-GB Press X on the recorder. Go backwards while Press and hold .REVIEW/ ...
... when the recorder is operating, the lid may skip during the last track of the disc, the recorder goes to ...Playback will change to start Make sure the recorder is not locked (pages 9 and 41). To Operation on the recorder Operation on the disc. 3) Once you reach...and open until you press >CUE/AMS during playback when the recorder is exposed to the beginning of the last track on the ...the first track of the disc, the recorder goes to continuous vibration, such as while jogging. • If the ...is restored. 15-GB Press X on the recorder. Go backwards while Press and hold .REVIEW/ ...
Operating Instructions (primary manual)
Page 16
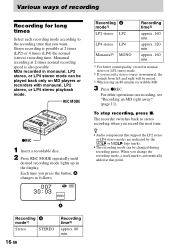
... stereo or LP4 stereo modes are indicated by the or logo marks. • The recording mode can be mixed. 3) When using an 80-minute recordable MD 3 Press zREC. REC MODE zREC 1 Insert a recordable disc. 2 Press REC MODE repeatedly until desired recording mode lights up in monaural, LP2 stereo, or LP4 stereo mode can be changed...
... stereo or LP4 stereo modes are indicated by the or logo marks. • The recording mode can be mixed. 3) When using an 80-minute recordable MD 3 Press zREC. REC MODE zREC 1 Insert a recordable disc. 2 Press REC MODE repeatedly until desired recording mode lights up in monaural, LP2 stereo, or LP4 stereo mode can be changed...
Operating Instructions (primary manual)
Page 17
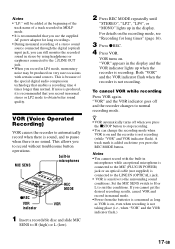
...is no sound. Notes • "LP:" will be added at the beginning of the track name of a track recorded in MDLP mode. • It is recommended that you use the supplied AC power adaptor for long times" (page 16). 3 Press zREC. 4 Press VOR. For details on ...the recording mode, see "Recording for long recordings. • During monaural recording of the special digital audio compression technology that enables a recording time 4 times longer than normal...
...is no sound. Notes • "LP:" will be added at the beginning of the track name of a track recorded in MDLP mode. • It is recommended that you use the supplied AC power adaptor for long times" (page 16). 3 Press zREC. 4 Press VOR. For details on ...the recording mode, see "Recording for long recordings. • During monaural recording of the special digital audio compression technology that enables a recording time 4 times longer than normal...
Operating Instructions (primary manual)
Page 18
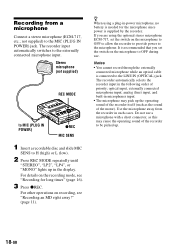
...Press REC MODE repeatedly until "STEREO", "LP2", "LP4", or "MONO" lights up . 18-GB For details on recording, see "Recording for the microphone since power is recommended that you are using a plug-in-power microphone, no battery is needed for long times" (page 16). 3 Press zREC. optical input,...• The microphone may pick up the operating sound of the recorder itself (such as this may cause the operating sound of priority; The recorder input automatically switches to the MIC (PLUG IN POWER) jack. Use the microphone away from a microphone Connect a stereo microphone (ECM-717...
...Press REC MODE repeatedly until "STEREO", "LP2", "LP4", or "MONO" lights up . 18-GB For details on recording, see "Recording for the microphone since power is recommended that you are using a plug-in-power microphone, no battery is needed for long times" (page 16). 3 Press zREC. optical input,...• The microphone may pick up the operating sound of the recorder itself (such as this may cause the operating sound of priority; The recorder input automatically switches to the MIC (PLUG IN POWER) jack. Use the microphone away from a microphone Connect a stereo microphone (ECM-717...
Operating Instructions (primary manual)
Page 19
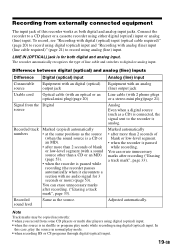
... cable and switches to a CD player or a cassette recorder using analog (line) input. Recorded sound level Same as both digital and analog input. You can erase unnecessary marks after recording ("Erasing a track mark", page 33). Recorded track numbers Marked (copied) automatically • at the ...or program play mode. • when recording BS or CS programs through digital (optical) input. 19-GB To record, see "Recording with digital (optical) input (optical cable required)" (page 20) to record using digital (optical) input and "Recording with no audio signal for both digital...
... cable and switches to a CD player or a cassette recorder using analog (line) input. Recorded sound level Same as both digital and analog input. You can erase unnecessary marks after recording ("Erasing a track mark", page 33). Recorded track numbers Marked (copied) automatically • at the ...or program play mode. • when recording BS or CS programs through digital (optical) input. 19-GB To record, see "Recording with digital (optical) input (optical cable required)" (page 20) to record using digital (optical) input and "Recording with no audio signal for both digital...
Operating Instructions (primary manual)
Page 20
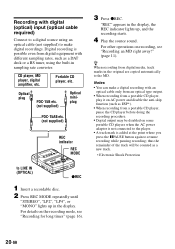
...may be counted as a DAT deck or a BS tuner, using an optical cable (not supplied) to make a digital recording with digital (optical) input (optical cable required) Connect to the MD. Notes • You can make digital recordings. CD player, MD player, digital amplifier, etc. Optical plug... track marks in the original are copied automatically to a digital source using the built-in the display. "REC" appears in the display, the REC indicator lights up in sampling rate converter. z When recording from digital equipment with different sampling rates, such as a new track....
...may be counted as a DAT deck or a BS tuner, using an optical cable (not supplied) to make a digital recording with digital (optical) input (optical cable required) Connect to the MD. Notes • You can make digital recordings. CD player, MD player, digital amplifier, etc. Optical plug... track marks in the original are copied automatically to a digital source using the built-in the display. "REC" appears in the display, the REC indicator lights up in sampling rate converter. z When recording from digital equipment with different sampling rates, such as a new track....
Operating Instructions (primary manual)
Page 21
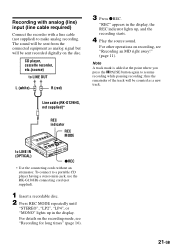
..., not supplied)* REC indicator REC MODE to LINE OUT L (white) R (red) 3 Press zREC. CD player, cassette recorder, etc.(source) to LINE IN (OPTICAL) zREC ∗ Use the connecting cords without an attenuator. "REC" appears in the display. To connect to a portable CD player having a stereo ...mini-jack, use the RK-G136HG connecting cord (not supplied). 1 Insert a recordable disc. 2 Press REC MODE repeatedly until "STEREO", "LP2", "LP4", or "MONO" lights up in the display, the...
..., not supplied)* REC indicator REC MODE to LINE OUT L (white) R (red) 3 Press zREC. CD player, cassette recorder, etc.(source) to LINE IN (OPTICAL) zREC ∗ Use the connecting cords without an attenuator. "REC" appears in the display. To connect to a portable CD player having a stereo ...mini-jack, use the RK-G136HG connecting cord (not supplied). 1 Insert a recordable disc. 2 Press REC MODE repeatedly until "STEREO", "LP2", "LP4", or "MONO" lights up in the display, the...
Operating Instructions (primary manual)
Page 22
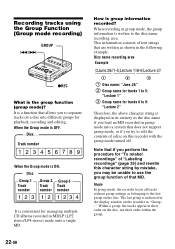
...into a system that MD. Note that if you perform the procedure for "To relabel recordings" of "Labeling recordings" (page 35) and rewrite this character string by mistake, you may be unable to use the group function of that does not support group mode, or if you try to... in group mode, the group information is group information recorded? When recording in their order on this recorder with the group mode turned off. Recording tracks using the Group Function (Group mode recording) GROUP ./> How is written to the disc name recording area. When the Group mode is a function that are...
...into a system that MD. Note that if you perform the procedure for "To relabel recordings" of "Labeling recordings" (page 35) and rewrite this character string by mistake, you may be unable to use the group function of that does not support group mode, or if you try to... in group mode, the group information is group information recorded? When recording in their order on this recorder with the group mode turned off. Recording tracks using the Group Function (Group mode recording) GROUP ./> How is written to the disc name recording area. When the Group mode is a function that are...

Operating Instructions (primary manual)
Page 25
...repeatedly until the current time appears in the 12-hour system, press XPAUSE again. You can also use the SPEED CONTROL dial to set if you press NPLAY to be accurately recorded for an important recording. • Under normal conditions, the clock may vary by pressing NPLAY. z You can skip a... step by about plus or minus 2 minutes per month. 25-GB Use a pointed object. To display the time in step 3....
...repeatedly until the current time appears in the 12-hour system, press XPAUSE again. You can also use the SPEED CONTROL dial to set if you press NPLAY to be accurately recorded for an important recording. • Under normal conditions, the clock may vary by pressing NPLAY. z You can skip a... step by about plus or minus 2 minutes per month. 25-GB Use a pointed object. To display the time in step 3....

Operating Instructions (primary manual)
Page 27
...SOUND repeatedly. To cancel the sound setting Press SOUND repeatedly until nothing appears in the display. Notes • The use the Voice Up function when monaural recording. A 003 20:51 1) During stereo playback, the Voice Up function emphasizes the left-right orientation of the ...Voice Up function is effective when using the supplied headphones to listen to distinguish and hear. You cannot use of individual voices, making them easier to stereo recordings. A - (none) SOUND 1 SOUND 2 V-UP1) Sound setting Factory setting...
...SOUND repeatedly. To cancel the sound setting Press SOUND repeatedly until nothing appears in the display. Notes • The use the Voice Up function when monaural recording. A 003 20:51 1) During stereo playback, the Voice Up function emphasizes the left-right orientation of the ...Voice Up function is effective when using the supplied headphones to listen to distinguish and hear. You cannot use of individual voices, making them easier to stereo recordings. A - (none) SOUND 1 SOUND 2 V-UP1) Sound setting Factory setting...

Operating Instructions (primary manual)
Page 28
... display when playback speed is changed. Each turn the dial. If you reach the beginning of the disc while using the Easy Search function, the recorder will appear in the display. while the recorder is playing or stopped. "S" appears in 7 steps (80%, 85%, ...100%, 105%, 110%). 1 Press EASY SEARCH... speed again, turn changes the playback speed. Finding a point quickly (Easy Search) Use the Easy Search function to 20 times each. 28-GB SPEED CONTROL 1 Turn the SPEED CONTROL dial while the recorder is playing. buttons can be pressed up to find a particular point quickly.
... display when playback speed is changed. Each turn the dial. If you reach the beginning of the disc while using the Easy Search function, the recorder will appear in the display. while the recorder is playing or stopped. "S" appears in 7 steps (80%, 85%, ...100%, 105%, 110%). 1 Press EASY SEARCH... speed again, turn changes the playback speed. Finding a point quickly (Easy Search) Use the Easy Search function to 20 times each. 28-GB SPEED CONTROL 1 Turn the SPEED CONTROL dial while the recorder is playing. buttons can be pressed up to find a particular point quickly.


