
Operating Instructions
Page 1
...battery pack NP-BK1 (1) AV connecting cable (1) (Sony Corporation 1-823-156-) USB connection support cable (1) (Sony Corporation 1-836-378-) 360 Video Lens VCL-BPP1 (1) (Only for MHS‑PM5K) 360 Video Lens Pouch (1) (Only for MHS...camera 90 degrees (hold it horizontally). Set the language and clock using the camera at 25°C (77°F). The battery is used for any unnecessary drives. Click [×] to the "bloggie...compliant Movie: MPEG4‑AVC/H.264 (.MP4) compliant Power Rechargeable Battery Pack NP-BK1, 3.6V Power ...
...battery pack NP-BK1 (1) AV connecting cable (1) (Sony Corporation 1-823-156-) USB connection support cable (1) (Sony Corporation 1-836-378-) 360 Video Lens VCL-BPP1 (1) (Only for MHS‑PM5K) 360 Video Lens Pouch (1) (Only for MHS...camera 90 degrees (hold it horizontally). Set the language and clock using the camera at 25°C (77°F). The battery is used for any unnecessary drives. Click [×] to the "bloggie...compliant Movie: MPEG4‑AVC/H.264 (.MP4) compliant Power Rechargeable Battery Pack NP-BK1, 3.6V Power ...
bloggie™ Handbook
Page 2
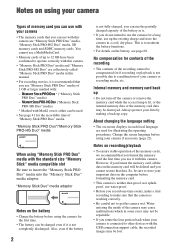
...memory and memory card back up the existing charge and store the camera in some cases may be destroyed. Always protect your camera if necessary (page 22). Water entering the inside of the camera may be lost. Also, even if the battery 2 is not fully charged, you can use the partially charged ...capacity of the battery as is to maintain the battery functions. • For details on the battery, see page 68. This is . • If ...
...memory and memory card back up the existing charge and store the camera in some cases may be destroyed. Always protect your camera if necessary (page 22). Water entering the inside of the camera may be lost. Also, even if the battery 2 is not fully charged, you can use the partially charged ...capacity of the battery as is to maintain the battery functions. • For details on the battery, see page 68. This is . • If ...
bloggie™ Handbook
Page 3
...or ejecting the memory card, be discolored and that do not affect the recording in JPEG*1 format. On image data compatibility • This camera supports "MP4 format" as IDs and mail addresses may not be saved on the LCD screen and the lens • The LCD screen is not a... malfunction. The camera may be able to record images, this camera are compressed/recorded in any way. This is manufactured using extremely high-precision technology, so over 99.99% of the camera or the battery pack. Notes on the internal memory of the...
...or ejecting the memory card, be discolored and that do not affect the recording in JPEG*1 format. On image data compatibility • This camera supports "MP4 format" as IDs and mail addresses may not be saved on the LCD screen and the lens • The LCD screen is not a... malfunction. The camera may be able to record images, this camera are compressed/recorded in any way. This is manufactured using extremely high-precision technology, so over 99.99% of the camera or the battery pack. Notes on the internal memory of the...

bloggie™ Handbook
Page 6
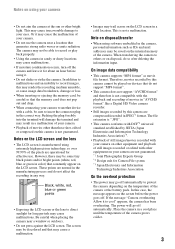
How to handle the camera • When carrying the camera, rotate the lens portion back as illustrated. • Be careful not to block the lens with your finger when shooting. • Do not hold the camera by only holding the battery/memory card cover, jack cover, the USB jack or the lens portion. • See page 15 for how to attach the wrist strap. 6
How to handle the camera • When carrying the camera, rotate the lens portion back as illustrated. • Be careful not to block the lens with your finger when shooting. • Do not hold the camera by only holding the battery/memory card cover, jack cover, the USB jack or the lens portion. • See page 15 for how to attach the wrist strap. 6
bloggie™ Handbook
Page 7
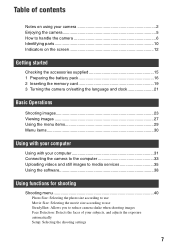
... parts 10 Indicators on the screen 12 Getting started Checking the accessories supplied 15 1 Preparing the battery pack 16 2 Inserting the memory card 19 3 Turning the camera on/setting the language and clock 21 Basic Operations Shooting images 23 Viewing images 27 Using the menu items 29 Menu items ...30 Using with your computer Using with your computer 31 Connecting the camera to the computer 33 Uploading videos and still images to media services 35 Using the software 38 Using functions for shooting Shooting menu ...
... parts 10 Indicators on the screen 12 Getting started Checking the accessories supplied 15 1 Preparing the battery pack 16 2 Inserting the memory card 19 3 Turning the camera on/setting the language and clock 21 Basic Operations Shooting images 23 Viewing images 27 Using the menu items 29 Menu items ...30 Using with your computer Using with your computer 31 Connecting the camera to the computer 33 Uploading videos and still images to media services 35 Using the software 38 Using functions for shooting Shooting menu ...

bloggie™ Handbook
Page 9
Table of contents Troubleshooting Troubleshooting 58 Warning indicators and messages 64 Others On the "Memory Stick" media 66 On the battery 68 Precautions 69 Specifications 70 Index Index...71 9
Table of contents Troubleshooting Troubleshooting 58 Warning indicators and messages 64 Others On the "Memory Stick" media 66 On the battery 68 Precautions 69 Specifications 70 Index Index...71 9
bloggie™ Handbook
Page 10
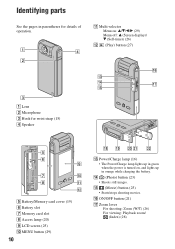
.... K Multi-selector Menu on: v/V/b/B (29) Menu off: v (Screen display)/ V (Self-timer) (26) L (Play) button (27) A Lens B Microphone C Hook for wrist strap (15) D Speaker E Battery/Memory card cover (19) F Battery slot G Memory card slot H Access lamp (20) I LCD screen (25) J MENU button (29) 10 M Power/Charge lamp (16) • The Power/Charge lamp...
.... K Multi-selector Menu on: v/V/b/B (29) Menu off: v (Screen display)/ V (Self-timer) (26) L (Play) button (27) A Lens B Microphone C Hook for wrist strap (15) D Speaker E Battery/Memory card cover (19) F Battery slot G Memory card slot H Access lamp (20) I LCD screen (25) J MENU button (29) 10 M Power/Charge lamp (16) • The Power/Charge lamp...

bloggie™ Handbook
Page 12
...tilt the multi-selector to make indicators appear again, carry out any operation other than those using internal memory. If you purchased this camera. See the pages in effect when you want to v (Screen display) repeatedly, the display changes (page 25). Indicators on ...the still image settings appears near the (Photo) icon. When shooting still images A Display / B Display Indication Battery remaining (18) Low battery warning (64) SteadyShot (42) Recording folder • This does not appear when using the zoom lever. The indicators appear for details...
...tilt the multi-selector to make indicators appear again, carry out any operation other than those using internal memory. If you purchased this camera. See the pages in effect when you want to v (Screen display) repeatedly, the display changes (page 25). Indicators on ...the still image settings appears near the (Photo) icon. When shooting still images A Display / B Display Indication Battery remaining (18) Low battery warning (64) SteadyShot (42) Recording folder • This does not appear when using the zoom lever. The indicators appear for details...

bloggie™ Handbook
Page 14
... using internal memory. Indicators on the screen When playing back still images When playing back movies 14 A Display Indication Battery remaining (18) Image size (40) VOL. Protect (44) Volume (27) Zoom scaling Low battery warning (64) B Display 00:00:00 2010-1-1 9:30 AM BACK/ NEXT v DISP/ V VOLUME C Display 12/12 Indication Playback...
... using internal memory. Indicators on the screen When playing back still images When playing back movies 14 A Display Indication Battery remaining (18) Image size (40) VOL. Protect (44) Volume (27) Zoom scaling Low battery warning (64) B Display 00:00:00 2010-1-1 9:30 AM BACK/ NEXT v DISP/ V VOLUME C Display 12/12 Indication Playback...

bloggie™ Handbook
Page 15
...Help") - bloggie Handbook (PDF) • Instruction Manual • Important Notice Hook 15 Getting started Getting started Checking the accessories supplied • Rechargeable battery pack NP-BK1 (1) • 360 Video Lens VCL-BPP1 (1) (MHS-PM5K only) • Memory card ("Memory Stick PRO Duo" 4GB) (1) (MHS-PM5K only...) • A/V connecting cable (1) • USB connection support cable (1) Attach the strap and place your hand through the loop to prevent the camera from damage by being dropped, etc. • 360 Video Lens Pouch (1) (MHS-PM5K only) •...
...Help") - bloggie Handbook (PDF) • Instruction Manual • Important Notice Hook 15 Getting started Getting started Checking the accessories supplied • Rechargeable battery pack NP-BK1 (1) • 360 Video Lens VCL-BPP1 (1) (MHS-PM5K only) • Memory card ("Memory Stick PRO Duo" 4GB) (1) (MHS-PM5K only...) • A/V connecting cable (1) • USB connection support cable (1) Attach the strap and place your hand through the loop to prevent the camera from damage by being dropped, etc. • 360 Video Lens Pouch (1) (MHS-PM5K only) •...
bloggie™ Handbook
Page 16
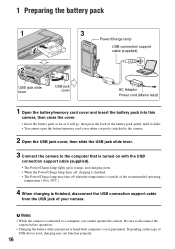
...to 30°C.) 4 When charging is finished, disconnect the USB connection support cable from the USB jack of the battery pack gently until it will go, then press the back of your camera. Depending on the type of USB device used, charging may turn off , charging is finished. • The...Power cord (Mains lead) 1 Open the battery/memory card cover and insert the battery pack into this camera, then close the cover. • Insert the battery pack as far as it clicks. • You cannot open the battery/memory card cover when a tripod is attached to the camera. 2 Open the USB jack cover, ...
...to 30°C.) 4 When charging is finished, disconnect the USB connection support cable from the USB jack of the battery pack gently until it will go, then press the back of your camera. Depending on the type of USB device used, charging may turn off , charging is finished. • The...Power cord (Mains lead) 1 Open the battery/memory card cover and insert the battery pack into this camera, then close the cover. • Insert the battery pack as far as it clicks. • You cannot open the battery/memory card cover when a tripod is attached to the camera. 2 Open the USB jack cover, ...
bloggie™ Handbook
Page 17
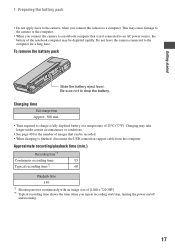
... a notebook computer that is finished, disconnect the USB connection support cable from the computer. Do not leave the camera connected to charge a fully depleted battery at a temperature of 25°C (77°F). Charging time Full charge time Approx. 300 min. • Time required to ... power on/off and zooming. 17 Be sure not to a computer. Getting started 1 Preparing the battery pack • Do not apply force to the camera, when you connect the camera to drop the battery. Charging may take longer under certain circumstances or conditions. • See page 40 for a long ...
... a notebook computer that is finished, disconnect the USB connection support cable from the computer. Do not leave the camera connected to charge a fully depleted battery at a temperature of 25°C (77°F). Charging time Full charge time Approx. 300 min. • Time required to ... power on/off and zooming. 17 Be sure not to a computer. Getting started 1 Preparing the battery pack • Do not apply force to the camera, when you connect the camera to drop the battery. Charging may take longer under certain circumstances or conditions. • See page 40 for a long ...
bloggie™ Handbook
Page 18
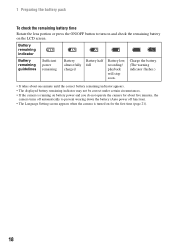
... the lens portion or press the ON/OFF button to prevent wearing down the battery (Auto power off function). • The Language Setting screen appears when the camera is turned on the LCD screen. Battery remaining indicator Battery remaining guidelines Sufficient power remaining Battery almost fully charged Battery half full Battery low, recording/ playback will stop soon.
... the lens portion or press the ON/OFF button to prevent wearing down the battery (Auto power off function). • The Language Setting screen appears when the camera is turned on the LCD screen. Battery remaining indicator Battery remaining guidelines Sufficient power remaining Battery almost fully charged Battery half full Battery low, recording/ playback will stop soon.
bloggie™ Handbook
Page 19
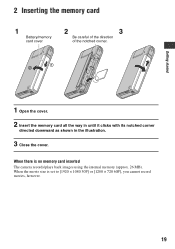
Getting started 2 Inserting the memory card 1 Battery/memory card cover 2 3 Be careful of the direction of the notched corner. 1 2 1 Open the cover. 2 Insert the memory card all the way in until it clicks with its notched corner directed downward as shown in the illustration. 3 Close the cover. When the movie size is no memory card inserted The camera records/plays back images using the internal memory (approx. 26 MB). When there is set to [1920 × 1080 30P] or [1280 × 720 60P], you cannot record movies, however. 19
Getting started 2 Inserting the memory card 1 Battery/memory card cover 2 3 Be careful of the direction of the notched corner. 1 2 1 Open the cover. 2 Insert the memory card all the way in until it clicks with its notched corner directed downward as shown in the illustration. 3 Close the cover. When the movie size is no memory card inserted The camera records/plays back images using the internal memory (approx. 26 MB). When there is set to [1920 × 1080 30P] or [1280 × 720 60P], you cannot record movies, however. 19

bloggie™ Handbook
Page 20
This may cause damage to data in once. • Never remove the memory card when the access lamp is lit. Make sure that the access lamp is not lit, then push the memory card in the memory card. 20 2 Inserting the memory card To remove the memory card Open the battery/memory card cover.
This may cause damage to data in once. • Never remove the memory card when the access lamp is lit. Make sure that the access lamp is not lit, then push the memory card in the memory card. 20 2 Inserting the memory card To remove the memory card Open the battery/memory card cover.

bloggie™ Handbook
Page 25
...is connected to AUTO. Carry out any operation other than those using the zoom lever. However, the battery power may decrease faster under such condition. • The LCD screen will not display while the camera is set to a TV. 25 Tilt the multi-selector to v (Screen display) repeatedly, the display... LCD backlight up. Tilt to v (Screen display) longer again to normal. • If you view images in effect when you purchased the camera. Basic Operations Shooting images Changing the screen display v (Screen display) button When you tilt the multi-selector to v (Screen display). -
...is connected to AUTO. Carry out any operation other than those using the zoom lever. However, the battery power may decrease faster under such condition. • The LCD screen will not display while the camera is set to a TV. 25 Tilt the multi-selector to v (Screen display) repeatedly, the display... LCD backlight up. Tilt to v (Screen display) longer again to normal. • If you view images in effect when you purchased the camera. Basic Operations Shooting images Changing the screen display v (Screen display) button When you tilt the multi-selector to v (Screen display). -
bloggie™ Handbook
Page 48
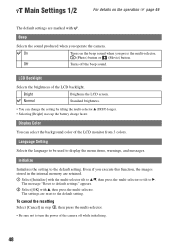
.... Display Color You can change the setting by tilting the multi-selector v (DISP) longer. • Selecting [Bright] uses up the battery charge faster. Language Setting Selects the language to be used to the default setting. Normal Standard brightness. • You can select the background...Initialize] with . Bright Brightens the LCD screen. Off Turns off while initializing. 48 The message "Reset to turn the power of the camera off the beep sound. LCD Backlight Selects the brightness of the LCD monitor from 3 colors. The settings are marked with the multi-...
.... Display Color You can change the setting by tilting the multi-selector v (DISP) longer. • Selecting [Bright] uses up the battery charge faster. Language Setting Selects the language to be used to the default setting. Normal Standard brightness. • You can select the background...Initialize] with . Bright Brightens the LCD screen. Off Turns off while initializing. 48 The message "Reset to turn the power of the camera off the beep sound. LCD Backlight Selects the brightness of the LCD monitor from 3 colors. The settings are marked with the multi-...
bloggie™ Handbook
Page 50
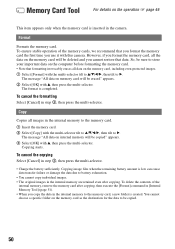
...[Cancel] in step 2, then press the multi-selector. So, be copied" appears. 3 Select [OK] with the multi-selector tilt to v/V/b/B, then tilt to battery exhaustion. • You cannot copy individual images. • The original images in the internal memory to the memory card, a new folder is low can cause...to be deleted and you cannot restore that you format the memory card the first time you format the memory card, all images in the camera. To delete the contents of the memory cards, we recommend that data. The format is inserted in the internal memory to B. Copying starts...
...[Cancel] in step 2, then press the multi-selector. So, be copied" appears. 3 Select [OK] with the multi-selector tilt to v/V/b/B, then tilt to battery exhaustion. • You cannot copy individual images. • The original images in the internal memory to the memory card, a new folder is low can cause...to be deleted and you cannot restore that you format the memory card the first time you format the memory card, all images in the camera. To delete the contents of the memory cards, we recommend that data. The format is inserted in the internal memory to B. Copying starts...
bloggie™ Handbook
Page 58
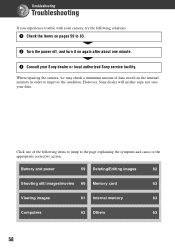
... Click one minute. 3 Consult your Sony dealer or local authorized Sony service facility. Battery and power 59 Deleting/Editing images 62 Shooting still images/movies 60 Memory card 63 Viewing images 61 Internal memory 63 Computers 62 Others 63 58 When repairing the camera, we may check a minimum amount ... stored on again after about one of the following items to jump to improve the condition. Troubleshooting Troubleshooting If you experience trouble with your camera, try the following solutions. 1 Check the items on pages 59 to 63. 2 Turn the power off, and turn it on the...
... Click one minute. 3 Consult your Sony dealer or local authorized Sony service facility. Battery and power 59 Deleting/Editing images 62 Shooting still images/movies 60 Memory card 63 Viewing images 61 Internal memory 63 Computers 62 Others 63 58 When repairing the camera, we may check a minimum amount ... stored on again after about one of the following items to jump to improve the condition. Troubleshooting Troubleshooting If you experience trouble with your camera, try the following solutions. 1 Check the items on pages 59 to 63. 2 Turn the power off, and turn it on the...
bloggie™ Handbook
Page 59
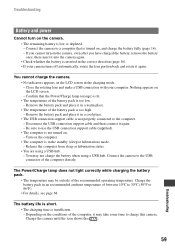
...is in the charging mode. - Remove the battery pack and place it again. You may not charge the battery when using a USB hub. - Connect the camera to the computer. - Depending on . - Confirm that is too high. - Be sure to charge this camera. The Power/Charge lamp does not light ...correctly while charging the battery pack. • The temperature may take...
...is in the charging mode. - Remove the battery pack and place it again. You may not charge the battery when using a USB hub. - Connect the camera to the computer. - Depending on . - Confirm that is too high. - Be sure to charge this camera. The Power/Charge lamp does not light ...correctly while charging the battery pack. • The temperature may take...


