
bloggie™ Handbook
Page 2
... due to maintain the battery functions. • For details on the computer before using your camera if necessary (page 22). Water entering the inside of the camera may be sure to make sure that the camera is lit, or the internal memory data or the memory card data may cause malfunctions which ... events, make a trial recording to store your important data on the battery, see page 68. Internal memory and memory card back up copy. Notes on using your camera Types of memory card you can use with your camera • The memory cards that you cannot restore that data. "Memory Stick PRO ...
... due to maintain the battery functions. • For details on the computer before using your camera if necessary (page 22). Water entering the inside of the camera may be sure to make sure that the camera is lit, or the internal memory data or the memory card data may cause malfunctions which ... events, make a trial recording to store your important data on the battery, see page 68. Internal memory and memory card back up copy. Notes on using your camera Types of memory card you can use with your camera • The memory cards that you cannot restore that data. "Memory Stick PRO ...

bloggie™ Handbook
Page 6
How to handle the camera • When carrying the camera, rotate the lens portion back as illustrated. • Be careful not to block the lens with your finger when shooting. • Do not hold the camera by only holding the battery/memory card cover, jack cover, the USB jack or the lens portion. • See page 15 for how to attach the wrist strap. 6
How to handle the camera • When carrying the camera, rotate the lens portion back as illustrated. • Be careful not to block the lens with your finger when shooting. • Do not hold the camera by only holding the battery/memory card cover, jack cover, the USB jack or the lens portion. • See page 15 for how to attach the wrist strap. 6
bloggie™ Handbook
Page 10
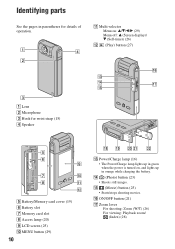
P ON/OFF button (21) Q Zoom lever For shooting: Zoom (W/T) (26) For viewing: Playback zoom/ (Index) (28) Identifying parts See the pages in orange while charging the battery. N (Photo) button (23) • Shoots still images. K Multi-selector Menu on: v/V/b/B (29) Menu off: v (Screen display)/ V (Self-timer) (26) L (...
P ON/OFF button (21) Q Zoom lever For shooting: Zoom (W/T) (26) For viewing: Playback zoom/ (Index) (28) Identifying parts See the pages in orange while charging the battery. N (Photo) button (23) • Shoots still images. K Multi-selector Menu on: v/V/b/B (29) Menu off: v (Screen display)/ V (Self-timer) (26) L (...

bloggie™ Handbook
Page 12
...Battery remaining (18) Low battery warning (64) SteadyShot (42) Recording folder • This does not appear when using the zoom lever. See the pages in effect when you tilt the multi-selector to make indicators appear again, carry out any operation other than those using internal memory. The indicators...) Indication Current date and time Changing the screen display Using the self-timer 12 Indicators on the screen When you purchased this camera. Indicators on the still image settings appears near the (Photo) icon. If you want to v (Screen display) repeatedly, the display changes...
...Battery remaining (18) Low battery warning (64) SteadyShot (42) Recording folder • This does not appear when using the zoom lever. See the pages in effect when you tilt the multi-selector to make indicators appear again, carry out any operation other than those using internal memory. The indicators...) Indication Current date and time Changing the screen display Using the self-timer 12 Indicators on the screen When you purchased this camera. Indicators on the still image settings appears near the (Photo) icon. If you want to v (Screen display) repeatedly, the display changes...
bloggie™ Handbook
Page 17
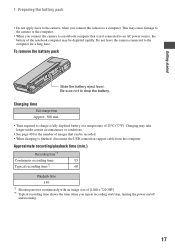
... *1 Shooting movies continuously with an image size of [1280 × 720 30P] *2 Typical recording time shows the time when you connect the camera to a notebook computer that can be depleted rapidly. To remove the battery pack Slide the battery eject lever. Charging time Full charge time Approx.... is not connected to an AC power source, the battery of the notebook computer may take longer under certain circumstances or conditions. • See page 40 for a long time. Be sure not to charge a fully depleted battery at a temperature of images that is finished, disconnect the USB...
... *1 Shooting movies continuously with an image size of [1280 × 720 30P] *2 Typical recording time shows the time when you connect the camera to a notebook computer that can be depleted rapidly. To remove the battery pack Slide the battery eject lever. Charging time Full charge time Approx.... is not connected to an AC power source, the battery of the notebook computer may take longer under certain circumstances or conditions. • See page 40 for a long time. Be sure not to charge a fully depleted battery at a temperature of images that is finished, disconnect the USB...
bloggie™ Handbook
Page 18
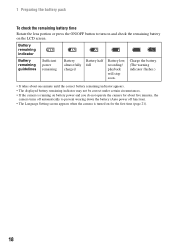
...flashes.) • It takes about five minutes, the camera turns off function). • The Language Setting screen appears when the camera is running on battery power and you do not operate the camera for the first time (page 21). 18 1 Preparing the battery pack To check ... remaining indicator appears. • The displayed battery remaining indicator may not be correct under certain circumstances. • If the camera is turned on the LCD screen. Battery remaining indicator Battery remaining guidelines Sufficient power remaining Battery almost fully charged Battery half full...
...flashes.) • It takes about five minutes, the camera turns off function). • The Language Setting screen appears when the camera is running on battery power and you do not operate the camera for the first time (page 21). 18 1 Preparing the battery pack To check ... remaining indicator appears. • The displayed battery remaining indicator may not be correct under certain circumstances. • If the camera is turned on the LCD screen. Battery remaining indicator Battery remaining guidelines Sufficient power remaining Battery almost fully charged Battery half full...

bloggie™ Handbook
Page 22
...] with B, then press the multi-selector. To change the language settings Press MENU and select (Setup) t (page 48). (Main Settings 1/2) t [Language Setting] To change the date and time Press MENU and select (Setup) t [Clock Settings] (page 52). 22 To turn the power off Press the ON/OFF button. • You can also... turn the power off by rotating the lens portion back while the camera is in the recording mode. • You cannot turn the power...
...] with B, then press the multi-selector. To change the language settings Press MENU and select (Setup) t (page 48). (Main Settings 1/2) t [Language Setting] To change the date and time Press MENU and select (Setup) t [Clock Settings] (page 52). 22 To turn the power off Press the ON/OFF button. • You can also... turn the power off by rotating the lens portion back while the camera is in the recording mode. • You cannot turn the power...

bloggie™ Handbook
Page 28
You can delete images from the MENU button (page 43). 28 To delete the images Allows you to the index screen Slide the zoom lever toward (Index) while displaying a still image or pausing the playback of a movie. Viewing images To return to select unwanted images for deletion.
You can delete images from the MENU button (page 43). 28 To delete the images Allows you to the index screen Slide the zoom lever toward (Index) while displaying a still image or pausing the playback of a movie. Viewing images To return to select unwanted images for deletion.

bloggie™ Handbook
Page 30
Menu for shooting (page 40) Photo Size SteadyShot Setup Movie Size Face Detection Menu for viewing (page 43) (Delete) (Protect) (Setup) (Slideshow) (Rotate) 30 The shooting menu is available only in the shooting mode, and the viewing menu is available only in the playback mode. Only the available items are displayed on the camera mode. Menu items The available menu items vary depending on the screen.
Menu for shooting (page 40) Photo Size SteadyShot Setup Movie Size Face Detection Menu for viewing (page 43) (Delete) (Protect) (Setup) (Slideshow) (Rotate) 30 The shooting menu is available only in the shooting mode, and the viewing menu is available only in the playback mode. Only the available items are displayed on the camera mode. Menu items The available menu items vary depending on the screen.
bloggie™ Handbook
Page 38
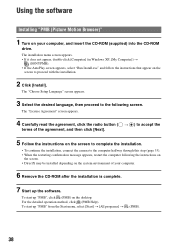
..., and then click [Next]. 5 Follow the instructions on the screen to complete the installation. • To continue the installation, connect the camera to proceed with the installation. 2 Click [Install]. The installation menu screen appears. • If it does not appear, double-click [Computer...screen appears, select "Run Install.exe" and follow the instructions that appear on the screen to the computer halfway through this step (page 33). • When the restarting confirmation message appears, restart the computer following screen. Using the software Installing "PMB (Picture Motion ...
..., and then click [Next]. 5 Follow the instructions on the screen to complete the installation. • To continue the installation, connect the camera to proceed with the installation. 2 Click [Install]. The installation menu screen appears. • If it does not appear, double-click [Computer...screen appears, select "Run Install.exe" and follow the instructions that appear on the screen to the computer halfway through this step (page 33). • When the restarting confirmation message appears, restart the computer following screen. Using the software Installing "PMB (Picture Motion ...
bloggie™ Handbook
Page 40
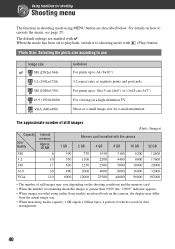
... A4 (8×10") 3:2 aspect ratio as in shooting mode using earlier Sony models are played back on how to shooting mode with this camera 2 GB 4 GB 8 GB 16 GB 32 GB 5M 6 390 770...When the mode has been set to playback, switch it to operate the menu, see page 29. Using functions for shooting Shooting menu The function in photo prints and postcards For prints...1 GB Memory card formatted with (Play) button. The default settings are described below. For details on this camera, the display may differ from the actual image size. • When measuring media capacity, 1 GB equals ...
... A4 (8×10") 3:2 aspect ratio as in shooting mode using earlier Sony models are played back on how to shooting mode with this camera 2 GB 4 GB 8 GB 16 GB 32 GB 5M 6 390 770...When the mode has been set to playback, switch it to operate the menu, see page 29. Using functions for shooting Shooting menu The function in photo prints and postcards For prints...1 GB Memory card formatted with (Play) button. The default settings are described below. For details on this camera, the display may differ from the actual image size. • When measuring media capacity, 1 GB equals ...
bloggie™ Handbook
Page 41
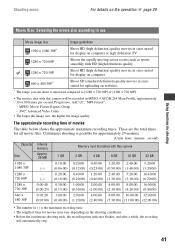
... or high definition TV 1280 × 720 60P Shoots the rapidly moving action scenes such as sports smoothly with this camera will automatically stop. 41 Shooting menu For details on the operation 1 page 29 Using functions for shooting Movie Size: Selecting the movie size according to [1280 × 720 30P] or [1280...) (11:00:00) (22:00:00) • The number in ( ) is narrowed compared to use Movie image size Usage guidelines 1920 × 1080 30P* Shoot HD (high definition) quality movies in sizes suited for all movie files. MPEG: Movie Picture Experts Group -
... or high definition TV 1280 × 720 60P Shoots the rapidly moving action scenes such as sports smoothly with this camera will automatically stop. 41 Shooting menu For details on the operation 1 page 29 Using functions for shooting Movie Size: Selecting the movie size according to [1280 × 720 30P] or [1280...) (11:00:00) (22:00:00) • The number in ( ) is narrowed compared to use Movie image size Usage guidelines 1920 × 1080 30P* Shoot HD (high definition) quality movies in sizes suited for all movie files. MPEG: Movie Picture Experts Group -

bloggie™ Handbook
Page 42
...this reduces the overall recording time. Off Does not activate Face Detection function. Off Does not activate the camera shake reduction function. • The camera shake reduction function works only in the recording time of your subjects, and adjusts the exposure automatically On Activates... settings You can change the settings on the operation 1 page 29 Your camera uses the VBR (Variable Bit Rate) format to automatically adjust image quality to reduce camera shake when shooting images On Activates the camera shake reduction function. SteadyShot: Allows you to suit the ...
...this reduces the overall recording time. Off Does not activate Face Detection function. Off Does not activate the camera shake reduction function. • The camera shake reduction function works only in the recording time of your subjects, and adjusts the exposure automatically On Activates... settings You can change the settings on the operation 1 page 29 Your camera uses the VBR (Variable Bit Rate) format to automatically adjust image quality to reduce camera shake when shooting images On Activates the camera shake reduction function. SteadyShot: Allows you to suit the ...

bloggie™ Handbook
Page 43
... the menu. 3 Select (Slideshow) with the multi-selector tilt to v/V, then press the multi-selector. 4 Select [Start] with a mark again to operate the menu, see page 29.
... the menu. 3 Select (Slideshow) with the multi-selector tilt to v/V, then press the multi-selector. 4 Select [Start] with a mark again to operate the menu, see page 29.

bloggie™ Handbook
Page 44
Viewing menu For details on the operation 1 page 29 Interval 1 sec 3 sec 5 sec 10 sec Sets the slide show ends. (Protect): Preventing accidental erasure Protects recorded images against accidental erasure. The mark is released. (Rotate): Rotating a still image Rotates a still image. 1 Press (Play) button to set the camera to playback mode. 2 Select the...
Viewing menu For details on the operation 1 page 29 Interval 1 sec 3 sec 5 sec 10 sec Sets the slide show ends. (Protect): Preventing accidental erasure Protects recorded images against accidental erasure. The mark is released. (Rotate): Rotating a still image Rotates a still image. 1 Press (Play) button to set the camera to playback mode. 2 Select the...

bloggie™ Handbook
Page 45
Viewing menu For details on the operation 1 page 29 4 Select [Rotate] with v/V, then press the multi-selector. 5 Select [ ], then rotate the image with b/B. 6 Select [OK] with other cameras. • When viewing images on the software. (Setup): Changing Setup items See page 46. Movies - Using functions for viewing 45 Protected still images • You may not be reflected depending on a computer, the image rotation information may not be able to rotate images shot with v/V, then press the multi-selector. • You cannot rotate the following types of images. -
Viewing menu For details on the operation 1 page 29 4 Select [Rotate] with v/V, then press the multi-selector. 5 Select [ ], then rotate the image with b/B. 6 Select [OK] with other cameras. • When viewing images on the software. (Setup): Changing Setup items See page 46. Movies - Using functions for viewing 45 Protected still images • You may not be reflected depending on a computer, the image rotation information may not be able to rotate images shot with v/V, then press the multi-selector. • You cannot rotate the following types of images. -

bloggie™ Handbook
Page 47
On Use the Flicker Reduction. Customizing the settings 47 Off Does not use the Flicker Reduction. Shooting Setting For details on the operation 1 page 46 The default settings are marked with . Flicker Reduction Curbs the flicker generated by fluorescent by using the electro-shutter.
On Use the Flicker Reduction. Customizing the settings 47 Off Does not use the Flicker Reduction. Shooting Setting For details on the operation 1 page 46 The default settings are marked with . Flicker Reduction Curbs the flicker generated by fluorescent by using the electro-shutter.
bloggie™ Handbook
Page 48
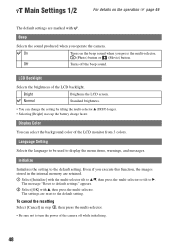
...• Be sure not to B. Language Setting Selects the language to be used to the default setting. LCD Backlight Selects the brightness of the camera off the beep sound. Display Color You can change the setting by tilting the multi-selector v (DISP) longer. • Selecting [Bright] ...uses up the battery charge faster. On Turns on the operation 1 page 46 The default settings are marked with v, then press the multi-selector. Main Settings 1/2 For details on the beep sound when you operate the...
...• Be sure not to B. Language Setting Selects the language to be used to the default setting. LCD Backlight Selects the brightness of the camera off the beep sound. Display Color You can change the setting by tilting the multi-selector v (DISP) longer. • Selecting [Bright] ...uses up the battery charge faster. On Turns on the operation 1 page 46 The default settings are marked with v, then press the multi-selector. Main Settings 1/2 For details on the beep sound when you operate the...

bloggie™ Handbook
Page 49
...images on the memory card when a memory card is not inserted. Select this when you want to view images on a TV screen, check page 56 for the display method of images on the recording media set [LUN Settings] to [Multi], while uploading videos and still images to a ...computer. Different countries and regions use different TV color systems. If you connect the camera to media services using "PMB Portable". Customizing the settings 49 b Note • Be sure to NTSC mode (e.g., for Europe, China). NTSC Sets ...
...images on the memory card when a memory card is not inserted. Select this when you want to view images on a TV screen, check page 56 for the display method of images on the recording media set [LUN Settings] to [Multi], while uploading videos and still images to a ...computer. Different countries and regions use different TV color systems. If you connect the camera to media services using "PMB Portable". Customizing the settings 49 b Note • Be sure to NTSC mode (e.g., for Europe, China). NTSC Sets ...
bloggie™ Handbook
Page 50
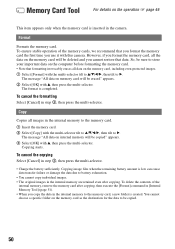
... memory card after copying. The format is completed. Format Formats the memory card. So, be copied" appears. 3 Select [OK] with this camera. To cancel the formatting Select [Cancel] in the internal memory are retained even after copying, then execute the [Format] command in [Internal Memory Tool.... The message "All data on internal memory will be copied. 50 To cancel the copying Select [Cancel] in the camera. Memory Card Tool For details on the operation 1 page 46 This item appears only when the memory card is inserted in step 3, then press the multi-selector. •...
... memory card after copying. The format is completed. Format Formats the memory card. So, be copied" appears. 3 Select [OK] with this camera. To cancel the formatting Select [Cancel] in the internal memory are retained even after copying, then execute the [Format] command in [Internal Memory Tool.... The message "All data on internal memory will be copied. 50 To cancel the copying Select [Cancel] in the camera. Memory Card Tool For details on the operation 1 page 46 This item appears only when the memory card is inserted in step 3, then press the multi-selector. •...
