Operating Instructions
Page 6
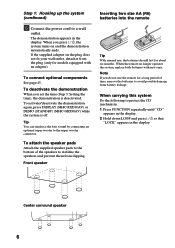
...protect the CD mechanism. 1 Press FUNCTION repeatedly until "CD" appears in the display. 2 Hold down LOOP and press so that "LOCK" appears in the display. Front speaker Inserting two size AA (R6) batteries into the remote ] } } ] Tip With normal use the remote for about ...six months. The demonstration appears in the display. To activate/deactivate the demonstration again, press DISPLAY (MHC-RXD10AV) or DEMO (STANDBY) (MHC-GRX90AV) while the system is deactivated. To attach the speaker...
...protect the CD mechanism. 1 Press FUNCTION repeatedly until "CD" appears in the display. 2 Hold down LOOP and press so that "LOCK" appears in the display. Front speaker Inserting two size AA (R6) batteries into the remote ] } } ] Tip With normal use the remote for about ...six months. The demonstration appears in the display. To activate/deactivate the demonstration again, press DISPLAY (MHC-RXD10AV) or DEMO (STANDBY) (MHC-GRX90AV) while the system is deactivated. To attach the speaker...

Operating Instructions
Page 8
... for Dolby Pro Logic Surround sound. 8 "PRO LOGIC ON" appears. 2 Press T.TONE ON/OFF on the remote to adjust the volume. The test tone is heard from each speaker using the test tone that the system provides. (Power) 1 ◊ √ · ª· ª· =+ p 0 ) P · ...P p ◊ √ 1 2, 4 3 1 Press PRO LOGIC (or PRO LOGIC ON/OFF on the remote). Step 2: Setting up your listening position, press...
... for Dolby Pro Logic Surround sound. 8 "PRO LOGIC ON" appears. 2 Press T.TONE ON/OFF on the remote to adjust the volume. The test tone is heard from each speaker using the test tone that the system provides. (Power) 1 ◊ √ · ª· ª· =+ p 0 ) P · ...P p ◊ √ 1 2, 4 3 1 Press PRO LOGIC (or PRO LOGIC ON/OFF on the remote). Step 2: Setting up your listening position, press...

Operating Instructions
Page 13
... MODE ◊ √ · ª· ª· =+ p 0 ) P · P p ◊ √ CD · = + p P 0 ) VOLUME +/- When you press CD (P (or CD · on the remote) when the disc tray is not placed properly it on the disc tray. DISC SKIP/ EX-CHANGE (Power) p 2 CD (P 1 1 Press § and place up to rotate the disc tray. 2 Press one...
... MODE ◊ √ · ª· ª· =+ p 0 ) P · P p ◊ √ CD · = + p P 0 ) VOLUME +/- When you press CD (P (or CD · on the remote) when the disc tray is not placed properly it on the disc tray. DISC SKIP/ EX-CHANGE (Power) p 2 CD (P 1 1 Press § and place up to rotate the disc tray. 2 Press one...

Operating Instructions
Page 14
...clockwise (to go forward) or counterclockwise (to resume play Press p. Play only the CD you reach the desired track. (Or press + (to go forward) or = (to the CD player and start playing a CD just by pressing CD (P or the DISC 1~3 buttons (Automatic Source Selection). • If there is ...appears. playing Adjust the volume Turn VOLUME (or press VOLUME +/- on the remote). Select a track During play and release it when you have selected Press PLAY MODE repeatedly until "ALL DISCS" appears. When the system is in the Power Saving Mode, the One Touch Play function does not ...
...clockwise (to go forward) or counterclockwise (to resume play Press p. Play only the CD you reach the desired track. (Or press + (to go forward) or = (to the CD player and start playing a CD just by pressing CD (P or the DISC 1~3 buttons (Automatic Source Selection). • If there is ...appears. playing Adjust the volume Turn VOLUME (or press VOLUME +/- on the remote). Select a track During play and release it when you have selected Press PLAY MODE repeatedly until "ALL DISCS" appears. When the system is in the Power Saving Mode, the One Touch Play function does not ...

Operating Instructions
Page 16
...clockwise = + (or press + (or press = on the remote) on the model you can receive. Turn VOLUME (or press VOLUME +/- Be sure to check which bands you select UKV. 2 Turn the jog dial (or press = or + on the remote). numbers. Preset number* Frequency * When only one station is displayed... when you can receive vary depending on the remote) for higher for lower preset preset numbers. Listening to tune in the desired preset station....
...clockwise = + (or press + (or press = on the remote) on the model you can receive. Turn VOLUME (or press VOLUME +/- Be sure to check which bands you select UKV. 2 Turn the jog dial (or press = or + on the remote). numbers. Preset number* Frequency * When only one station is displayed... when you can receive vary depending on the remote) for higher for lower preset preset numbers. Listening to tune in the desired preset station....

Operating Instructions
Page 18
.... Select ß (or RELAY) to record on both sides, be sure to record on one side. Deck B stands by for songs you record on the remote. * AMS (Automatic Music Sensor) (Power) 3p To stop recording Press p. Recording from the reverse side, recording stops at the end of the reverse side. •...
.... Select ß (or RELAY) to record on both sides, be sure to record on one side. Deck B stands by for songs you record on the remote. * AMS (Automatic Music Sensor) (Power) 3p To stop recording Press p. Recording from the reverse side, recording stops at the end of the reverse side. •...

Operating Instructions
Page 19
Remove the cassette Press §. When the system is in the Power Saving Mode, the One Touch Play function does not work. • You can switch from another source to the tape deck ...-forward Press 0 or ). continued Basic Operations 2 Press DIRECTION repeatedly to select A to play the reverse side. (Press DECK A (or DECK B) ª· again on the remote). To play both decks in lowlevel high-frequency signals, press DOLBY NR so that "DOLBY NR" appears. ◊ √ · ª· ª· =+ p 0 ) P ·...
Remove the cassette Press §. When the system is in the Power Saving Mode, the One Touch Play function does not work. • You can switch from another source to the tape deck ...-forward Press 0 or ). continued Basic Operations 2 Press DIRECTION repeatedly to select A to play the reverse side. (Press DECK A (or DECK B) ª· again on the remote). To play both decks in lowlevel high-frequency signals, press DOLBY NR so that "DOLBY NR" appears. ◊ √ · ª· ª· =+ p 0 ) P ·...

Operating Instructions
Page 20
... same direction as the 9 or ( indicator to go back. (Or press = or + on the left and right channels. - The recording level is recorded on the remote.) The search direction, + (forward) or - (back), and number of songs being skipped (1~9) appear in deck B. Deck B stands by for the beginning of a baritone sax). - Example...
... same direction as the 9 or ( indicator to go back. (Or press = or + on the left and right channels. - The recording level is recorded on the remote.) The search direction, + (forward) or - (back), and number of songs being skipped (1~9) appear in deck B. Deck B stands by for the beginning of a baritone sax). - Example...

Operating Instructions
Page 24
...repeatedly until "SHUFFLE" or "PROGRAM" disappears from the display. Tips • You can play all the tracks on the remote). 1 2 Jog dial 1 Press FUNCTION repeatedly until "CD" appears in the display. All the tracks play by pressing PLAY MODE repeatedly to select "SHUFFLE". • To skip...track, turn the jog dial clockwise (or press + on one CD or all the CDs in random order. 24 To select a desired CD Press DISC 1~3. "1 DISC" shuffles the CD whose DISC indicator is green. 3 Press CD (P. Playing the CD tracks in their original order. Shuffle Play You can start Shuffle ...
...repeatedly until "SHUFFLE" or "PROGRAM" disappears from the display. Tips • You can play all the tracks on the remote). 1 2 Jog dial 1 Press FUNCTION repeatedly until "CD" appears in the display. All the tracks play by pressing PLAY MODE repeatedly to select "SHUFFLE". • To skip...track, turn the jog dial clockwise (or press + on one CD or all the CDs in random order. 24 To select a desired CD Press DISC 1~3. "1 DISC" shuffles the CD whose DISC indicator is green. 3 Press CD (P. Playing the CD tracks in their original order. Shuffle Play You can start Shuffle ...

Operating Instructions
Page 26
To Check the program Clear a track from the display. CHECK on the remote repeatedly until the number of the total playing time during programming, this means: - the total playing time has exceeded 100 minutes. Press CD (P to be erased lights up, then press CLEAR. 1 Select the disc tray with a DISC 1~3... button. 2 Select the track by turning the jog dial. 3 Press ENTER/NEXT. CLEAR on the remote in the CD player even after it has been played back. Tips • The program you have programmed a track number which exceeds 20. - Playing...
To Check the program Clear a track from the display. CHECK on the remote repeatedly until the number of the total playing time during programming, this means: - the total playing time has exceeded 100 minutes. Press CD (P to be erased lights up, then press CLEAR. 1 Select the disc tray with a DISC 1~3... button. 2 Select the track by turning the jog dial. 3 Press ENTER/NEXT. CLEAR on the remote in the CD player even after it has been played back. Tips • The program you have programmed a track number which exceeds 20. - Playing...

Operating Instructions
Page 28
Recording a CD by the total playing time. 7 To program additional tracks to be recorded on the remote to "0.00" in the order you want. Total playing time Disc number (including selected track) 11, EDIT 5 6 10 1 2 3, 12 DOLBY NR ◊ √ &#...183; ª· ª· =+ p 0 ) P · P p ◊ √ CHECK 8 Track number 6 Press ENTER/NEXT. Skip step 4 to select tracks from all the CDs in ...
Recording a CD by the total playing time. 7 To program additional tracks to be recorded on the remote to "0.00" in the order you want. Total playing time Disc number (including selected track) 11, EDIT 5 6 10 1 2 3, 12 DOLBY NR ◊ √ &#...183; ª· ª· =+ p 0 ) P · P p ◊ √ CHECK 8 Track number 6 Press ENTER/NEXT. Skip step 4 to select tracks from all the CDs in ...

Operating Instructions
Page 29
...and the CD player ... selected CD appears, followed by for playback. Recording starts. Note that you cannot use this function after pressing CD SYNC.... In order to use Tape Select Edit for discs containing over 20 tracks. 1 Insert a CD. 2 Press FUNCTION repeatedly...cancel the program by pressing PLAY MODE repeatedly until "CD" appears in low-level high-frequency signals, press DOLBY ... 10 Press CD SYNC. Selecting tape length automatically -Tape Select Edit You can check the most suitable tape length for recording a CD. 9 Repeat...
...and the CD player ... selected CD appears, followed by for playback. Recording starts. Note that you cannot use this function after pressing CD SYNC.... In order to use Tape Select Edit for discs containing over 20 tracks. 1 Insert a CD. 2 Press FUNCTION repeatedly...cancel the program by pressing PLAY MODE repeatedly until "CD" appears in low-level high-frequency signals, press DOLBY ... 10 Press CD SYNC. Selecting tape length automatically -Tape Select Edit You can check the most suitable tape length for recording a CD. 9 Repeat...

Operating Instructions
Page 30
...Power) LOOP Jog dial FLASH Jog dial / Press and hold both LOOP and FLASH at the point you can repeat part of a CD during playback. while holding FLASH on the remote) to resume normal play . To adjust the flash length Turn the jog dial while holding LOOP (or press SELECT > or . ...This lets you can "flash" the CD sound during playback. To adjust the loop length Turn the jog dial while holding FLASH (or...
...Power) LOOP Jog dial FLASH Jog dial / Press and hold both LOOP and FLASH at the point you can repeat part of a CD during playback. while holding FLASH on the remote) to resume normal play . To adjust the flash length Turn the jog dial while holding LOOP (or press SELECT > or . ...This lets you can "flash" the CD sound during playback. To adjust the loop length Turn the jog dial while holding FLASH (or...

Operating Instructions
Page 32
... sound characteristic according to the sound you are listening to select the preset you can also enjoy audio emphasis using this function, the system switches the equalizer according to the genre automatically. The last effect chosen appears in the display. 2 Use the jog dial to ... 3 (Power) SYNC EQ Music menu options " " appears if you store your own effects (see "Making a personal audio emphasis file" on the remote) repeatedly so that "EFFECT OFF" appears in the display. Besides, you desire. When using the synchronized equalizer function. Selecting the audio emphasis To cancel ...
... sound characteristic according to the sound you are listening to select the preset you can also enjoy audio emphasis using this function, the system switches the equalizer according to the genre automatically. The last effect chosen appears in the display. 2 Use the jog dial to ... 3 (Power) SYNC EQ Music menu options " " appears if you store your own effects (see "Making a personal audio emphasis file" on the remote) repeatedly so that "EFFECT OFF" appears in the display. Besides, you desire. When using the synchronized equalizer function. Selecting the audio emphasis To cancel ...

Operating Instructions
Page 35
... adjustments first (see page 7). (Power) PRO LOGIC To cancel the Dolby Pro Logic Surround sound Press PRO LOGIC (or PRO LOGIC ON/OFF on the remote) again to turn off Dolby Pro Logic Surround sound. · ª· ª· =+ p 0 ) P · P p ◊ √ ◊...; √ PRO LOGIC ON/OFF / Press PRO LOGIC (or PRO LOGIC ON/OFF on the remote) while playing a program source. Notes • You can enjoy the Dolby Pro Logic Surround sound of videos that are Dolby Surround encoded (q). Enjoying Dolby Pro...
... adjustments first (see page 7). (Power) PRO LOGIC To cancel the Dolby Pro Logic Surround sound Press PRO LOGIC (or PRO LOGIC ON/OFF on the remote) again to turn off Dolby Pro Logic Surround sound. · ª· ª· =+ p 0 ) P · P p ◊ √ ◊...; √ PRO LOGIC ON/OFF / Press PRO LOGIC (or PRO LOGIC ON/OFF on the remote) while playing a program source. Notes • You can enjoy the Dolby Pro Logic Surround sound of videos that are Dolby Surround encoded (q). Enjoying Dolby Pro...

Operating Instructions
Page 42
...Press SLEEP repeatedly until "SLEEP OFF" appears. 42 You can do so by 10 minutes. Sleep Timer You can let the system turn -off by selecting the CD function and not playing a CD. • When high level sound signals are playing. -a duet is being played. -the source has strong echoes or chorus...Falling asleep to prevent distortion of the microphone. • If you want by pressing SLEEP. Every time you press EFFECT (or ON/OFF on the remote) or recall a sound effect, the karaoke mode is cancelled. • The instrumental sound may be reduced as well as the singer's voice when ...
...Press SLEEP repeatedly until "SLEEP OFF" appears. 42 You can do so by 10 minutes. Sleep Timer You can let the system turn -off by selecting the CD function and not playing a CD. • When high level sound signals are playing. -a duet is being played. -the source has strong echoes or chorus...Falling asleep to prevent distortion of the microphone. • If you want by pressing SLEEP. Every time you press EFFECT (or ON/OFF on the remote) or recall a sound effect, the karaoke mode is cancelled. • The instrumental sound may be reduced as well as the singer's voice when ...

Operating Instructions
Page 46
To listen to the sound of the plugs and the connectors. To super woofer Tip When you connect a Sony MD deck, you can connect an optional super woofer speaker. To the audio output To the audio input of the MD deck of the MD deck Connecting a super woofer speaker You can use the MD ·, P, and p buttons on this unit's remote to perform play, pause, and stop operations. 46 Connecting audio components (continued) Connecting an MD deck for analog recording Make sure to match the color of the connected MD deck, press FUNCTION repeatedly until "MD" appears.
To listen to the sound of the plugs and the connectors. To super woofer Tip When you connect a Sony MD deck, you can connect an optional super woofer speaker. To the audio output To the audio input of the MD deck of the MD deck Connecting a super woofer speaker You can use the MD ·, P, and p buttons on this unit's remote to perform play, pause, and stop operations. 46 Connecting audio components (continued) Connecting an MD deck for analog recording Make sure to match the color of the connected MD deck, press FUNCTION repeatedly until "MD" appears.

Operating Instructions
Page 52
...Replace the batteries. The CD will not play. •The CD is not lying flat in the disc tray. •The CD is dirty. •The CD is not pointing in the direction of the system's sensor. •The batteries have reached the end of the microphone. The remote does not function. ...•There is an obstacle between the remote and the system. •The remote is inserted label side down ...
...Replace the batteries. The CD will not play. •The CD is not lying flat in the disc tray. •The CD is dirty. •The CD is not pointing in the direction of the system's sensor. •The batteries have reached the end of the microphone. The remote does not function. ...•There is an obstacle between the remote and the system. •The remote is inserted label side down ...

Operating Instructions
Page 56
Specifications (continued) Speaker Front Speaker SS-RXD10AV for MHC-RXD10AV/ SS-GRX90AV for MHC-GRX90AV (Australian model) Speaker system 3-way, bass-reflex type, magnetically shielded type Speaker units Woofer: 17 cm (63/4 in.), cone type Tweeter: 5 cm (2 in.),... models: Approx. 11.0 kg (24 lb 4 oz) Approx. 10.9 kg Approx. 11.3 kg Approx. 12.2 kg Supplied accessories: AM loop antenna (1) Remote Commander (1) Batteries (2) FM lead antenna (1) Speaker cords (3 or 5 (for front speakers with voltage selector Power consumption U.S.A model: Canadian model: European model: Other...
Specifications (continued) Speaker Front Speaker SS-RXD10AV for MHC-RXD10AV/ SS-GRX90AV for MHC-GRX90AV (Australian model) Speaker system 3-way, bass-reflex type, magnetically shielded type Speaker units Woofer: 17 cm (63/4 in.), cone type Tweeter: 5 cm (2 in.),... models: Approx. 11.0 kg (24 lb 4 oz) Approx. 10.9 kg Approx. 11.3 kg Approx. 12.2 kg Supplied accessories: AM loop antenna (1) Remote Commander (1) Batteries (2) FM lead antenna (1) Speaker cords (3 or 5 (for front speakers with voltage selector Power consumption U.S.A model: Canadian model: European model: Other...


