Operating Instructions
Page 1
4-235-231-11(1) Mini Hi-Fi Component System Operating Instructions Owner's Record The model and serial numbers are located on the rear panel of the unit. Record the serial number in the space provided below. Model No. MHC-RG70AV/DX60AV © 2001 Sony Corporation 1 Serial No. Refer to them whenever you call upon your Sony dealer regarding this product.
4-235-231-11(1) Mini Hi-Fi Component System Operating Instructions Owner's Record The model and serial numbers are located on the rear panel of the unit. Record the serial number in the space provided below. Model No. MHC-RG70AV/DX60AV © 2001 Sony Corporation 1 Serial No. Refer to them whenever you call upon your Sony dealer regarding this product.

Operating Instructions
Page 2
... magnitude to correct the interference by turning the equipment off and on, the user is located on the apparatus. The CLASS 1 LASER PRODUCT MARKING is encouraged to try to constitute a risk of important operating and maintenance (servicing) instructions in a residential installation. This equipment generates, uses, and can be connected to the grounding system of the building, as close to...
... magnitude to correct the interference by turning the equipment off and on, the user is located on the apparatus. The CLASS 1 LASER PRODUCT MARKING is encouraged to try to constitute a risk of important operating and maintenance (servicing) instructions in a residential installation. This equipment generates, uses, and can be connected to the grounding system of the building, as close to...

Operating Instructions
Page 3
... 18 Sound Adjustment Adjusting the sound 19 Selecting the sound effect 19 Enjoying Dolby Pro Logic Surround sound 20 Selecting the surround effect 21 Adjusting the graphic equalizer and storing 21 Other Features Enhancing video game sound - Table of Contents Parts Identification Main unit 4 Remote Control 5 Getting Started Hooking up to music - Program Play 11 Using the CD display 12 Tuner Presetting radio stations 13 Listening to the radio - Daily Timer 23 Optional Components Hooking up the optional A/V components 24 Connecting a DVD player 24 Connecting a video game...
... 18 Sound Adjustment Adjusting the sound 19 Selecting the sound effect 19 Enjoying Dolby Pro Logic Surround sound 20 Selecting the surround effect 21 Adjusting the graphic equalizer and storing 21 Other Features Enhancing video game sound - Table of Contents Parts Identification Main unit 4 Remote Control 5 Getting Started Hooking up to music - Program Play 11 Using the CD display 12 Tuner Presetting radio stations 13 Listening to the radio - Daily Timer 23 Optional Components Hooking up the optional A/V components 24 Connecting a DVD player 24 Connecting a video game...

Operating Instructions
Page 5
... (25) MD (VIDEO) qa (24) P FILE qh (21) PRESET EQ qk (19) PRESET + wd (14) PRESET - wd (14) PROLOGIC ON/OFF 8 (20) REAR/CENTER LEVEL 6 (8) SLEEP 1 (22) TAPE A/B qs (16, 17) TEST TONE qd (8, 9) TUNER/BAND ql (13, 14, 17) TUNING + wd (13) TUNING - wd (13) VOL +/- 9 BUTTON DESCRIPTIONS ?/1 (power) 4 v/V/b/B qg M (fast forward) wd . (go back) wd > (go forward) wd X (pause) wd nN (play) wd m (rewind...
... (25) MD (VIDEO) qa (24) P FILE qh (21) PRESET EQ qk (19) PRESET + wd (14) PRESET - wd (14) PROLOGIC ON/OFF 8 (20) REAR/CENTER LEVEL 6 (8) SLEEP 1 (22) TAPE A/B qs (16, 17) TEST TONE qd (8, 9) TUNER/BAND ql (13, 14, 17) TUNING + wd (13) TUNING - wd (13) VOL +/- 9 BUTTON DESCRIPTIONS ?/1 (power) 4 v/V/b/B qg M (fast forward) wd . (go back) wd > (go forward) wd X (pause) wd nN (play) wd m (rewind...
Operating Instructions
Page 6
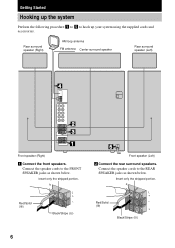
Rear surround speaker (Right) AM loop antenna FM antenna Center surround speaker Rear surround speaker (Left) 4 2 3 1 Front speaker (Right) 1 Connect the front speakers. Connect the speaker cords to the REAR SPEAKER jacks as shown below . R + L + Red/Solid - (3) + Black/Stripe (#) 6 Insert only the stripped portion. R + L + Red/Solid - (3) Black/Stripe (#) 5 Front speaker (Left) 2 Connect the rear surround speakers. Connect the speaker cords to hook up your system using the supplied cords and accessories. Getting Started Hooking up the system Perform the ...
Rear surround speaker (Right) AM loop antenna FM antenna Center surround speaker Rear surround speaker (Left) 4 2 3 1 Front speaker (Right) 1 Connect the front speakers. Connect the speaker cords to the REAR SPEAKER jacks as shown below . R + L + Red/Solid - (3) + Black/Stripe (#) 6 Insert only the stripped portion. R + L + Red/Solid - (3) Black/Stripe (#) 5 Front speaker (Left) 2 Connect the rear surround speakers. Connect the speaker cords to hook up your system using the supplied cords and accessories. Getting Started Hooking up the system Perform the ...
Operating Instructions
Page 8
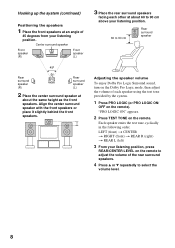
... as the front speakers. Adjusting the speaker volume To enjoy Dolby Pro Logic Surround sound, turn on the Dolby Pro Logic mode, then adjust the volume of the rear surround speakers. 4 Press v or V repeatedly to 90 cm Rear surround speaker 45º Rear surround speaker (R) Rear surround speaker (L) 2 Place the center surround speaker at about 60 to 90 cm above your listening position. 60 to select the volume level. 8 "PRO LOGIC ON" appears. 2 Press TEST TONE on the remote). Align the center surround speaker with the front speakers or place...
... as the front speakers. Adjusting the speaker volume To enjoy Dolby Pro Logic Surround sound, turn on the Dolby Pro Logic mode, then adjust the volume of the rear surround speakers. 4 Press v or V repeatedly to 90 cm Rear surround speaker 45º Rear surround speaker (R) Rear surround speaker (L) 2 Place the center surround speaker at about 60 to 90 cm above your listening position. 60 to select the volume level. 8 "PRO LOGIC ON" appears. 2 Press TEST TONE on the remote). Align the center surround speaker with the front speakers or place...

Operating Instructions
Page 9
.... 7 Press TEST TONE on the remote) all discs are finished adjusting. Inserting two R6 (size AA) batteries into the remote e E E e Tip With normal use the remote for Dolby Pro Logic Surround sound. Proceed to step 5 when "CLOCK" appears in the display. 3 Press v or V repeatedly to avoid possible damage from battery leakage. Tip If you release the buttons, "LOCK" appears. 3 Unplug the power cord. Setting the time 1 Turn on the system...
.... 7 Press TEST TONE on the remote) all discs are finished adjusting. Inserting two R6 (size AA) batteries into the remote e E E e Tip With normal use the remote for Dolby Pro Logic Surround sound. Proceed to step 5 when "CLOCK" appears in the display. 3 Press v or V repeatedly to avoid possible damage from battery leakage. Tip If you release the buttons, "LOCK" appears. 3 Unplug the power cord. Setting the time 1 Turn on the system...

Operating Instructions
Page 14
... station is factory-set to tune in step 2. Preset Tuning Preset radio stations in the display. on the remote) repeatedly. or > (or PRESET - "COMPLETE" appears. Listening to select "FM" or "AM". 2 Press . There will be no stereo effect, but the reception will improve. • To improve broadcast reception, adjust the supplied antennas. 14 Preset number Frequency* * When only one are retained for the European and Middle Eastern models) The AM tuning...
... station is factory-set to tune in step 2. Preset Tuning Preset radio stations in the display. on the remote) repeatedly. or > (or PRESET - "COMPLETE" appears. Listening to select "FM" or "AM". 2 Press . There will be no stereo effect, but the reception will improve. • To improve broadcast reception, adjust the supplied antennas. 14 Preset number Frequency* * When only one are retained for the European and Middle Eastern models) The AM tuning...

Operating Instructions
Page 15
... radio. 2 Press . To check the RDS information Each time you press DISPLAY, the display changes cyclically as follows: Station name* t Frequency t Program type* t Clock display t Effect status * If the RDS broadcast is not received, the station name and program type may not work properly if the station you want is available only on RDS services in the display. The tuner starts searching the preset RDS stations ("SEARCH" and the selected program...
... radio. 2 Press . To check the RDS information Each time you press DISPLAY, the display changes cyclically as follows: Station name* t Frequency t Program type* t Clock display t Effect status * If the RDS broadcast is not received, the station name and program type may not work properly if the station you want is available only on RDS services in the display. The tuner starts searching the preset RDS stations ("SEARCH" and the selected program...
Operating Instructions
Page 16
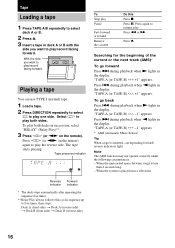
... Z. during playback when N lights in the display. When the unrecorded space between songs is placed near a television. Press X. Press m or M. When the system is less than 4 seconds long. - Playing a tape You can use TYPE I (normal) tape. 1 Load a tape. 2 Press DIRECTION repeatedly to select g to play both decks in succession, select "RELAY" (Relay Play)**. 3 Press hH (or nN on the remote) again to play . Press . With the...
... Z. during playback when N lights in the display. When the unrecorded space between songs is placed near a television. Press X. Press m or M. When the system is less than 4 seconds long. - Playing a tape You can use TYPE I (normal) tape. 1 Load a tape. 2 Press DIRECTION repeatedly to select g to play both decks in succession, select "RELAY" (Relay Play)**. 3 Press hH (or nN on the remote) again to play . Press . With the...

Operating Instructions
Page 18
... must first preset the radio station (see "Presetting radio stations" on page 13) and set the clock (see "Setting the time" on the remote. The CD player stands by for recording a CD, press EDIT until the desired track appears in the direction of the tape. 1 Load a CD and load a recordable tape into deck B. 2 Press CD. 3 Press PLAY MODE repeatedly until "PROGRAM" appears in the display. 4 Press one side. Select j (or...
... must first preset the radio station (see "Presetting radio stations" on page 13) and set the clock (see "Setting the time" on the remote. The CD player stands by for recording a CD, press EDIT until the desired track appears in the direction of the tape. 1 Load a CD and load a recordable tape into deck B. 2 Press CD. 3 Press PLAY MODE repeatedly until "PROGRAM" appears in the display. 4 Press one side. Select j (or...
Operating Instructions
Page 19
... recorded (e.g., "TUNER FM 5"), then the original display appears. 6 Load a recordable tape into deck B. 7 Press ?/1 to turn on the remote and press v or V repeatedly to minimum. When the recording starts, the volume level is ideal for music sources, and the V-GROOVE setting is set the time to power mode, the equalizer curve changes, and the "GROOVE" indicator lights up. Cancel the timer Press CLOCK/TIMER SELECT on the system until the...
... recorded (e.g., "TUNER FM 5"), then the original display appears. 6 Load a recordable tape into deck B. 7 Press ?/1 to turn on the remote and press v or V repeatedly to minimum. When the recording starts, the volume level is ideal for music sources, and the V-GROOVE setting is set the time to power mode, the equalizer curve changes, and the "GROOVE" indicator lights up. Cancel the timer Press CLOCK/TIMER SELECT on the system until the...

Operating Instructions
Page 20
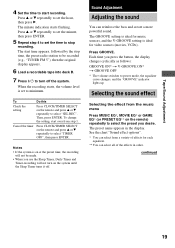
... PlayStation 1, 2 and other video game music sources Enjoying Dolby Pro Logic Surround sound You can enjoy Dolby Pro Logic Surround sound from Dolby Surround-encoded video tapes. Press PRO LOGIC (or PRO LOGIC ON/OFF on the remote) again to turn off Dolby Pro Logic Surround sound. 20 To cancel the Dolby Pro Logic Surround sound Press PRO LOGIC (or PRO LOGIC ON/OFF on the remote) while playing a program source. The PRO LOGIC button lights up. Sound effect options "SURR" appears if you select an effect with...
... PlayStation 1, 2 and other video game music sources Enjoying Dolby Pro Logic Surround sound You can enjoy Dolby Pro Logic Surround sound from Dolby Surround-encoded video tapes. Press PRO LOGIC (or PRO LOGIC ON/OFF on the remote) again to turn off Dolby Pro Logic Surround sound. 20 To cancel the Dolby Pro Logic Surround sound Press PRO LOGIC (or PRO LOGIC ON/OFF on the remote) while playing a program source. The PRO LOGIC button lights up. Sound effect options "SURR" appears if you select an effect with...

Operating Instructions
Page 23
... and the hour indication flashes. 5 Set the time to start from step 1. The indication changes as follows: t TUNER y CD PLAY T t TAPE PLAY T 8 Press ENTER. Tip The system turns on page 9). 1 Prepare the music source you want to select "DAILY 1 (or 2)", then press ENTER. Start over from a specific track, make a program (see "Programing CD tracks" on the remote and press v or V repeatedly to select the respective mode ("DAILY 1" or "DAILY...
... and the hour indication flashes. 5 Set the time to start from step 1. The indication changes as follows: t TUNER y CD PLAY T t TAPE PLAY T 8 Press ENTER. Tip The system turns on page 9). 1 Prepare the music source you want to select "DAILY 1 (or 2)", then press ENTER. Start over from a specific track, make a program (see "Programing CD tracks" on the remote and press v or V repeatedly to select the respective mode ("DAILY 1" or "DAILY...

Operating Instructions
Page 24
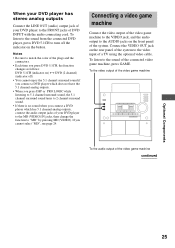
... a stereo sound track from the DVD player, press DVD 5.1CH to turn off the indicator. "VIDEO" will be switched to "VIDEO". Do this system. Optional Components Hooking up the optional A/V components You can connect your DVD player has 5.1 channel analog outputs To listen to the sound from CD to MD Listen to the connected MD deck Listen to the connected VCR Connect a sub woofer speaker. This switches the "MD" function to "MD". Press MD (VIDEO). To the digital input jack of the DVD player 24...
... a stereo sound track from the DVD player, press DVD 5.1CH to turn off the indicator. "VIDEO" will be switched to "VIDEO". Do this system. Optional Components Hooking up the optional A/V components You can connect your DVD player has 5.1 channel analog outputs To listen to the sound from CD to MD Listen to the connected MD deck Listen to the connected VCR Connect a sub woofer speaker. This switches the "MD" function to "MD". Press MD (VIDEO). To the digital input jack of the DVD player 24...
Operating Instructions
Page 25
... DSP or PRO LOGIC while listening to 5.1 channel surround sound, the 5.1 channel surround sound turns to 2 channel surround sound. • If there is no sound when you cannot select "MD", see page 24. When your DVD player has stereo analog outputs Connect the LINE OUT (audio) output jack of your DVD player to the MD (VIDEO) IN jacks, then change the function to "MD" by pressing MD (VIDEO). If you connect a DVD player which has 5.1 channel analog outputs, connect the audio output jacks of your DVD player to the FRONT jacks of the system...
... DSP or PRO LOGIC while listening to 5.1 channel surround sound, the 5.1 channel surround sound turns to 2 channel surround sound. • If there is no sound when you cannot select "MD", see page 24. When your DVD player has stereo analog outputs Connect the LINE OUT (audio) output jack of your DVD player to the MD (VIDEO) IN jacks, then change the function to "MD" by pressing MD (VIDEO). If you connect a DVD player which has 5.1 channel analog outputs, connect the audio output jacks of your DVD player to the FRONT jacks of the system...

Operating Instructions
Page 28
... of the speaker cord will obstruct the speaker connections. • There is turned on page 24). Move the stereo system away from the speakers or change the direction of the system's sensor. • The batteries have run down. "0:00" (or "12:00 AM") flashes in the direction of the microphone. Press ?/1 to turn off the system, leave the system turned off . Should any problem using this system, use the following : - "Presetting radio stations" on page...
... of the speaker cord will obstruct the speaker connections. • There is turned on page 24). Move the stereo system away from the speakers or change the direction of the system's sensor. • The batteries have run down. "0:00" (or "12:00 AM") flashes in the direction of the microphone. Press ?/1 to turn off the system, leave the system turned off . Should any problem using this system, use the following : - "Presetting radio stations" on page...

Operating Instructions
Page 29
... ?/1 at the same time. 4 Press ?/1 to the end. The system is not placed properly. Additional Information 29 Play does not start from one channel or unbalanced left and right volume. • Check the speaker connection and speaker placement. If other troubles not described above occur, reset the system as follows: 1 Unplug the power cord. 2 Plug the power cord back in program or shuffle mode. The tape does not erase...
... ?/1 at the same time. 4 Press ?/1 to the end. The system is not placed properly. Additional Information 29 Play does not start from one channel or unbalanced left and right volume. • Check the speaker connection and speaker placement. If other troubles not described above occur, reset the system as follows: 1 Unplug the power cord. 2 Plug the power cord back in program or shuffle mode. The tape does not erase...

Operating Instructions
Page 31
... DVD INPUT: FRONT IN (phono jacks): voltage 450 mV, impedance 47 kilohms REAR IN (phono jacks): voltage 450 mV, impedance 47 kilohms CENTER IN (phono jacks): voltage 450 mV, impedance 47 kilohms WOOFER IN (phono jacks): voltage 450 mV, impedance 47 kilohms Outputs PHONES (stereo mini jack): accepts headphones of 8 ohms or more FRONT SPEAKER: accepts impedance of 6 to 16 ohms REAR SPEAKER: accepts impedance of 6 to 16 ohms CENTER SPEAKER: accepts impedance of 6 to 16 ohms WOOFER: voltage 1 V, impedance 1 kilohms CD player section System Compact disc and digital audio system...
... DVD INPUT: FRONT IN (phono jacks): voltage 450 mV, impedance 47 kilohms REAR IN (phono jacks): voltage 450 mV, impedance 47 kilohms CENTER IN (phono jacks): voltage 450 mV, impedance 47 kilohms WOOFER IN (phono jacks): voltage 450 mV, impedance 47 kilohms Outputs PHONES (stereo mini jack): accepts headphones of 8 ohms or more FRONT SPEAKER: accepts impedance of 6 to 16 ohms REAR SPEAKER: accepts impedance of 6 to 16 ohms CENTER SPEAKER: accepts impedance of 6 to 16 ohms WOOFER: voltage 1 V, impedance 1 kilohms CD player section System Compact disc and digital audio system...

Operating Instructions
Page 32
... AM tuner section Tuning range Pan-American model: European model: Antenna Antenna terminals Intermediate frequency 530 - 1,710 kHz (with the interval set at 10 kHz) 531 - 1,710 kHz (with the interval set at 9 kHz) 531 - 1,602 kHz (with the interval set at 9 kHz) AM loop antenna External antenna terminal 450 kHz Speaker Front speaker SS-RG70AV/SS-DX60AV Speaker system 3-way, 3-unit, bass-reflex type, magnetically shielded type Speaker units Sub Woofer...
... AM tuner section Tuning range Pan-American model: European model: Antenna Antenna terminals Intermediate frequency 530 - 1,710 kHz (with the interval set at 10 kHz) 531 - 1,710 kHz (with the interval set at 9 kHz) 531 - 1,602 kHz (with the interval set at 9 kHz) AM loop antenna External antenna terminal 450 kHz Speaker Front speaker SS-RG70AV/SS-DX60AV Speaker system 3-way, 3-unit, bass-reflex type, magnetically shielded type Speaker units Sub Woofer...


