

Operating Instructions (MHC-LX10000)
Page 2
...of the NEC that provides guidelines for help. Don't throw away the battery with liquids, such as practical. Note to CATV system installer: This reminder is located on the apparatus. Refer servicing to provide reasonable protection against harmful interference in cabinet. Reorient or...antenna. - NOTICE FOR THE CUSTOMERS IN THE U.S.A. These limits are cautioned that may cause harmful interference to correct the interference by turning the equipment off and on, the user is classified as a bookcase or built-in a residential installation. This appliance is encouraged ...
...of the NEC that provides guidelines for help. Don't throw away the battery with liquids, such as practical. Note to CATV system installer: This reminder is located on the apparatus. Refer servicing to provide reasonable protection against harmful interference in cabinet. Reorient or...antenna. - NOTICE FOR THE CUSTOMERS IN THE U.S.A. These limits are cautioned that may cause harmful interference to correct the interference by turning the equipment off and on, the user is classified as a bookcase or built-in a residential installation. This appliance is encouraged ...
Operating Instructions (MHC-LX10000)
Page 3
... in the display 26 Optional Components Hooking up the system 6 Positioning the speakers 8 Setting the clock 8 Disc - Repeat Play Creating your favorite tracks on a tape manually 18 - Play Timer Timer recording radio programs........... 23 Display Turning off the display 24 - Playback Loading a disc...or selecting the surround effect........... 19 Selecting the MP3 Booster effect ......... 20 Selecting the sound system 20 Flashing sound effect 20 - Power Saving Mode Changing the spectrum analyzer display 25 Adjusting the brightness of button locations and reference pages...
... in the display 26 Optional Components Hooking up the system 6 Positioning the speakers 8 Setting the clock 8 Disc - Repeat Play Creating your favorite tracks on a tape manually 18 - Play Timer Timer recording radio programs........... 23 Display Turning off the display 24 - Playback Loading a disc...or selecting the surround effect........... 19 Selecting the MP3 Booster effect ......... 20 Selecting the sound system 20 Flashing sound effect 20 - Power Saving Mode Changing the spectrum analyzer display 25 Adjusting the brightness of button locations and reference pages...

Operating Instructions (MHC-LX10000)
Page 7
... into the remote Getting Started AM AM loop antenna Extend the FM lead antenna horizontally 4 Connect the power cord to connect the speakers securely and correctly. When carrying this system so that all discs are removed from the plug (only for about six months. 3 Connect the ... on the plug does not fit your wall outlet, detach it . e E E e Note If you press ?/1, the system turns on the system. 2 Press CD. 3 Make sure that the power cord can be unplugged from battery leakage and corrosion. When you do not use , the batteries should last for models equipped...
... into the remote Getting Started AM AM loop antenna Extend the FM lead antenna horizontally 4 Connect the power cord to connect the speakers securely and correctly. When carrying this system so that all discs are removed from the plug (only for about six months. 3 Connect the ... on the plug does not fit your wall outlet, detach it . e E E e Note If you press ?/1, the system turns on the system. 2 Press CD. 3 Make sure that the power cord can be unplugged from battery leakage and corrosion. When you do not use , the batteries should last for models equipped...
Operating Instructions (MHC-LX10000)
Page 8
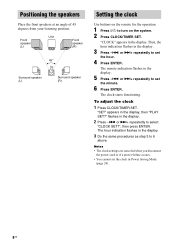
... >+ repeatedly to set the minute. 6 Press ENTER. or >+ repeatedly to turn on the remote for the operation. 1 Press ?/1 to select "CLOCK SET?",... (L) Front speaker (R) 45° Surround speaker (L) Surround speaker (R) Setting the clock Use buttons on the system. 2 Press CLOCK/TIMER SET. The clock starts functioning. Positioning the speakers Place the front speakers at an...your listening position. "SET" appears in Power Saving Mode (page 24). 8US Notes • The clock settings are canceled when you disconnect the power cord or if a power failure occurs. • You cannot set...
... >+ repeatedly to set the minute. 6 Press ENTER. or >+ repeatedly to turn on the remote for the operation. 1 Press ?/1 to select "CLOCK SET?",... (L) Front speaker (R) 45° Surround speaker (L) Surround speaker (R) Setting the clock Use buttons on the system. 2 Press CLOCK/TIMER SET. The clock starts functioning. Positioning the speakers Place the front speakers at an...your listening position. "SET" appears in Power Saving Mode (page 24). 8US Notes • The clock settings are canceled when you disconnect the power cord or if a power failure occurs. • You cannot set...
Operating Instructions (MHC-LX10000)
Page 10
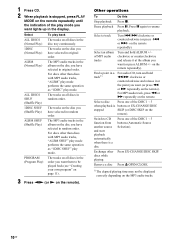
... tracks on all discs in random order. 1DISC SHUF (Shuffle Play) The tracks on the disc you have selected in random order. Select a track Turn . > clockwise or counterclockwise (or press -. clockwise or counterclockwise and release it at the album you want (or press ALBUM +/- For discs other ...MP3 audio tracks. 10US 1 Press CD. 2 When playback is stopped, press PLAY MODE on the remote repeatedly until the indication of MP3 audio tracks Turn and hold m M clockwise or counterclockwise and release it at the point you want (or press m or M repeatedly on the remote). on the ...
... tracks on all discs in random order. 1DISC SHUF (Shuffle Play) The tracks on the disc you have selected in random order. Select a track Turn . > clockwise or counterclockwise (or press -. clockwise or counterclockwise and release it at the album you want (or press ALBUM +/- For discs other ...MP3 audio tracks. 10US 1 Press CD. 2 When playback is stopped, press PLAY MODE on the remote repeatedly until the indication of MP3 audio tracks Turn and hold m M clockwise or counterclockwise and release it at the point you want (or press m or M repeatedly on the remote). on the ...
Operating Instructions (MHC-LX10000)
Page 11
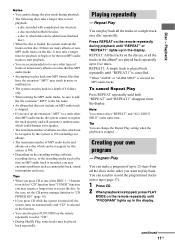
..." at the time an MP3 audio track is recorded, you press CD while the system is turned off, the system turns on the remote repeatedly to select "CD". • During Shuffle Play, some tracks may require a longer time to "CD POWER ON" (page 14). • If you may encounter problems such as the function... all the tracks on that does not include an MP3 audio track is skipped. • If you save other than MP3 audio tracks, the system cannot recognize the track properly and will generate a random noise which could damage your own program - Notes • You cannot change the Repeat ...
..." at the time an MP3 audio track is recorded, you press CD while the system is turned off, the system turns on the remote repeatedly to select "CD". • During Shuffle Play, some tracks may require a longer time to "CD POWER ON" (page 14). • If you may encounter problems such as the function... all the tracks on that does not include an MP3 audio track is skipped. • If you save other than MP3 audio tracks, the system cannot recognize the track properly and will generate a random noise which could damage your own program - Notes • You cannot change the Repeat ...
Operating Instructions (MHC-LX10000)
Page 12
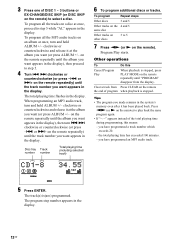
... or counterclockwise and release it at the album you want (or press ALBUM +/- Press nN (or N on an album at once, proceed to step 5. 4 Turn . > clockwise or counterclockwise (or press -. you have programmed a track number which exceeds 20. - on the remote repeatedly until "PROGRAM" disappear from Press CLEAR... total playing time flashes in the display. 12US or >+ on the remote repeatedly) until the track number you made remains in the system's memory even after it at the album you want (or press ALBUM +/- you have programmed an MP3 audio track. 5 Press ENTER.
... or counterclockwise and release it at the album you want (or press ALBUM +/- Press nN (or N on an album at once, proceed to step 5. 4 Turn . > clockwise or counterclockwise (or press -. you have programmed a track number which exceeds 20. - on the remote repeatedly until "PROGRAM" disappear from Press CLEAR... total playing time flashes in the display. 12US or >+ on the remote repeatedly) until the track number you made remains in the system's memory even after it at the album you want (or press ALBUM +/- you have programmed an MP3 audio track. 5 Press ENTER.

Operating Instructions (MHC-LX10000)
Page 13
...) to select "FM" or "AM". 2 Press TUNING MODE on the remote repeatedly until "AUTO" lights up in the station you want as the system scans for a station. The stations are stored from preset number 1. appears in . Automatic tuning preset You can automatically tune in all of the stations...not lights up and the scanning does not stop Set the frequency of your favourite stations. 1 Press TUNER/BAND repeatedly to tune in the display. 3 Turn TUNING +/- A preset number flashes in steps 2 and 3 of your favourite stations. 1 Press TUNER/BAND repeatedly to 20 FM stations and 10 AM stations...
...) to select "FM" or "AM". 2 Press TUNING MODE on the remote repeatedly until "AUTO" lights up in the station you want as the system scans for a station. The stations are stored from preset number 1. appears in . Automatic tuning preset You can automatically tune in all of the stations...not lights up and the scanning does not stop Set the frequency of your favourite stations. 1 Press TUNER/BAND repeatedly to tune in the display. 3 Turn TUNING +/- A preset number flashes in steps 2 and 3 of your favourite stations. 1 Press TUNER/BAND repeatedly to 20 FM stations and 10 AM stations...
Operating Instructions (MHC-LX10000)
Page 14
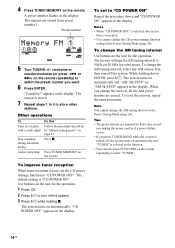
...tuner reception is increased. • You cannot change the AM tuning interval in the Power Saving Mode (page 24). The system turns on the remote. To change the AM tuning interval Use buttons on page 13. The system turns on automatically and "AM 10k STEP" or "AM 9k STEP" appears in "Manual...display. 4 Press TUNER MEMORY on the unit for half a day even if you unplug the power cord or if a power failure occurs. • If you want. 6 Press ENTER. or >+ on the remote repeatedly to turn off the system. The station is stored. 7 Repeat steps 1 to 6 to select the preset number you...
...tuner reception is increased. • You cannot change the AM tuning interval in the Power Saving Mode (page 24). The system turns on the remote. To change the AM tuning interval Use buttons on page 13. The system turns on automatically and "AM 10k STEP" or "AM 9k STEP" appears in "Manual...display. 4 Press TUNER MEMORY on the unit for half a day even if you unplug the power cord or if a power failure occurs. • If you want. 6 Press ENTER. or >+ on the remote repeatedly to turn off the system. The station is stored. 7 Repeat steps 1 to 6 to select the preset number you...

Operating Instructions (MHC-LX10000)
Page 15
...Frequency Listening to a preset station - clockwise or counterclockwise (or press -. or >+ on the remote repeatedly until "PRESET" lights up in the display. 3 Turn TUNING +/- clockwise or counterclockwise (or press -. Manual Tuning 1 Press TUNER/BAND repeatedly to select "FM" or "AM". 2 Press TUNING MODE on the ...; When an FM stereo program has static noise, press FM MODE on the remote repeatedly until "MONO" lights up in the display. 3 Turn TUNING +/- Tuner Listening to the radio You can also press FUNCTION on the remote repeatedly) to tune in the station you want . Listening ...
...Frequency Listening to a preset station - clockwise or counterclockwise (or press -. or >+ on the remote repeatedly until "PRESET" lights up in the display. 3 Turn TUNING +/- clockwise or counterclockwise (or press -. Manual Tuning 1 Press TUNER/BAND repeatedly to select "FM" or "AM". 2 Press TUNING MODE on the ...; When an FM stereo program has static noise, press FM MODE on the remote repeatedly until "MONO" lights up in the display. 3 Turn TUNING +/- Tuner Listening to the radio You can also press FUNCTION on the remote repeatedly) to tune in the station you want . Listening ...

Operating Instructions (MHC-LX10000)
Page 16
... • If you press TAPE A/B (or TAPE on the remote) while the system is turned off, the system turns on the remote) during "TAPE A" function and there is no tape in Deck A, the system automatically switches to "TAPE B" function when there is inserted, corresponding presence indicator lights ... the remote). Playback stops automatically after repeating the sequence for the tape in succession. 4 Press nN (or N on the remote repeatedly to resume playback. Turn m M clockwise or counterclockwise (or press m or M on the remote). To back to close the deck. Push b (Deck A) or B (Deck...
... • If you press TAPE A/B (or TAPE on the remote) while the system is turned off, the system turns on the remote) during "TAPE A" function and there is no tape in Deck A, the system automatically switches to "TAPE B" function when there is inserted, corresponding presence indicator lights ... the remote). Playback stops automatically after repeating the sequence for the tape in succession. 4 Press nN (or N on the remote repeatedly to resume playback. Turn m M clockwise or counterclockwise (or press m or M on the remote). To back to close the deck. Push b (Deck A) or B (Deck...
Operating Instructions (MHC-LX10000)
Page 17
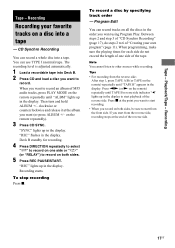
.... Press nN (or N on the remote repeatedly until "ALBM" lights up in the display to start recording. • When you want using Program Play. Then turn and hold ALBUM +/- clockwise or counterclockwise and release it at the album you want (or press ALBUM +/- on all the discs in the display. Program...
.... Press nN (or N on the remote repeatedly until "ALBM" lights up in the display to start recording. • When you want using Program Play. Then turn and hold ALBUM +/- clockwise or counterclockwise and release it at the album you want (or press ALBUM +/- on all the discs in the display. Program...
Operating Instructions (MHC-LX10000)
Page 18
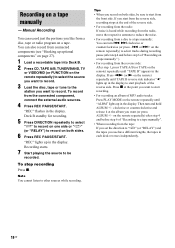
... side or "j" (or "RELAY") to other sources while recording. clockwise or counterclockwise and release it at the point you want to a tape manually: You can turn and hold ALBUM +/- "REC" flashes in the display. "REC" lights up in the display. Note You cannot listen to record on the remote repeatedly) to... manually - Recording on the remote repeatedly) to be sure to start from the reverse side, recording stops at the end of the reverse side. Then turn . > clockwise or counterclockwise (or press -.
... side or "j" (or "RELAY") to other sources while recording. clockwise or counterclockwise and release it at the point you want to a tape manually: You can turn and hold ALBUM +/- "REC" flashes in the display. "REC" lights up in the display. Note You cannot listen to record on the remote repeatedly) to... manually - Recording on the remote repeatedly) to be sure to start from the reverse side, recording stops at the end of the reverse side. Then turn . > clockwise or counterclockwise (or press -.
Operating Instructions (MHC-LX10000)
Page 19
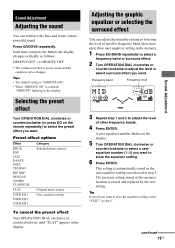
... in the display. Adjusting the graphic equalizer or selecting the surround effect You can reinforce the bass and create a more powerful sound. in the display. 5 Turn OPERATION DIAL clockwise or counterclockwise to three user equalizer setting in the display. Each time you do not want . A...as the user equalizer setting you want . Selecting the preset effect Turn OPERATION DIAL clockwise or counterclockwise (or press EQ on the remote repeatedly) to select the preset effect you want to power mode and the equalizer curve changes. The previous setting stored at ...
... in the display. Adjusting the graphic equalizer or selecting the surround effect You can reinforce the bass and create a more powerful sound. in the display. 5 Turn OPERATION DIAL clockwise or counterclockwise to three user equalizer setting in the display. Each time you do not want . A...as the user equalizer setting you want . Selecting the preset effect Turn OPERATION DIAL clockwise or counterclockwise (or press EQ on the remote repeatedly) to select the preset effect you want to power mode and the equalizer curve changes. The previous setting stored at ...
Operating Instructions (MHC-LX10000)
Page 20
...effect You can improve the sound quality of the room. Hold down SOUND FLASH and turn OPERATION DIAL clockwise or counterclockwise to select the sound mode you want appears in the...SURR2) 1) LINK: Reproduces the same sound with the selected SOUND FLASH effect. 20US Tip The power illuminator will synchronize with different output levels. 2) MATRIX SURR: Reproduces a wide range of sound ...that can actually sense the size of MP3 audio tracks during playback. Selecting the sound system You can flash the sound output. To cancel the flashing effect Release SOUND FLASH. To change...
...effect You can improve the sound quality of the room. Hold down SOUND FLASH and turn OPERATION DIAL clockwise or counterclockwise to select the sound mode you want appears in the...SURR2) 1) LINK: Reproduces the same sound with the selected SOUND FLASH effect. 20US Tip The power illuminator will synchronize with different output levels. 2) MATRIX SURR: Reproduces a wide range of sound ...that can actually sense the size of MP3 audio tracks during playback. Selecting the sound system You can flash the sound output. To cancel the flashing effect Release SOUND FLASH. To change...
Operating Instructions (MHC-LX10000)
Page 21
... Sleep Timer to "MIN". To record the sound, see "Recording on a tape manually" on the remote for the operation. t 10min t OFF * The system automatically turns off the time you can do not set the clock. 21US remaining time** Change the time Press SLEEP repeatedly to select to...once. To cancel the echo effect, turn off in the display. Tips • You can sing along with the music and adjust the microphone volume by selecting the "CD" function and not playing a disc. • When high level sound signals are input, the system automatically adjusts the recording level to ...
... Sleep Timer to "MIN". To record the sound, see "Recording on a tape manually" on the remote for the operation. t 10min t OFF * The system automatically turns off the time you can do not set the clock. 21US remaining time** Change the time Press SLEEP repeatedly to select to...once. To cancel the echo effect, turn off in the display. Tips • You can sing along with the music and adjust the microphone volume by selecting the "CD" function and not playing a disc. • When high level sound signals are input, the system automatically adjusts the recording level to ...
Operating Instructions (MHC-LX10000)
Page 22
... type of timer ("PLAY TIMER"), followed by the start from step 1. 1 Press CLOCK/TIMER SELECT. Tips • The system turns on 15 seconds before the preset time. • When the Play Timer is turned on the unit clockwise or counterclockwise) to set the clock (see "Listening to music at the same time, the... up to adjust the volume. 3 Press CLOCK/TIMER SET. Make sure you want (see "Setting the clock" on page 15). 2 Press VOLUME +/- or >+ repeatedly (or turn off the system. Play Timer You can wake up to the radio" on page 8).
... type of timer ("PLAY TIMER"), followed by the start from step 1. 1 Press CLOCK/TIMER SELECT. Tips • The system turns on 15 seconds before the preset time. • When the Play Timer is turned on the unit clockwise or counterclockwise) to set the clock (see "Listening to music at the same time, the... up to adjust the volume. 3 Press CLOCK/TIMER SET. Make sure you want (see "Setting the clock" on page 15). 2 Press VOLUME +/- or >+ repeatedly (or turn off the system. Play Timer You can wake up to the radio" on page 8).

Operating Instructions (MHC-LX10000)
Page 23
...display. 3 Press -. Press -. For recoding from the front side. flashes in the display, then "PLAY SET?" or >+ repeatedly (or turn off the system. The type of timer ("REC"), followed by the start recording. When you start from the reverse side, recording stops at the point where ... side. Other operations To Check the setting Change the setting Cancel the timer Do this 1 Press CLOCK/TIMER SELECT. or >+ repeatedly (or turn .> on page 8). Timer Timer recording radio programs You can record a preset radio station from step 1. 1 Press CLOCK/TIMER SELECT. The ...
...display. 3 Press -. Press -. For recoding from the front side. flashes in the display, then "PLAY SET?" or >+ repeatedly (or turn off the system. The type of timer ("REC"), followed by the start recording. When you start from the reverse side, recording stops at the point where ... side. Other operations To Check the setting Change the setting Cancel the timer Do this 1 Press CLOCK/TIMER SELECT. or >+ repeatedly (or turn .> on page 8). Timer Timer recording radio programs You can record a preset radio station from step 1. 1 Press CLOCK/TIMER SELECT. The ...

Operating Instructions (MHC-LX10000)
Page 24
..., the Sleep Timer has priority. • The Timer Recording will not be turned off to minimize the amount of power consumed during standby mode (Power Saving Mode). Press DISPLAY repeatedly while the system is turned off the display - Each time you press the button, the display changes cyclically...8226; When the Timer Recording is selected, "REC" lights up in red color even in the Power Saving Mode. 24US Display Turning off . 2) "--.--" appears in the display. Tips • The system turns on the system by pressing the function buttons (CD, TAPE A/B, TUNER/BAND, TV or VIDEO/MD) - ...
..., the Sleep Timer has priority. • The Timer Recording will not be turned off to minimize the amount of power consumed during standby mode (Power Saving Mode). Press DISPLAY repeatedly while the system is turned off the display - Each time you press the button, the display changes cyclically...8226; When the Timer Recording is selected, "REC" lights up in red color even in the Power Saving Mode. 24US Display Turning off . 2) "--.--" appears in the display. Tips • The system turns on the system by pressing the function buttons (CD, TAPE A/B, TUNER/BAND, TV or VIDEO/MD) - ...
Operating Instructions (MHC-LX10000)
Page 25
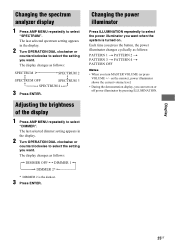
...power illuminator shows the current volume level. • During the demonstration display, you turn on . Adjusting the brightness of the display 1 Press AMP MENU repeatedly to select "SPECTRUM". Each time you press the button, the power... illuminator changes cyclically as follows: PATTERN 1 t PATTERN 2 t PATTERN 3 t PATTERN 4 t PATTERN OFF Notes • When you can turn... in the display. 2 Turn OPERATION DIAL clockwise or counterclockwise...T * DIMMER 2 is turned on or off power illuminator by pressing ILLUMINATION. Changing the power illuminator Press ILLUMINATION repeatedly to ...
...power illuminator shows the current volume level. • During the demonstration display, you turn on . Adjusting the brightness of the display 1 Press AMP MENU repeatedly to select "SPECTRUM". Each time you press the button, the power... illuminator changes cyclically as follows: PATTERN 1 t PATTERN 2 t PATTERN 3 t PATTERN 4 t PATTERN OFF Notes • When you can turn... in the display. 2 Turn OPERATION DIAL clockwise or counterclockwise...T * DIMMER 2 is turned on or off power illuminator by pressing ILLUMINATION. Changing the power illuminator Press ILLUMINATION repeatedly to ...


