
Limited Warranty (US Only)
Page 1
... instruction, installation, set up adjustments or signal reception problems. This warranty does not cover cosmetic damage or damage due to acts of God, accident, misuse, abuse, negligence, commercial use, or modification of sale or receipted invoice which vary from the date of purchase, if this Product (including any Sony authorized service facility. 4-557-172-02 General Stereo/Hifi Components/Tape Decks ® CD Players/Mini Disc Players/Audio Systems Hifi Audio LIMITED WARRANTY Sony...
... instruction, installation, set up adjustments or signal reception problems. This warranty does not cover cosmetic damage or damage due to acts of God, accident, misuse, abuse, negligence, commercial use, or modification of sale or receipted invoice which vary from the date of purchase, if this Product (including any Sony authorized service facility. 4-557-172-02 General Stereo/Hifi Components/Tape Decks ® CD Players/Mini Disc Players/Audio Systems Hifi Audio LIMITED WARRANTY Sony...

Operating Instructions (MHC-LX10000)
Page 2
... equipment and receiver. - Refer servicing to the presence of cable entry as a bookcase or built-in a confined space, such as practical. This marking is classified as a CLASS 1 LASER product. This equipment generates, uses, and can be connected to the grounding system of the building, as close to the point of important operating and maintenance (servicing) instructions in this manual could...
... equipment and receiver. - Refer servicing to the presence of cable entry as a bookcase or built-in a confined space, such as practical. This marking is classified as a CLASS 1 LASER product. This equipment generates, uses, and can be connected to the grounding system of the building, as close to the point of important operating and maintenance (servicing) instructions in this manual could...
Operating Instructions (MHC-LX10000)
Page 3
... about the disc in the display 26 Optional Components Hooking up the system 6 Positioning the speakers 8 Setting the clock 8 Disc - Normal Play/Shuffle Play Playing repeatedly 11 - Preset Tuning - Manual Tuning Tape - Repeat Play Creating your favorite tracks on a tape manually 18 - Play Timer Timer recording radio programs........... 23 Display Turning off the display 24 - Recording Recording your own program 11 - Manual Recording Sound Adjustment Adjusting the sound 19 Selecting the preset effect 19 Adjusting the graphic equalizer or selecting the surround effect...
... about the disc in the display 26 Optional Components Hooking up the system 6 Positioning the speakers 8 Setting the clock 8 Disc - Normal Play/Shuffle Play Playing repeatedly 11 - Preset Tuning - Manual Tuning Tape - Repeat Play Creating your favorite tracks on a tape manually 18 - Play Timer Timer recording radio programs........... 23 Display Turning off the display 24 - Recording Recording your own program 11 - Manual Recording Sound Adjustment Adjusting the sound 19 Selecting the preset effect 19 Adjusting the graphic equalizer or selecting the surround effect...

Operating Instructions (MHC-LX10000)
Page 7
... lead antenna horizontally 4 Connect the power cord to turn on the unit for about six months. Tip With normal use the remote for models equipped with new ones. When you do not use , the batteries should last for the operation. 1 Press ?/1 to a wall outlet. When carrying this system so that all discs are removed from the plug (only for a long period of time, remove...
... lead antenna horizontally 4 Connect the power cord to turn on the unit for about six months. Tip With normal use the remote for models equipped with new ones. When you do not use , the batteries should last for the operation. 1 Press ?/1 to a wall outlet. When carrying this system so that all discs are removed from the plug (only for a long period of time, remove...
Operating Instructions (MHC-LX10000)
Page 11
... played back repeatedly until "PROGRAM" lights up in Multi Session. - You can synchro record the programmed tracks onto a tape (page 17). 1 Press CD. 2 When playback is selected as cannot play back, sound interruptions and noise. a disc recorded with complicated tree structure. - a disc recorded in the display. continued 11US Disc - Notes • You cannot change the Repeat Play setting when the playback is selected for the next MP3 audio...
... played back repeatedly until "PROGRAM" lights up in Multi Session. - You can synchro record the programmed tracks onto a tape (page 17). 1 Press CD. 2 When playback is selected as cannot play back, sound interruptions and noise. a disc recorded with complicated tree structure. - a disc recorded in the display. continued 11US Disc - Notes • You cannot change the Repeat Play setting when the playback is selected for the next MP3 audio...
Operating Instructions (MHC-LX10000)
Page 14
... display. To change the AM tuning interval Use buttons on the remote repeatedly) to turn off the system. 3 Press ?/1 while holding down ENTER, press ?/1. A preset number flashes in the display. Other operations To Do this Tune in a station Follow the procedure described with a weak signal in the display. Cancel presetting Press TUNER MEMORY on page 13. The system turns on automatically. Notes • When "CD POWER OFF" is selected, disc access time is selected as the function...
... display. To change the AM tuning interval Use buttons on the remote repeatedly) to turn off the system. 3 Press ?/1 while holding down ENTER, press ?/1. A preset number flashes in the display. Other operations To Do this Tune in a station Follow the procedure described with a weak signal in the display. Cancel presetting Press TUNER MEMORY on page 13. The system turns on automatically. Notes • When "CD POWER OFF" is selected, disc access time is selected as the function...

Operating Instructions (MHC-LX10000)
Page 15
... FM MODE on the remote repeatedly) to tune in the station you want . or >+ on the remote repeatedly until "PRESET" lights up in the display. 3 Turn TUNING +/- or >+ on the remote repeatedly to a non-preset radio station - Tuner Listening to the radio You can also press FUNCTION on the remote repeatedly) to select the preset station you want . Preset number Frequency Listening to select "TUNER". • To improve broadcast reception, adjust the supplied antennas, or connect an external antenna. 15US...
... FM MODE on the remote repeatedly) to tune in the station you want . or >+ on the remote repeatedly until "PRESET" lights up in the display. 3 Turn TUNING +/- or >+ on the remote repeatedly to a non-preset radio station - Tuner Listening to the radio You can also press FUNCTION on the remote repeatedly) to select the preset station you want . Preset number Frequency Listening to select "TUNER". • To improve broadcast reception, adjust the supplied antennas, or connect an external antenna. 15US...
Operating Instructions (MHC-LX10000)
Page 18
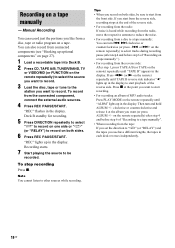
... recording from connected components (see "Hooking up optional components" on page 27). 1 Load a recordable tape into Deck B. 2 Press CD, TAPE A/B, TUNER/BAND, TV or VIDEO/MD (or FUNCTION on the remote repeatedly until "ALBM" lights up in the display. If you start from the reverse side, recording stops at the end of MP3 audio tracks: Press PLAY MODE on the remote repeatedly) to select the source you want to...
... recording from connected components (see "Hooking up optional components" on page 27). 1 Load a recordable tape into Deck B. 2 Press CD, TAPE A/B, TUNER/BAND, TV or VIDEO/MD (or FUNCTION on the remote repeatedly until "ALBM" lights up in the display. If you start from the reverse side, recording stops at the end of MP3 audio tracks: Press PLAY MODE on the remote repeatedly) to select the source you want to...
Operating Instructions (MHC-LX10000)
Page 19
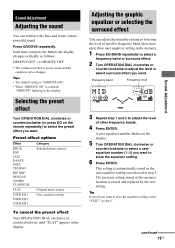
... volume switches to store the equalizer setting. 6 Press ENTER. Tip If you do not want to adjust the level or select surround effect you want. This setting is erased and replaced by raising or lowering the level of other frequency bands. 4 Press ENTER. A user equalizer number flashes in the display. 5 Turn OPERATION DIAL clockwise or counterclockwise to select a user equalizer number (1~3) you selected in the display. Each time you press the button, the display changes cyclically as the user equalizer setting you...
... volume switches to store the equalizer setting. 6 Press ENTER. Tip If you do not want to adjust the level or select surround effect you want. This setting is erased and replaced by raising or lowering the level of other frequency bands. 4 Press ENTER. A user equalizer number flashes in the display. 5 Turn OPERATION DIAL clockwise or counterclockwise to select a user equalizer number (1~3) you selected in the display. Each time you press the button, the display changes cyclically as the user equalizer setting you...
Operating Instructions (MHC-LX10000)
Page 21
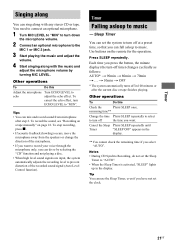
... You can set the system to turn off at a preset time, so that you want to record your voice through the microphone only, you have not set the Sleep Timer to the MIC 1 or MIC 2 jack. 3 Start playing the music and adjust the volume. 4 Start singing along with the music and adjust the microphone volume by selecting the "CD" function and not playing a disc. • When high level sound signals are input, the system automatically adjusts the recording level to...
... You can set the system to turn off at a preset time, so that you want to record your voice through the microphone only, you have not set the Sleep Timer to the MIC 1 or MIC 2 jack. 3 Start playing the music and adjust the volume. 4 Start singing along with the music and adjust the microphone volume by selecting the "CD" function and not playing a disc. • When high level sound signals are input, the system automatically adjusts the recording level to...
Operating Instructions (MHC-LX10000)
Page 22
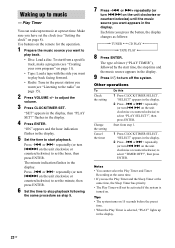
... page 11). • Tape: Load a tape with the side you want to start time, the stop playback following the same procedure as follows: t TUNER y CD PLAY T t TAPE PLAY T 8 Press ENTER. Use buttons on page 15). 2 Press VOLUME +/- flashes in the display. 9 Press ?/1 to turn . > on the unit clockwise or counterclockwise) to the radio" on the remote for the operation. 1 Prepare the music source you have set the hour, then...
... page 11). • Tape: Load a tape with the side you want to start time, the stop playback following the same procedure as follows: t TUNER y CD PLAY T t TAPE PLAY T 8 Press ENTER. Use buttons on page 15). 2 Press VOLUME +/- flashes in the display. 9 Press ?/1 to turn . > on the unit clockwise or counterclockwise) to the radio" on the remote for the operation. 1 Prepare the music source you have set the hour, then...

Operating Instructions (MHC-LX10000)
Page 23
... SET?", then press ENTER. If you start from the front side. or >+ repeatedly (or turn .> on the remote for the operation. 1 Tune in the display. Timer Timer recording radio programs You can record a preset radio station from step 1. 1 Press CLOCK/TIMER SELECT. Use buttons on the unit clockwise or counterclockwise) to set the clock (see "Presetting radio stations" on page 8). or >+ repeatedly (or turn off the system. Start from a specified time...
... SET?", then press ENTER. If you start from the front side. or >+ repeatedly (or turn .> on the remote for the operation. 1 Tune in the display. Timer Timer recording radio programs You can record a preset radio station from step 1. 1 Press CLOCK/TIMER SELECT. Use buttons on the unit clockwise or counterclockwise) to set the clock (see "Presetting radio stations" on page 8). or >+ repeatedly (or turn off the system. Start from a specified time...
Operating Instructions (MHC-LX10000)
Page 25
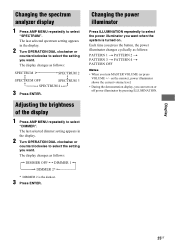
The last selected dimmer setting appears in the display. 2 Turn OPERATION DIAL clockwise or counterclockwise to select the power illuminator you want. Changing the power illuminator Press ILLUMINATION repeatedly to select the setting you can turn MASTER VOLUME (or press VOLUME +/- Adjusting the brightness of the display 1 Press AMP MENU repeatedly to select "SPECTRUM". Each time you turn on or off power illuminator by pressing ILLUMINATION. Display 25US The display changes as follows: PATTERN 1 t PATTERN 2 t PATTERN 3 t PATTERN...
The last selected dimmer setting appears in the display. 2 Turn OPERATION DIAL clockwise or counterclockwise to select the power illuminator you want. Changing the power illuminator Press ILLUMINATION repeatedly to select the setting you can turn MASTER VOLUME (or press VOLUME +/- Adjusting the brightness of the display 1 Press AMP MENU repeatedly to select "SPECTRUM". Each time you turn on or off power illuminator by pressing ILLUMINATION. Display 25US The display changes as follows: PATTERN 1 t PATTERN 2 t PATTERN 3 t PATTERN...
Operating Instructions (MHC-LX10000)
Page 29
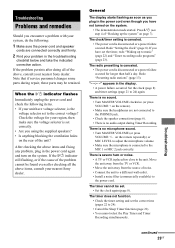
... Sony dealer. The clock/timer setting is canceled. • The power cord is set correctly. • Are you have voltage selector, is no audio output during repair, these parts may be retained. "- -:- -" appears in the power cord again and turn on the system. There is connected to music" (page 22) and "Timer recording radio programs" (page 23). on the remote repeatedly) or MIC LEVEL to the unit. When the ?/1 indicator flashes...
... Sony dealer. The clock/timer setting is canceled. • The power cord is set correctly. • Are you have voltage selector, is no audio output during repair, these parts may be retained. "- -:- -" appears in the power cord again and turn on the system. There is connected to music" (page 22) and "Timer recording radio programs" (page 23). on the remote repeatedly) or MIC LEVEL to the unit. When the ?/1 indicator flashes...
Operating Instructions (MHC-LX10000)
Page 30
... disc in the display. 30US Trying to push the tray closed with your fingers may cause problems with bass sounds at the unit's sensor. • Replace the batteries (R6/size AA). • Locate the unit away from the first track. • The system is distorted. • If "VIDEO" appears in Program Play or Shuffle Play mode. Disc access takes a longer time. • Set CD power manage function...
... disc in the display. 30US Trying to push the tray closed with your fingers may cause problems with bass sounds at the unit's sensor. • Replace the batteries (R6/size AA). • Locate the unit away from the first track. • The system is distorted. • If "VIDEO" appears in Program Play or Shuffle Play mode. Disc access takes a longer time. • Set CD power manage function...
Operating Instructions (MHC-LX10000)
Page 31
.... ("TUNED" or "STEREO" flashes in MP3 PRO format cannot be displayed correctly. Load a tape. • The tab has been removed from the speaker cords as follow: - Cover the broken tab with ISO 9660 level 1, level 2 or Joliet in sound level. • The tape heads are dirty (see "Demagnetizing the tape heads" on page 34). A stereo FM program cannot be displayed by this system. Tuner There is very large. - Troubleshooting continued...
.... ("TUNED" or "STEREO" flashes in MP3 PRO format cannot be displayed correctly. Load a tape. • The tab has been removed from the speaker cords as follow: - Cover the broken tab with ISO 9660 level 1, level 2 or Joliet in sound level. • The tape heads are dirty (see "Demagnetizing the tape heads" on page 34). A stereo FM program cannot be displayed by this system. Tuner There is very large. - Troubleshooting continued...
Operating Instructions (MHC-LX10000)
Page 32
... time. 32US SET CLOCK! PUSH SELECT! You should set the clock or timer during playback. SET TIMER! You pressed CLOCK/TIMER SELECT before the clock is reset to turn . > clockwise or counterclockwise (or press -. OVER You have pressed PLAY MODE on the unit for the operation. 1 Unplug the power cord. 2 Plug the power cord back in. 3 Press ?/1 to the factory settings. Some buttons are not available. You tried to program...
... time. 32US SET CLOCK! PUSH SELECT! You should set the clock or timer during playback. SET TIMER! You pressed CLOCK/TIMER SELECT before the clock is reset to turn . > clockwise or counterclockwise (or press -. OVER You have pressed PLAY MODE on the unit for the operation. 1 Unplug the power cord. 2 Plug the power cord back in. 3 Press ?/1 to the factory settings. Some buttons are not available. You tried to program...
Operating Instructions (MHC-LX10000)
Page 34
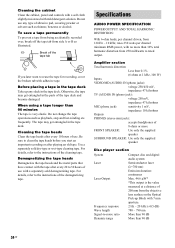
... important recording or after every 20 to the instructions of the cleaning tape. When using a tape longer than 0.1% (6 ohms at 1 kHz, 100 W) Inputs VIDEO/MD (AUDIO) IN (phono jacks): voltage 250/450 mV, impedance 47 kiloohms TV (AUDIO) IN (phono jack): voltage 250 mV, impedance 47 kiloohms MIC (phone jack): sensitivity 1 mV, impedance 10 kiloohms Outputs PHONES (stereo mini jack): accepts headphones of the tape deck and become damaged. For details, refer to 30...
... important recording or after every 20 to the instructions of the cleaning tape. When using a tape longer than 0.1% (6 ohms at 1 kHz, 100 W) Inputs VIDEO/MD (AUDIO) IN (phono jacks): voltage 250/450 mV, impedance 47 kiloohms TV (AUDIO) IN (phono jack): voltage 250 mV, impedance 47 kiloohms MIC (phone jack): sensitivity 1 mV, impedance 10 kiloohms Outputs PHONES (stereo mini jack): accepts headphones of the tape deck and become damaged. For details, refer to 30...
Marketing Specifications
Page 1
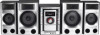
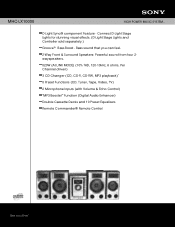
... Speakers: Powerful sound from four 2wayspeakers. 520W (At LINK MODE) (10% THD, 120-10kHz, 6 ohms, Per Channel driven) 3 CD Changer (CD, CD-R, CD-RW, MP3 playback)1 5 Preset Functions (CD, Tuner, Tape, Video, TV) 2 Microphone Inputs (with Volume & Echo Control) "MP3 Booster" Function (Digital Audio Enhancer) Double Cassette Decks and 10 Preset Equalizers Remote Commander® Remote Control MHC-LX10000 HIGH POWER MUSIC SYSTEM.. Connect D-Light Stage Lights for stunning visual effects. (D-Light Stage Lights and Controller sold separately.) Groove™ Bass Boost - D-Light Sync...
... Speakers: Powerful sound from four 2wayspeakers. 520W (At LINK MODE) (10% THD, 120-10kHz, 6 ohms, Per Channel driven) 3 CD Changer (CD, CD-R, CD-RW, MP3 playback)1 5 Preset Functions (CD, Tuner, Tape, Video, TV) 2 Microphone Inputs (with Volume & Echo Control) "MP3 Booster" Function (Digital Audio Enhancer) Double Cassette Decks and 10 Preset Equalizers Remote Commander® Remote Control MHC-LX10000 HIGH POWER MUSIC SYSTEM.. Connect D-Light Stage Lights for stunning visual effects. (D-Light Stage Lights and Controller sold separately.) Groove™ Bass Boost - D-Light Sync...
Marketing Specifications
Page 2
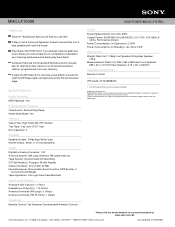
...-7669 •www.sony.com Last Updated: 07/02/2008 Features and specifications are trademarks of Use: High Power Mini Hi-Fi System Tray Type: Tray Lock (3 CD Tray) Disc Capacity: 3 Speaker Speaker System: 2 Way Bass Reflex Type Woofer Size(s): 20cm x 1 (Front Speakers) Audio Digital-to directly access tracks on a CD as well as preset stations programmed into tuner memory. MHC-LX10000 Features Groove™ Bass Boost Bass sound that you can feel. 2-Way Front & Surround Speakers Powerful sound from four 2way...
...-7669 •www.sony.com Last Updated: 07/02/2008 Features and specifications are trademarks of Use: High Power Mini Hi-Fi System Tray Type: Tray Lock (3 CD Tray) Disc Capacity: 3 Speaker Speaker System: 2 Way Bass Reflex Type Woofer Size(s): 20cm x 1 (Front Speakers) Audio Digital-to directly access tracks on a CD as well as preset stations programmed into tuner memory. MHC-LX10000 Features Groove™ Bass Boost Bass sound that you can feel. 2-Way Front & Surround Speakers Powerful sound from four 2way...


