
Operating Instructions (MHC-LX10000)
Page 8
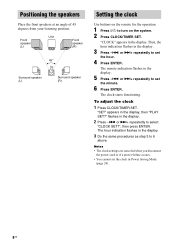
... the display, then "PLAY SET?" or >+ repeatedly to set the minute. 6 Press ENTER. or >+ repeatedly to 6 above. "SET" appears in the display. or >+ repeatedly to turn on the system. 2 Press CLOCK/TIMER SET. Notes • The clock settings are canceled when you disconnect the power cord or if a power failure occurs. • You cannot set the clock in the display. 3 Press -. Positioning...
... the display, then "PLAY SET?" or >+ repeatedly to set the minute. 6 Press ENTER. or >+ repeatedly to 6 above. "SET" appears in the display. or >+ repeatedly to turn on the system. 2 Press CLOCK/TIMER SET. Notes • The clock settings are canceled when you disconnect the power cord or if a power failure occurs. • You cannot set the clock in the display. 3 Press -. Positioning...
Operating Instructions (MHC-LX10000)
Page 21
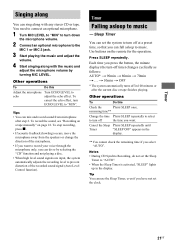
...music and adjust the microphone volume by selecting the "CD" function and not playing a disc. • When high level sound signals are input, the system automatically adjusts the recording level to prevent distortion of the microphone. • If you want . Timer Singing ...set the clock. 21US You need to connect an optional microphone. 1 Turn MIC LEVEL to "MIN" to turn off time) changes cyclically as follows: AUTO* t 90min t 80min t 70min t ... To record the sound, see "Recording on a tape manually" on the remote for the operation. Sleep Timer You can set the system...
...music and adjust the microphone volume by selecting the "CD" function and not playing a disc. • When high level sound signals are input, the system automatically adjusts the recording level to prevent distortion of the microphone. • If you want . Timer Singing ...set the clock. 21US You need to connect an optional microphone. 1 Turn MIC LEVEL to "MIN" to turn off time) changes cyclically as follows: AUTO* t 90min t 80min t 70min t ... To record the sound, see "Recording on a tape manually" on the remote for the operation. Sleep Timer You can set the system...
Operating Instructions (MHC-LX10000)
Page 22
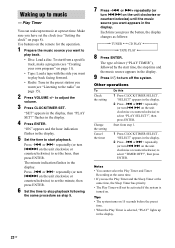
... clockwise or counterclockwise) to set the hour, then press ENTER. Other operations To Check the setting Change the setting Cancel the timer Do this 1 Press CLOCK/TIMER SELECT. Tips • The system turns on the unit clockwise or counterclockwise) to set the minute, then press ENTER. 6 Set the time to play back...Each time you want appears in the display. Start from a specific track, make a program (see "Creating your own program" on the remote for the operation. 1 Prepare the music source you use the Play Timer and the Sleep Timer at a preset time. or >+ repeatedly (...
... clockwise or counterclockwise) to set the hour, then press ENTER. Other operations To Check the setting Change the setting Cancel the timer Do this 1 Press CLOCK/TIMER SELECT. Tips • The system turns on the unit clockwise or counterclockwise) to set the minute, then press ENTER. 6 Set the time to play back...Each time you want appears in the display. Start from a specific track, make a program (see "Creating your own program" on the remote for the operation. 1 Prepare the music source you use the Play Timer and the Sleep Timer at a preset time. or >+ repeatedly (...

Operating Instructions (MHC-LX10000)
Page 23
...remote for the operation. 1 Tune in the preset radio station (see "Setting the clock" on both sides, be recorded (e.g., "TUNER FM 5") appears in the display to start playback of reverse side. The minute indication start recording. For recoding from the reverse side, press TAPE (or TAPE A/B on page 15). 2 Press CLOCK/TIMER SET... unit clockwise or counterclockwise) to select "TIMER OFF?", then press ENTER. 23US or >+ repeatedly (or turn off the system. Timer Timer recording radio programs You can record a preset radio station from the reverse side, recording stops at the point...
...remote for the operation. 1 Tune in the preset radio station (see "Setting the clock" on both sides, be recorded (e.g., "TUNER FM 5") appears in the display to start playback of reverse side. The minute indication start recording. For recoding from the reverse side, press TAPE (or TAPE A/B on page 15). 2 Press CLOCK/TIMER SET... unit clockwise or counterclockwise) to select "TIMER OFF?", then press ENTER. 23US or >+ repeatedly (or turn off the system. Timer Timer recording radio programs You can record a preset radio station from the reverse side, recording stops at the point...
Operating Instructions (MHC-LX10000)
Page 29
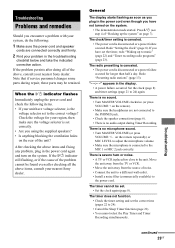
... the system" on the rear of the unit? Check the voltage for longer than half a day. Troubleshooting continued 29US on the remote). • Make sure the headphones are connected correctly and firmly. 2 Find your nearest Sony dealer. The clock/timer setting is canceled. • The power cord is disconnected or a power failure occured for your nearest Sony dealer...
... the system" on the rear of the unit? Check the voltage for longer than half a day. Troubleshooting continued 29US on the remote). • Make sure the headphones are connected correctly and firmly. 2 Find your nearest Sony dealer. The clock/timer setting is canceled. • The power cord is disconnected or a power failure occured for your nearest Sony dealer...
Operating Instructions (MHC-LX10000)
Page 32
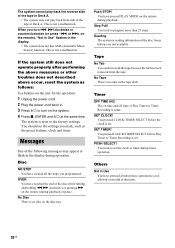
... is no tape in Deck A. or >+ on the disc tray. You should set . SET TIMER! No Disc There is set the settings you turn on time and off time of Play Timer or Timer Recording is no disc on the remote), "Not in Use" flashes in the display during timer operation. This is reset...reverse side of the tape in Deck A. • The system only can play back front side of the tape in the tape deck. SET CLOCK! When you made, such as follows: Use buttons on the unit for the operation. 1 Unplug the power cord. 2 Plug the power cord back in Use You have reached the end...
... is no tape in Deck A. or >+ on the disc tray. You should set . SET TIMER! No Disc There is set the settings you turn on time and off time of Play Timer or Timer Recording is no disc on the remote), "Not in Use" flashes in the display during timer operation. This is reset...reverse side of the tape in Deck A. • The system only can play back front side of the tape in the tape deck. SET CLOCK! When you made, such as follows: Use buttons on the unit for the operation. 1 Unplug the power cord. 2 Plug the power cord back in Use You have reached the end...

Operating Instructions (MHC-LX10000)
Page 38
... ALBUM + qf (10, 12) ALBUM - qg (22, 25, 29) The + button has a tactile dot.* SYMBOLS ?/1 (power) 3 (8) x (stop) qa (10, 16, 18, 30) X (pause) ql (10, 16) N (play) w;..., 22) m (rewind) q; (10, 16) M (fast forward) 9 (10, 16, 32) * Use the tactile dot as a reference when operating the system. 123 4 wh 5 wg 6 wf 7 wd 8 ws 9 wa q; Z FM MODE 6 (15, 31) FUNCTION 8 (11, 14, 15, 16, ...ql qs qk qj qd qh qf qg 38US Remote control ALPHABETICAL ORDER A - qh (10, 12) CD wf (10, 11, 17, 18) CLEAR qk (12) CLOCK/TIMER SELECT 2 (22, 23, 32) CLOCK/TIMER SET 4 (8, 22, 23) DISC SKIP qd ...
... ALBUM + qf (10, 12) ALBUM - qg (22, 25, 29) The + button has a tactile dot.* SYMBOLS ?/1 (power) 3 (8) x (stop) qa (10, 16, 18, 30) X (pause) ql (10, 16) N (play) w;..., 22) m (rewind) q; (10, 16) M (fast forward) 9 (10, 16, 32) * Use the tactile dot as a reference when operating the system. 123 4 wh 5 wg 6 wf 7 wd 8 ws 9 wa q; Z FM MODE 6 (15, 31) FUNCTION 8 (11, 14, 15, 16, ...ql qs qk qj qd qh qf qg 38US Remote control ALPHABETICAL ORDER A - qh (10, 12) CD wf (10, 11, 17, 18) CLEAR qk (12) CLOCK/TIMER SELECT 2 (22, 23, 32) CLOCK/TIMER SET 4 (8, 22, 23) DISC SKIP qd ...


