
Operating Instructions
Page 6
Front speaker (L) Front speaker (R) Tip With normal use the remote for a long period of 45 degrees from slipping. When the remote no longer operates the system, replace both batteries with new ones. Note If you connect them from your listening position. When carrying this system...each other at an angle of time, remove the batteries to 90 cm Surround speaker 6 Inserting two size AA (R6) batteries into the remote e E E e Positioning the speakers (MHC-BX7/DX7 only) Before you do not use , the batteries should last for about 60 to 90 cm above your listening position. 60 ...
Front speaker (L) Front speaker (R) Tip With normal use the remote for a long period of 45 degrees from slipping. When the remote no longer operates the system, replace both batteries with new ones. Note If you connect them from your listening position. When carrying this system...each other at an angle of time, remove the batteries to 90 cm Surround speaker 6 Inserting two size AA (R6) batteries into the remote e E E e Positioning the speakers (MHC-BX7/DX7 only) Before you do not use , the batteries should last for about 60 to 90 cm above your listening position. 60 ...
Operating Instructions
Page 8
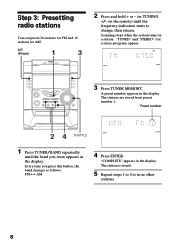
... 1 to 4 to change, then release. Step 3: Presetting radio stations You can preset 20 stations for FM and 10 stations for a stereo program) appear. on the remote) until the band you press this button, the band changes as follows: FM y AM 4 Press ENTER. The stations are stored from preset number 1.
... 1 to 4 to change, then release. Step 3: Presetting radio stations You can preset 20 stations for FM and 10 stations for a stereo program) appear. on the remote) until the band you press this button, the band changes as follows: FM y AM 4 Press ENTER. The stations are stored from preset number 1.
Operating Instructions
Page 9
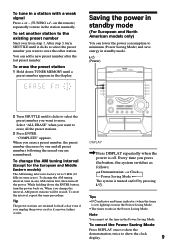
... factory set another station to show the clock display. 9 To erase the preset station 1 Hold down the ENTER button, turn the power back on the remote) repeatedly to erase. When you unplug the power cord or if a power failure occurs. "COMPLETE" appears. To set to erase all preset numbers following the...
... factory set another station to show the clock display. 9 To erase the preset station 1 Hold down the ENTER button, turn the power back on the remote) repeatedly to erase. When you unplug the power cord or if a power failure occurs. "COMPLETE" appears. To set to erase all preset numbers following the...

Operating Instructions
Page 11
...During play Press x. Exchange other Press DISC SKIP EX-CHANGE. CDs while playing Adjust the volume Turn VOLUME (or press VOL +/- SKIP on the remote). on the remote). When a disc tray holding a CD is selected (or the CD in a track Turn SHUTTLE clockwise (to go forward) or counterclockwise (to... PLAY MODE repeatedly until "CONTINUE ALL DISCS" or "SHUFFLE ALL DISCS" appears. Find a point in the disc tray is no disc on the remote). Play only the CD you reach the desired point (or press and hold . Remove the CD Press Z OPEN/CLOSE. Release it clicks and...
...During play Press x. Exchange other Press DISC SKIP EX-CHANGE. CDs while playing Adjust the volume Turn VOLUME (or press VOL +/- SKIP on the remote). on the remote). When a disc tray holding a CD is selected (or the CD in a track Turn SHUTTLE clockwise (to go forward) or counterclockwise (to... PLAY MODE repeatedly until "CONTINUE ALL DISCS" or "SHUFFLE ALL DISCS" appears. Find a point in the disc tray is no disc on the remote). Play only the CD you reach the desired point (or press and hold . Remove the CD Press Z OPEN/CLOSE. Release it clicks and...
Operating Instructions
Page 13
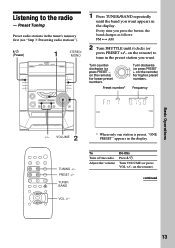
...Adjust the volume Do this Press ?/1. VOLUME * When only one station is preset, "ONE PRESET" appears in the display. on the remote) for higher preset J numbers. TUNER BAND VOL +/- Listening to tune in the preset station you press the button, the band changes as...the band you want . continued Basic Operations 13 Turn VOLUME (or press VOL +/- Turn clockwise j (or press PRESET + on the remote). PRESET +/- on the remote) for lower preset numbers. Every time you want appears in the display. Turn counterclockwise (or press PRESET - Preset number* Frequency MHz ...
...Adjust the volume Do this Press ?/1. VOLUME * When only one station is preset, "ONE PRESET" appears in the display. on the remote) for higher preset J numbers. TUNER BAND VOL +/- Listening to tune in the preset station you press the button, the band changes as...the band you want . continued Basic Operations 13 Turn VOLUME (or press VOL +/- Turn clockwise j (or press PRESET + on the remote). PRESET +/- on the remote) for lower preset numbers. Every time you want appears in the display. Turn counterclockwise (or press PRESET - Preset number* Frequency MHz ...

Operating Instructions
Page 14
...an FM program is noisy, press STEREO/MONO so that "MONO" appears in step 2. You can record the radio program on the remote) to restore the stereo effect. • To improve broadcast reception, reorient the supplied antennas. Preset number Turn clockwise (or press PRESET + ...on the remote) J for higher preset numbers. Recording from the radio You can use TYPE I (normal) tape. ?/1 (Power) 1 5 DOLBY NR 2 x 4,6 3 1 Press ...
...an FM program is noisy, press STEREO/MONO so that "MONO" appears in step 2. You can record the radio program on the remote) to restore the stereo effect. • To improve broadcast reception, reorient the supplied antennas. Preset number Turn clockwise (or press PRESET + ...on the remote) J for higher preset numbers. Recording from the radio You can use TYPE I (normal) tape. ?/1 (Power) 1 5 DOLBY NR 2 x 4,6 3 1 Press ...

Operating Instructions
Page 15
...reverse side indicator lights up (see page 16). 2 • When you want to tune in the desired station manually. • When you record on the remote) in step 2 to record facing forward 4 Press REC PAUSE/START. Recording starts. Tips • If you want to reduce the hiss noise in step... 4 (MHC-BX9/DX9 only). • If noise is heard while recording from the reverse side, recording stops at the end of the reverse side, then press ...
...reverse side indicator lights up (see page 16). 2 • When you want to tune in the desired station manually. • When you record on the remote) in step 2 to record facing forward 4 Press REC PAUSE/START. Recording starts. Tips • If you want to reduce the hiss noise in step... 4 (MHC-BX9/DX9 only). • If noise is heard while recording from the reverse side, recording stops at the end of the reverse side, then press ...

Operating Instructions
Page 16
... select deck A or B. 2 Press Z and insert a recorded tape in succession, select RELAY (relay play Press x. When the unit is recorded on the remote). With the side you want to play both decks in deck A or B. Press nN again to resume play the reverse side. Press again to play... - or > repeatedly for the beginning of songs being skipped (1~9) appear in lowlevel high-frequency signals, press DOLBY NR so that "DOLBY NR" appears (MHC-BX9/DX9 only). • When no tapes are inserted, all indicators light. Fast-forward Turn SHUTTLE clockwise until it clicks (or press M on the...
... select deck A or B. 2 Press Z and insert a recorded tape in succession, select RELAY (relay play Press x. When the unit is recorded on the remote). With the side you want to play both decks in deck A or B. Press nN again to resume play the reverse side. Press again to play... - or > repeatedly for the beginning of songs being skipped (1~9) appear in lowlevel high-frequency signals, press DOLBY NR so that "DOLBY NR" appears (MHC-BX9/DX9 only). • When no tapes are inserted, all indicators light. Fast-forward Turn SHUTTLE clockwise until it clicks (or press M on the...

Operating Instructions
Page 22
... you have programmed a track number which exceeds 20. - you made remains in the CD player even after it has been played back. CHECK on the remote repeatedly until "PGM" or "SHUFFLE" disappears from the end Clear a specific track in stop mode Add a track to the program in stop mode Clear the... entire program Press CHECK on the remote in stop mode. Press nN to be erased lights up, then press CLEAR. 1 Select the disc tray with a DISC 1~3 button. 2 Select the track by pressing...
... you have programmed a track number which exceeds 20. - you made remains in the CD player even after it has been played back. CHECK on the remote repeatedly until "PGM" or "SHUFFLE" disappears from the end Clear a specific track in stop mode Add a track to the program in stop mode Clear the... entire program Press CHECK on the remote in stop mode. Press nN to be erased lights up, then press CLEAR. 1 Select the disc tray with a DISC 1~3 button. 2 Select the track by pressing...
Operating Instructions
Page 25
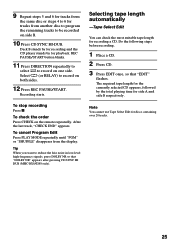
..., "CHECK END" appears. The required tape length for the currently selected CD appears, followed by for recording a CD. Select j (or RELAY) to record on the remote repeatedly. To cancel Program Edit Press PLAY MODE repeatedly until "PGM" or "SHUFFLE" disappears from another disc to program the remaining tracks to record on... playback. Do the following steps before recording. 1 Place a CD. 2 Press CD. 3 Press EDIT once, so that "DOLBY NR" appears after pressing CD SYNC HI DUB (MHC-BX9/DX9 only).
..., "CHECK END" appears. The required tape length for the currently selected CD appears, followed by for recording a CD. Select j (or RELAY) to record on the remote repeatedly. To cancel Program Edit Press PLAY MODE repeatedly until "PGM" or "SHUFFLE" disappears from another disc to program the remaining tracks to record on... playback. Do the following steps before recording. 1 Place a CD. 2 Press CD. 3 Press EDIT once, so that "DOLBY NR" appears after pressing CD SYNC HI DUB (MHC-BX9/DX9 only).

Operating Instructions
Page 26
This lets you create original recordings. To use the tape deck on the remote (or press b/B while holding FLASH to resume normal play . Adjust the loop and flash lengths independently beforehand if necessary. • To record the loop or ...
This lets you create original recordings. To use the tape deck on the remote (or press b/B while holding FLASH to resume normal play . Adjust the loop and flash lengths independently beforehand if necessary. • To record the loop or ...
Operating Instructions
Page 28
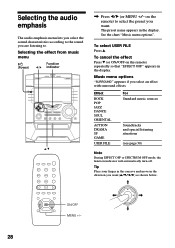
... the effect from music menu ?/1 (Power) Function b/B indicator v/V hH S s l L j J H S s ON/OFF MENU +/- , Press b/B (or MENU +/- on the remote) repeatedly so that "EFFECT OFF" appears in the display. The preset name appears in the display. Music menu options "SURROUND" appears if you want . See... the chart "Music menu options". To select USER FILE Press v. To cancel the effect Press V (or ON/OFF on the remote) to . Selecting the audio emphasis The audio emphasis menu lets you select the sound characteristics according to the sound you are listening to...
... the effect from music menu ?/1 (Power) Function b/B indicator v/V hH S s l L j J H S s ON/OFF MENU +/- , Press b/B (or MENU +/- on the remote) repeatedly so that "EFFECT OFF" appears in the display. The preset name appears in the display. Music menu options "SURROUND" appears if you want . See... the chart "Music menu options". To select USER FILE Press v. To cancel the effect Press V (or ON/OFF on the remote) to . Selecting the audio emphasis The audio emphasis menu lets you select the sound characteristics according to the sound you are listening to...
Operating Instructions
Page 30
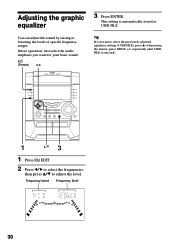
... is selected). 1 3 v/V 1 Press EQ EDIT. 2 Press b/B to select the frequencies, then press v/V to select the previously adjusted equalizer settings (USER FILE), press v (when using the remote, press MENU +/- repeatedly until USER FILE is automatically stored as USER FILE. Frequency band Frequency level 30 Adjusting the graphic equalizer You can adjust the...
... is selected). 1 3 v/V 1 Press EQ EDIT. 2 Press b/B to select the frequencies, then press v/V to select the previously adjusted equalizer settings (USER FILE), press v (when using the remote, press MENU +/- repeatedly until USER FILE is automatically stored as USER FILE. Frequency band Frequency level 30 Adjusting the graphic equalizer You can adjust the...

Operating Instructions
Page 34
...; During KARAOKE PON, equalizer and surround settings cannot be changed. • If you are input, the unit automatically adjusts the recording level to 5 on the remote) or recall a sound effect, the karaoke mode is singing in deck B. 2 Press one side. Notes • The instrumental sound may be recorded.
...; During KARAOKE PON, equalizer and surround settings cannot be changed. • If you are input, the unit automatically adjusts the recording level to 5 on the remote) or recall a sound effect, the karaoke mode is singing in deck B. 2 Press one side. Notes • The instrumental sound may be recorded.

Operating Instructions
Page 36
... cannot activate DAILY 1 and DAILY 2 timer at the same time. • You cannot set the minute, then press ENTER. Tip The power turns on the remote to select "DAILY 1 (or 2)", then press ENTER. The type of timer (DAILY 1 or DAILY 2), followed by the start over from step 1. or > repeatedly to set... timer on and off times are the same. • When you use the Sleep Timer, Daily Timer and Timer recording will not turn on the remote. The minute indication starts flashing. 1 Press . or > repeatedly on 15 seconds before the preset time. 36 or > repeatedly until the Sleep Timer turns it ...
... cannot activate DAILY 1 and DAILY 2 timer at the same time. • You cannot set the minute, then press ENTER. Tip The power turns on the remote to select "DAILY 1 (or 2)", then press ENTER. The type of timer (DAILY 1 or DAILY 2), followed by the start over from step 1. or > repeatedly to set... timer on and off times are the same. • When you use the Sleep Timer, Daily Timer and Timer recording will not turn on the remote. The minute indication starts flashing. 1 Press . or > repeatedly on 15 seconds before the preset time. 36 or > repeatedly until the Sleep Timer turns it ...
Operating Instructions
Page 39
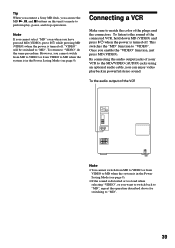
... or from VIDEO to perform play, pause, and stop operations. To return to "VIDEO". However, you can use the MD N, X, and x buttons on this unit's remote to MD when the system is in the Power Saving Mode (see page 9). Connecting a VCR Make sure to MD when the system is in powerful... "MD" function to "VIDEO" do the same procedure. "VIDEO" will be switched to the sound of the plugs and the connectors. Tip When you connect a Sony MD deck, you have pressed MD (VIDEO), press ?/1 while pressing MD (VIDEO) when the power is turned off . Note If you cannot select "MD" even...
... or from VIDEO to perform play, pause, and stop operations. To return to "VIDEO". However, you can use the MD N, X, and x buttons on this unit's remote to MD when the system is in the Power Saving Mode (see page 9). Connecting a VCR Make sure to MD when the system is in powerful... "MD" function to "VIDEO" do the same procedure. "VIDEO" will be switched to the sound of the plugs and the connectors. Tip When you connect a Sony MD deck, you have pressed MD (VIDEO), press ?/1 while pressing MD (VIDEO) when the power is turned off . Note If you cannot select "MD" even...
Operating Instructions
Page 43
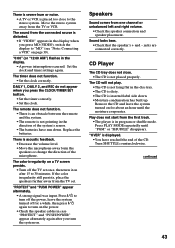
... the disc tray. •The CD is dirty. •The CD is inserted label side down . The remote does not function. •There is an obstacle between the remote and the system. •The remote is not pointing in case "PROTECT" and "PUSH POWER" appear alternately again after 15 to turn on the...
... the disc tray. •The CD is dirty. •The CD is inserted label side down . The remote does not function. •There is an obstacle between the remote and the system. •The remote is not pointing in case "PROTECT" and "PUSH POWER" appear alternately again after 15 to turn on the...
Operating Instructions
Page 47
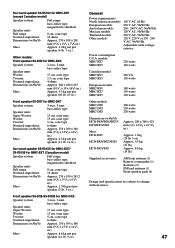
...MHC-BX7 MHC-BX5 220 watts 160 watts Canadian model: MHC-BX7 MHC-BX5 280 VA 150 watts European models: MHC-BX9 MHC-BX7 MHC-BX5 180 watts 195 watts 190 watts Other models: MHC-DX9 MHC-DX7 MHC-DX5 300 watts 250 watts 230 watts Dimensions (w/h/d) HCD-BX9/DX9/BX7/ DX7/BX5/DX5 Mass : HCD-DX9 HCD-BX9/DX7/DX5 HCD-BX7/BX5.../4 in .) Approx. 11 kg (24 lb. 5 oz) Approx. 9.5 kg (21 lb.) Approx. 8.6 kg (19 lb.) Supplied accessories: AM loop antenna (1) Remote commander (1) Batteries (2) FM lead antenna (1) Front speaker pads (8) Design and specifications are subject to change without notice. 47
...MHC-BX7 MHC-BX5 220 watts 160 watts Canadian model: MHC-BX7 MHC-BX5 280 VA 150 watts European models: MHC-BX9 MHC-BX7 MHC-BX5 180 watts 195 watts 190 watts Other models: MHC-DX9 MHC-DX7 MHC-DX5 300 watts 250 watts 230 watts Dimensions (w/h/d) HCD-BX9/DX9/BX7/ DX7/BX5/DX5 Mass : HCD-DX9 HCD-BX9/DX7/DX5 HCD-BX7/BX5.../4 in .) Approx. 11 kg (24 lb. 5 oz) Approx. 9.5 kg (21 lb.) Approx. 8.6 kg (19 lb.) Supplied accessories: AM loop antenna (1) Remote commander (1) Batteries (2) FM lead antenna (1) Front speaker pads (8) Design and specifications are subject to change without notice. 47


