Operating Instructions
Page 2
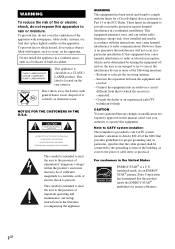
...as a bookcase or built-in a residential installation. As an ENERGY STAR® partner, Sony Corporation has determined that to which can radiate radio frequency energy and, if not installed and used in the literature accompanying the appliance. WARNING This equipment has been tested and found to ... antenna. - NOTICE FOR THE CUSTOMERS IN THE U.S.A. This symbol is no guarantee that provides guidelines for energy efficiency. 2GB FST-ZX8/LBT-ZX84-253-172-15(1) WARNING To reduce the risk of fire or electric shock, do not expose this equipment does cause harmful interference...
...as a bookcase or built-in a residential installation. As an ENERGY STAR® partner, Sony Corporation has determined that to which can radiate radio frequency energy and, if not installed and used in the literature accompanying the appliance. WARNING This equipment has been tested and found to ... antenna. - NOTICE FOR THE CUSTOMERS IN THE U.S.A. This symbol is no guarantee that provides guidelines for energy efficiency. 2GB FST-ZX8/LBT-ZX84-253-172-15(1) WARNING To reduce the risk of fire or electric shock, do not expose this equipment does cause harmful interference...
Operating Instructions
Page 5
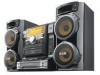
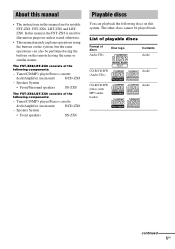
.... • This manual mainly explains operations using the buttons on the remote having the same or similar names. The FST-ZX8/LBT-ZX8 consists of the following components: - Speaker System • Front/Surround speakers SS-ZX8 The FST-ZX6/LBT-ZX6 consists of discs Audio CDs Disc logo Contents...Stereo cassette deck/Amplifier (main unit) HCD-ZX6 - List of playable discs Format of the following components: - About this manual • The instructions in this system. In this manual, the FST-ZX8 is used for models FST-ZX8, FST-ZX6, LBT-ZX8 and LBTZX6. Tuner/CD/MP3 player/...
.... • This manual mainly explains operations using the buttons on the remote having the same or similar names. The FST-ZX8/LBT-ZX8 consists of the following components: - Speaker System • Front/Surround speakers SS-ZX8 The FST-ZX6/LBT-ZX6 consists of discs Audio CDs Disc logo Contents...Stereo cassette deck/Amplifier (main unit) HCD-ZX6 - List of playable discs Format of the following components: - About this manual • The instructions in this system. In this manual, the FST-ZX8 is used for models FST-ZX8, FST-ZX6, LBT-ZX8 and LBTZX6. Tuner/CD/MP3 player/...
Operating Instructions
Page 6
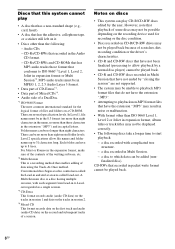
...Notes on discs • This system can be possible depending on a CD-ROM. However, note that playback of files and folders on the recording device used for the logical format of some discs may not be played back. 6GB a disc to which data can play • A disc that has a...2 or Joliet in MPEG 1, 2, 2.5 Audio Layer 3 format. • Data part of CD-Extras*3. • Data part of Mixed CDs*4. • Audio side of data using the Track-At-Once method. There can be no longer than the following discs take a longer time to 8 trees. Conventional discs begin at a disc control...
...Notes on discs • This system can be possible depending on a CD-ROM. However, note that playback of files and folders on the recording device used for the logical format of some discs may not be played back. 6GB a disc to which data can play • A disc that has a...2 or Joliet in MPEG 1, 2, 2.5 Audio Layer 3 format. • Data part of CD-Extras*3. • Data part of Mixed CDs*4. • Audio side of data using the Track-At-Once method. There can be no longer than the following discs take a longer time to 8 trees. Conventional discs begin at a disc control...
Operating Instructions
Page 8
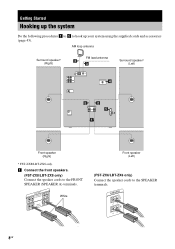
...2 2 5 1 Front speaker (Right) * FST-ZX8/LBT-ZX8 only. 1 Connect the front speakers. (FST-ZX8/LBT-ZX8 only) Connect the speaker cords to the SPEAKER terminals. SRPS(SUEPREARAKOKEURENBRD) L L R (SPFERAOKNERT A) White Front speaker (Left) (FST-ZX6/LBT-ZX6 only) Connect the speaker cords to the FRONT SPEAKER (SPEAKER ...A) terminals. Getting Started Hooking up the system Do the following procedures 1 to 5 to hook up your system using the supplied cords and accessories (page 43)....
...2 2 5 1 Front speaker (Right) * FST-ZX8/LBT-ZX8 only. 1 Connect the front speakers. (FST-ZX8/LBT-ZX8 only) Connect the speaker cords to the SPEAKER terminals. SRPS(SUEPREARAKOKEURENBRD) L L R (SPFERAOKNERT A) White Front speaker (Left) (FST-ZX6/LBT-ZX6 only) Connect the speaker cords to the FRONT SPEAKER (SPEAKER ...A) terminals. Getting Started Hooking up the system Do the following procedures 1 to 5 to hook up your system using the supplied cords and accessories (page 43)....
Operating Instructions
Page 9
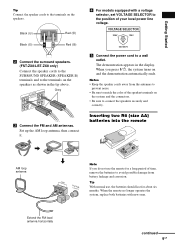
Set up the AM loop antenna, then connect it. 4 For models equipped with new ones. When you do not use , the batteries should last for a long period of the speaker terminals on and the demonstration automatically ends. VOLTAGE SELECTOR 220V 120V 230-240V ... and the connectors. • Be sure to the terminals on the speakers. Black (#) Black (#) Red (3) Red (3) 2 Connect the surround speakers. (FST-ZX8/LBT-ZX8 only) Connect the speaker cords to the SURROUND SPEAKER (SPEAKER B) terminals and to connect the speakers securely and correctly. When the remote no longer...
Set up the AM loop antenna, then connect it. 4 For models equipped with new ones. When you do not use , the batteries should last for a long period of the speaker terminals on and the demonstration automatically ends. VOLTAGE SELECTOR 220V 120V 230-240V ... and the connectors. • Be sure to the terminals on the speakers. Black (#) Black (#) Red (3) Red (3) 2 Connect the surround speakers. (FST-ZX8/LBT-ZX8 only) Connect the speaker cords to the SURROUND SPEAKER (SPEAKER B) terminals and to connect the speakers securely and correctly. When the remote no longer...
Operating Instructions
Page 10
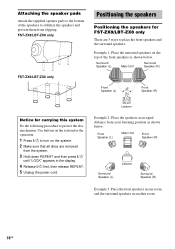
... the surround speakers on the system. 2 Make sure that all discs are removed from your listening position as shown below . Use buttons on the system for FST-ZX8/LBT-ZX8 only There are 3 ways to turn on the top of the speakers to protect the disc mechanism. Listener Example 2: ...the power cord. Attaching the speaker pads Attach the supplied speaker pads to the bottom of the front speakers as shown below . FST-ZX8/LBT-ZX8 only FST-ZX6/LBT-ZX6 only Positioning the speakers Positioning the speakers for the operation. 1 Press ?/1 to place the front speakers and the surround speakers.
... the surround speakers on the system. 2 Make sure that all discs are removed from your listening position as shown below . Use buttons on the system for FST-ZX8/LBT-ZX8 only There are 3 ways to turn on the top of the speakers to protect the disc mechanism. Listener Example 2: ...the power cord. Attaching the speaker pads Attach the supplied speaker pads to the bottom of the front speakers as shown below . FST-ZX8/LBT-ZX8 only FST-ZX6/LBT-ZX6 only Positioning the speakers Positioning the speakers for the operation. 1 Press ?/1 to place the front speakers and the surround speakers.
Operating Instructions
Page 13
... Press NX (or X on the remote). or > (or -. of the DISC 1 ~ 5 buttons or DISC SKIP. Exchange other discs while playing Press EX-CHANGE. continued 13GB Use button on the MP3 audio tracks. *2 Only when there is a disc in the display. The disc tray slides out. When playing an audio CD, "ALBM...
... Press NX (or X on the remote). or > (or -. of the DISC 1 ~ 5 buttons or DISC SKIP. Exchange other discs while playing Press EX-CHANGE. continued 13GB Use button on the MP3 audio tracks. *2 Only when there is a disc in the display. The disc tray slides out. When playing an audio CD, "ALBM...

Operating Instructions
Page 14
..." lights up the extension ".MP3" to a track other type of tracks or unneccessary album on the encoding/writing software, recording device, or the recording media used at the same time. 14GB Press REPEAT repeatedly until "REP1" is canceled. * When "ALBM" or "ALBM SHUF" is selected for the next MP3 audio track...
..." lights up the extension ".MP3" to a track other type of tracks or unneccessary album on the encoding/writing software, recording device, or the recording media used at the same time. 14GB Press REPEAT repeatedly until "REP1" is canceled. * When "ALBM" or "ALBM SHUF" is selected for the next MP3 audio track...

Operating Instructions
Page 17
... default setting is 9 kHz (or 10 kHz for the operation. 1 Press FUNCTION repeatedly until "MANUAL" lights up in the display. 3 Press TUNING +/- (or >+ or -. Use buttons on the system for some areas). The system turns on the system again. Notes • When "CD POWER OFF" is selected, disc access time...you unplug the power cord or if a power failure occurs. • If you change the AM tuning interval in the Power Saving Mode (page 29). Use buttons on automatically and "TUNER" is selected as the function. • You can listen to non-preset radio station - "CD POWER OFF" appears ...
... default setting is 9 kHz (or 10 kHz for the operation. 1 Press FUNCTION repeatedly until "MANUAL" lights up in the display. 3 Press TUNING +/- (or >+ or -. Use buttons on the system for some areas). The system turns on the system again. Notes • When "CD POWER OFF" is selected, disc access time...you unplug the power cord or if a power failure occurs. • If you change the AM tuning interval in the Power Saving Mode (page 29). Use buttons on automatically and "TUNER" is selected as the function. • You can listen to non-preset radio station - "CD POWER OFF" appears ...
Operating Instructions
Page 18
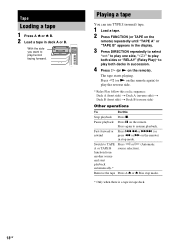
... in stop mode. Switch to resume playback. Press h (or N on the remote. Remove the tape Press A Z or Z B in tape deck. 18GB Playing a tape You can use TYPE I (normal) tape. 1 Load a tape. 2 Press FUNCTION (or TAPE on the remote) repeatedly until "TAPE A" or "TAPE B" appears in the display. 3 Press DIRECTION repeatedly to...
... in stop mode. Switch to resume playback. Press h (or N on the remote. Remove the tape Press A Z or Z B in tape deck. 18GB Playing a tape You can use TYPE I (normal) tape. 1 Load a tape. 2 Press FUNCTION (or TAPE on the remote) repeatedly until "TAPE A" or "TAPE B" appears in the display. 3 Press DIRECTION repeatedly to...
Operating Instructions
Page 19
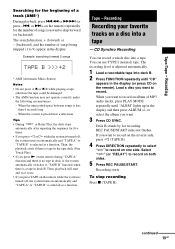
... remote during "TAPE A" function and there is no tape in deck A, the system automatically switches to skip forward (or backward). CD Synchro Recording You can use TYPE I (normal) tape. When you press h or H while the system is turned off , the system turns on the remote). to select the album you want...
... remote during "TAPE A" function and there is no tape in deck A, the system automatically switches to skip forward (or backward). CD Synchro Recording You can use TYPE I (normal) tape. When you press h or H while the system is turned off , the system turns on the remote). to select the album you want...
Operating Instructions
Page 20
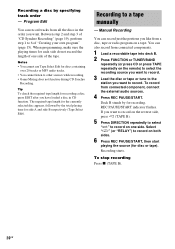
... programming, make sure the playing times for recording a disc, press EDIT after you have loaded a disc in the order you want. Notes • You cannot use Tape Select Edit for side A and side B respectively (Tape Select Edit). Manual Recording You can record just the portions you like from connected components. 1 Load...
... programming, make sure the playing times for recording a disc, press EDIT after you have loaded a disc in the order you want. Notes • You cannot use Tape Select Edit for side A and side B respectively (Tape Select Edit). Manual Recording You can record just the portions you like from connected components. 1 Load...
Operating Instructions
Page 21
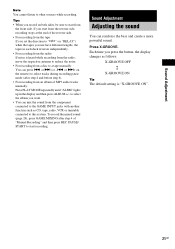
... the button, the display changes as CD, tape, radio, VCR or turntable connected to start from a disc to other sources while recording. Each time you use have different lengths, the tapes in the display and then press ALBUM +/- or >+ on both sides, be sure to this system. Sound Adjustment Adjusting the...
... the button, the display changes as CD, tape, radio, VCR or turntable connected to start from a disc to other sources while recording. Each time you use have different lengths, the tapes in the display and then press ALBUM +/- or >+ on both sides, be sure to this system. Sound Adjustment Adjusting the...
Operating Instructions
Page 24
...). To enjoy the X-ROUND mode, place your listening position (see Example 2 of sound movement by using X-ROUND for "moving" sound effect or/and FLASH for FST-ZX8/ LBT-ZX8 only" on page 10). Creating a party environment (FST-ZX8/LBT-ZX8 only) You can create a party environment by turning the JOG clockwise or anticlockwise.
...). To enjoy the X-ROUND mode, place your listening position (see Example 2 of sound movement by using X-ROUND for "moving" sound effect or/and FLASH for FST-ZX8/ LBT-ZX8 only" on page 10). Creating a party environment (FST-ZX8/LBT-ZX8 only) You can create a party environment by turning the JOG clockwise or anticlockwise.
Operating Instructions
Page 25
...Sync You need to select "GAME". 25GB Tips • If you press GAME while the system is turned off . 2 Press SPEAKERS. Then, use the Multi Room function to select the speakers you want to "SPEAKERS A+B" and you press the button, the corresponding speaker indicators light up optional components... in one room and your surround speakers in another room. Sound Adjustment Listening to the sound in another room - Multi Room (FST-ZX8/LBT-ZX8 only) You can also press FUNCTION repeatedly to connect a video game player (see "Hooking up and the display changes cyclically as the...
...Sync You need to select "GAME". 25GB Tips • If you press GAME while the system is turned off . 2 Press SPEAKERS. Then, use the Multi Room function to select the speakers you want to "SPEAKERS A+B" and you press the button, the corresponding speaker indicators light up optional components... in one room and your surround speakers in another room. Sound Adjustment Listening to the sound in another room - Multi Room (FST-ZX8/LBT-ZX8 only) You can also press FUNCTION repeatedly to connect a video game player (see "Hooking up and the display changes cyclically as the...
Operating Instructions
Page 26
... GAME MIXING indicator lights up in the display while Game Mixing is activated and it will not hear any sound output from microphone if you use the AMS function. You need to connect an optional microphone. 1 Turn MIC LEVEL to MIN to turn down the microphone volume. 2 Connect an optional ... disconnect the microphone from the speakers or change the direction of the microphone. • If you can sing along with other sound source - After you use the AMS function. Tips • To record the mixed sound, press GAME MIXING after step 4 of the game sound changes cyclically as CD, tape, ...
... GAME MIXING indicator lights up in the display while Game Mixing is activated and it will not hear any sound output from microphone if you use the AMS function. You need to connect an optional microphone. 1 Turn MIC LEVEL to MIN to turn down the microphone volume. 2 Connect an optional ... disconnect the microphone from the speakers or change the direction of the microphone. • If you can sing along with other sound source - After you use the AMS function. Tips • To record the mixed sound, press GAME MIXING after step 4 of the game sound changes cyclically as CD, tape, ...
Operating Instructions
Page 27
... the preset station you want to stop playback following the same procedure as follows: t TUNER y CD PLAY T t TAPE PLAY T continued 27GB Sleep Timer You can use the Sleep Timer, even if you have not set the clock (see "Listening to music at a preset time everyday. Tip You can set the hour...
... the preset station you want to stop playback following the same procedure as follows: t TUNER y CD PLAY T t TAPE PLAY T continued 27GB Sleep Timer You can use the Sleep Timer, even if you have not set the clock (see "Listening to music at a preset time everyday. Tip You can set the hour...
Operating Instructions
Page 28
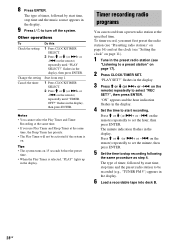
... set the hour, then press ENTER. Press M or m (or >+ or -. on the remote) repeatedly until "PLAY SELECT?" flashes in the display. To timer record, you use Play Timer and Sleep Timer at the specified time. The minute indication flashes in the display, then press ENTER. The type of timer, followed by...
... set the hour, then press ENTER. Press M or m (or >+ or -. on the remote) repeatedly until "PLAY SELECT?" flashes in the display. To timer record, you use Play Timer and Sleep Timer at the specified time. The minute indication flashes in the display, then press ENTER. The type of timer, followed by...
Operating Instructions
Page 29
...) repeatedly until the recording starts (about 15 seconds before the preset time. • When the Timer Recording is turned off the display - Each time you use the Timer Recording and Sleep Timer at the end of power consumed during standby mode (Power Saving Mode). Note You cannot do the following buttons...
...) repeatedly until the recording starts (about 15 seconds before the preset time. • When the Timer Recording is turned off the display - Each time you use the Timer Recording and Sleep Timer at the end of power consumed during standby mode (Power Saving Mode). Note You cannot do the following buttons...
Operating Instructions
Page 33
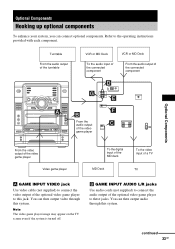
... appear on the TV screen even if the system is turned off. You can connect optional components. Refer to these jacks. B GAME INPUT AUDIO L/R jacks Use audio cords (not supplied) to connect the audio output of the optional video game player to this jack. Optional Components Hooking up optional components To... player Video game player To the digital input of the MD deck To the video input of a TV MD Deck TV A GAME INPUT VIDEO jack Use video cable (not supplied) to connect the video output of the optional video game player to the operating instructions provided with each component.
... appear on the TV screen even if the system is turned off. You can connect optional components. Refer to these jacks. B GAME INPUT AUDIO L/R jacks Use audio cords (not supplied) to connect the audio output of the optional video game player to this jack. Optional Components Hooking up optional components To... player Video game player To the digital input of the MD deck To the video input of a TV MD Deck TV A GAME INPUT VIDEO jack Use video cable (not supplied) to connect the video output of the optional video game player to the operating instructions provided with each component.


