
Limited Warranty (US Only)
Page 1
... warranty is valid only in material or workmanship as fuses or batteries). 4-557-172-02 General Stereo/Hifi Components/Tape Decks ® CD Players/Mini Disc Players/Audio Systems Hifi Audio LIMITED WARRANTY Sony Electronics Inc. ("Sony") warrants this Product is determined to be presented to obtain warranty service. This warranty does not cover customer instruction, installation, set up adjustments or signal reception problems. This warranty does not cover cosmetic damage or damage...
... warranty is valid only in material or workmanship as fuses or batteries). 4-557-172-02 General Stereo/Hifi Components/Tape Decks ® CD Players/Mini Disc Players/Audio Systems Hifi Audio LIMITED WARRANTY Sony Electronics Inc. ("Sony") warrants this Product is determined to be presented to obtain warranty service. This warranty does not cover customer instruction, installation, set up adjustments or signal reception problems. This warranty does not cover cosmetic damage or damage...
Operating Instructions
Page 3
... to Part 15 of time. 14) Refer all instructions. 5) Do not use attachments/accessories specified by the manufacturer. 12) Use only with the cart, stand, tripod, bracket, or table specified by one wider than the other apparatus (including amplifiers) that any changes or modification not expressly approved in any heat sources such as power-supply cord or plug is used in a residential installation...
... to Part 15 of time. 14) Refer all instructions. 5) Do not use attachments/accessories specified by the manufacturer. 12) Use only with the cart, stand, tripod, bracket, or table specified by one wider than the other apparatus (including amplifiers) that any changes or modification not expressly approved in any heat sources such as power-supply cord or plug is used in a residential installation...
Operating Instructions
Page 6
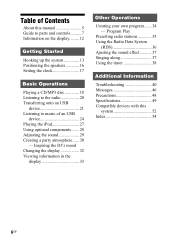
... 54 6GB Program Play Presetting radio stations 35 Using the Radio Data System (RDS 36 Ajusting the sound effect........... 37 Singing along 37 Using the timer 38 Additional Information Troubleshooting 40 Messages 46 Precautions 48 Specifications 49 Compatible devices with this manual 5 Guide to parts and controls.......... 7 Information on the display......... 12 Getting Started Hooking up the system 13 Positioning the speakers 16 Setting the clock 17 Basic Operations Playing a CD/MP3 disc 18...
... 54 6GB Program Play Presetting radio stations 35 Using the Radio Data System (RDS 36 Ajusting the sound effect........... 37 Singing along 37 Using the timer 38 Additional Information Troubleshooting 40 Messages 46 Precautions 48 Specifications 49 Compatible devices with this manual 5 Guide to parts and controls.......... 7 Information on the display......... 12 Getting Started Hooking up the system 13 Positioning the speakers 16 Setting the clock 17 Basic Operations Playing a CD/MP3 disc 18...
Operating Instructions
Page 9
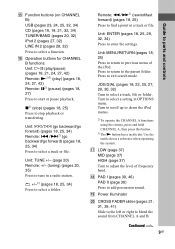
... controls Use the tactile dot as a reference when operating the system. Continued l 9GB Guide to select a track or file. Unit: MENU/RETURN (pages 18, 25) Press to return to select a folder. Turn to select a track, file or folder. JOG DIAL (pages 18, 22, 25, 27, 29, 30, 32) Turn to select a setting in OPTIONS menu. Remote: m/M2) (rewind/fast forward) (pages 18, 25) Press to select a function. O Function buttons...
... controls Use the tactile dot as a reference when operating the system. Continued l 9GB Guide to select a track or file. Unit: MENU/RETURN (pages 18, 25) Press to return to select a folder. Turn to select a track, file or folder. JOG DIAL (pages 18, 22, 25, 27, 29, 30, 32) Turn to select a setting in OPTIONS menu. Remote: m/M2) (rewind/fast forward) (pages 18, 25) Press to select a function. O Function buttons...
Operating Instructions
Page 10
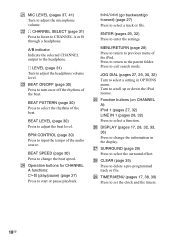
.... JOG DIAL (pages 27, 29, 30, 32) Turn to change the beat speed. Turn to the parent folder. W BEAT ON/OFF (page 30) Press to adjust the microphone volume. U MIC LEVEL (pages 37, 41) Turn to turn on CHANNEL A): iPod 1 (pages 27, 32) LINE IN 1 (pages 28, 32) Press to adjust the headphone volume level. i LEVEL (page 31) Turn to select a function. Y Function buttons (on or off the rhythms of the...
.... JOG DIAL (pages 27, 29, 30, 32) Turn to change the beat speed. Turn to the parent folder. W BEAT ON/OFF (page 30) Press to adjust the microphone volume. U MIC LEVEL (pages 37, 41) Turn to turn on CHANNEL A): iPod 1 (pages 27, 32) LINE IN 1 (pages 28, 32) Press to adjust the headphone volume level. i LEVEL (page 31) Turn to select a function. Y Function buttons (on or off the rhythms of the...

Operating Instructions
Page 14
... local power line voltage. RL FRONT SPEAKER * Refer to the control signals transmitted by the D-LIGHT SYNC controller upon receiving music source from the plug (only for the recommended lighting device. Depending on and the demonstration automatically ends. The lighting device will react according to the operating instructions supplied with the D-LIGHT SYNC controller for models equipped with an adaptor). D SYSTEM CONTROL jack Connect the system connector of the plug. Unit (Left panel) Subwoofer (Rear panel) Plug Screws 14GB SYSTEM CONTROL cord Note...
... local power line voltage. RL FRONT SPEAKER * Refer to the control signals transmitted by the D-LIGHT SYNC controller upon receiving music source from the plug (only for the recommended lighting device. Depending on and the demonstration automatically ends. The lighting device will react according to the operating instructions supplied with the D-LIGHT SYNC controller for models equipped with an adaptor). D SYSTEM CONTROL jack Connect the system connector of the plug. Unit (Left panel) Subwoofer (Rear panel) Plug Screws 14GB SYSTEM CONTROL cord Note...

Operating Instructions
Page 20
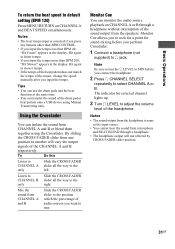
... AM preset stations are erased. The system turn off the system. 3 When demonstration appears, hold down ENTER on the remote for some areas). Listening to the radio Use buttons on CHANNEL B and then press "/1. To tune in the display. "AM 9K STEP" or "AM 10K STEP" appears in a station with a weak signal" below. 4 Press VOLUME +/- Tip To improve broadcast reception, adjust the supplied antennas, or connect an external antenna.
... AM preset stations are erased. The system turn off the system. 3 When demonstration appears, hold down ENTER on the remote for some areas). Listening to the radio Use buttons on CHANNEL B and then press "/1. To tune in the display. "AM 9K STEP" or "AM 10K STEP" appears in a station with a weak signal" below. 4 Press VOLUME +/- Tip To improve broadcast reception, adjust the supplied antennas, or connect an external antenna.
Operating Instructions
Page 22
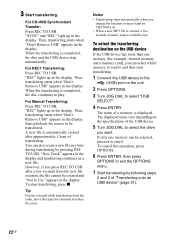
... (for example, internal memory and a memory card), you change the function or tuner band on CHANNEL B. • When a new MP3 file is created, a few seconds from the radio, move the respective antenna to exit the OPTIONS menu. 7 Start transferring by pressing REC TO USB. "SYNC" and "REC" light up in the display and transferring continues as a new file. When the...
... (for example, internal memory and a memory card), you change the function or tuner band on CHANNEL B. • When a new MP3 file is created, a few seconds from the radio, move the respective antenna to exit the OPTIONS menu. 7 Start transferring by pressing REC TO USB. "SYNC" and "REC" light up in the display and transferring continues as a new file. When the...

Operating Instructions
Page 24
... automatically if: - the number of audio files on the USB device reaches the limit for a list of space during transferring or erase operations. Therefore, the playback sequence may corrupt the data on the remote). 24GB on the remote repeatedly to select "USB"). 2 Connect an optional USB device to this system are transferred with copyright protection (Digital Rights Management) cannot be...
... automatically if: - the number of audio files on the USB device reaches the limit for a list of space during transferring or erase operations. Therefore, the playback sequence may corrupt the data on the remote). 24GB on the remote repeatedly to select "USB"). 2 Connect an optional USB device to this system are transferred with copyright protection (Digital Rights Management) cannot be...
Operating Instructions
Page 27
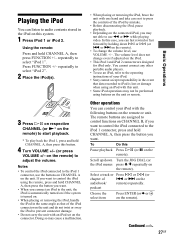
... to control functions on the remote). repeatedly to control the iPod using an iPod with this system. 1 Press iPod 1 or iPod 2. or > on the remote). • To change even if adjusted on the iPod. • This iPod 1 and iPod 2 connector are assigned to select "iPod 2". 2 Place the iPod(s). 3 Press HS on respective CHANNEL (or N* on the remote or unit. Using the remote: Press and hold CHANNEL A, then press the button you want to control the iPod connected to the iPod...
... to control functions on the remote). repeatedly to control the iPod using an iPod with this system. 1 Press iPod 1 or iPod 2. or > on the remote). • To change even if adjusted on the iPod. • This iPod 1 and iPod 2 connector are assigned to select "iPod 2". 2 Place the iPod(s). 3 Press HS on respective CHANNEL (or N* on the remote or unit. Using the remote: Press and hold CHANNEL A, then press the button you want to control the iPod connected to the iPod...
Operating Instructions
Page 28
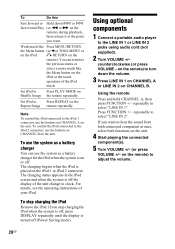
... LINE IN 2 jacks using audio cord (not supplied). 2 Turn VOLUME +/- Work much like Press MENU/RETURN the Menu button (or B or TOOL MENU or on the iPod O RETURN on the unit. Note To control the iPod connected to turn down l or L fast rewind Play (or m or M on the remote) during playback, then release it at once, select both connected component at the point you want. Using optional components 1 Connect a portable audio player to select "LINE IN 2". repeatedly...
... LINE IN 2 jacks using audio cord (not supplied). 2 Turn VOLUME +/- Work much like Press MENU/RETURN the Menu button (or B or TOOL MENU or on the iPod O RETURN on the unit. Note To control the iPod connected to turn down l or L fast rewind Play (or m or M on the remote) during playback, then release it at once, select both connected component at the point you want. Using optional components 1 Connect a portable audio player to select "LINE IN 2". repeatedly...

Operating Instructions
Page 29
... the sound quality by using the MP3 BOOSTER+ function. 1 Press OPTIONS. 2 Turn JOG DIAL to select "MP3 BOOSTER+", then press ENTER. 3 Turn JOG DIAL to power mode and the equalizer curve changes. To exit the OPTIONS menu, press OPTIONS. 29GB Set the surround effect Press SURROUND repeatedly until "GROOVE"* or "Z-GROOVE"* lights up in 4 levels (0 dB, 4 dB, 7 dB, 10 dB). "BOOSTER" lights up in the display. * The volume switches to select "AUTO...
... the sound quality by using the MP3 BOOSTER+ function. 1 Press OPTIONS. 2 Turn JOG DIAL to select "MP3 BOOSTER+", then press ENTER. 3 Turn JOG DIAL to power mode and the equalizer curve changes. To exit the OPTIONS menu, press OPTIONS. 29GB Set the surround effect Press SURROUND repeatedly until "GROOVE"* or "Z-GROOVE"* lights up in 4 levels (0 dB, 4 dB, 7 dB, 10 dB). "BOOSTER" lights up in the display. * The volume switches to select "AUTO...

Operating Instructions
Page 30
... can be used with any source. Adjust the volume of the music, press BPM CONTROL 4 times to start playback of the beat pattern. Each time you want . Inspiring the DJ's mood Using the drum pads - Change the drum sound Hold down BEAT SPEED and turn JOG DIAL to select the beat pattern you select will be replaced with a box. 5 Press BPM CONTROL again to output the PAD...
... can be used with any source. Adjust the volume of the music, press BPM CONTROL 4 times to start playback of the beat pattern. Each time you want . Inspiring the DJ's mood Using the drum pads - Change the drum sound Hold down BEAT SPEED and turn JOG DIAL to select the beat pattern you select will be replaced with a box. 5 Press BPM CONTROL again to output the PAD...
Operating Instructions
Page 31
...) Press MENU/RETURN on CHANNEL A or B through a headphone. • The headphone output will vary the output signals of audio sources you to seek for a point for selected channel lights up. 3 Turn i LEVEL to the left. Notes • The beat tempo input is same as the input source. • You cannot hear the sound from the headphone is canceled if you press any buttons other than BPM CONTROL. •...
...) Press MENU/RETURN on CHANNEL A or B through a headphone. • The headphone output will vary the output signals of audio sources you to seek for a point for selected channel lights up. 3 Turn i LEVEL to the left. Notes • The beat tempo input is same as the input source. • You cannot hear the sound from the headphone is canceled if you press any buttons other than BPM CONTROL. •...

Operating Instructions
Page 35
... perform the erase operation. appears in the display. you want . The stations are stored from the program remote when playback is stopped, press PLAY MODE on the remote to the radio" (page 20)). 2 Press TUNER MEMORY. The station is replaced by selecting the corresponding preset number. A preset number flashes in the display. Preset number 3 Press +/- Use buttons on the remote repeatedly until "PGM" disappear from the display. If another station is already assigned to play back the same...
... perform the erase operation. appears in the display. you want . The stations are stored from the program remote when playback is stopped, press PLAY MODE on the remote to the radio" (page 20)). 2 Press TUNER MEMORY. The station is replaced by selecting the corresponding preset number. A preset number flashes in the display. Preset number 3 Press +/- Use buttons on the remote repeatedly until "PGM" disappear from the display. If another station is already assigned to play back the same...
Operating Instructions
Page 38
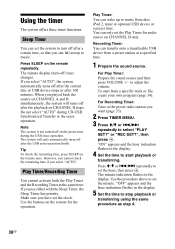
... the Recording Timer at a preset time. Recording Timer: You can only set the hour, then press . Use the buttons on the remote for audio source on CHANNEL B stops. or "REC SET?", then press . The minute indication flashes in the preset radio station you can set the system to music. Using the timer The system offers three timer functions. You can transfer onto a transferable USB device from disc, iPod 2, tuner or optional USB device...
... the Recording Timer at a preset time. Recording Timer: You can only set the hour, then press . Use the buttons on the remote for audio source on CHANNEL B stops. or "REC SET?", then press . The minute indication flashes in the preset radio station you can set the system to music. Using the timer The system offers three timer functions. You can transfer onto a transferable USB device from disc, iPod 2, tuner or optional USB device...

Operating Instructions
Page 40
... you plug in the power cord again and turn on the system. • The demonstration mode started. After checking the above items, consult your nearest Sony dealer. If you have set correctly. • Are the + and - Note that if service personnel changes some parts during repair, these parts may be found even after doing all the above items and fixing any problems, plug in the power cord even...
... you plug in the power cord again and turn on the system. • The demonstration mode started. After checking the above items, consult your nearest Sony dealer. If you have set correctly. • Are the + and - Note that if service personnel changes some parts during repair, these parts may be found even after doing all the above items and fixing any problems, plug in the power cord even...

Operating Instructions
Page 45
... details, see the operating instructions of audio files has exceeded 999. • Files that you connect a commercially available external antenna. • The supplied FM lead antenna receives signals along its entire length, so make sure you cannot obtain good reception, we recommend that are using an unsupported iPod. The iPod cannot be played back. • Playback is playing music. • Adjust the volume. • Depending on...
... details, see the operating instructions of audio files has exceeded 999. • Files that you connect a commercially available external antenna. • The supplied FM lead antenna receives signals along its entire length, so make sure you cannot obtain good reception, we recommend that are using an unsupported iPod. The iPod cannot be played back. • Playback is playing music. • Adjust the volume. • Depending on...
Marketing Specifications
Page 1
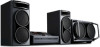
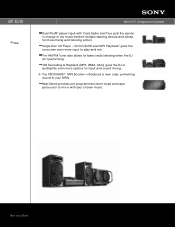
... the consumer even more input to your chosen music. USB Recording & Playback (MP3, WMA, AAC) gives the DJ or audiophile even more mixing and listening action. Beat Blend provides pre-programmed drum loops and layer ...music behind multiple steering wheels and allows for more options for basic radio listening when the DJ isn't performing. The AM/FM Tuner also allows for input and sound mixing. Single-Disc CD Player - The XROSSFADE™ MP3 Booster+ introduces a new, crisp, pulverizing sound to play and mix. LBT-DJ2i New Mini Hi-Fi Component System Dual iPod®1 player input...
... the consumer even more input to your chosen music. USB Recording & Playback (MP3, WMA, AAC) gives the DJ or audiophile even more mixing and listening action. Beat Blend provides pre-programmed drum loops and layer ...music behind multiple steering wheels and allows for more options for basic radio listening when the DJ isn't performing. The AM/FM Tuner also allows for input and sound mixing. Single-Disc CD Player - The XROSSFADE™ MP3 Booster+ introduces a new, crisp, pulverizing sound to play and mix. LBT-DJ2i New Mini Hi-Fi Component System Dual iPod®1 player input...
Marketing Specifications
Page 2
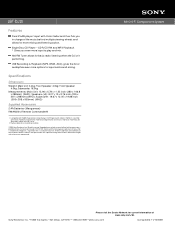
... action. Sony, Remote Commander, XROSSFADE, Muteki and the Sony logo are approximate. All other countries. All rights reserved. LBT-DJ2i Features Dual iPod® player1 input with iPod® 4th generation (color display), iPod 5th generation (video), iPod Mini 1st and 2nd generation, iPod Nano 1st generation, iPod Nano 2nd generation (aluminum), iPod Touch, iPod Nano 3rd generation (video) and iPod Classic. 2. Front Speaker: 4.0kg; Front Speaker: 4.0kg; Mini Hi-Fi Component System Please visit...
... action. Sony, Remote Commander, XROSSFADE, Muteki and the Sony logo are approximate. All other countries. All rights reserved. LBT-DJ2i Features Dual iPod® player1 input with iPod® 4th generation (color display), iPod 5th generation (video), iPod Mini 1st and 2nd generation, iPod Nano 1st generation, iPod Nano 2nd generation (aluminum), iPod Touch, iPod Nano 3rd generation (video) and iPod Classic. 2. Front Speaker: 4.0kg; Front Speaker: 4.0kg; Mini Hi-Fi Component System Please visit...


